


zKars
 Subscriber
-
Joined
-
Last visited
Everything posted by zKars
-
 Relax. There is no coolant access there. You have no blockage. Study the sensor body, you will see no fluid sealing mechanism. It is just measuring the temp of the aluminum head to gauge engine temperature, which should be very similar to coolant temperatute. Clean the body and hole to ensure good thermal conduction, but most problems people have is with the electrical connection to the sensor being dirty and corroded causing false resistance values that throw off the ECCS resulting in an overly rich condition while warming up. Check the sensor resistance values at 20C and 80C using the FSM charts on page EF & EC-87 to check if its reading correctly, and clean the connector and pins thoroughly. Make the measurement at the ECCS connector to include the connection at the sensor to see if its making good contact. Jim
 -
Simplify. The points do nothing but make and break a connection from the negative side of the coil to ground. Confirm this happens as the points open and close as you crank the engine. The + side of the coil is supplied with ~9-10 volts when the key is ON (via the drop provided by the ballast resistor below the coil) and +12v when cranking. Verify that this is the case. Get back to us Jim
-
Fuel leaks are never safe. Keep the car outside and not driven if you can until this is resolved. Jim
-
There is no such thing as too many Z's. Go get it Dave! Jim
-
Nice idea! Kinda like Twitter for the car restoration community. 140 words and 4 little pic per post per day (so you not on it all damn day kids!) Just a few areas of common concern on the wipers. They can be slow for three major reasons, in order of likely hood (debatable no doubt). 1) Dirty, worn and or un-lubricated arm linkage and pivots, 2) Reduced power supply to the motor due to bad connections, everything from the battery wires, fuses, switch contacts and connectors along the entire wiring harness, but start with the connection in the engine bay. 3) Worn out motor (brushes or bushings). When you get all of these items sorted out, and you'll find the wipers are more or less "ok" on all but the heaviest downpours. The honda motor upgrade is great. You'll may also find that a product like "Rainex" helps in the mean time! Keep up the great work Jim
-
I never thought of myself as a 'proper datsun petrolhead' but it captures the spirit perfectly! Welcome to Datsun heaven! Jim
-
And now that I realize you're THAT dave and you're just down the road in Strathmore, I'de be happy to show you my wiring any time. Z club meeting tonight at Brasso Nissan 7:00pm as usual. I won't have the Z there this month, its in paint jail for a couple of weeks yet but we can chat. Jim
-
It just involves another auxiliary fuse panel, something modern. Painless has a few options. Power supply comes from a new cable from the battery, via an ignition controlled relay. Pretty simple. Now where to mount it, well, passenger side kick panel or up behind the glove box is handy. Most important point here is, don't try to use any of the stock circuits. I have Vintage AC, power seats, stereo, head light relays, rad fan relays, horn relays, power locks, etc etc and all their fuses, all on a fresh modern fuse panel. Much better, ahhhhhh Jim
-
-
97.23% chance they are M6 x 1.00. 15 mm length would be just fine. Not positive since I'm not in a spot where I can check, but the only other size that even remotely possible is M5 x 0.8. Can't imagine they are M8x1.25, but I've never had a Z in the shop that had a pan or had a chance to put one back on! The holes I've seen in the rad support and frame rails seem to me to be M6
-
Never seen a split bushing. The factory bushings I seen are one piece that are press-flared outward and don't start with a split shell. Must be some kind of aftermarket stock bushing replacement. In any event, just do what Terrapin did, grind out the inner flare and make it all smooth... You do need the shell or the ID is too big for the POLY bushing. Its all good.
-
The parts are not missing. The later 280's (77 78?) use a slightly different system to connect the cable to the read brakes. The cable comes without the ends you find on the 240 cables, and I pretty sure there is no part you could buy separately. You will have to use the ends from your old cable. Make a slit with a dremel cutoff wheel or hacksaw, then spread the bracket to allow the old cable end to be removed, then use these on the 280 cable. You may wish to get the slit welded again to prevent an un-intentional escape.... Jim
-
Language is important, yes? S30 70-78 Z S130 79-83 280ZX (sorry mgood) z31 84-89 300 ZX z32 90-96 300 ZX z33 350Z z34 370Z Others will chime in with other items. alloy wheels types and hubcaps come to mind. Jim
-
Mine arrived yesterday. I'm in the process of getting m Z painted now, and that lovely decal will be on a fresh windshield in about 4 weeks. Perfect final touch. Thanks for doing this. I know the time and effort it took was substantial. Jim
-
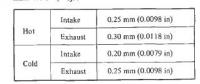
Torker: You're getting your millimeters and your inches mixed up! Read those specs again! For a guy from Kansas, 0.080 (Intake) and 0.010 (Exhaust) in INCHES cold! 0.010 (I) and 0.012 (E) in INCHES hot! FSM grab attached. Jim
-
You are just dealing with a bad case. Nothing that unusual. I had to weld a 4 foot bar to the gland nuts on one set of struts of mine to finally get the leverage required to crack them free. Then the shocks were stuck in the tubes. I poured penetrating fluid down them for days until they freed up. I have read/heard that others had to drill a hole in the bottom of the strut and drive the shock out with a punch. Last resort, but worth considering. Use a big punch otherwise you might puncture the shock. Heat, my usual favorite, is not the right solution to brake the shock free from the tube due to the danger of shock explosion. Welcome to world of z suspension overhaul. Tried the spindle pins yet? Jim
-
There is a thin spacer plate on the end of the crank that has to come off! Just stare at the end, you'll see it. Its just sitting there. And you need to put a pilot bushing in the end of the crank for the manual trans input shaft to fit in. There is a thread on here with detailed step by step instructions on everything you need to collect and do. Search and yee will find, something like that. Let us know if you run into any problems. Jim
-
So we are done with the head liner install on the 74. Too easy. We are using the MSA replacement, which is good in two ways. It is quite stiff, and has a fabric/netting stuff over the foam, so it takes glue really well. We (two of us) held it up and tucked it in all around the outside with no glue first to test fit, center it and to mark center. It pretty much holds itself up without glue its so stiff. One of use then sat in the passenger seat and held up half and kept it in position, while the other guy pulled down the headliner on the other half and sprayed it with glue, waited the 5 minutes as suggested, then stuck it back up. Repeat on the other side, tuck it back in around the edges, all with fingers, no sticks. Done in 30 minutes. Left about 6 inches all around the edge with no glue to make tucking easy. I guess the true test will be tomorrow if its still up there! Thanks for the tips, took all the stress out of by having a plan in mind. Jim
-
This is spooky. Talk about good timing. We are doing this today on a 74! Excellent advice all around. Thanks! Jim and Andy
-
Tom: I worried like a parent after you left, figuring it wasn't going to be all "smooth" from that point onward. I assumed everything went "ok", and you got everything you were going on time, one way or the other. Congrats on the wedding, the career and your conquering of the Canadian road system. Handle everything in life like that and you'll never have a problem you can't handle. All the best. Jim
-
Michael. Wow, you've discovered an excellent resource for brake line parts and tools. This will help me and hopefully several others. Thanks! Jim
-
There is a few threads on people's Vintage Air installs here. Search for "Vintage Air" and you'll find it. This are great photos and documentation posted. If all else fails, go to vintageair.com. They have all of there documentation on line so you can read and understand how AC systems are wired and plumbed. This may help you to figure out what goes where. It is a bit difficult to understand why MSA would supply such poor documentation. I'de be asking for help from them and expressing some concerns about it. Reminds me of the graining, barely ledgable xerox's of xerox's of xerox's instruction pages I found in a Tokico spring/shock kit recently... Unacceptable! Don't stand for it! Demand better! (getting down from soap box now....) Jim
-
Search for "EFI BIBLE", do a little light reading, and learn the function of the "AAR" valve and how it may relate to your running problem. Also discover while reading the 61 or so posts on the topic that the majority of any used ones you may be offered no longer function very well due to advanced age; ie take care when buying one, if and when you decide you need it. In Alabama, with the exception of the weather this December and early January in most of North America, you may decide its not needed... Jim
-
Most of us are just using 5/8 ID heater hose. Nothing special. Basic car parts store stuff.
-
I confirm that it is a 2.2K ohm resistor, 2200 ohms. Get a 1/2 watt resistor. Jim

