


zKars
 Subscriber
-
Joined
-
Last visited
Everything posted by zKars
-
 $10+postage. Send me a PM and we’ll conclude the deal offline.
 -
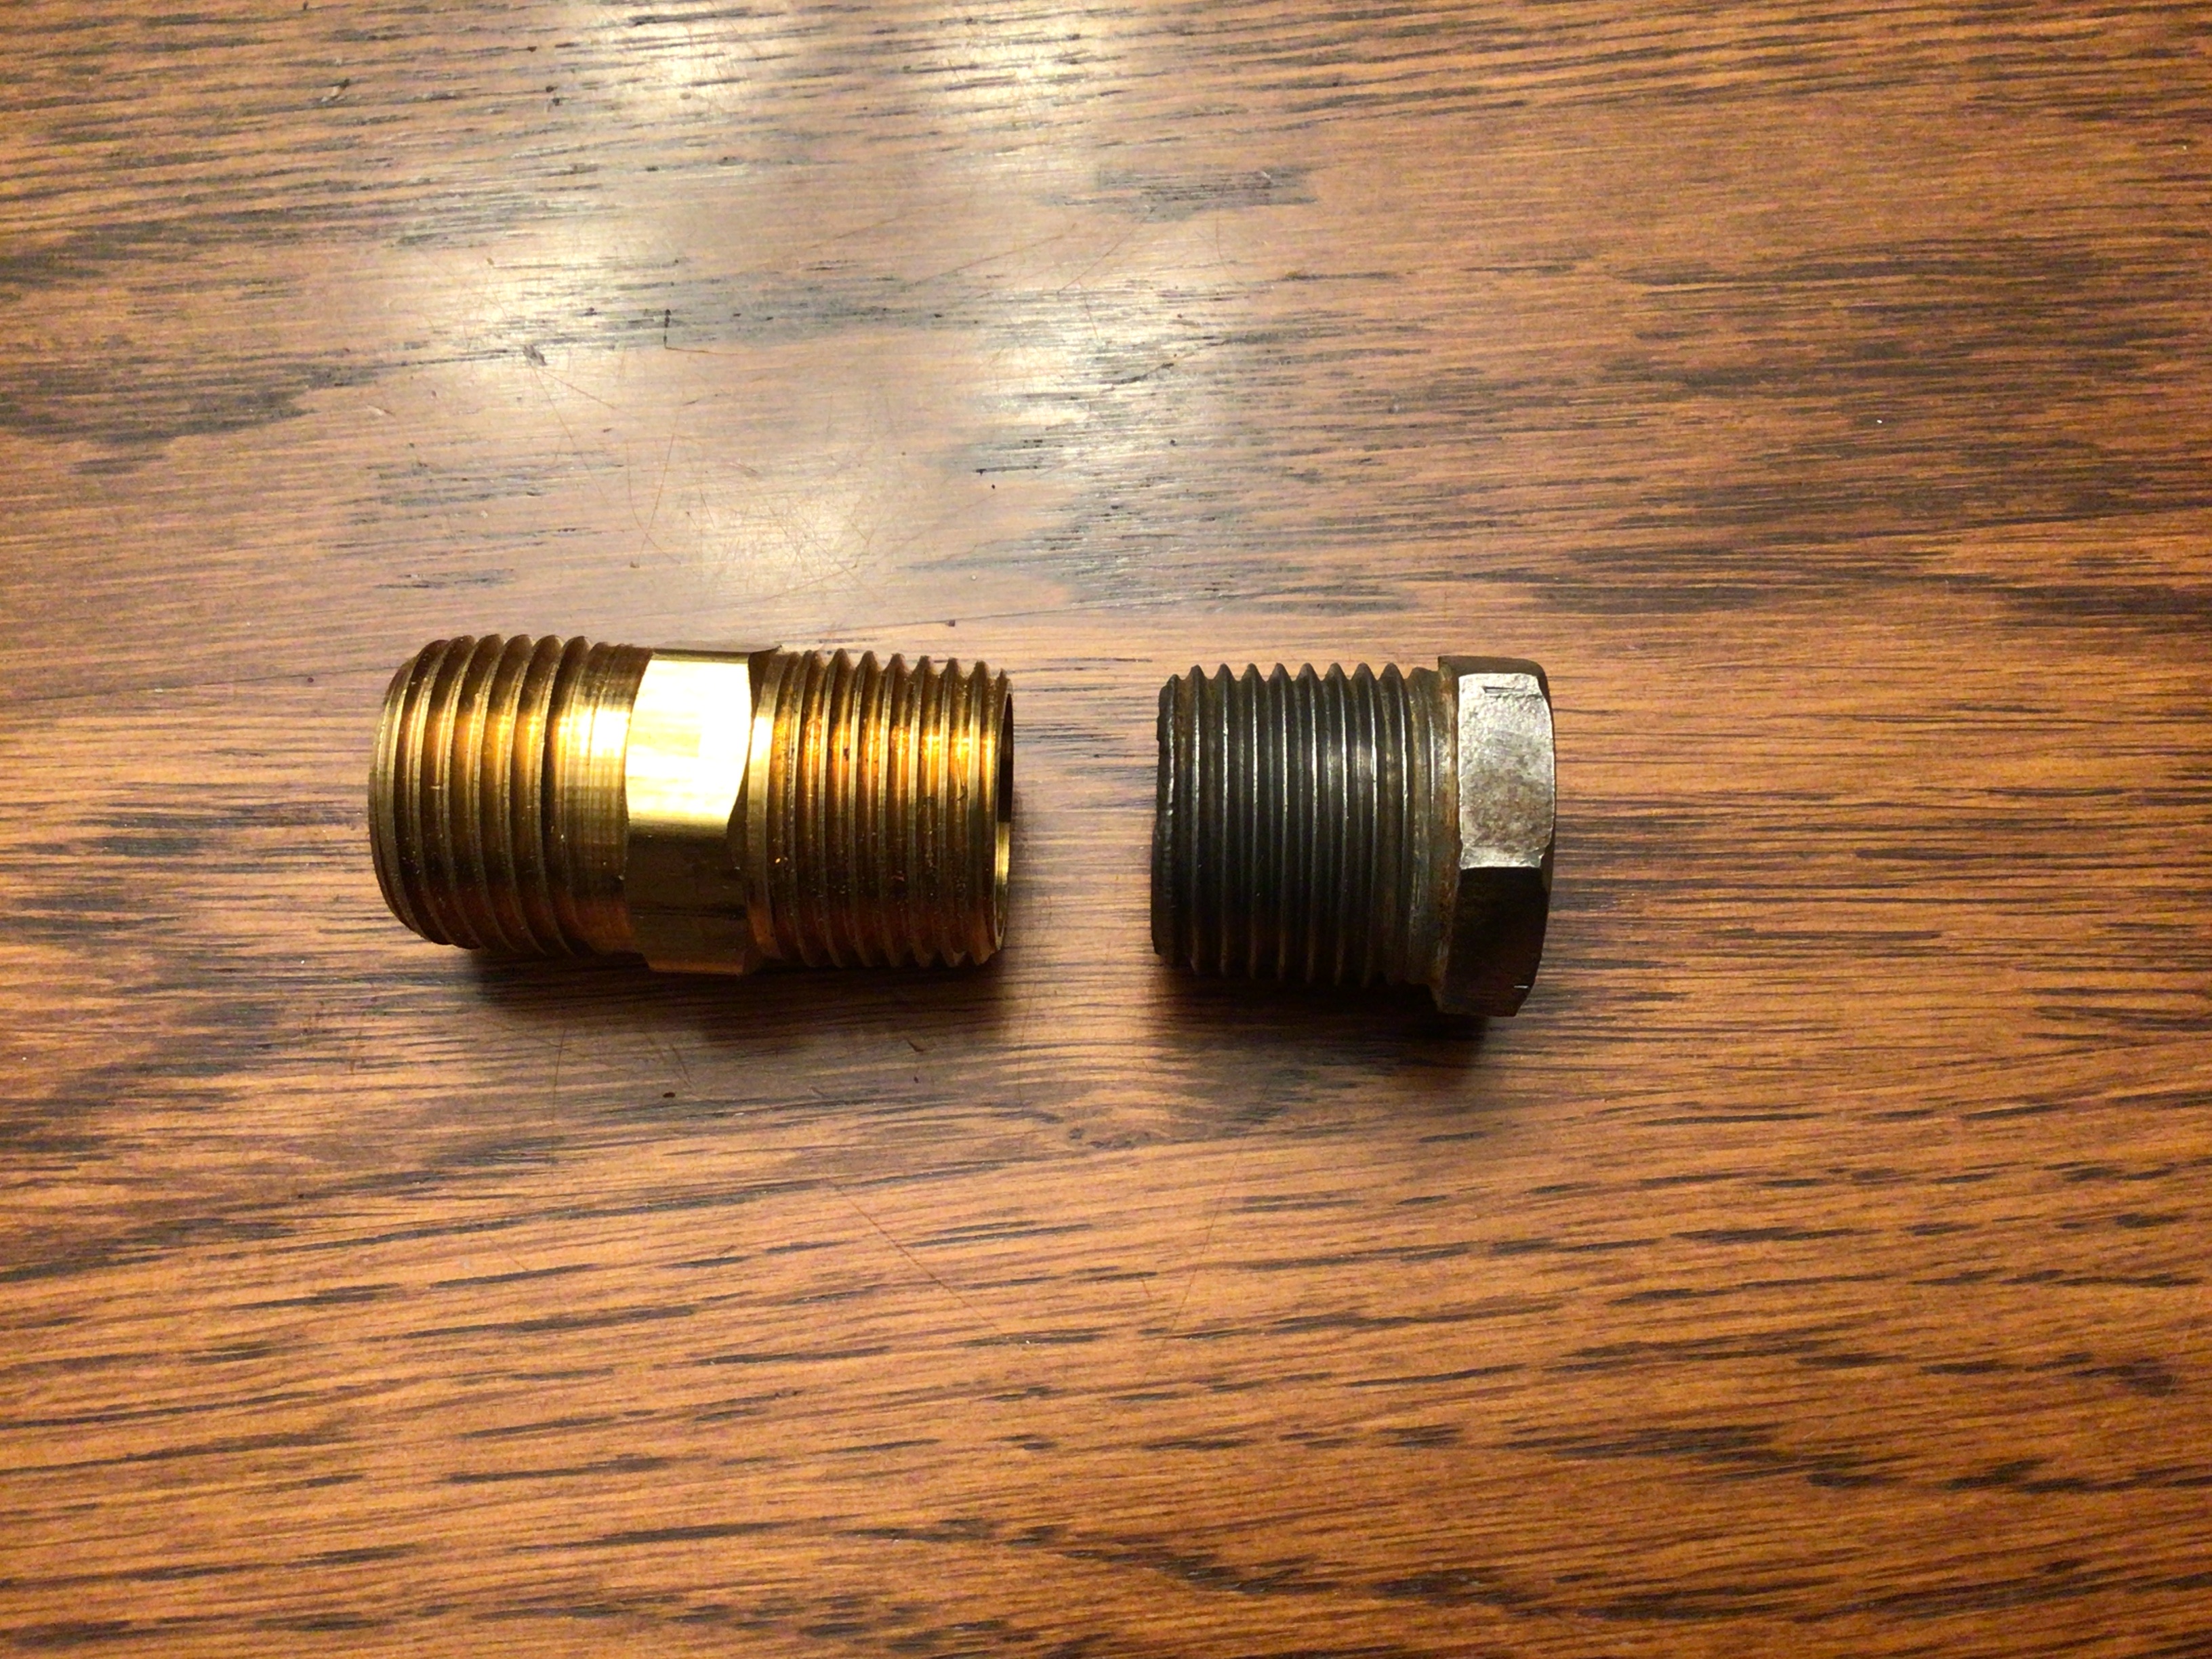
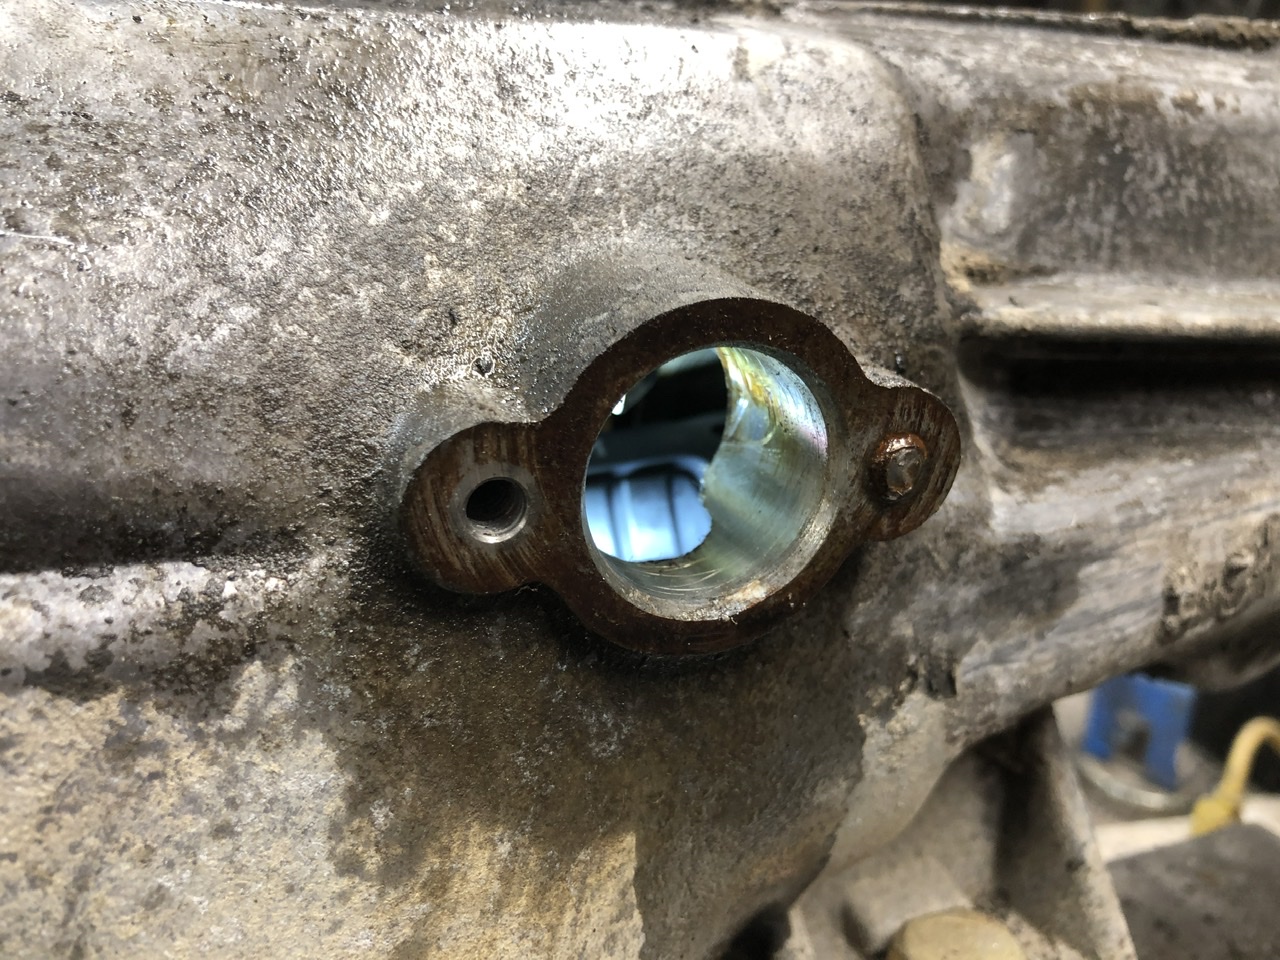
That is the block drain. The plug or whatever in the picture is not the stock one, who knows what someone used in the past. Remove whatever is there (it will drain 99% of the coolant so be prepared, drain the rad first) and see what you have. That hole is 1/2” BSPT threads. In this case, since NPT is the same thread per inch as BSPT (14), you may get a 1/2 NPT plug to fit and seal if you have trouble sourcing a 1/2” BSPT plug. 1/2” NPT on the left, correct block plug with 1/2” BSPT on the right.

-
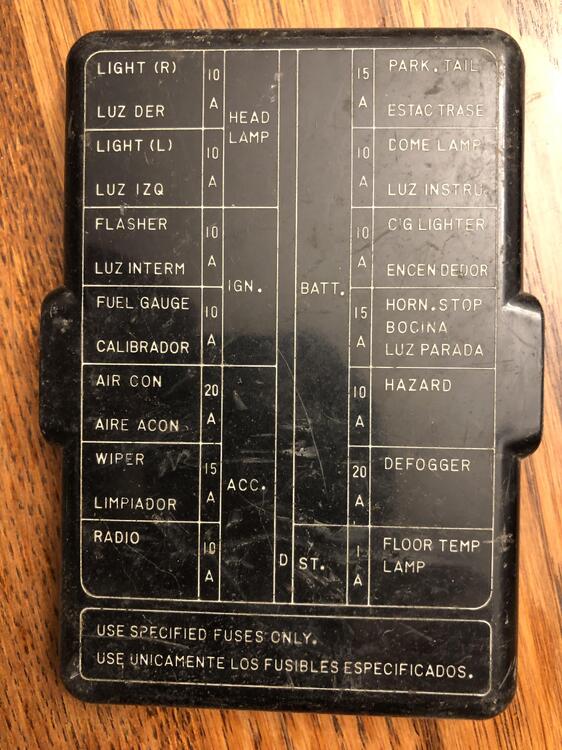
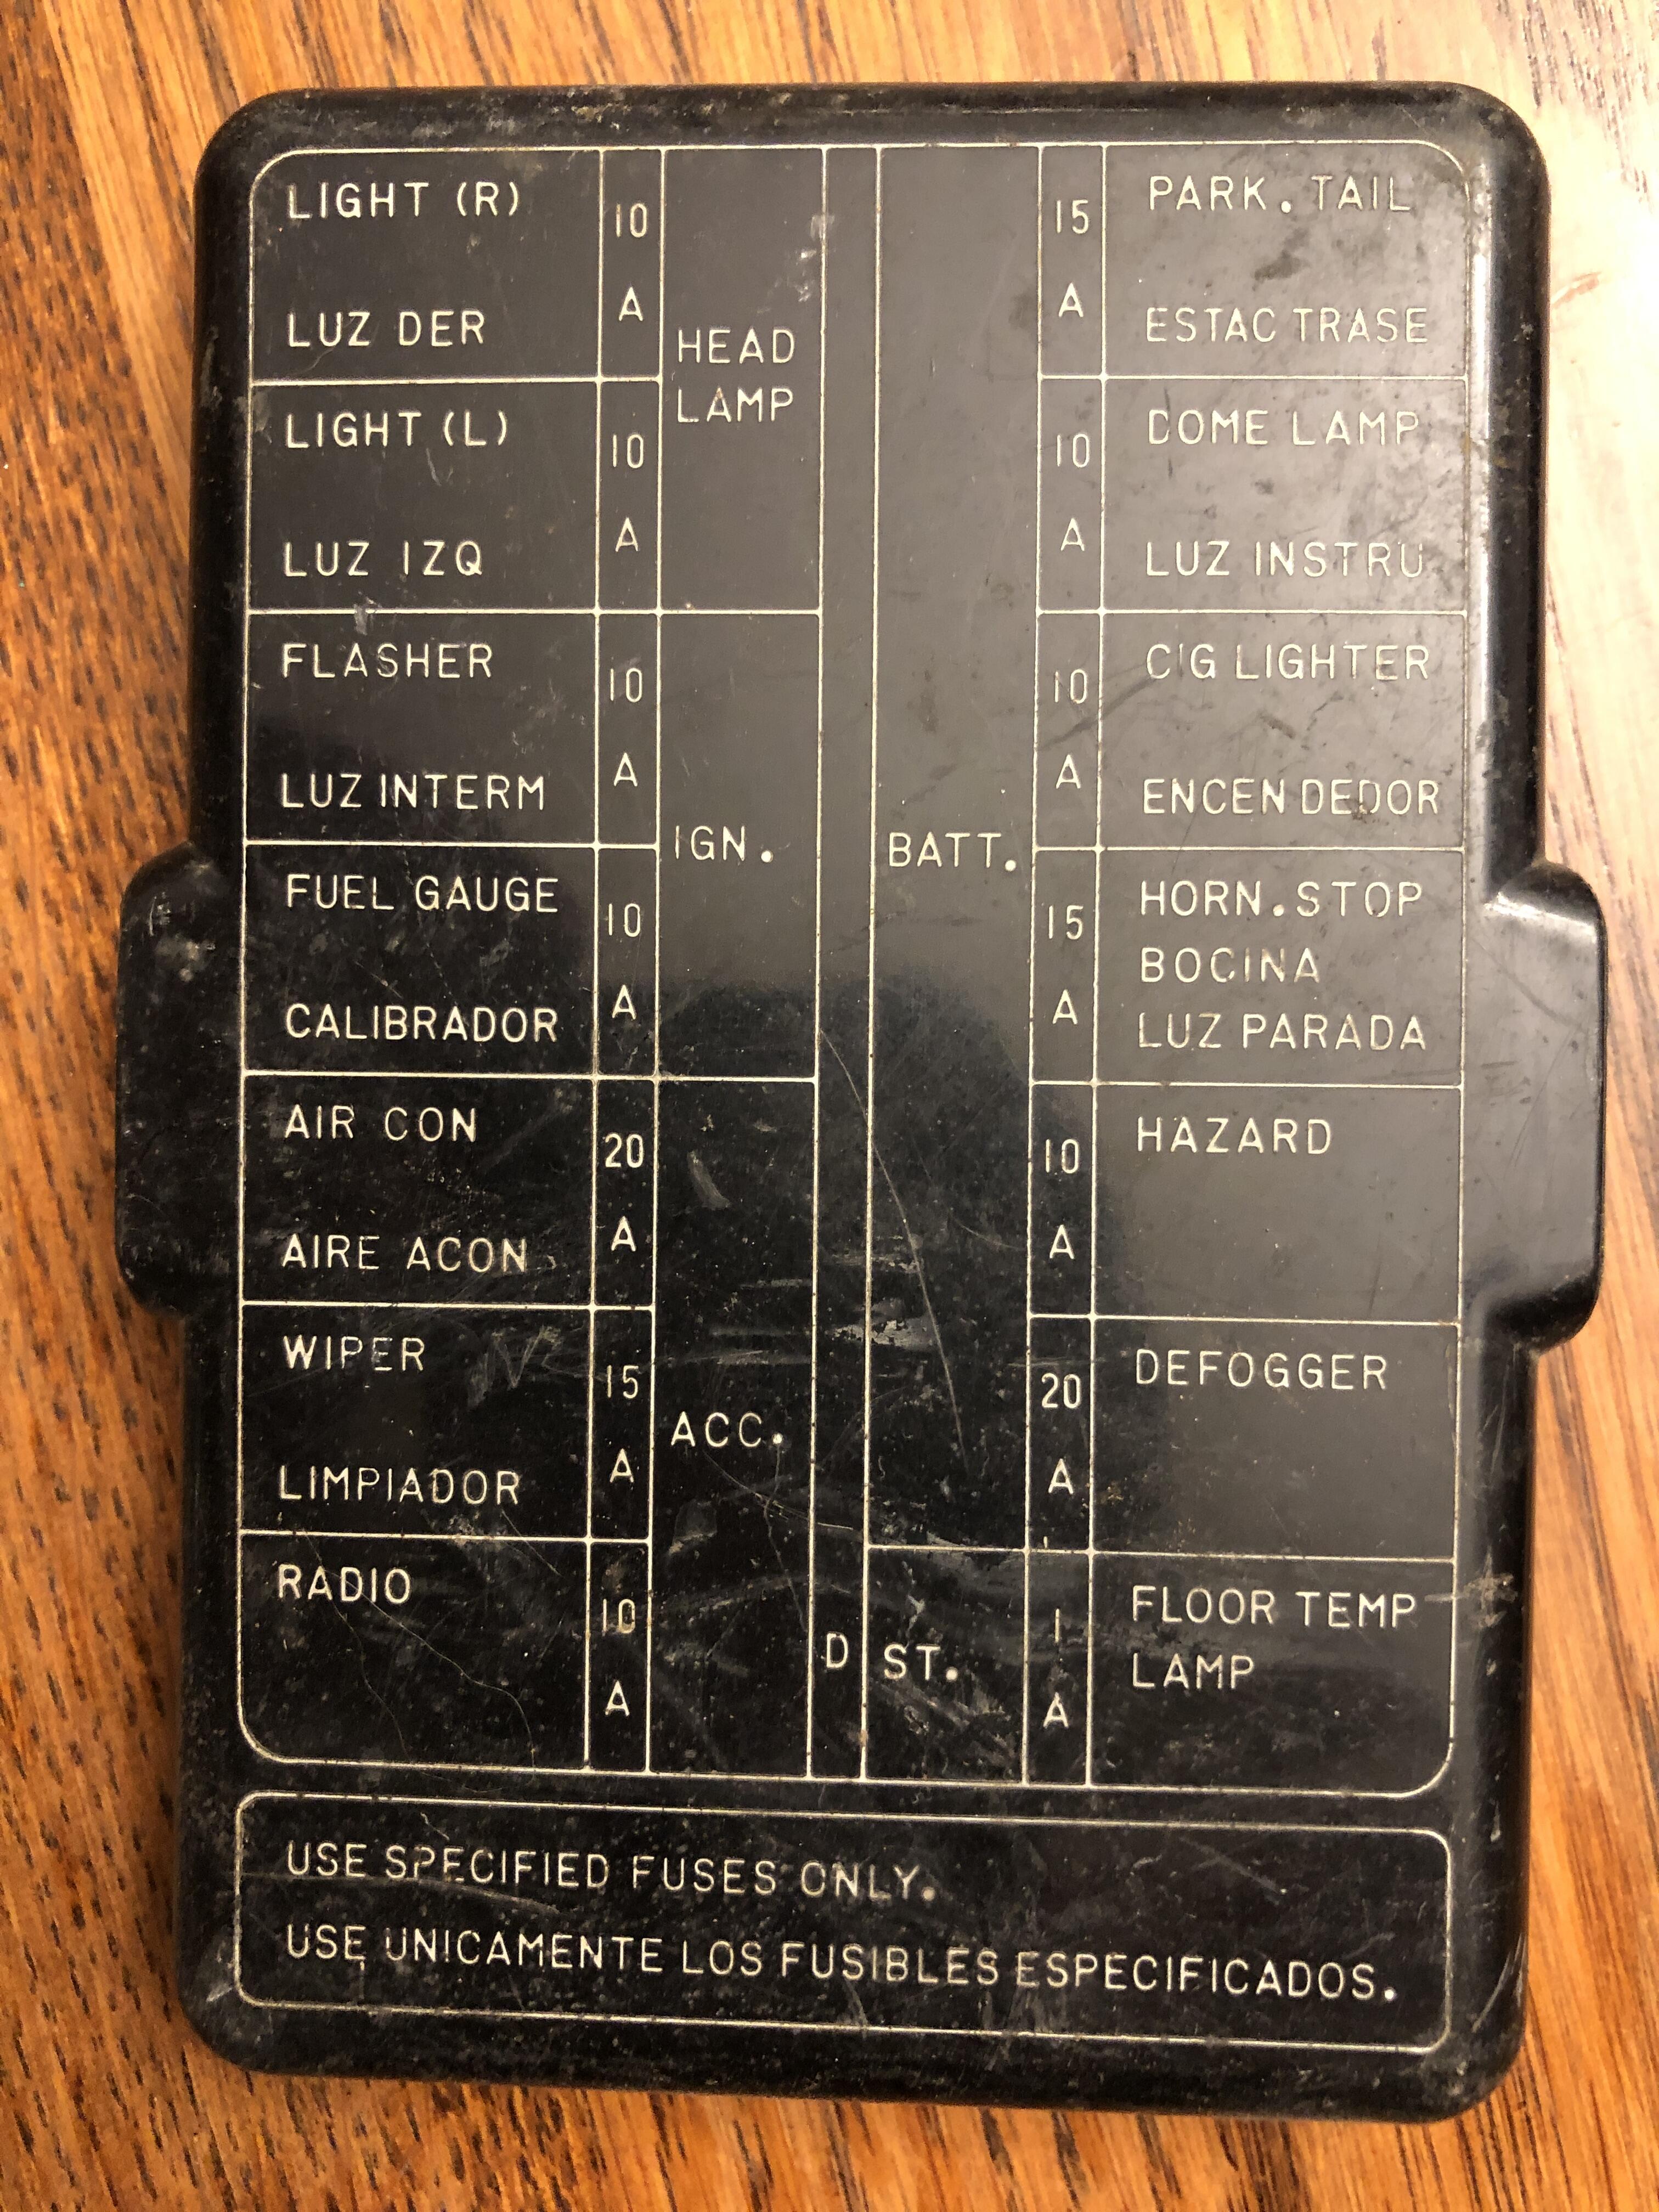
Better. Far from perfect

-
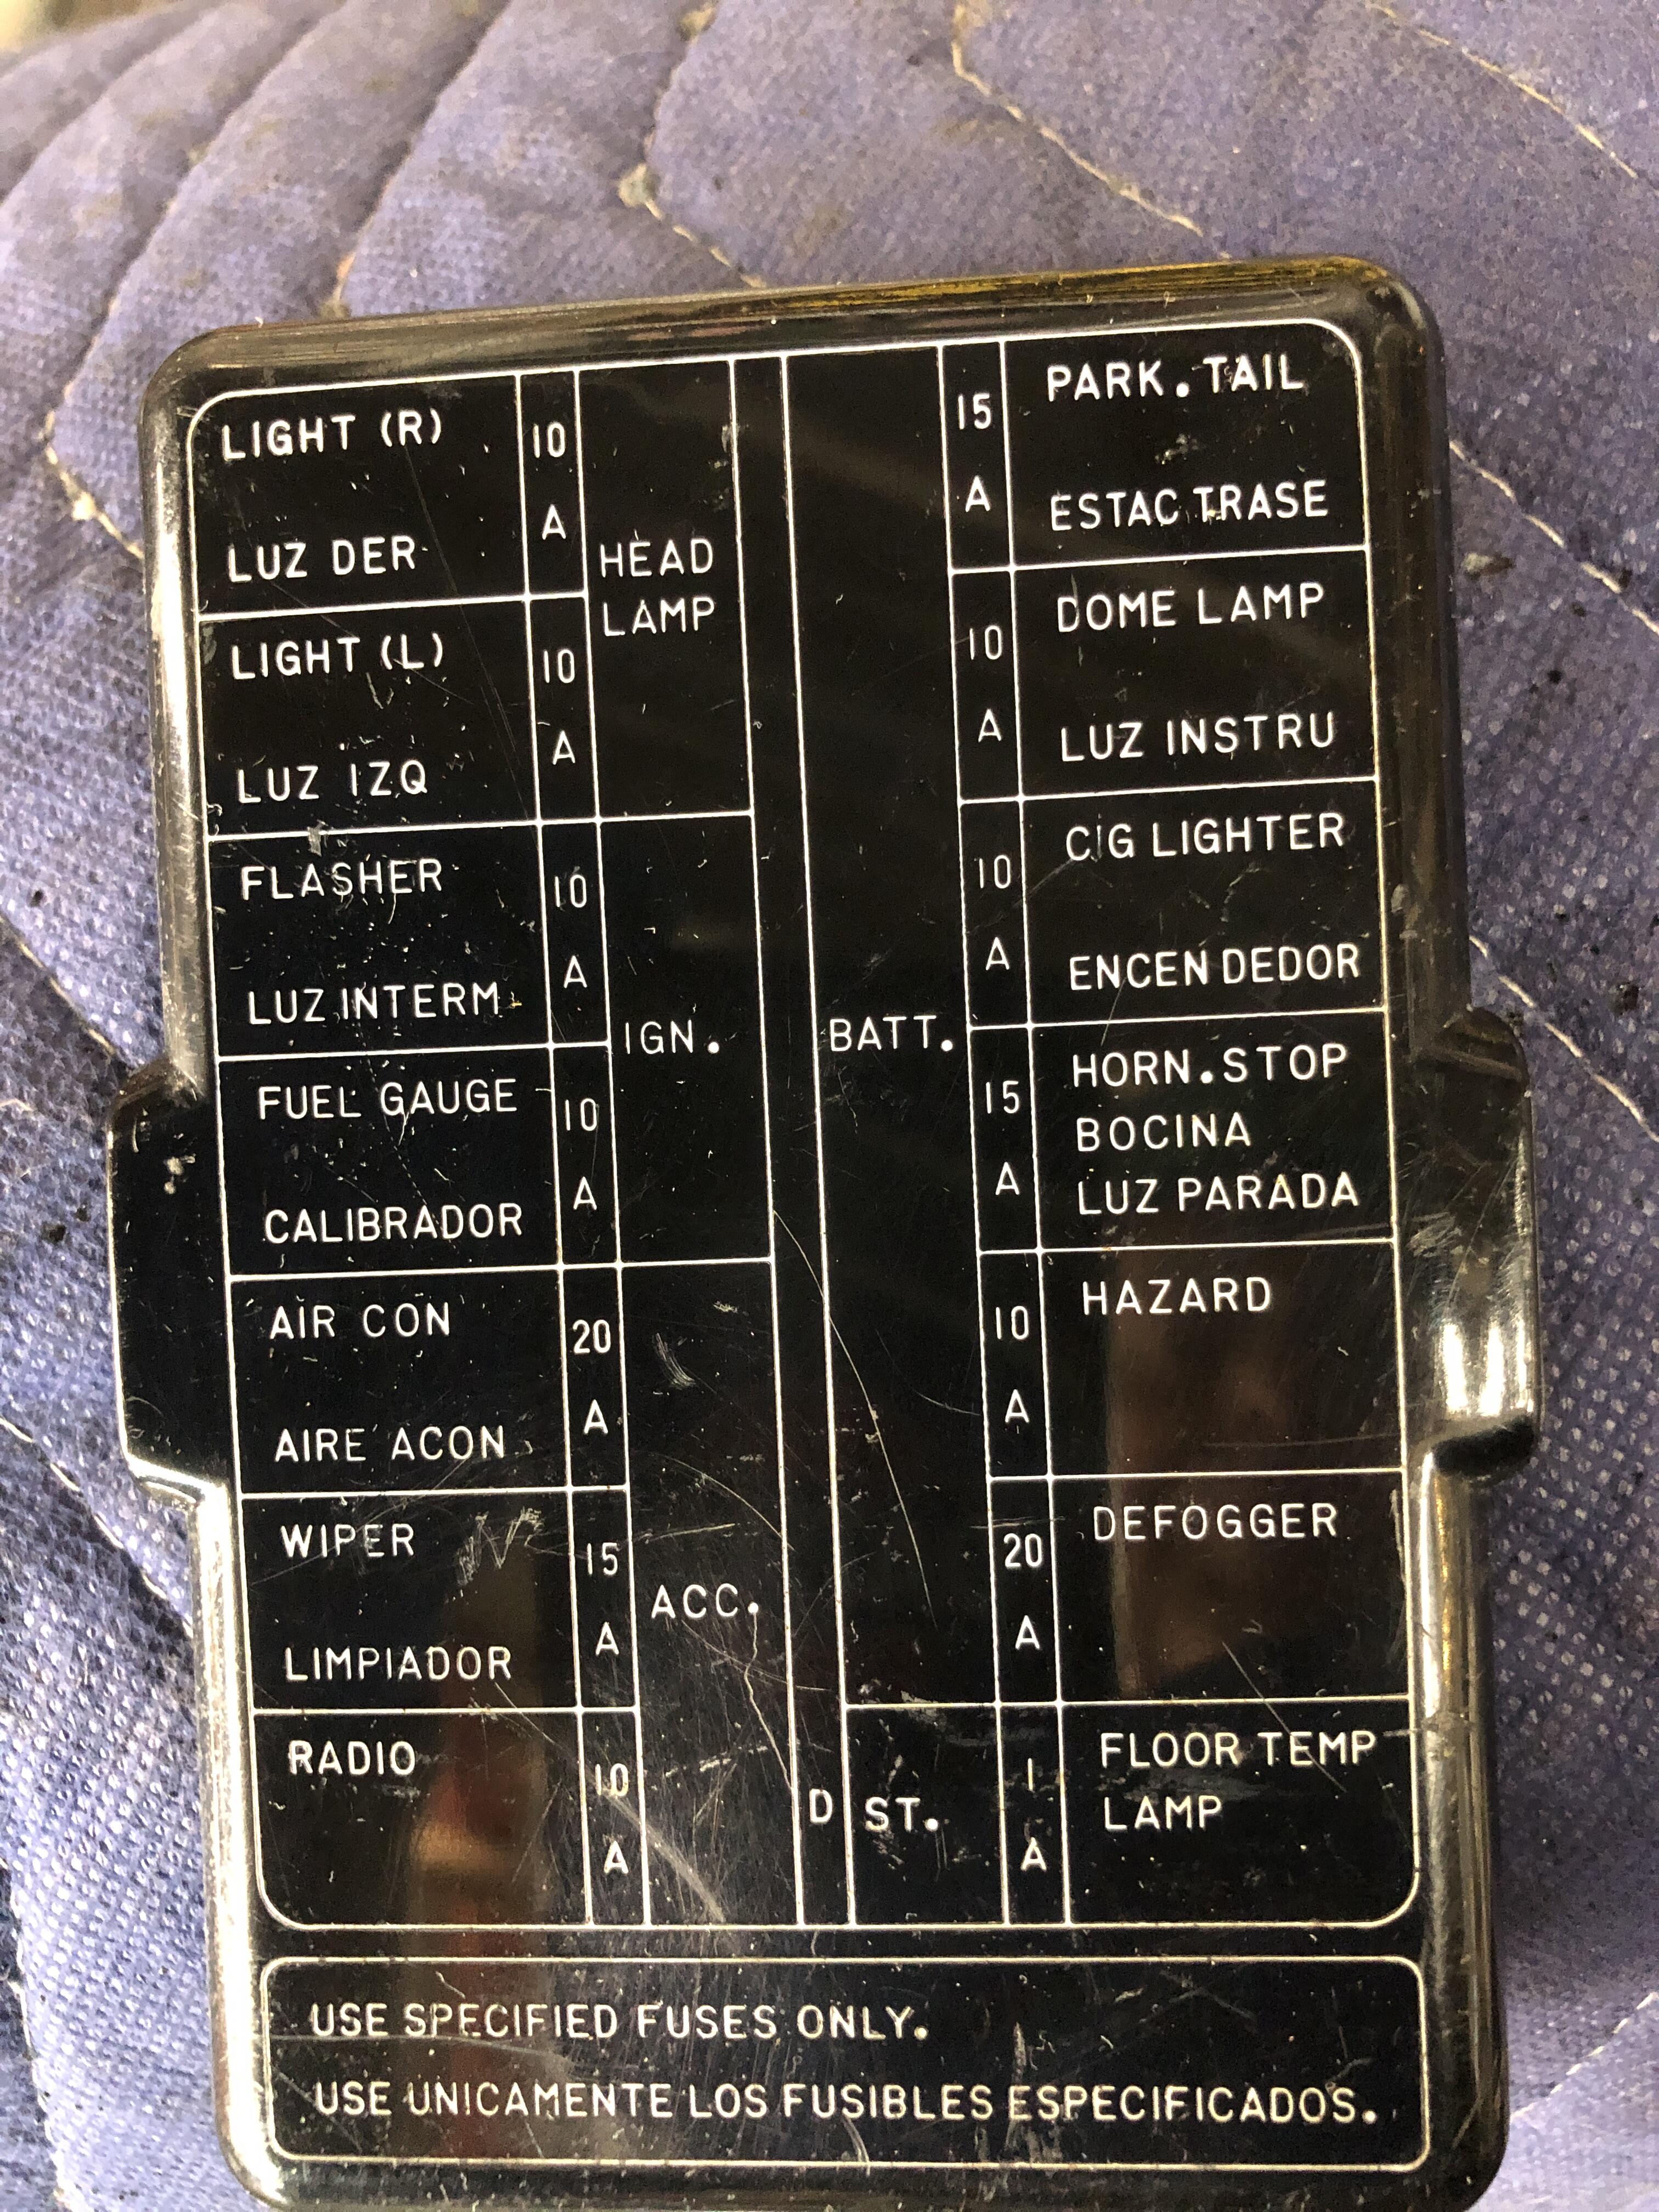
Being a thing that exists down in the passenger foot well, it is subject to abrasion. I will take the plastic polish to it and see what comes out/off and repost a picture.
-
How about this one?
-
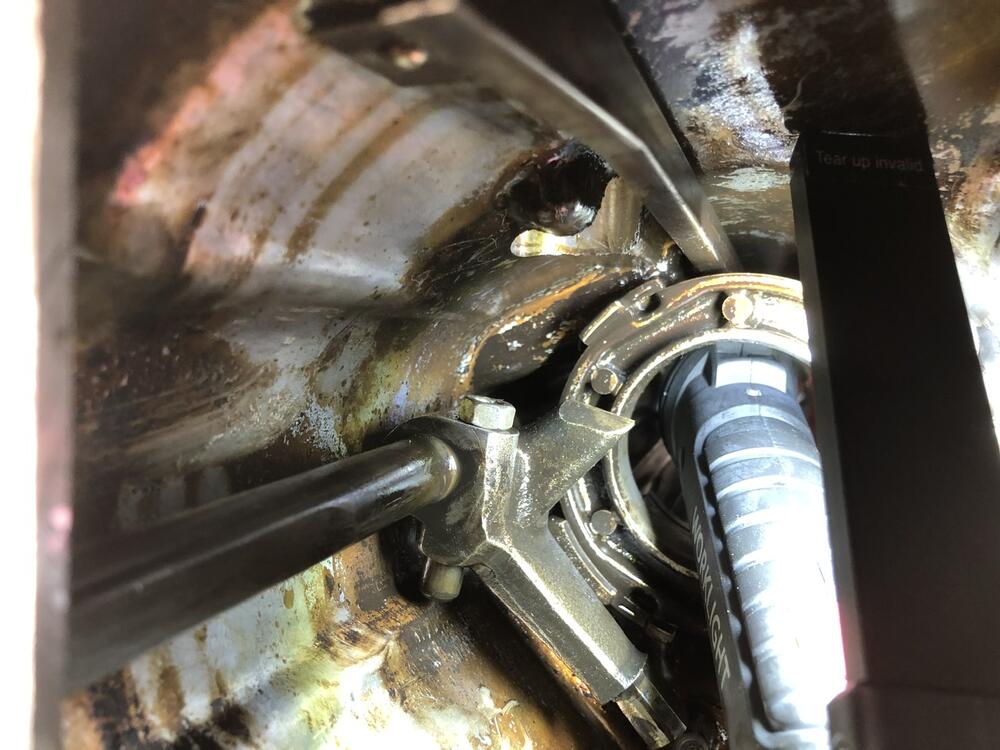
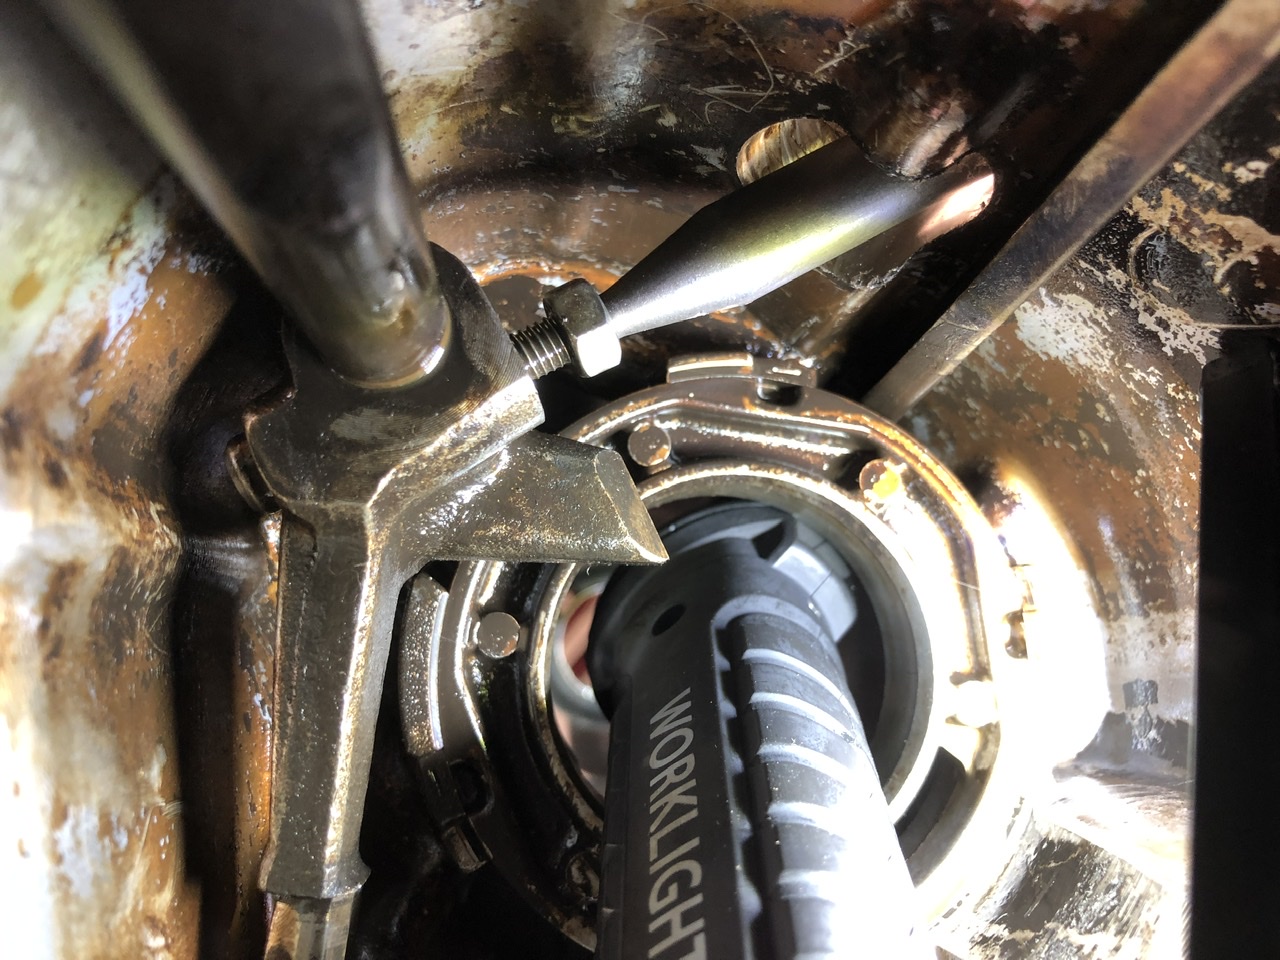
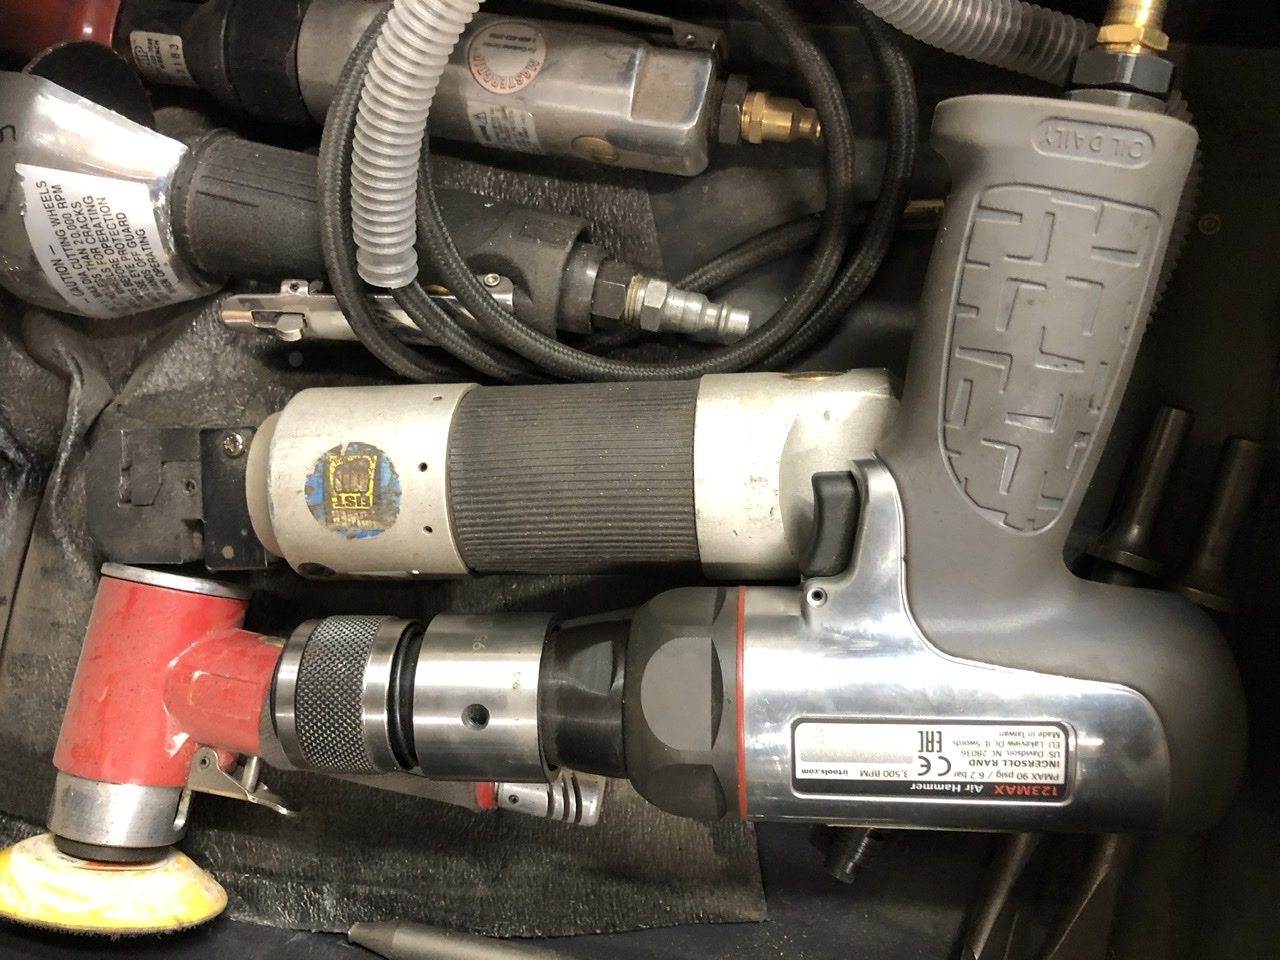
And for the sake of completeness, today I’m rebuilding a later 5 speed that DOES have the reverse lockout switch access, so I took a few pictures to show how to get that shift rod pin out. No trick necessary, just take the reverse lockout (don’t break a bolt like I did, grr….), position the lock pin so you can see it and get a straight shot at it through that hole, get your air chisel out, put the nut back on the bolt (about 2/3rds of the nut thickness) so the tip of the air chisel has a place to set, then pull the trigger for maybe 1/2 a second. Boom it’s out. Remember you can’t put the reverse lockout thingy in the wrong way, the holes are offset. Another detail, the o-ring on the reverse lockout thingy, and on the end of the shift rod, and the one on the outside of the speedo cable drive cog are all the same.


-
I can offer this perspective about what is the right console for your car. Since the various welded on brackets that mount the early and late consoles are different, both at the front and rear of the console, whichever ones you have on this Z determine which console is correct. You mentioned the early one you have “fits” assuming the screws that secure it under the ashtray cover in the front, and the three in the rear all fit, then your car is correct with the early console. Changing to the later console is not trivial, but possible. I have seen plenty of Z’s that are a mix of various so called S1 and S2 parts in this VIN range. You have the S2 steering wheel, S1 console. Your air vents are likely on the sail panels, but you may still have vertical defroster lines. Rejoice in the quirkiness of the mixed up car. It’s a real thing.
-
I’ve had me dirty little fingers in this lovely pile of 73 chocolaty goodness. The paint is the best over all quality I’ve seen to date. The car is an amazing low mileage time capsule. It certainly is raising some mighty good numbers isn’t it? Couple of heavy hitters doing a bit of sparring, will have to wait until the weekend to see where it finishs.
-
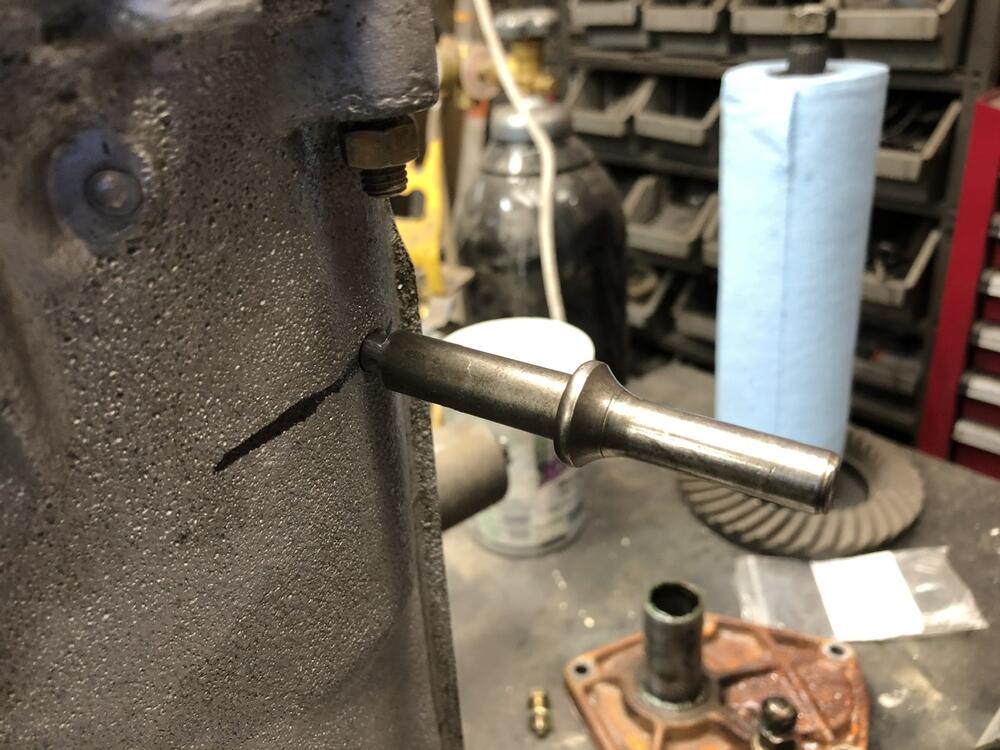
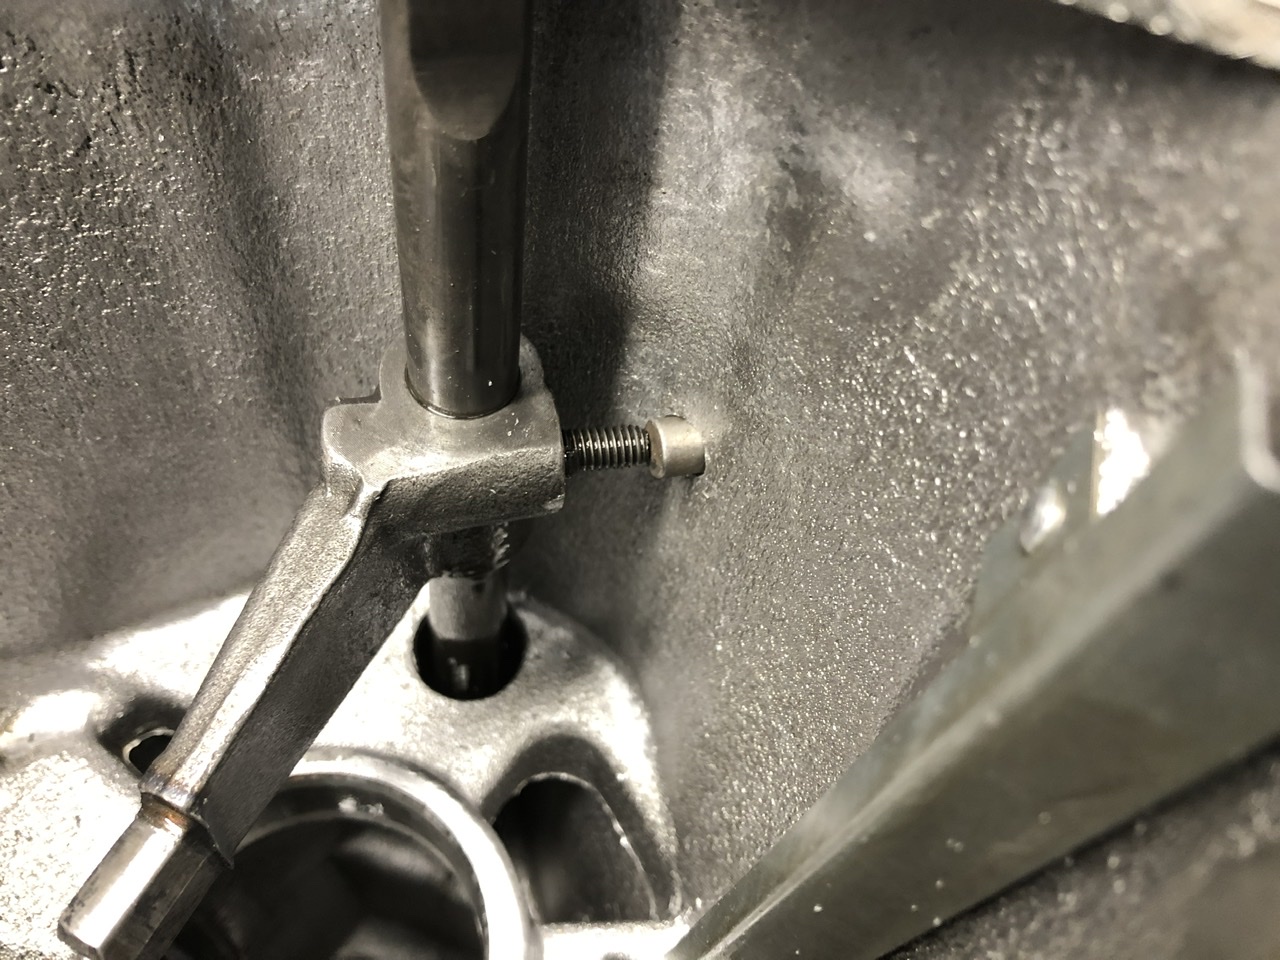
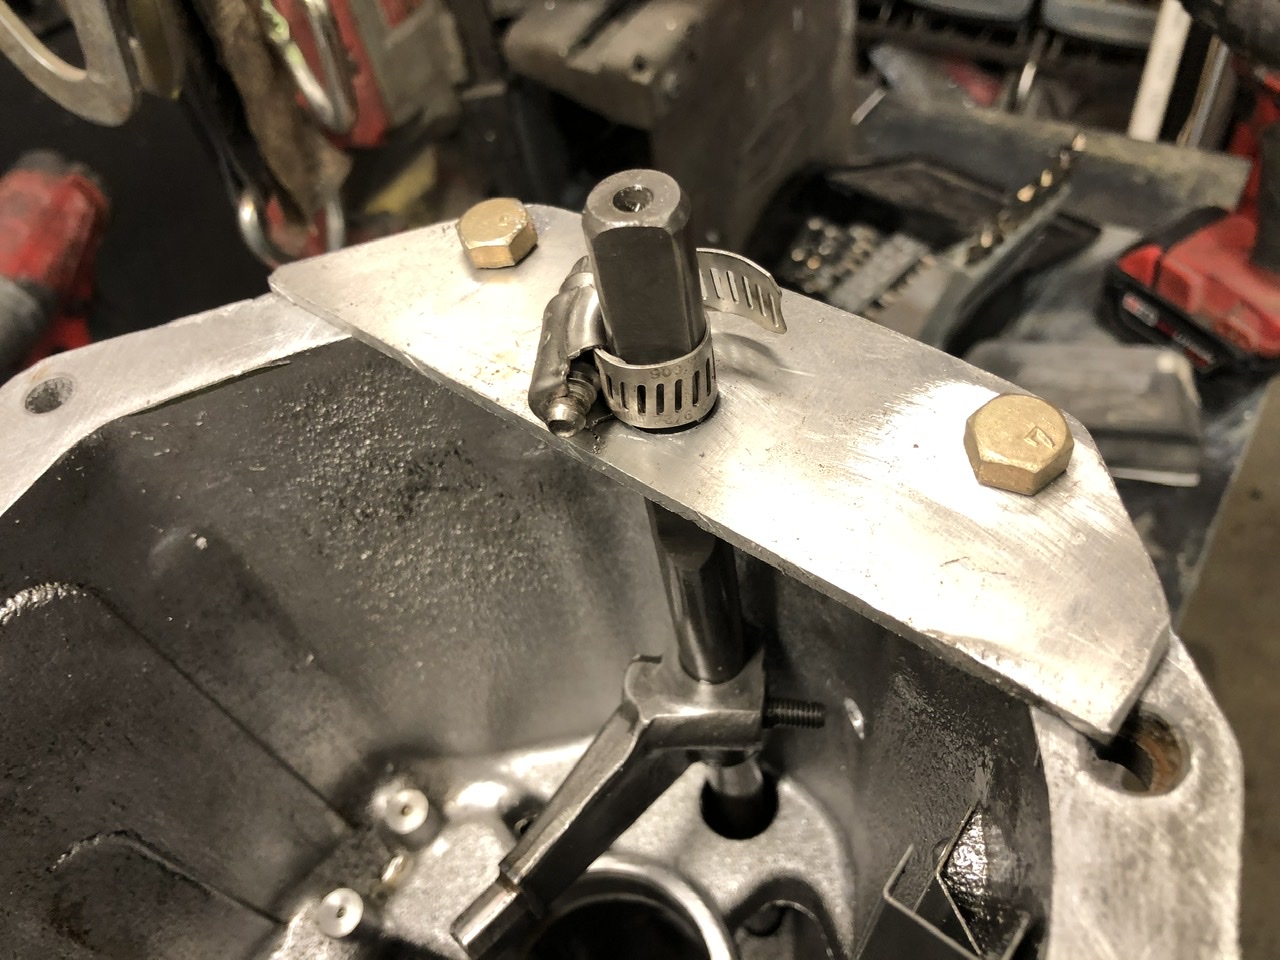
You can move the rod in and out several inches so the front to back position is not very critical. I made a simple plate jig to hold the end of the rod in place to support it while bashing the pin out. 17/32 bit for the rod I think. Hose clamp to hold the rod fully forward. This puts the pin head exactly 3-1/8 back from the case face. I have used an air chisel tool with a round bit in the past to get this pin out, it works extremely well and is nearly instantaneous. Beating it with a punch requires more effort and unpleasant words.

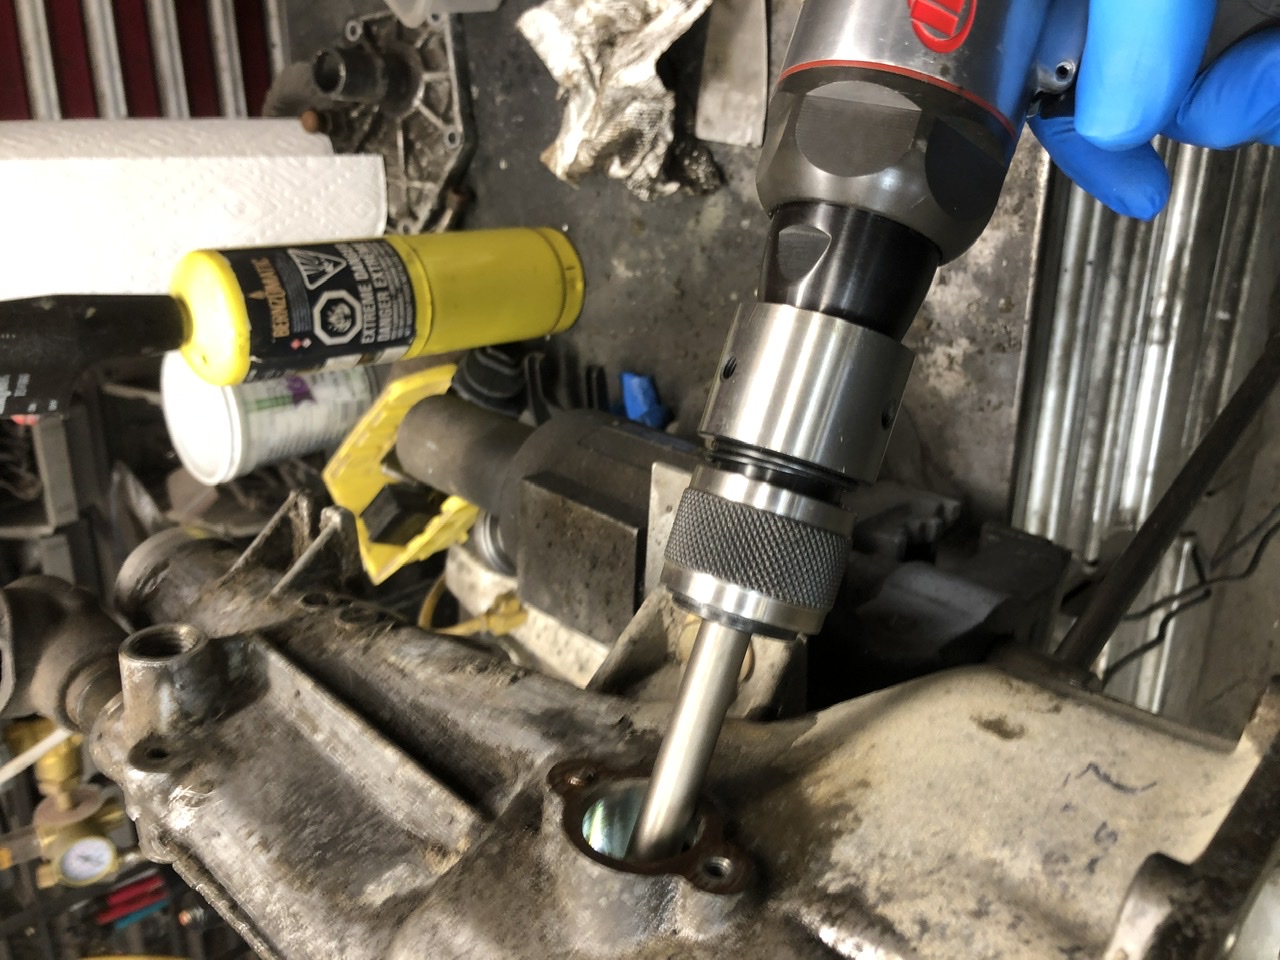
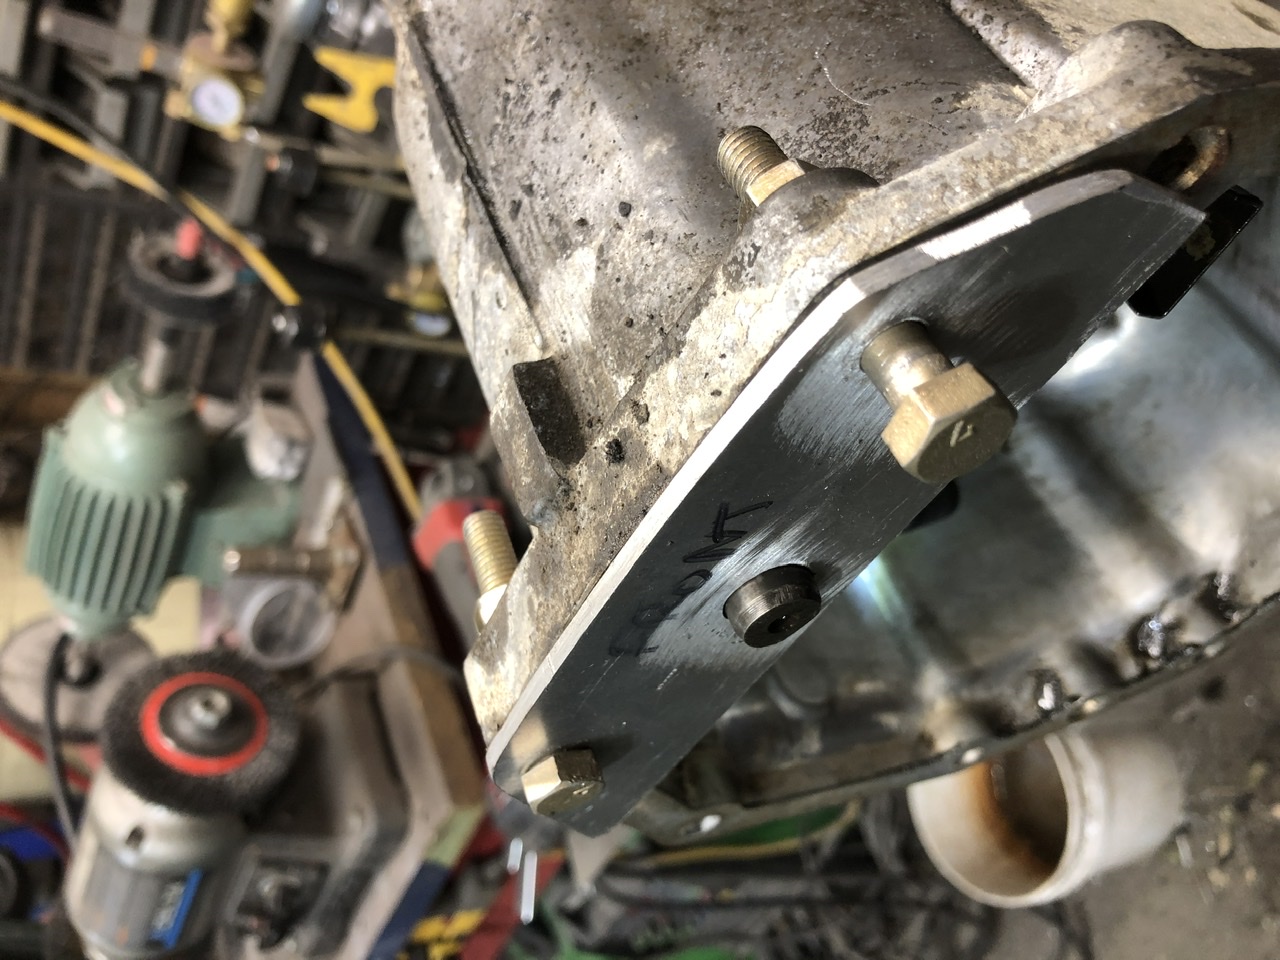
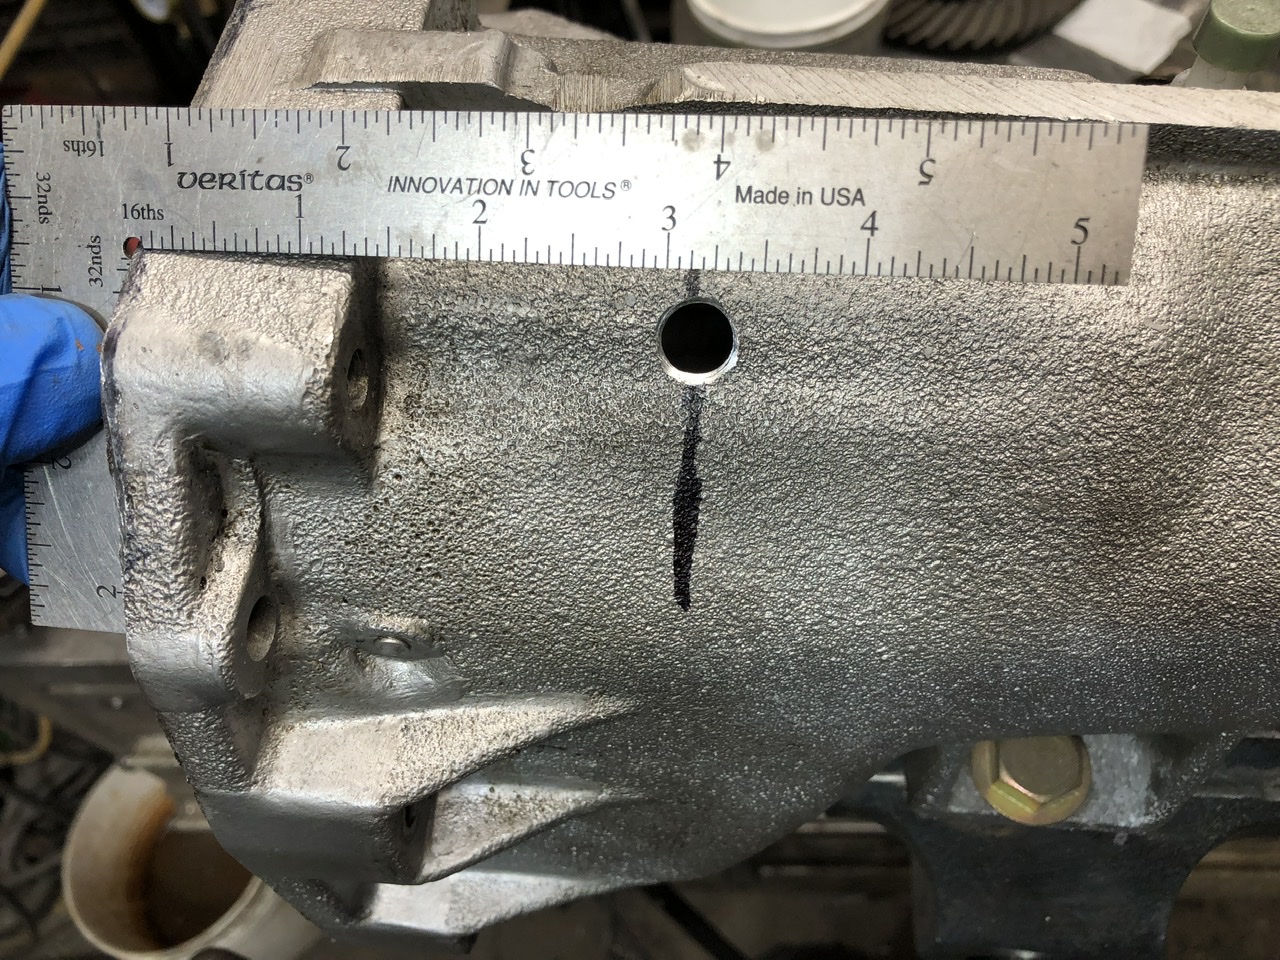
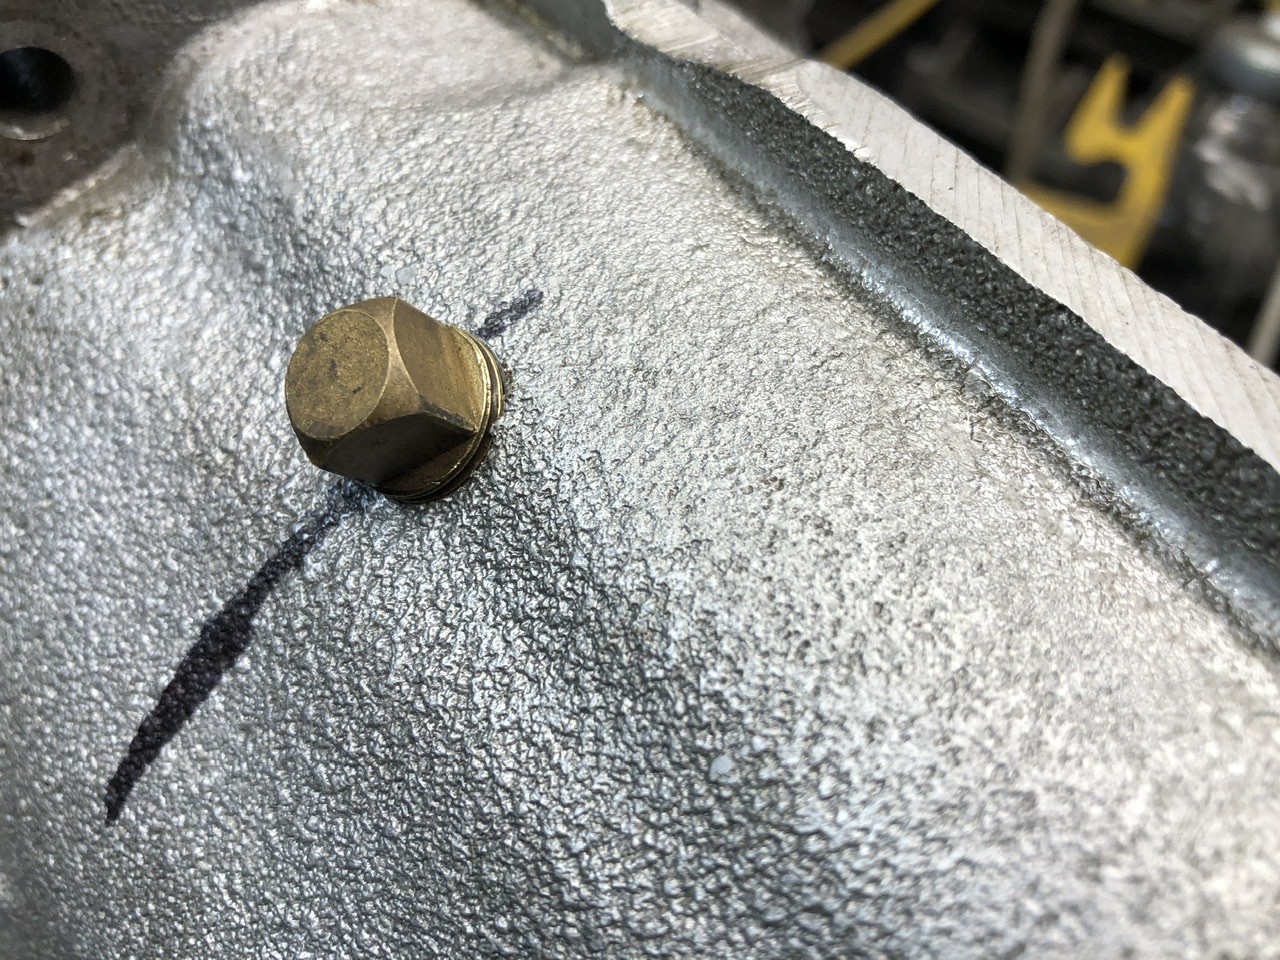
 I drilled a 5/16 hole, then enlarged it to about 3/8 and angled it to aim at the pin more directly. When done I drilled it to 27/64 (just under 7/16) and tapped it with a 1/4NPT tap and plugged it. The hole is 3.125 from the case face, and down 1.375 from the casting edge above. I’d likely use a plug with a recessed hex head rather than the square headed thing I show, it’s just what I had on hand. Locktight it in.
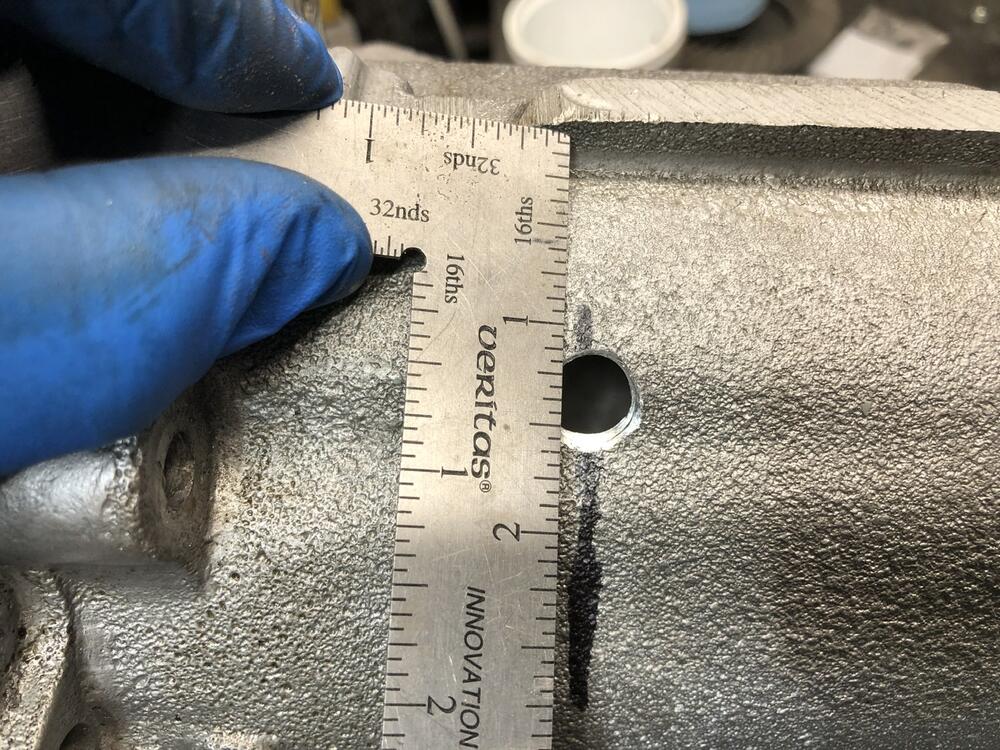


 I’m not sure if this is the best thread to add this information to, but it started out and generally speaks to rebuilding the 5 speeds, even though it ended with exhaust nuts…. I’m back rebuilding a few 5 speeds again this fall, and did an operation for the first time and thought I would record the “how to” here for posterity. This relates to replacing the two shifter rod seals (o-ring and oil seal) in the upper rear case of 71B 5 speeds. I think it applies to the 4 speeds as well. This requires removing the shifter rod which requires you remove the spindle pin like lock pin that resides in the rear case to detach the shifter rod from the finger that engages the shift forks. On the 81-83 trans, you have access through the reverse lockout thingy hole to bash it out with a punch or air hammer but on the 77-80 transmissions, there is no such reverse lockout do-hicky. We/I have given advice previously to drill a hole “in the right spot” then to plug when done. Until now, no one has documented exactly where to drill and how to plug. Well here goes.
SteveJ for the win! Thread is now full circle and officially closed.
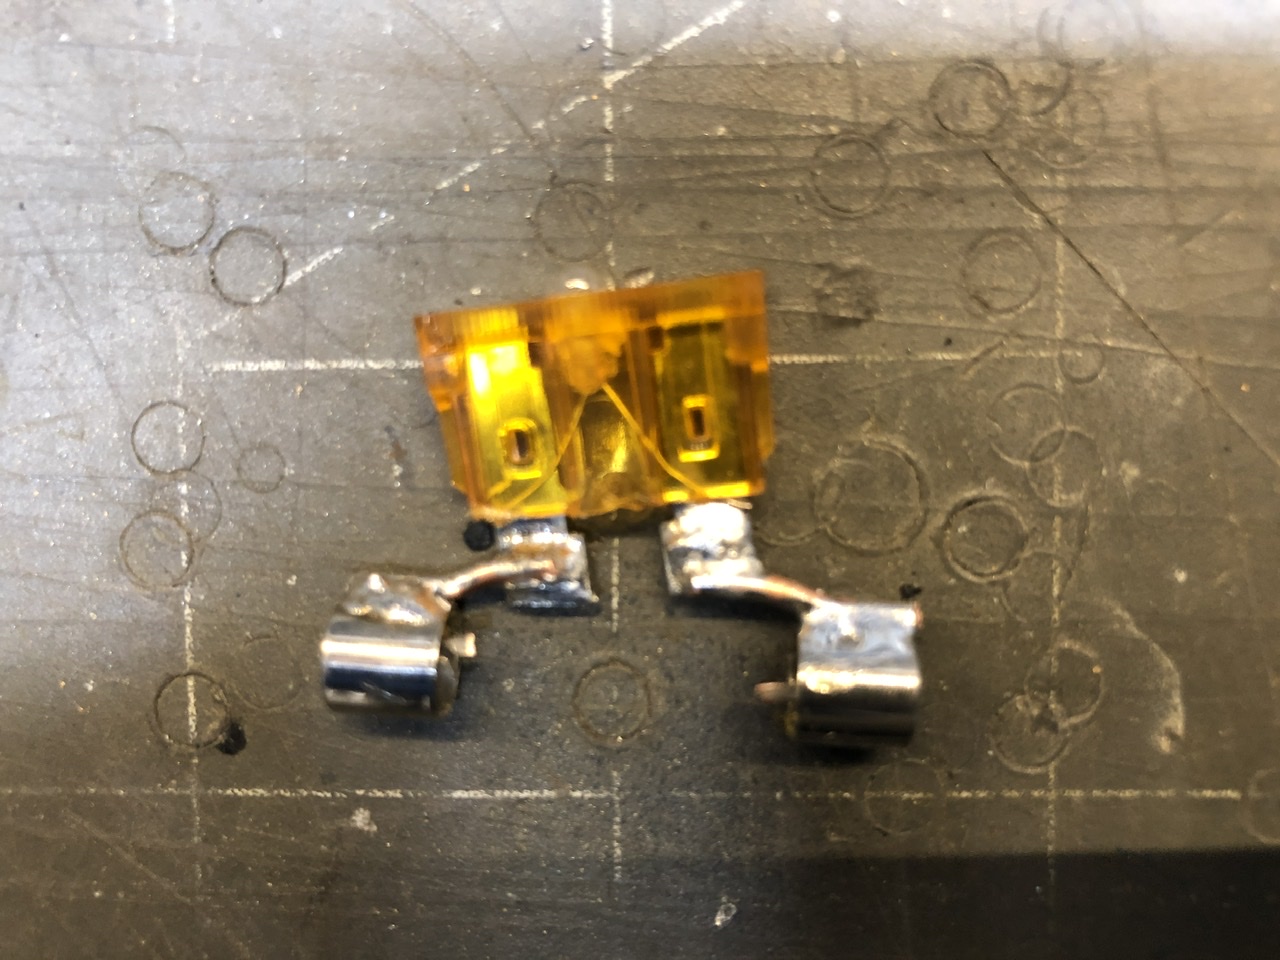
I had to try this idea. It works”, but I don’t think it will be a good solution. Not enough contact area between the fuse blades and the slit in the brass tubing. I used 1/4 OD, .029 wall thickness brass tubing, with 3/16 OD plastic tubing as the non-conductive bridge. Cut slits in the tubing with a oscillating saw blade, squeezed it shut, then stuffed a fuse into it. The tube sections are 1/2” long, overall is 1.25” For higher current circuits, 15 amp and over, I don’t think the poor/small contact between the blades and edge of the slit in the brass tubing is enough to keep heat from becoming an issue. It works, you can keep a couple in the glove box with ATO fuses and get home if you had to.
I’m not sure if this is the best thread to add this information to, but it started out and generally speaks to rebuilding the 5 speeds, even though it ended with exhaust nuts…. I’m back rebuilding a few 5 speeds again this fall, and did an operation for the first time and thought I would record the “how to” here for posterity. This relates to replacing the two shifter rod seals (o-ring and oil seal) in the upper rear case of 71B 5 speeds. I think it applies to the 4 speeds as well. This requires removing the shifter rod which requires you remove the spindle pin like lock pin that resides in the rear case to detach the shifter rod from the finger that engages the shift forks. On the 81-83 trans, you have access through the reverse lockout thingy hole to bash it out with a punch or air hammer but on the 77-80 transmissions, there is no such reverse lockout do-hicky. We/I have given advice previously to drill a hole “in the right spot” then to plug when done. Until now, no one has documented exactly where to drill and how to plug. Well here goes.
SteveJ for the win! Thread is now full circle and officially closed.
I had to try this idea. It works”, but I don’t think it will be a good solution. Not enough contact area between the fuse blades and the slit in the brass tubing. I used 1/4 OD, .029 wall thickness brass tubing, with 3/16 OD plastic tubing as the non-conductive bridge. Cut slits in the tubing with a oscillating saw blade, squeezed it shut, then stuffed a fuse into it. The tube sections are 1/2” long, overall is 1.25” For higher current circuits, 15 amp and over, I don’t think the poor/small contact between the blades and edge of the slit in the brass tubing is enough to keep heat from becoming an issue. It works, you can keep a couple in the glove box with ATO fuses and get home if you had to.
 Soldering iron tip is my guess. Not Z related.
And the verdict is in. Yes you “Can”, but “Should you?” First attempt, not very neat, managed to break the glass, which should be left intact for structural integrity. The need to add a wire to bridge the distance gap is the biggest weakness of this approach. And yes you have to be careful with the heat on the plastic ATO fuse. And it was fun zapping the AGC fuse on a battery first. Does get hot, watch delicate pinkies
Soldering iron tip is my guess. Not Z related.
And the verdict is in. Yes you “Can”, but “Should you?” First attempt, not very neat, managed to break the glass, which should be left intact for structural integrity. The need to add a wire to bridge the distance gap is the biggest weakness of this approach. And yes you have to be careful with the heat on the plastic ATO fuse. And it was fun zapping the AGC fuse on a battery first. Does get hot, watch delicate pinkies Interesting! If the plastic ATO fuse body survives the soldering heat as well as the internal fusible metal, then this is actually not a bad idea! I will get my soldering iron out today for sure. Imagine the fun of intentionally shorting a 12v battery across a bunch of AGC fuses to blow them up for use! Zap Zap!
Bit late now, but a trick is to not install the new seal all the way flush so the seal lip rides on a new un-marked part of the crank snout. Use in a pinch, not the world’s best solution. I fully agree you are doing the right thing with this extreme case to use a speedy sleeve.
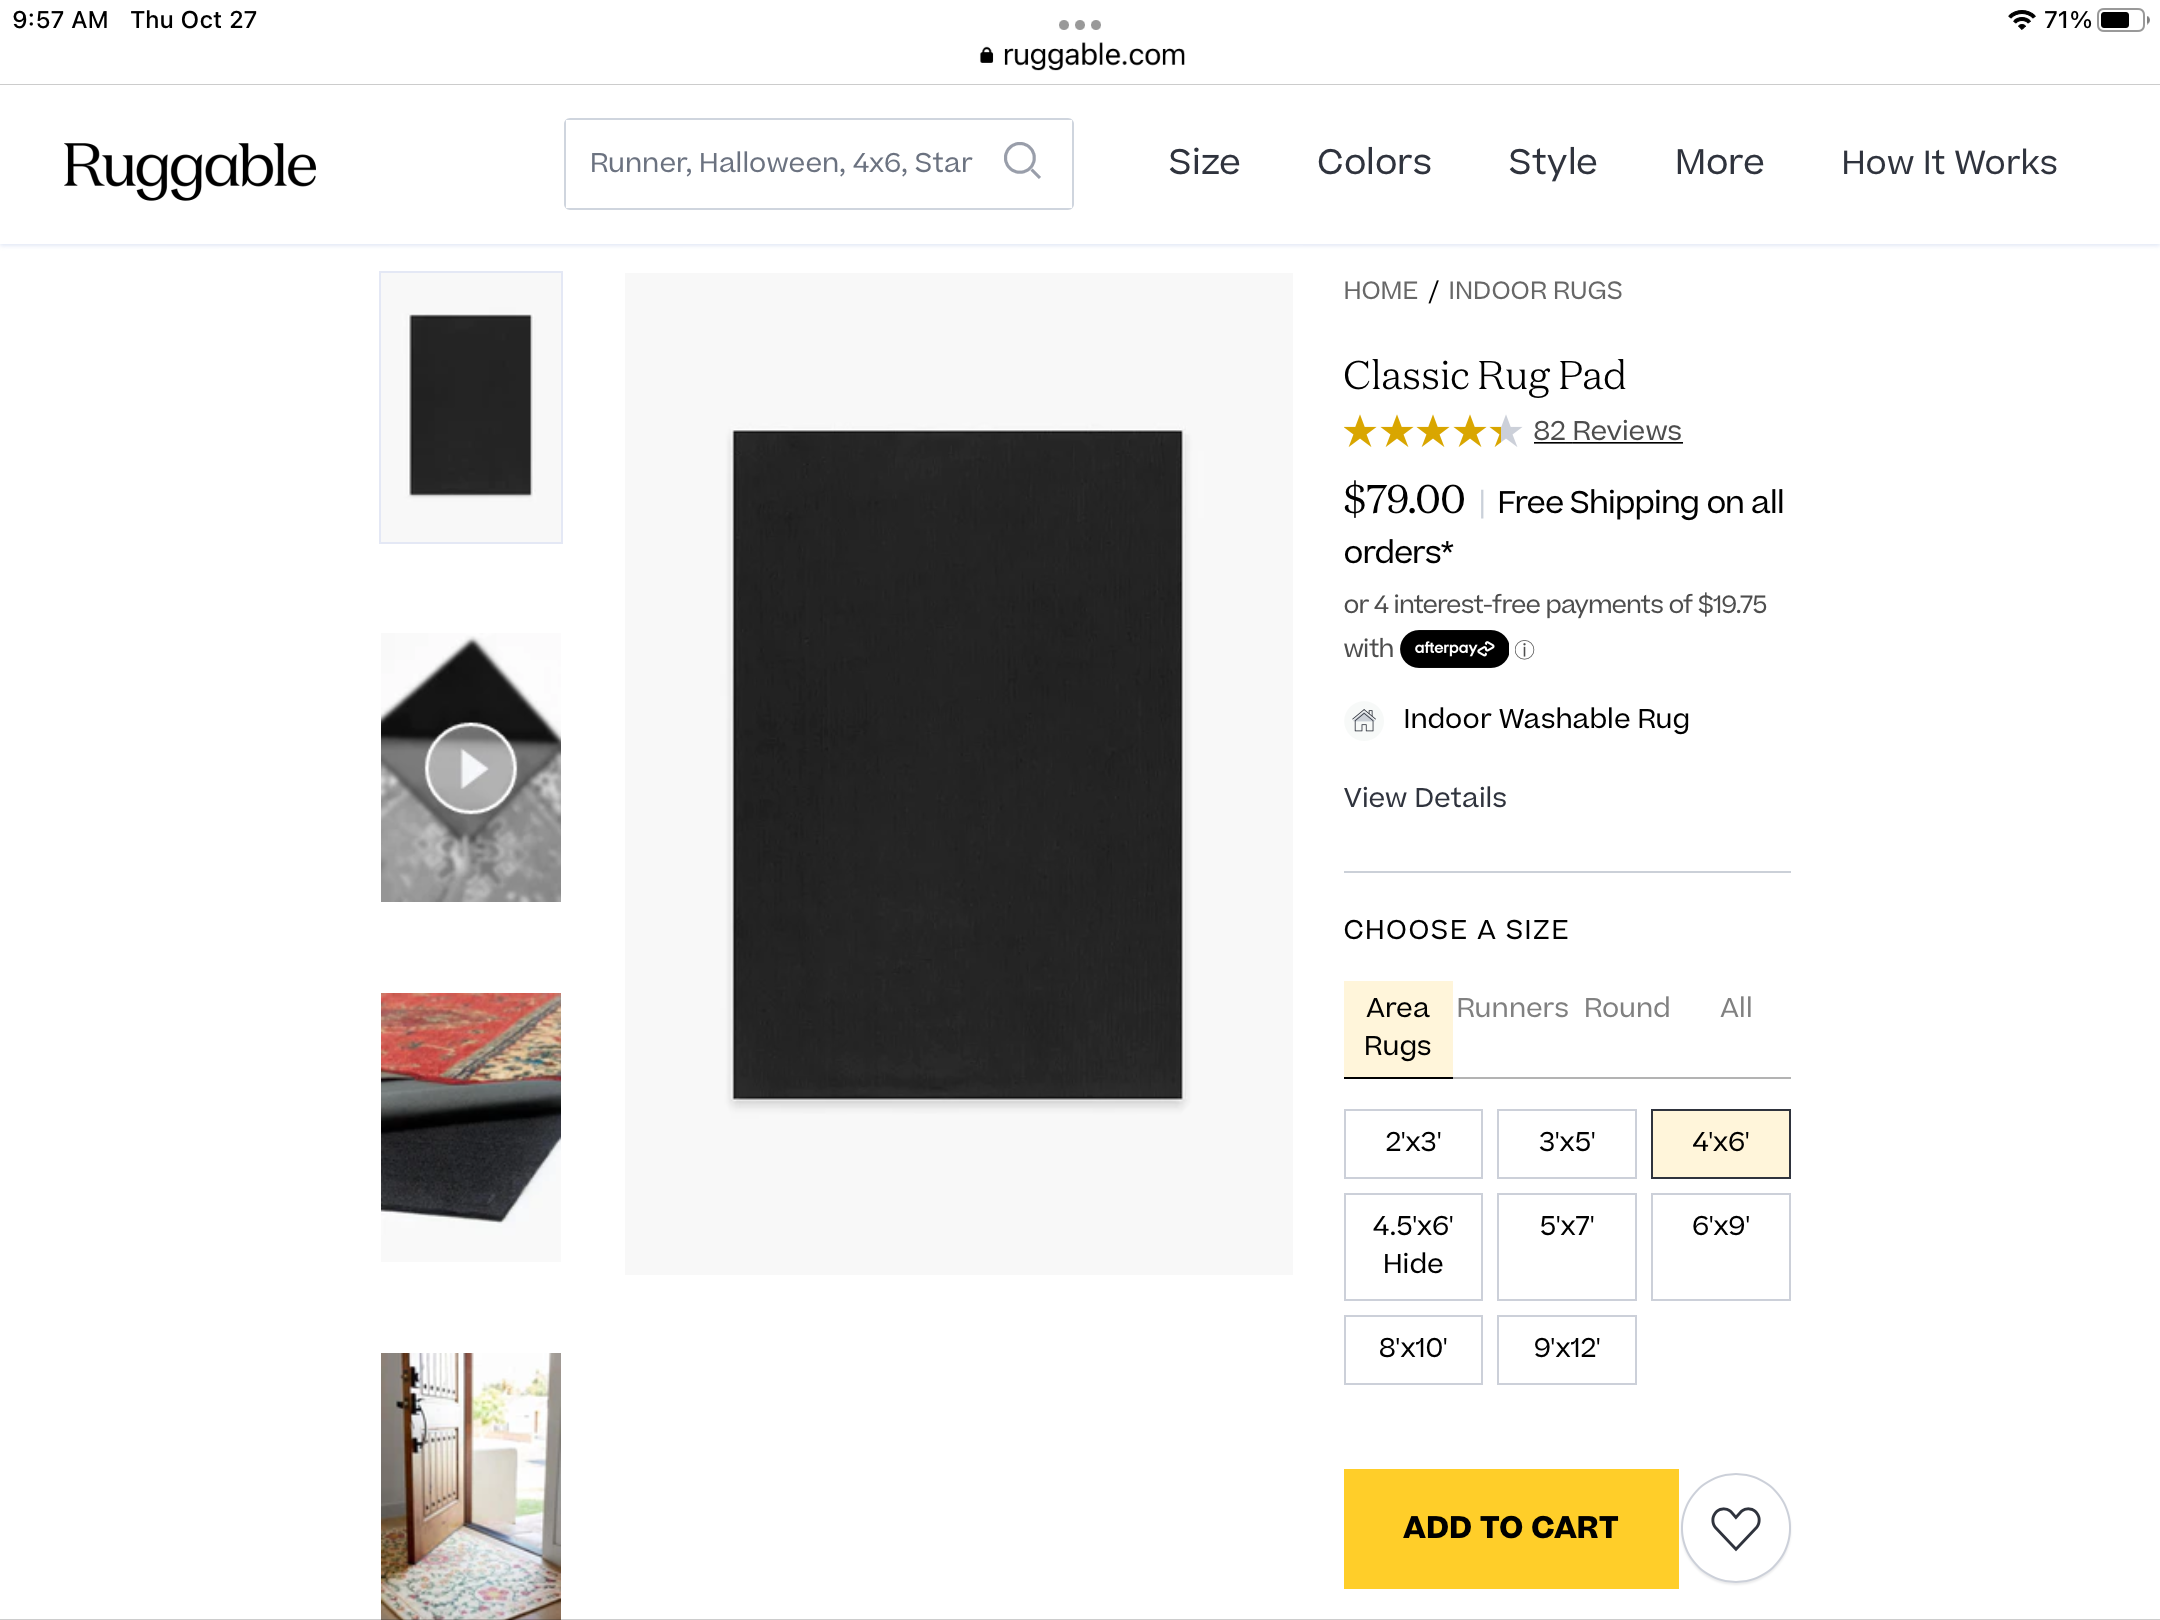
Here is a link to the product. https://ruggable.com/products/classic-rug-pad?size=4x6 It ain’t cheap, the 4x6 size ($79 USD) is good for the front and behind/under the seats, but you need another one for the hatch area if wanted to use it there to. Anyway, great product that both grabs the floor and the rug at the same time.
Interesting! If the plastic ATO fuse body survives the soldering heat as well as the internal fusible metal, then this is actually not a bad idea! I will get my soldering iron out today for sure. Imagine the fun of intentionally shorting a 12v battery across a bunch of AGC fuses to blow them up for use! Zap Zap!
Bit late now, but a trick is to not install the new seal all the way flush so the seal lip rides on a new un-marked part of the crank snout. Use in a pinch, not the world’s best solution. I fully agree you are doing the right thing with this extreme case to use a speedy sleeve.
Here is a link to the product. https://ruggable.com/products/classic-rug-pad?size=4x6 It ain’t cheap, the 4x6 size ($79 USD) is good for the front and behind/under the seats, but you need another one for the hatch area if wanted to use it there to. Anyway, great product that both grabs the floor and the rug at the same time. Recently we purchased some household area rugs from “Ruggable”. Most of their products are designed to be used on smooth hard surfaces, so they have come up with an underlay (they call it the “Pad”) that is rubberized and sticky on the back that prevents slipping on the hard floor, and has what can only be described as hook side “velcro” on the top side that sticks to the underside of their rugs, effectively locking the rug to the floor. It’s very thin, about and 1/8” (3mm). When I started working with it to lay down our new rug, I found it very frustrating to get the large rug to both keep this fancy underlay aligned with the floor AND the rug smoothly stuck down to the velcro like underlay. Smoothing out wrinkles moved the underlay and vise versa. Making it worse, the rug was large and I needed two sheets of the underlay, which had to be tightly aligned to each other. Sometime during this fight, I began thinking, “this stuff is astoundingly good at its job to the point of frustration” but it also struck me that it might be the answer to a problem I have with keeping rugs in place in the Datsun! I don’t think I’m the only one with annoyingly migrating rugs. I’ve tried spray gluing down the underlay, then glueing the rug to the underlay, but it always works loose. It’s clear why the stock top rug had those welded in hooks on the floor under the seat front and slots in the rugs to hold them in place. So I tried using this Ruggable sticky pad stuff and so far, I’m amazed at how well it works. I use it between the foil faced sound deadening I used and the top rug (with or without its sound deadening cushion) . I do spray glue the back of the rubber pad to make it stay in place to the foil, but I’m not sure I have to. The velcro upper faces sticks fantastic to the back of the rug.
240 hubs have 4 scallops on the front and 280 rotors have a completely smooth round shape. They take completely different rotors as well that have a very different offset. That said, the correct hub and rotor combo for either will put the disk at the same position since they both use the same caliper. You could have a 240 set on one side and a 280 set on the other and be just fine. You just can’t mix hubs and rotors. More likely you need to retract the pistons in the caliper all the way and then re-install. It will self center. Also a great reference discussing the differences http://240260280.com/Tech/General/Front Axle & Suspension/Wheel Bearing/index.html
Recently we purchased some household area rugs from “Ruggable”. Most of their products are designed to be used on smooth hard surfaces, so they have come up with an underlay (they call it the “Pad”) that is rubberized and sticky on the back that prevents slipping on the hard floor, and has what can only be described as hook side “velcro” on the top side that sticks to the underside of their rugs, effectively locking the rug to the floor. It’s very thin, about and 1/8” (3mm). When I started working with it to lay down our new rug, I found it very frustrating to get the large rug to both keep this fancy underlay aligned with the floor AND the rug smoothly stuck down to the velcro like underlay. Smoothing out wrinkles moved the underlay and vise versa. Making it worse, the rug was large and I needed two sheets of the underlay, which had to be tightly aligned to each other. Sometime during this fight, I began thinking, “this stuff is astoundingly good at its job to the point of frustration” but it also struck me that it might be the answer to a problem I have with keeping rugs in place in the Datsun! I don’t think I’m the only one with annoyingly migrating rugs. I’ve tried spray gluing down the underlay, then glueing the rug to the underlay, but it always works loose. It’s clear why the stock top rug had those welded in hooks on the floor under the seat front and slots in the rugs to hold them in place. So I tried using this Ruggable sticky pad stuff and so far, I’m amazed at how well it works. I use it between the foil faced sound deadening I used and the top rug (with or without its sound deadening cushion) . I do spray glue the back of the rubber pad to make it stay in place to the foil, but I’m not sure I have to. The velcro upper faces sticks fantastic to the back of the rug.
240 hubs have 4 scallops on the front and 280 rotors have a completely smooth round shape. They take completely different rotors as well that have a very different offset. That said, the correct hub and rotor combo for either will put the disk at the same position since they both use the same caliper. You could have a 240 set on one side and a 280 set on the other and be just fine. You just can’t mix hubs and rotors. More likely you need to retract the pistons in the caliper all the way and then re-install. It will self center. Also a great reference discussing the differences http://240260280.com/Tech/General/Front Axle & Suspension/Wheel Bearing/index.html The rubber pads are 3x1.75” and 1/4 thick. There are matching indents in the tanks to show you exactly where they go. I do have some pads in the stash that are much thicker at 3/4” but I’m no help at telling you which model they are from. I do have a couple of 4-pad groups taped together that are all the 1/4” thick ones so that is the likely correct set for the 240 and early 280 tanks (75-76) that are the same form factor.
I have resorted to the use of lacquer thinner for the final wash after mechanical removal of undercoating, and it works very very well. However, it’s as dangerous as gasoline in-terms of the its flammability. I ONLY use it with the doors wide open and a breeze blowing through. AND with full face organic rated breathing protection. Bit chilly around here in January…… Diesel fuel is cheaper and safer and just as effective, though messier and involves disposal of rags that don’t dry out through evaporation. Let’s be careful out there and do our best to ensure we can continue to do this hobby for as long as possible with the least side affects. /end fatherly rant…..
https://www.centercapsdirect.com/ Is one choice.
Just because, be warned, there are copies of this tool on Amazon for less. And surprisingly for more as well! Don't do it.
The rubber pads are 3x1.75” and 1/4 thick. There are matching indents in the tanks to show you exactly where they go. I do have some pads in the stash that are much thicker at 3/4” but I’m no help at telling you which model they are from. I do have a couple of 4-pad groups taped together that are all the 1/4” thick ones so that is the likely correct set for the 240 and early 280 tanks (75-76) that are the same form factor.
I have resorted to the use of lacquer thinner for the final wash after mechanical removal of undercoating, and it works very very well. However, it’s as dangerous as gasoline in-terms of the its flammability. I ONLY use it with the doors wide open and a breeze blowing through. AND with full face organic rated breathing protection. Bit chilly around here in January…… Diesel fuel is cheaper and safer and just as effective, though messier and involves disposal of rags that don’t dry out through evaporation. Let’s be careful out there and do our best to ensure we can continue to do this hobby for as long as possible with the least side affects. /end fatherly rant…..
https://www.centercapsdirect.com/ Is one choice.
Just because, be warned, there are copies of this tool on Amazon for less. And surprisingly for more as well! Don't do it.


Important Information
By using this site, you agree to our Privacy Policy and Guidelines. We have placed cookies on your device to help make this website better. You can adjust your cookie settings, otherwise we'll assume you're okay to continue.