Leaderboard


Popular Content
Showing content with the highest reputation on 12/08/2016 in all areas
-
1 pointHaha, same goes for me. Progress just keeps getting better in this thread, Looking really good.1 point
-
1 pointOn the driver side of the trailer the fender is hinged and folds down so you can open the door of the car. This way it is easier to get in and out of the car when it is on the trailer. There are two rubber T handles that you simply pull up out of their attachment points and the fender simply folds down.1 point
-
1 point
-
1 pointnot in the market for new wheels yet. just thought those look nice. Sent from my LG-D850 using Classic Zcar Club mobile1 point
-
1 pointMakes sense. I figured you had it under control. You're definitely bringing that one back from dead!1 point
-
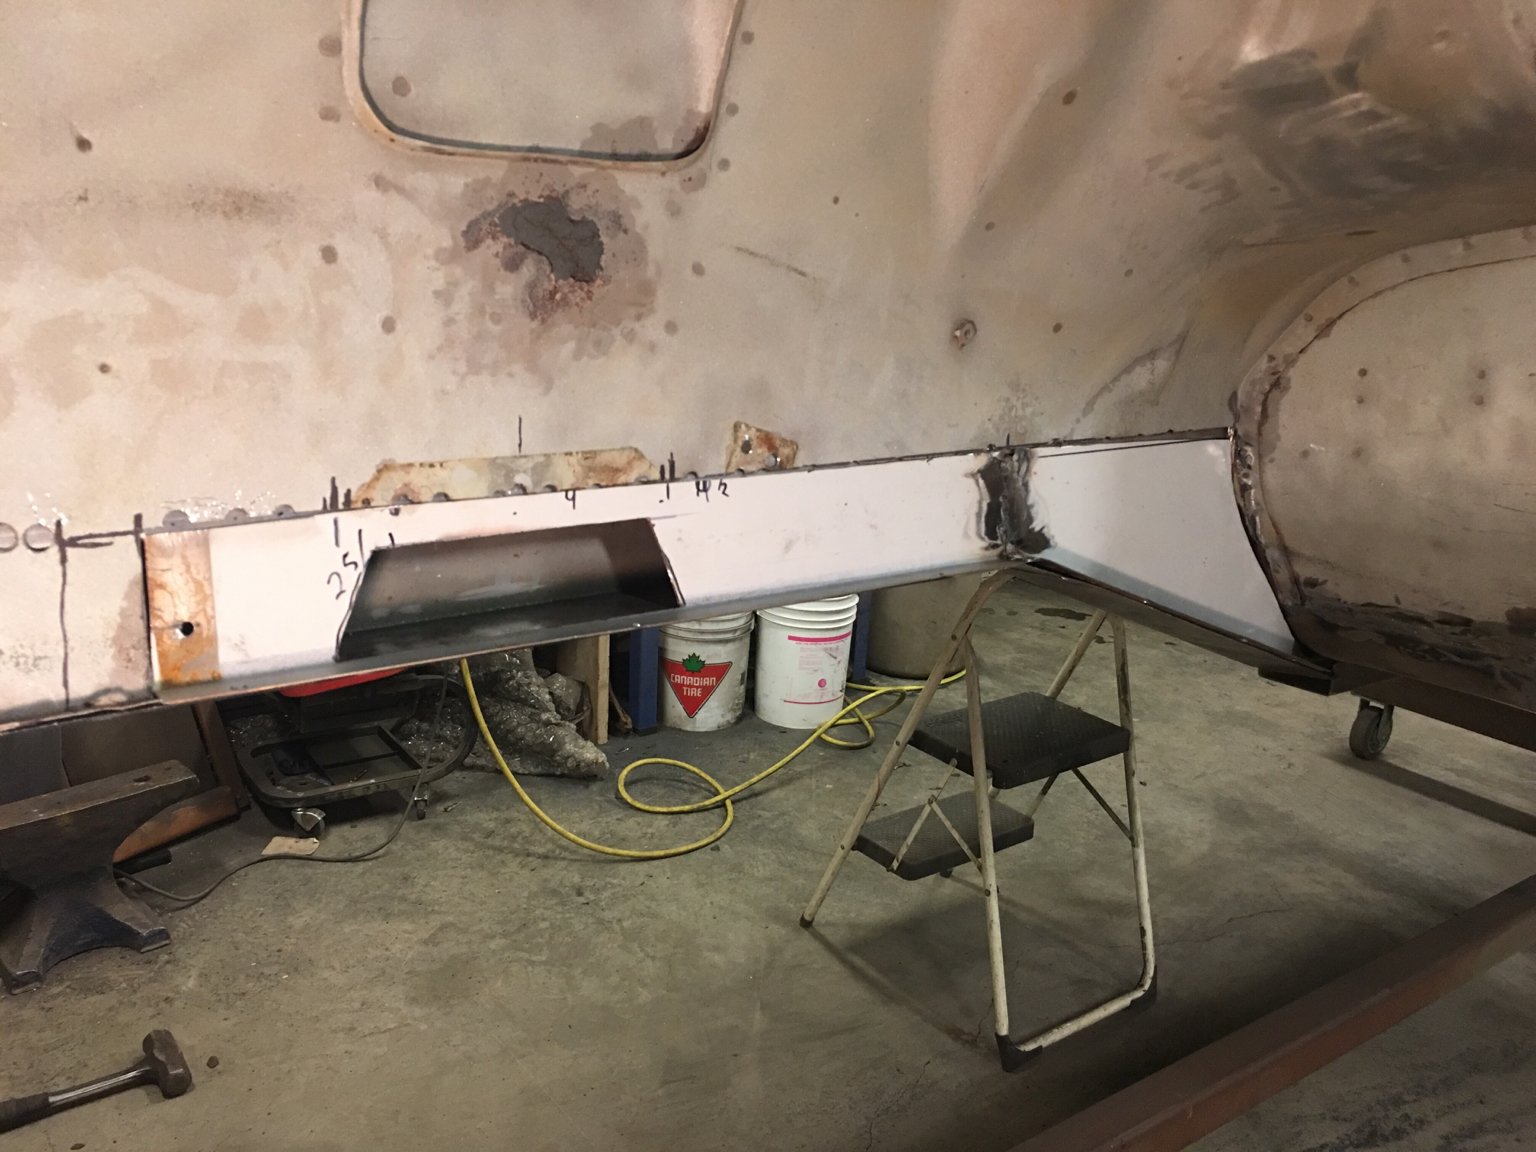
1 pointCut out the replacement sheet metal and fitted it up to the car and frame rail.

 1 point
 -
1 pointReduce your time by utilizing a cordless drill to remove and install bolts . A drill with adjustable torque is best . It will reduce time on your back and wrenching of the neck. Pick 4 of the easiest bolts to get to and leave them for last ( at the four corners) . Undo the front 2 first and let the pan rest on the crossmember . Then you will be able to see if the crank needs to be rotated. Then the last 2 to drop pan. I just used a Felpro gasket ( non cork) , get them from Autozone. Make sure pan isn't dimpled at bolt holes , work it flat if needed. Install in reverse order. I usually start all the bolts with my fingers and then use the cordless to set them. Then follow up with a 1/4" ratchet. Sent from my iPhone using Classic Zcar Club mobile1 point
-
1 pointI paid to have mine done last year along with a rear seal. I do recall laying under the Z thinking "Now, how am I going to do this?". I had one of those moments when it occurred to me that I had stretched my learning cure a little too far. So I punted….. I'll be following this thread.1 point
-
1 pointGo to your nearest tire shop make sure your tires on the tow vehicle are set to max or close to it. Don't try those coin operated compressors or you will be spending at least $5 and take forever to air up your tires. If your receiver hitch is straight then you should be good. If it has an angle to it then make sure the ball will be at the highest point. I helped Lonetree steve pick up a 240 earlier this year in Cheyenne, we came up from denver. He had a suburban and low tire pressure. The hitch was mounted low and barely cleared some of the roads. That was a long night just to get it loaded with a couple of flat tires. Used a come along and also had to raise the front of the trailer to get the 240 to clear the back end of the trailer. That due to the flat tire on the 240. I picked up a 620 pu, that was in grand junction. It towed fine, ran into a little snow on a couple of the mountain passes.1 point
-
1 pointEnjoying this spectacular fall weather and an engine that is running really well. My Mikunis have been really good to me and parting will be really tough. It's really a cool feeling when you open the hood for someone and they say - DAM! The fall weather means one last jet change for me . Time to increase the mains a size . Might go back to the dyno ( a different one) for one last pull. Still don't buy the last results . Ready to move on to FI , but don't want to take my car down for a minute. I've been driving it to work( 50 miles) lately just to drive it. But I will never be able to move on unless I say good bye to these. Might need to take another video too. Wish I had the money to make them wall art, but rather share them with another Z . Hopefully see them on a car in a show someday with that funky airbox !!1 point
-
Ever since I bought my Z I wanted to get the two missing series-1 specific components, the non-flapper air cleaner and the “2400” valve cover. Prices for both of these items have gone up significantly over the past few years. Luckily, after some patience and persistence I found both on Ebay at “reasonable” prices. The air cleaner needs to be stripped and repainted along with some new decals which I plan to get from Mike at Banzai Motorworks. The valve cover won’t go on until the air cleaner is done. My goal is to do this in the spring once I get some consistent warm weather. For now, they are in storage for safe keeping. That’s it for now. Once I wrap up the Honda Passport I will jump back in to the Z and document my various projects and tasks.1 point
-
1 point...part 2 cont. Inside the top of the casting. Notice that the 240Z casting has a little "SD" icon cast into it where as the F-10 pump lacks this detail. Identical casting otherwise. Here is how you swap the lower oil seal. Just fit a thin flat blade screw driver under the lip and pry up. TIP: Make sure to place a rag over the top when you do this as the pressure fit retainer clip will shoot out a few feet from where you are working. You can see that the retainer is already removed from the pump on the right. Oil seal comparison. Our old one on the left was torn and becoming brittle. Swap out the oil seals and replace the retainer by taking a socket about the same size a the inside of the retainer and tap it back in with a hammer. It might take a few times as the retainer wants to slip around. I had a helper when I did this operation. Line up the peen marks if possible. Install the diaphragm opposite how you took the old one out. You install the end of the rod diagonally so it can fit under the actuator arm. You may need to move the actuator arm down to allow the rod end to clear. It should pop into place. Install the pump back onto the engine block at this point. It's way easier this way trust me. Reassemble the upper casting using the bright new screws, top cover plate, and gasket from the new pump. Then screw the rebuilt fuel transfer housing onto the diaphragm base using the rest of the bright new screws. Reattach hoses and such. TIP: I did swap out the fuel inlet tube as the original one was much shorter and had a thinner OD tube diameter than the one from the F-10 pump. You may need to temporarily bolt the fuel transfer housing to the engine block to get enough torque to unscrew the inlet tube. These have tapered threads so they will seal against fuel leakage. No need to use plumbers tape or any sealer. The more you screw on the threads the tighter it will get. Crank up the engine and look for any leaks. All in all this took us about an hour to do and only cost me about $30.00. How awesome it that!!1 point
-
I had lunch the other day with my buddy and fellow Z owner Mike W. Since the sun was shining and I had nothing else to do I decided to tackle some small stuff on the Z. After buying the car getting under it I noticed the passenger side steering rack boot/bellow and outer tie rod boot was shot. I knew exactly the amount of effort this was going to take as I had done it on my old ’72 240z when I had it. The passenger side was not in much better shape so both sides needed to be done. I also remember and still read how the rack boots you buy on Rock Auto and other places that are supposed to be for our cars do not fit properly. The main problem being the inner side of the boot is too big to fit snuggly on the rack. Then I came across a post somewhere that an owner used some boots that are for a VW and were made by EMPI part# 88-1509-K. I found them on Amazon and purchased my Moog outer tie rods there as well since they seem to have the best price. I started on the passenger side and disassembly is very straight forward. A few tips and things to remember. Tip 1 - The passenger side threads on normally, aka clockwise aka, righty-tighty, left-loosy. The driver side is reverse threaded so to remove it you twist the tie rod off in a clock-wise fashion. Tip 2 - Break the jamb nuts loose first, again following the info in tip #1. Tip 3 - Once you have the new rack boot on take a wire brush and clean the threads of the rack. This will make installing the new jamb nut and tie rod much easier. Tip 4 – Do not rely on the number of turns of the old tie rod to get you close. Due to variations in from one manufacturer to another you need to measure from a fixed point to the center of the joint of the tie rod. In my case this was 23.5cm on each side. The whole job was done with very little drama and only one minor injury, a decent size scrape on the top of my bald head. Tip 5 – Always wear a hat when working under a car! With the passenger side tie rod and jamb nut off the rack boot was literally falling apart as I pulled it off. Compared to the new one it looks like a very good match.1 point
-
I have been hammering out some odds and ends on the Z over the past few weekends. On a recent trip to a local car show a few weeks ago pecan and walnut debris started shooting out of the passenger side fresh air vent. When I was installing all the new blower motor components I vacuumed the opening out several times but once I reached 70mph it started shooting out. The image below is probably a familiar site to anyone that has owned a classic automotive that has spent time outside. [url=http://s87.photobucket.com/user/camaroguy1969/media/1971%20240z/Nov%202014%20Work/Pecans02.jpg.html] I popped off the cowl panel expecting to find more shells and debris but to my surprise everything was now very clean. I managed to vacuum up a few leaves of other things but that was it. With the inside vac'd as well I crossed it off the list. A quick project done!1 point
-
I wanted to do a trial fit of the blower motor assembly to ensure the top cowl seal was the correct thickness. Before I could this I discovered the mounting holes has been a little chewed up, probably by whoever messed with the A/C before and sprayed foam fill everywhere. No worries as a few minutes with a tap and some oil cleaned everything up. A quick test mount showed everything was good so I moved back to the heater panel and cables. Since my cables were not in good shape I sourced a used set on Ebay. They were exactly what I needed and cost me $40 shipped. I picked up a used dash HVAC panel off the Datsun parts Facebook page. It was pricey at $110 shipped but seeing that new ones are $300 and my old one was toast it was a good deal. It is in very good condition and had already been cut for a modern stereo. I chose to hold off on touching it up until it was installed. Then I went about the task of reinstalling everything on to the back of the panel. Before I installed the control lever assembly I cleaned and re-greased the lever pivot points. This should help to provide years of smooth action. I carefully went about the process of reinstalling it the panel in the car, connecting the fan speed motor, and hooking up all the control cables. The blower motor assembly was reinstalled for the final time and everything hooked up to it.1 point
-
One of the great things about older cars is the opportunities they present in bringing parts back to life. One such part for my car is the Datsun script emblem that goes on the hatch. I did a refurb job on a used emblem I got off of Ebay. It came out so well I decided to post a thread about it here -> http://www.classiczcars.com/forums/body-paint-s30/52715-diy-datsun-script-emblem-repair-refurbishment.html#post4606511 point
-
During the work week I heard back from the radiator shop and the news was not good. They could not repair the existing core and they wanted over $400 to re-core it. Their advice, just buy a new one. I found a Champion 3-row all aluminum radiator part# CC110 on Ebay for $215 shipped. The seller, Big Dog Performance was “Johnny on the spot†getting it shipped out. They were also wonderful to work with. Thank you Sue and Chuck! PLUG: If you need a Champion radiator for your Z they have the best prices and service. The radiator arrived safe and sound via FedEx on Thursday July 3rd. Below are the Christmas pictures showing how it arrived and unwrapping it. I must say my initial inspection revealed a high quality radiator that was well packed and well made. Being aluminum it was significantly lighter than the old brass radiator I pulled out. Installation was just the reverse of taking the old one out. One change I made was going back to the stock style mechanical fan. The electric fans I removed were triggered by a temp probe that had to be pushed all the way through the radiator core. I could not bring myself to start bending up the fins on a brand new radiator for the probe. The mechanical clutched fan is an extra I got with another car a few years ago. It was in good shape but I will eventually buy a new one along with an MSA shroud to match the rest of the near pristine engine bay.1 point