Leaderboard

 Subscriber


Popular Content
Showing content with the highest reputation on 11/11/2015 in all areas
-
1 pointGood to hear that you got a reasonable adjuster. Sounds like you're back on track. I thought of another possibility last night. This actually happened to me over the summer, I wrote about it on the site. The EFI relay could be failing. This last summer, several times over the course of a week my engine would crank endlessly and not start after a short shopping trip. I would wait, while thinking and hoping, then try again and it would start. In my case, I also had a switch for the fuel pump and used it to make sure the pump was running, as a test, because I thought that maybe the AFM switch was stuck (it's happened before). Even with the pump running, it wouldn't start and I could see the tachometer needle moving, indicating spark. So that led me to the EFI relay, which was actually an extra one that came with the car. I had always wondered why the PO had an extra relay, and after the no-start I realized it was actually the left-over bad one,which I had swapped back in to test if it was good or not. Anyway, just wanted to add that in there for the record. After it was out I took it apart and found that the solenoid coil was crispy and brown. CO said that was a classic sign of an overheated solenoid. Apparently, a wire in the coil can break and open the circuit occasionally giving random failures. The relay is hard to get to, but it can be unplugged and a replacement plugged in and left hanging, for a test. It's above the hood release lever in the cabin.1 point
-
1 pointJai, I have no experience with insurance in the US, but over here repair companies ask a lot more for repairs when you go through an insurance company. A repairer told me he would give me 25% discount if he delt with me directly and not the insurance company.You could ask the repairer what he would prefer and if he will give you a discount.1 point
-
1 point1985 and 1986 Mustng SSP ( Police special ) had 15 x 7" steel rims with a 4 x 4.5" stud hole spacing that should fit our cars. You can get these widened fairly easily at shops that deal with widening wheels. Fairly common on the East coast in the land of Nascar. http://www.sspmustang.org/parts/wheels.htm You can also look at Circle Track suppliers who make steel wheels. They can provide and width and bolt pattern. 15" is a common size in Circle Track ( Dirt and Asphalt ). You can also get 14". Companies like Diamond,Basset, Bart etc all service the Circle Track market and can make just about anything you want. probably going to be a custom order, but they are surprisingly cheap. Basset makes their popular " D " hole lightweight series in many different 15" sizes with just about any back spacing and any 4 or 5 wheel stud pattern. Widths in 7", 8", 10", 11", 12", 13" and 14" .... is 14" gonna be wide enough?? Link to 15" steel " D Hole " series: http://www.bassettwheel.com/dhole_lightweight.html They also make 14" rims in limited widths, but could probably custom make something. http://www.bassettwheel.com/14x7_14x8_dhole.html Edit: They also make 15" DOT legal rims. These are made of thicker rim material to meet DOT Street legal standards ( IE: New York potholes!! ) and as a result weigh more. If you're really worried about that sort of thing.... http://www.bassettwheel.com/dot.html Edit-2: Summit Racing and Jegs sell Bassett wheels.1 point
-
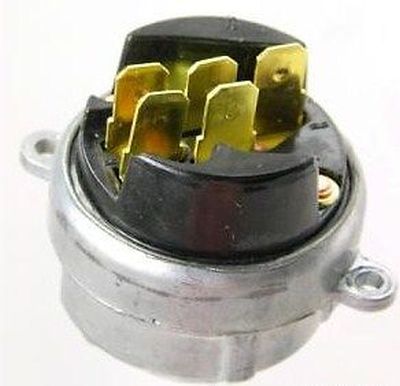
1 pointLikely not the only issue with RB but I am becoming suspicious of the ignition switch itself. It does not happen very often but they do go bad. If it were mine as long as we are trying parts out, I would try a different switch. I did have a spare so I will see if I can find it.
 1 point
 -
1 pointChas, when my ignition control module was going bad/gone bad it would show its ugly face driving it less than 10 minutes. I want to say more like 5 minutes IIRC. I have an extra ECU and ICM (TIU) that she can try if needed. But right now with everything thats been tested it seems to lean towards the ECU. But I'm no expert. What do you guys think, ZedHead, Chas, Site, everyone that has had their hands on it as well.1 point
-
1 pointOk I just skimmed through this thread real quick again and I don't see where the fusible links were checked. Were they? Jai, when the car stalls is it after hitting a bump in the road or something similar? Any jarring of the car? The reason I ask is I had a problem earlier this year with my car wanting to cut out on me. Was driving along and when I crossed the railroad tracks it seemed like it wanted to just quit but it didn't. Long story short. I had a bad connection at one of my fusible links under the white caps on the passenger side of the engine bay. Probably not the problem but would be a good idea to check them. If they are corroded they need to be cleaned. One less thing to worry about. And if they have been checked well then...........1 point
-
1 pointIf you don't have a PCV valve, the lower breather tube has to go somewhere. I've got one (a little strainer with a clear plastic bowl) between the breather tube and the PCV valve. It picks up about a tablespoon of oil per year. Don't want oil gunking up my PCV valve. Also have some clear fuel-resistant hoses going from the vents on the SU bowls to a catch can (vented plastic Sriracha bottle), so I'll know if they overflow. So far so good, but I can see how they might on a steep hill. So far they overflowed about one teaspoon in two years. It evaporated in the catch can. My floats are intentionally set a little high. Also have the coolant overflow from the recirculating tank going to a vented Sriracha bottle. So far nothing in it. Haven't gone up the mountain in summer since installing it, though. Catch cans required for race tracks as far as I know.1 point
-
1 pointI sanded my steering wheel down with steel wool. Started with coarse then worked down to 0000 polishing grade. Hit it with Mahogany stain. Then put about 5 or 6 coats of Tung oil, polishing each coat with steel wool before applying the next. The down side of this approach is that Tung oil has to dry for 24 hours between coats. But since the car is still in pieces, that isn't a huge problem. I painted the spokes with a gloss black paint before I started on the wood. It looks great, but I have no idea how long it will hold up. The car is in the garage, and I don't have access to a digital camera at the moment, or I would show you the result.1 point
-
1 pointrdefabri, here is a step-by-step on restoring your steering wheel courtesy of SZM. Enjoy. Sorry, no pics A Turn for the Better Refinishing the steering wheel on your 240Z is one of the easiest and least costly ways to upgrade the appearance of your Z’s cockpit. After all, the steering wheel is the one part of your car you see and touch every time you climb inside. In this article, Randy Lewis shares his experience from A to Z, having completed refurbishing the steering wheel on his three 240Zs. Follow his advice and in three hours or less (excluding driving time), even the greenest home mechanic will puff out his (or her) chest at the $15 refinished beauty. Difficulty level: 2 (10 being the hardest) Time: 3 Hrs Parts Cost: $15 Tools: socket set, philips screwdriver Overview After nearly 30 years of wear and tear, it’s amazing that most 240Z steering wheels have held up so well. Generally, these steering wheels suffer only a dull or worn finish on the rim, and perhaps spokes show chipped or peeling paint and a few rust spots here and there (Figure 1). Even in Arizona, where I live, the sun and heat don’t seem to have had an adverse effect on the rim as is typical with many American cars. The rim of the wheel is actually plastic, despite a rather realistic looking faux wood finish, fooling some owners. With age, the rim takes on a nice patina that tends to make it look even more like wood than when it was new. The trick to restoring a 240Z steering wheel is to enhance the rim’s patina, not remove it. Step One: Materials and Disassembly You’ll need the following materials to refinish your steering wheel, all of which you should be able to obtain at your local hardware store (Figure 2). • 220 wet/dry sandpaper • Very fine steel wool • SOS soap pads • Masking tape • One spray can of semi-gloss clear lacquer • One spray can of primer • One spray can of semi-gloss black To begin, you’ll need to remove the steering wheel from the column. This involves removing the horn pad from the center of the wheel (which simply snaps off as you pull it toward you) revealing a 22mm nut that secures the wheel to the column. After removing the nut, lock washer, and the spring-tensioned horn contact plate screws, you should be able to tap the wheel gently from behind, with equal pressure from both sides, and pull it free of the column. Once you have the wheel removed, take it to a sink or laundry tub large enough to submerge the entire wheel. Step two: Preparation The first step is to gently clean the rim and remove the years of accumulated dirt and grime. An SOS soap pad is the best way to do this without removing the patina. While running water over the wheel, or submerging it, slowly work your way around the rim with the pad, being careful not to bear down too firmly. You will notice the water turning an orange or brown color as the mild abrasive of the steel wool and the soap begin to work. When you no longer see color coming off the wheel, turn your attention to the spokes and center hub. Use the 220-grit sandpaper to smooth any imperfections from rust or peeling paint. Though it’s considerably more work, I would recommend completely removing the paint for the smoothest finish when new paint is applied. When you have completed these two steps, set the wheel aside to dry. When the wheel is dry, it will feel a bit rough to the touch. You’ll want to go over the wheel with very fine steel wool to assure that the surface is as smooth as possible. Again, be careful not to rub too hard and remove the patina. When the rim is universally smooth to the touch, carefully mask the spokes and center hub with masking tape (Figure 3). Step three: refinishing Once you have completed the masking, it’s time to spray the rim with clear lacquer. One very important note here is to spray several light mist coats (smoothing each coat with very fine steel wool between coats), rather than a single heavy coat. This avoids runs and orange peel; clear lacquer is especially prone to runs. In the event you don’t heed this advice, you will have the unpleasant task of removing the lacquer with thinner and starting over. Trust me on this one, I learned the hard way. Let the rim dry overnight to make sure the finish is good and hard. If you notice some variation in gloss level once the lacquer is dry, you can even out the finish by burnishing the rim with a paper towel, which acts as a very mild abrasive. Next, remove the masking tape from the spokes and center hub (checking to make sure that no sticky residue remains) and carefully mask the rim. You will find it helpful at this point, prior to spraying, to suspend the wheel with a wire coat hanger, giving you the ability to spray both sides of the wheel simultaneously. Spray the spokes and hub with primer as a base coat for the final finish coat. You will want to lightly sand the primed areas prior to spraying the semi-gloss black, in order to achieve the smoothest final finish. I have found the most durable and smoothest finish is obtained using high-temperature engine enamel. When you are satisfied with the results, simply remove the masking tape, reinstall the steering wheel in reverse order and go driving (Figure 4). When someone at your next club meet asks where you got the new “wood†steering wheel, tell them you found it in Sport Z Magazine for $15.1 point