


Leaderboard
-
rossiz
Free Member2Points1,109Posts -
grannyknot
Free Member1Points5,158Posts -
Captain Obvious
Free Member1Points10,081Posts -
240260280z
Free Member1Points5,426Posts


Popular Content
Showing content with the highest reputation on 06/30/2015 in all areas
-
If you are not on the list just reply to post and I'll update then delete your reply. 240tom Tom & LorriBlue Philip & JanetBpilati Bryan (TZCC)Captain Obvious Bruce and a pet unicorn?Carl Beck Carl BeckDiseazd Guy & BrendaGnose John jfa.series1 Jim & VickyMadKaw SteveMike W Mike & AlexPatcon Charles & ShelleyRyanT67 RyanS30Driver Jamesscarguy055 ScottSiteunseen CliffSteveJ Steve & Wendy (TZCC)Zup Jim1 point
-
Passed inspections with my silver 240z! And my blue barnfind moved by itself for the first time since 1996! ðŸ‘ðŸ»ðŸ‘ðŸ»ðŸ‘ðŸ»ðŸ‘ðŸ»

 1 point
 -
1 point
-
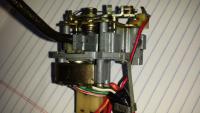
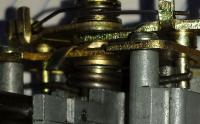
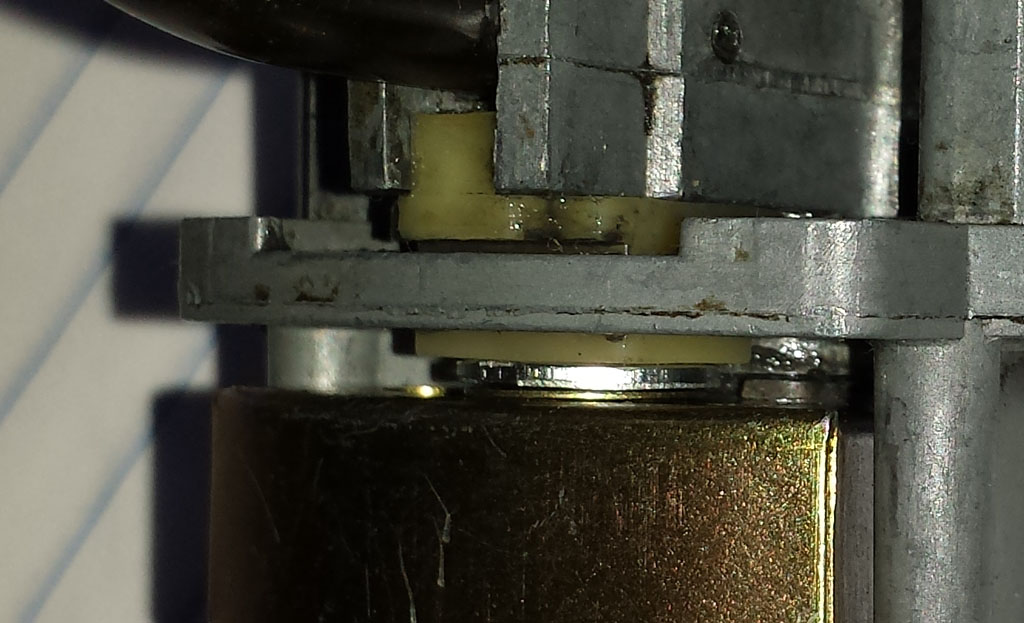
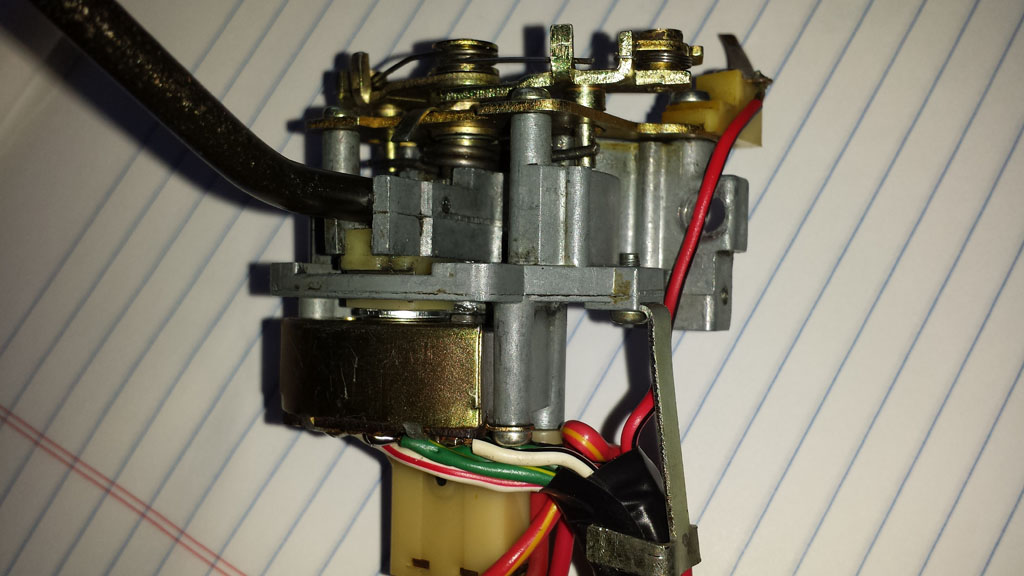
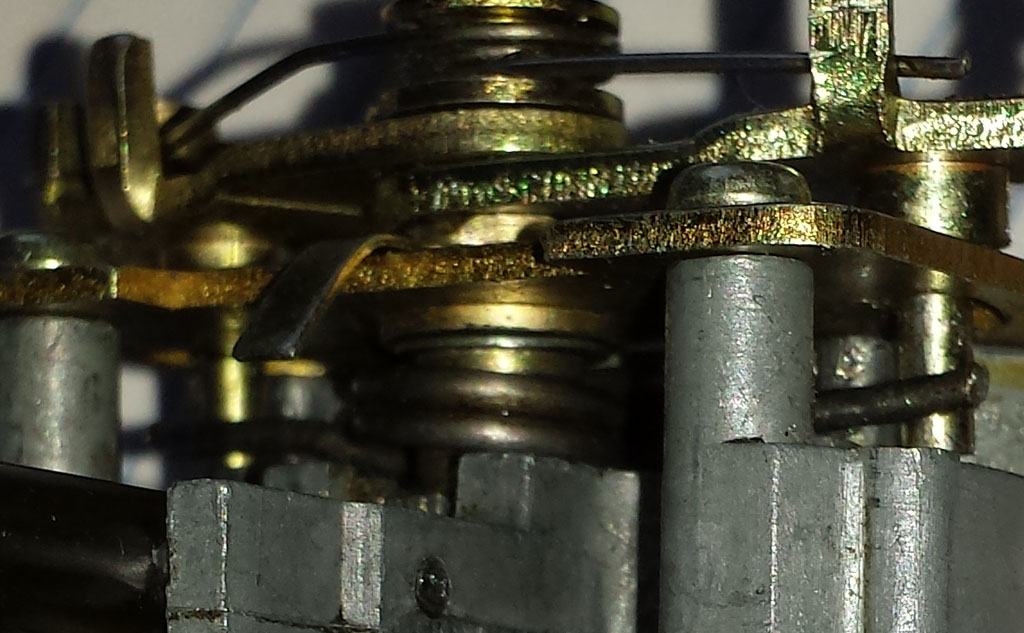
1 point1 pointa very simple thing to check: there are spiral hoses (like little versions of the hose that comes out of your clothes dryer) that duct the system. they have a foam seal that disintegrates and then they fall off their ports. get your yoga pants on, put your head under the dash upside down and look up on either side of the console and you'll see 'em. mine were both disconnected and just hanging there - an easy fix if you're lucky.1 pointNamerow, Yeah, I wouldn't be surprised if there were some differences with the earlier cars and I probably should have accounted for some of that. Sorry for any potential confusion and I'll take a look at the older wiring diagram and see what I come up with.1 pointBecause if it involves a laptop, I'm an idiot. If I had been exposed to it as a kid I would be fine, but now, forget it. I did mange to get the 123Ignition distributor programed, I was pretty proud of myself. But engine management, that sounds a lot harder.1 pointIf the car is complete, runs, drives, stops, and handles decently, buy it. Series-1 cars are indeed getting hard to find. The pictures you posted could be a repair from many years ago but it is hard to say exactly what they are. With no other pictures to show us, if it is all there and runs, at $6K you could buy it, clean it up, take some good pictures of it, and probably turn a decent profit. There are basket case cars with asking prices of $5K. The market is definitely moving with the Series-1 cars being the fastest. Buy it before someone else does.1 pointLike many of us with 40+ year old cars, components get old and tired, among them being our Turn Signal Switch Assembly. I had a recurring problem of not flashing the front passenger turn light and the dash indicator light. At first, I disassembled the slide switch and cleaned the contacts. This helped for a while. Then next time I disassembled the unit, the contacts looked clean enough so I did some continuity tests on the switch itself. the lights worked OK with the un-mounted switch but failed again after re-assembly. Jiggling the loosely mounted switch got an intermittent operation. Observing the operation of the switch I noticed there was a lot of free play in the various mechanisms. The switch consists of two main diecast components, the main casting and the pivot casting. The pivot casting mounts the turn signal lever, has detent balls/springs, connects to the slide switch through a nylon coupling. The top of the pivot casting has a press fitted stepped shank. This shank serves a bearing point and inserts into the top return pawl assembly. Between the pawl assembly and pivot casting is a torsion spring that snaps the pivot casting and lever back to the center detent position as the pawl cancels the signal. Upon dis-assembly I noticed two sources of the free play. First the nylon coupling connecting the switch to the pivot casting has shrunk over time. This is not unusual for nylon as it normally retains some water from the manufacturing process. The second issue was more problematic. The stepped shank press fitted into the pivot casting was now only loosely captured. And since the torsion spring continually presses on the shank, it tilted the shank and caused a wobble. This worsened the twisting of the nylon coupling. When the shank was pushed down into its former seat in the pivot casting, it was square and true. But as soon as any side load was applied, it cocked and the wobble began again. My first corrective action was to insert a 0.050"thick #8 washer over the post on the switch between the nylon coupling and the existing brass washer. This did a lot to control the twisting of the nylon coupling but the switch operation was intermittent due to the wobbling of the pivot casting. It was obvious that the severe stress of the torsion spring on the stepped shank and the nature of the zinc diecast material was going to make any re-staking of the shank problematic and short lived. Examining the bottom plate of the pawl assembly revealed a doubling washer to aid in making adequate sides to pivot surface. It occurred to me that if I could insert a shim between the doubling washer and stepped shank, I could hold the shank square. Assembling without the spring and using a feeler gauges, I was able to determine the free space was just about 0.018". I knew brass washers of similar thickness were used in clockworks, so I headed down to the local Ace Hardware. They didn't have any washers that thin, but we found a #8 spring washer exactly the right thickness. Getting the spring back into position with the wobbly shank proved to be a challenge, but when finished the entire switch assembly now works as good as new - or even better. If you attempt this repair, I would suggest NOT removing the torsion spring. When replacing the pawl mount plate, squeeze the pawl assemblies together, engage the stepped shank into the doubler washer, and firmly urge the plate into position to take the retaining screws. If you look carefully at the above photos, you can identify the added washers.

 1 point


Important Information
By using this site, you agree to our Privacy Policy and Guidelines. We have placed cookies on your device to help make this website better. You can adjust your cookie settings, otherwise we'll assume you're okay to continue.