All Activity
- Past hour
-
 Or it might be that it's not even worn in yet. I don't see hot spots.
 -
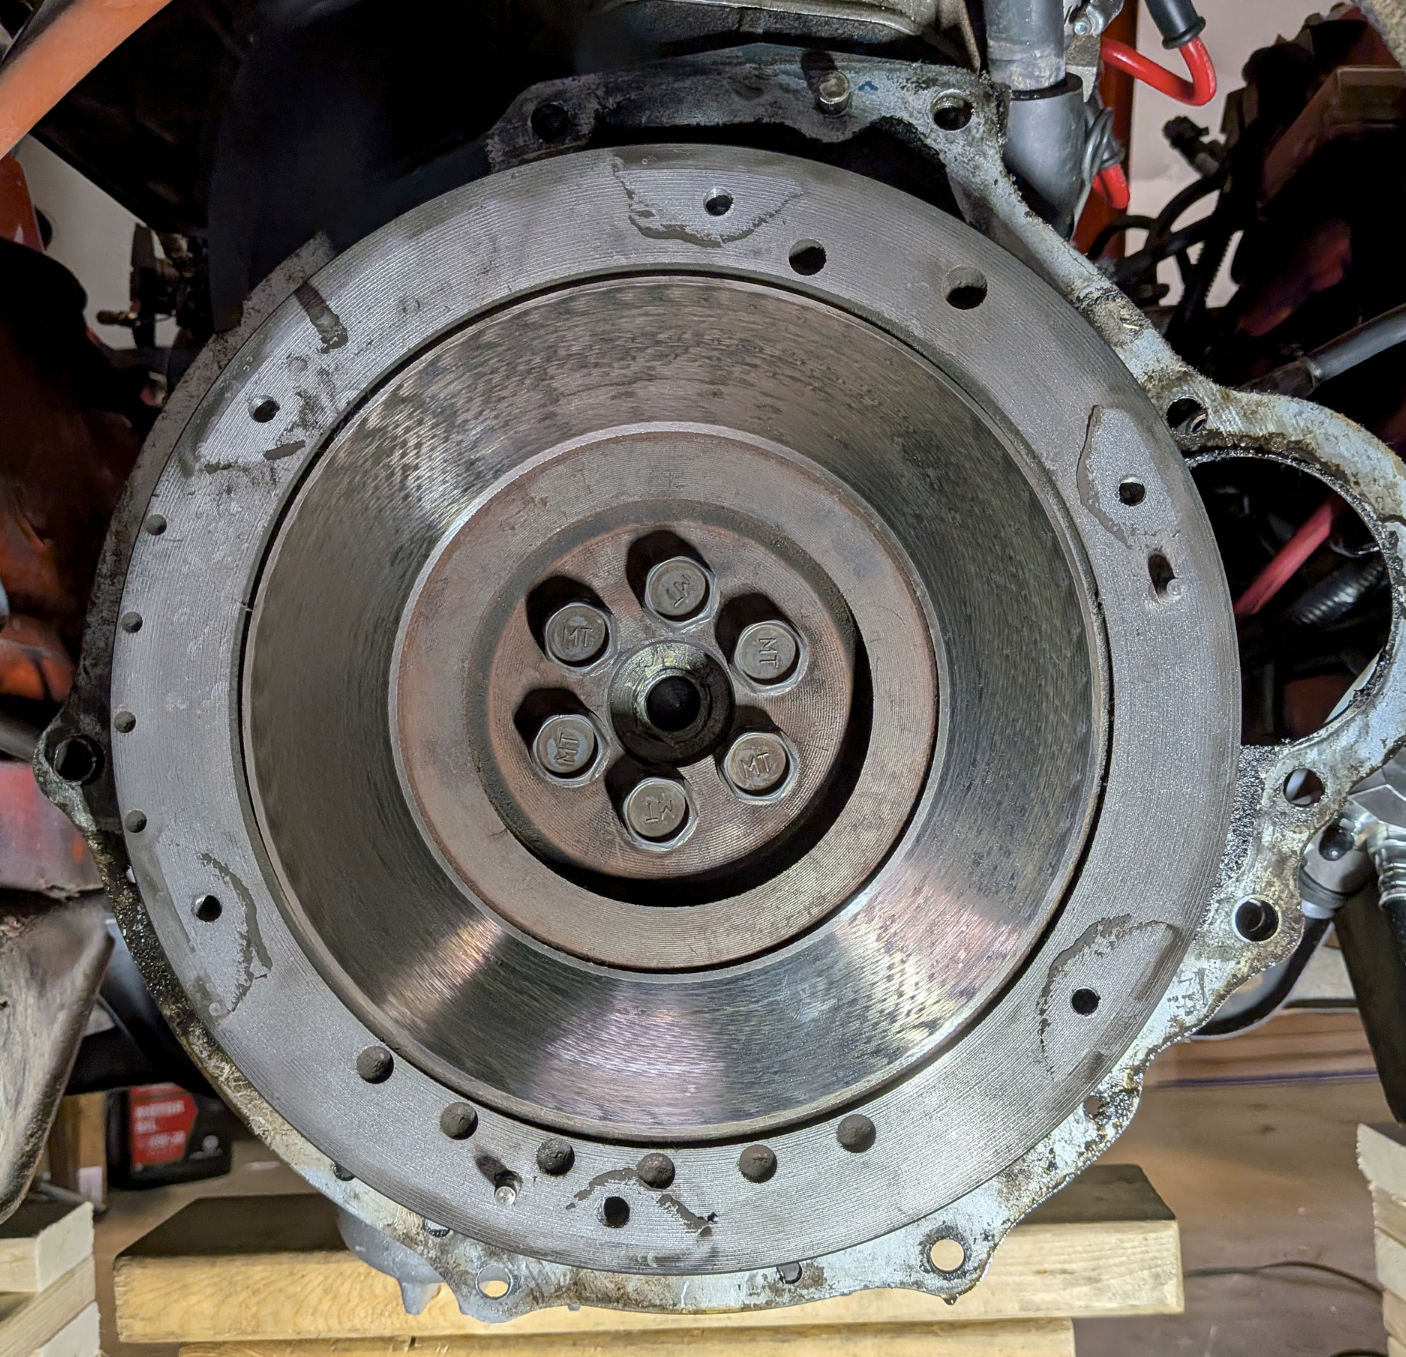
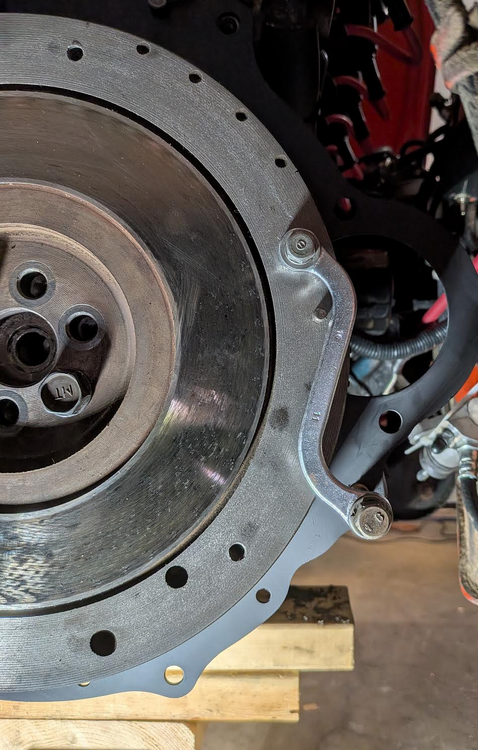
 Shoot, I wish I would have posted my flywheel's picture for you guys to review too. Here is what it looked like when I removed the clutch disc: Previously I didn't have any clutch slipping/disc chattering issues. My plan is to install the turbo next year and replace the clutch with a beefier version if it is needed. Either I will re-surface the stock flywheel then or go a with new lighter version, I will have to do a research about it/ask the forum for an opinion. Appreciate your input.
- Today
-
 The reference points used to generate that 913mm measurement are tricky to replicate in practice. If you look closely at the small sectional drawing of the front shock tower, you'll see that the 'A' point actually lies on the plane defined by the underside of the shock tower cap. You can't measure at this plane unless you remove both front struts and then use either a trammel bar or a plumb laser. So, instead, you have to measure across the tops of the shock tower caps. But... Not so apparent from the sectional drawing, but very clear to the naked eye, is that the shock tower cap has a lip on the top (this is a little more evident in the sectional drawing of the rear shock tower that appears on the right side of FSM Dwg. BF-3). The top of this lip sits (by my measurement) 13mm above the bottom (reference) surface of the cap. So when you take the 13.5-degree cant of the front strut into account, it means that if you measure the A-A distance at the top of the lip, the result it will be somewhat less than if you were measuring at the (intended) bottom surface of the cap. My calculator says that 'somewhat less' = 7mm, so a measurement of A-A taken across the top of the lips should be 906mm. Now, if you left the press-in black plastic trim buttons in place (did you?) and took your measurement across the top of the buttons, you'll be measuring at a plane that's even higher above bottom (reference) surface of the shock tower cap. 906mm will shrink to ~ 902mm (est). Also: It's difficult to make this measurement accurately with a steel rule or (worse still) a tape measure. The correct way is to use a trammel bar*. If you used a steel rule or tape measure, your measurement accuracy will be no better than plus/minus 1mm (and more likely only plus/minus 2mm). * You can make your own single-purpose trammel bar. Start with a 4-ft (1219mm) length of 1" x 2" lumber and two 6-inch lengths of straightened 0.032" wire. Drill a slightly undersized hole into the flat side of each end of the wood strip (drill all the way through) and then press the wire lengths into the holes. The holes should be about 900mm apart. Now, using 1-qt paint cans sitting on each front fender, support the wood strip (your 'trammel bar') above and across the shock towers. Adjust the projecting length of the wires as required. Then line up the tip of the LHS wire with the centre of the LHS shock tower trim button. Then -- taking care not to disturb the trammel bar -- bend the RHS wire until its tip aligns with the centre of the RHS shock tower trim button (you may need to go back and forth a bit, until you're satisfied that both wire tips are correctly aligned with the centres of the trim buttons). To get your final measurement, transfer the paint cans and the trammel bar to your shop bench (don't disturb the wires!). Then position a steel rule on the bench top so that it sits under the wire pointers and take your measurement.
 -
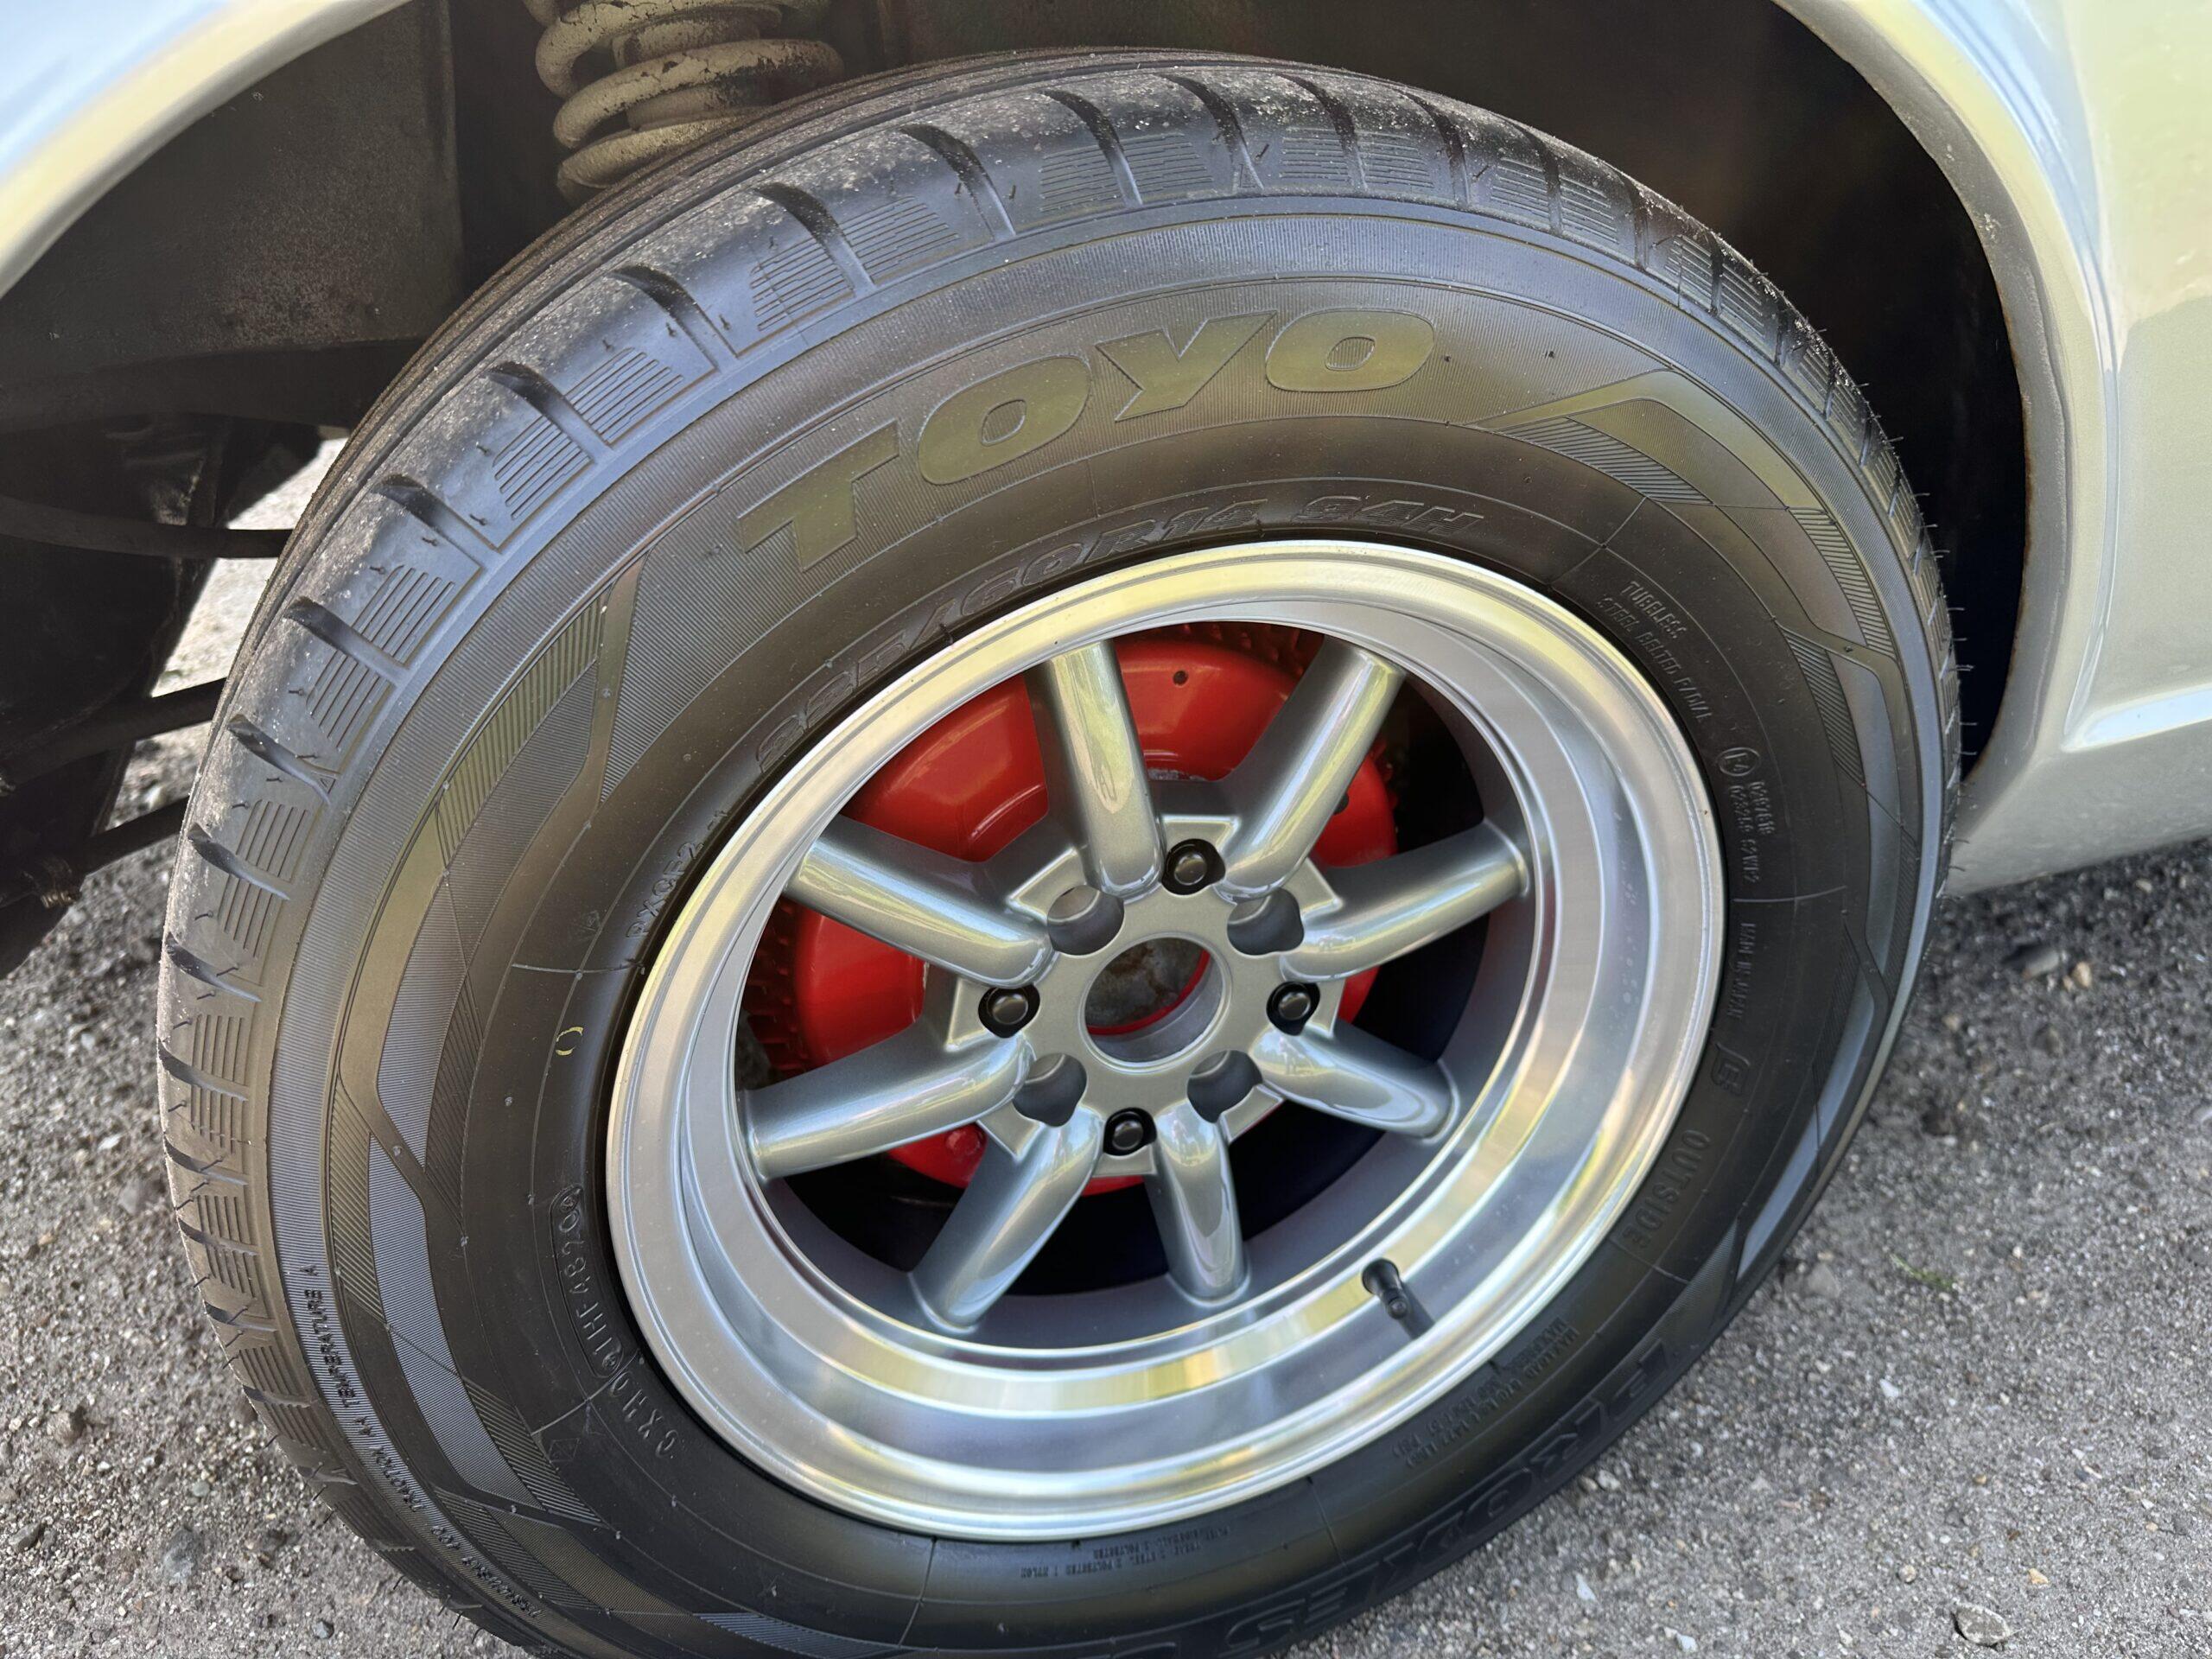
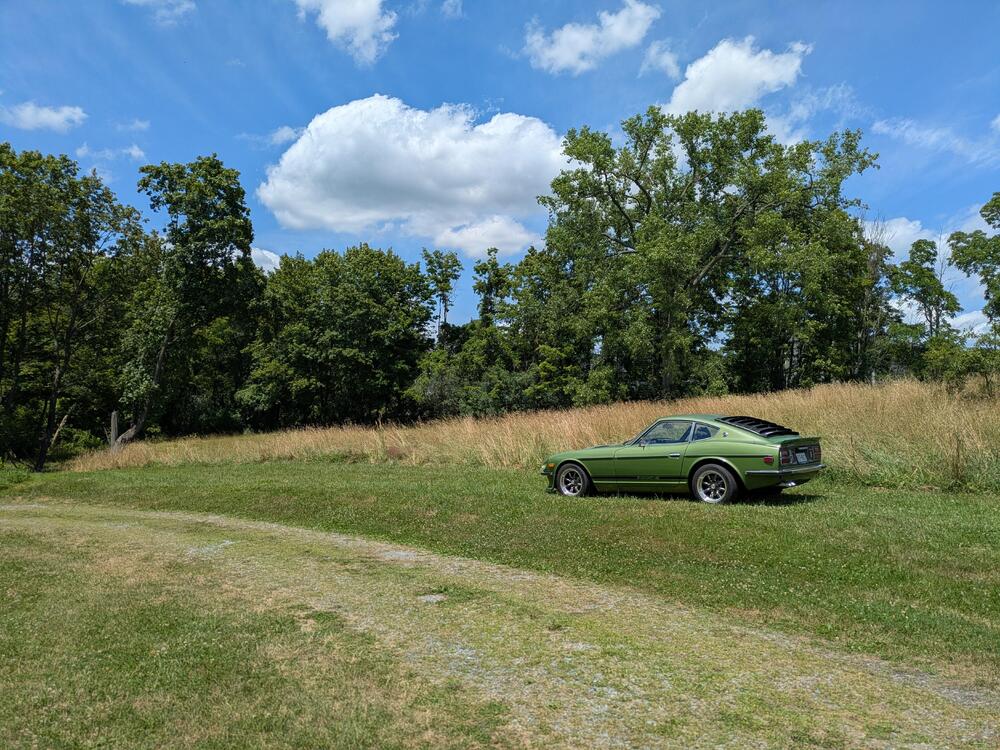
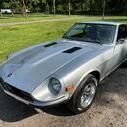 Bit late to the party but I believe my 280z came with the same or allmost the same wheels. Don’t know if they are modified as I haven’t taken the wheels off yet but I must say they look pretty good under my silver Z. Attached is one of the pictures from the auction I bought the car from. The seller also included the original set of wheels but I prefer these. Tire size is 225/60R14 in the rear and 195/70R14 in the front.
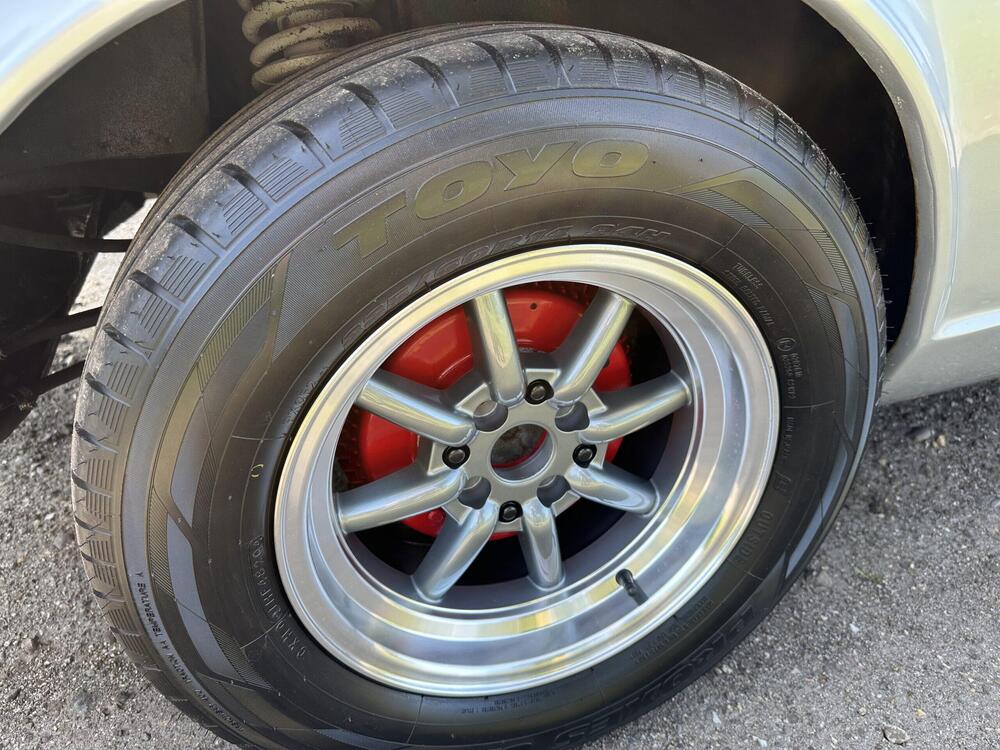
-
 @Patcon Having said that, I just looked through the excellently-researched 'Vintage Z Restoration Program Historical Compendium' put together by Chris Wenzel @26th-Z and he too specifically quotes powder coating as having been used. From the Compendium: "Nissan literature talks briefly about updating some aspects of the 240Z. A 3-row radiator was used and the tire specification was updated. In an effort to provide more durability to suspension components they were powder coated "to factory colors" so as to "ensure that you will enjoy your 240Z's performance for years to come"." Obviously it's a quote from NMC USA's VZ Program sales literature, so I don't know if that was the reality or not, but the fact that the independent Japanese journalist who visited Pierre'Z in person reported the same thing might suggest something. Of course he could simply have been quoting the literature, I don't know. I've always found powder coating to be much too thick on such parts, and there's always an issue where the powder coating transitions to a wear/bearing/mounting surface. I've seen it peel away in those places, so I much prefer paint (as per original manufacturing). Inspection of a few VZ Program cars would probably settle the question as to what was actually applied on them.
 -
Mitchel0407 changed their profile photo
-
Maybe a bit late to the party but I’ll be using this thread to rebuild my 1977 280z door hinges as the passenger side in particular sages so much that the door won’t even close anymore. Any tips on removing and installing the doors on a 280z? The tricky bit is that they are bolted from the outside and I don’t want to remove the entire front end.
-

-
-
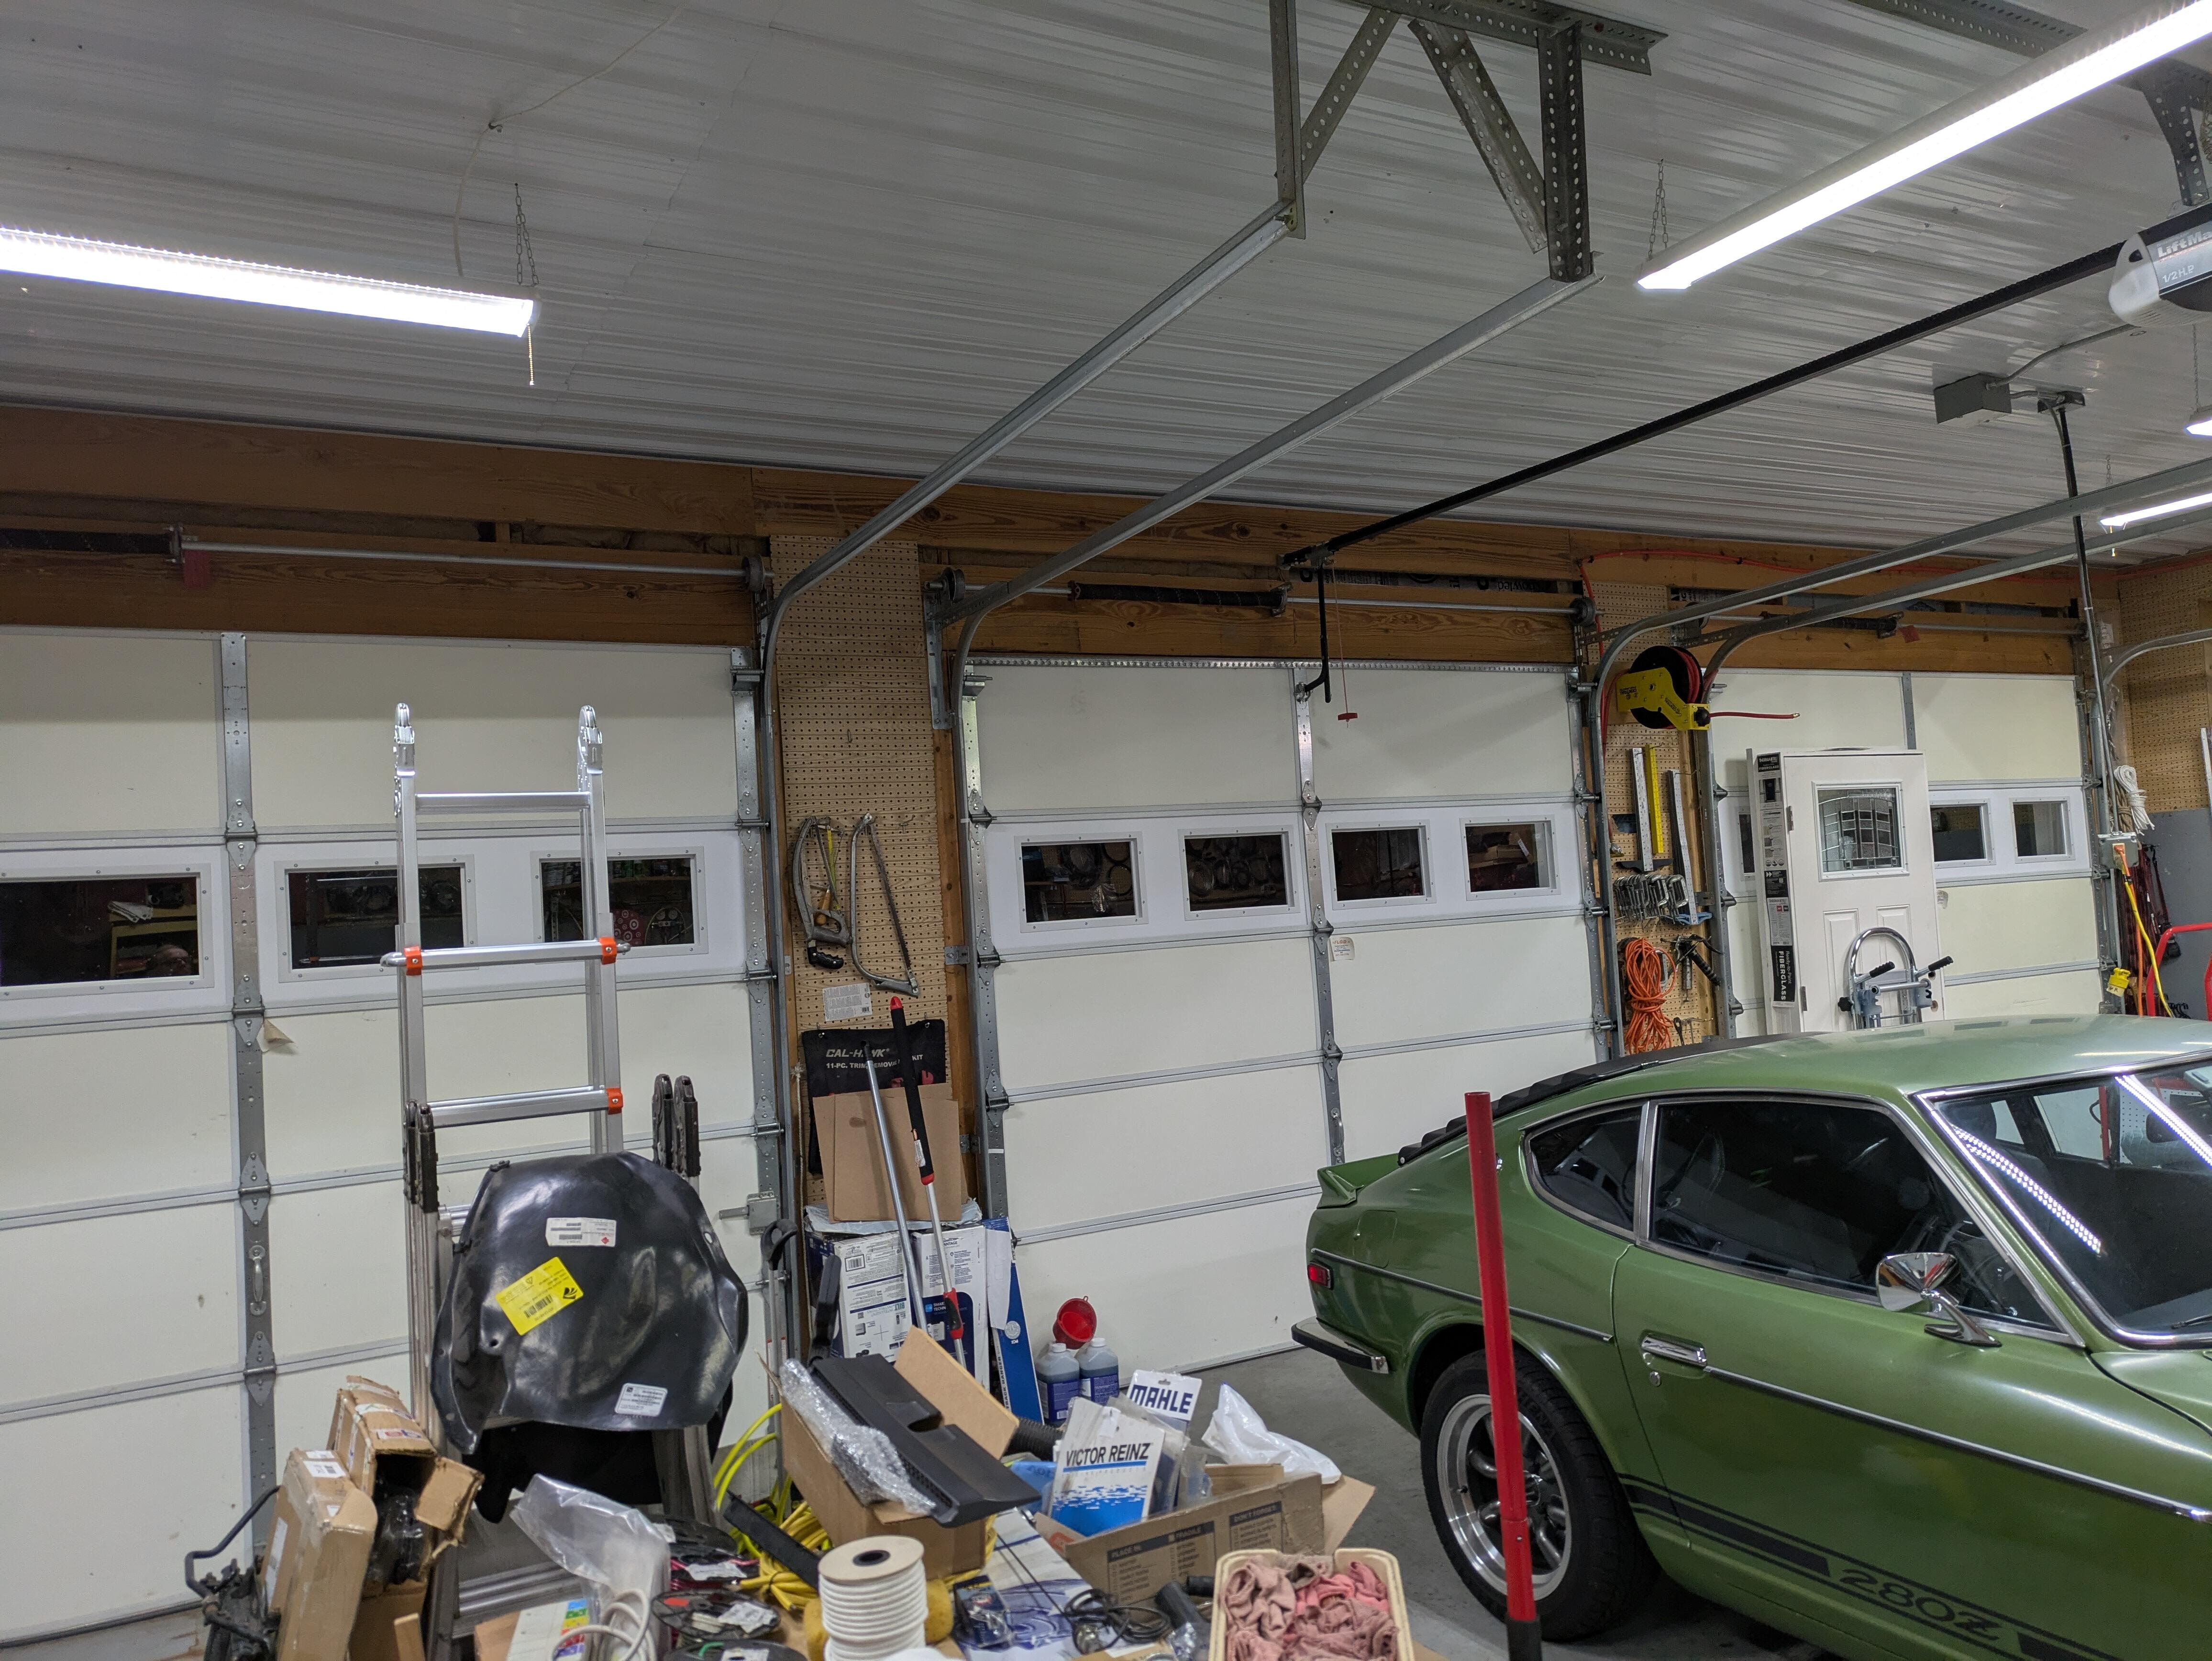
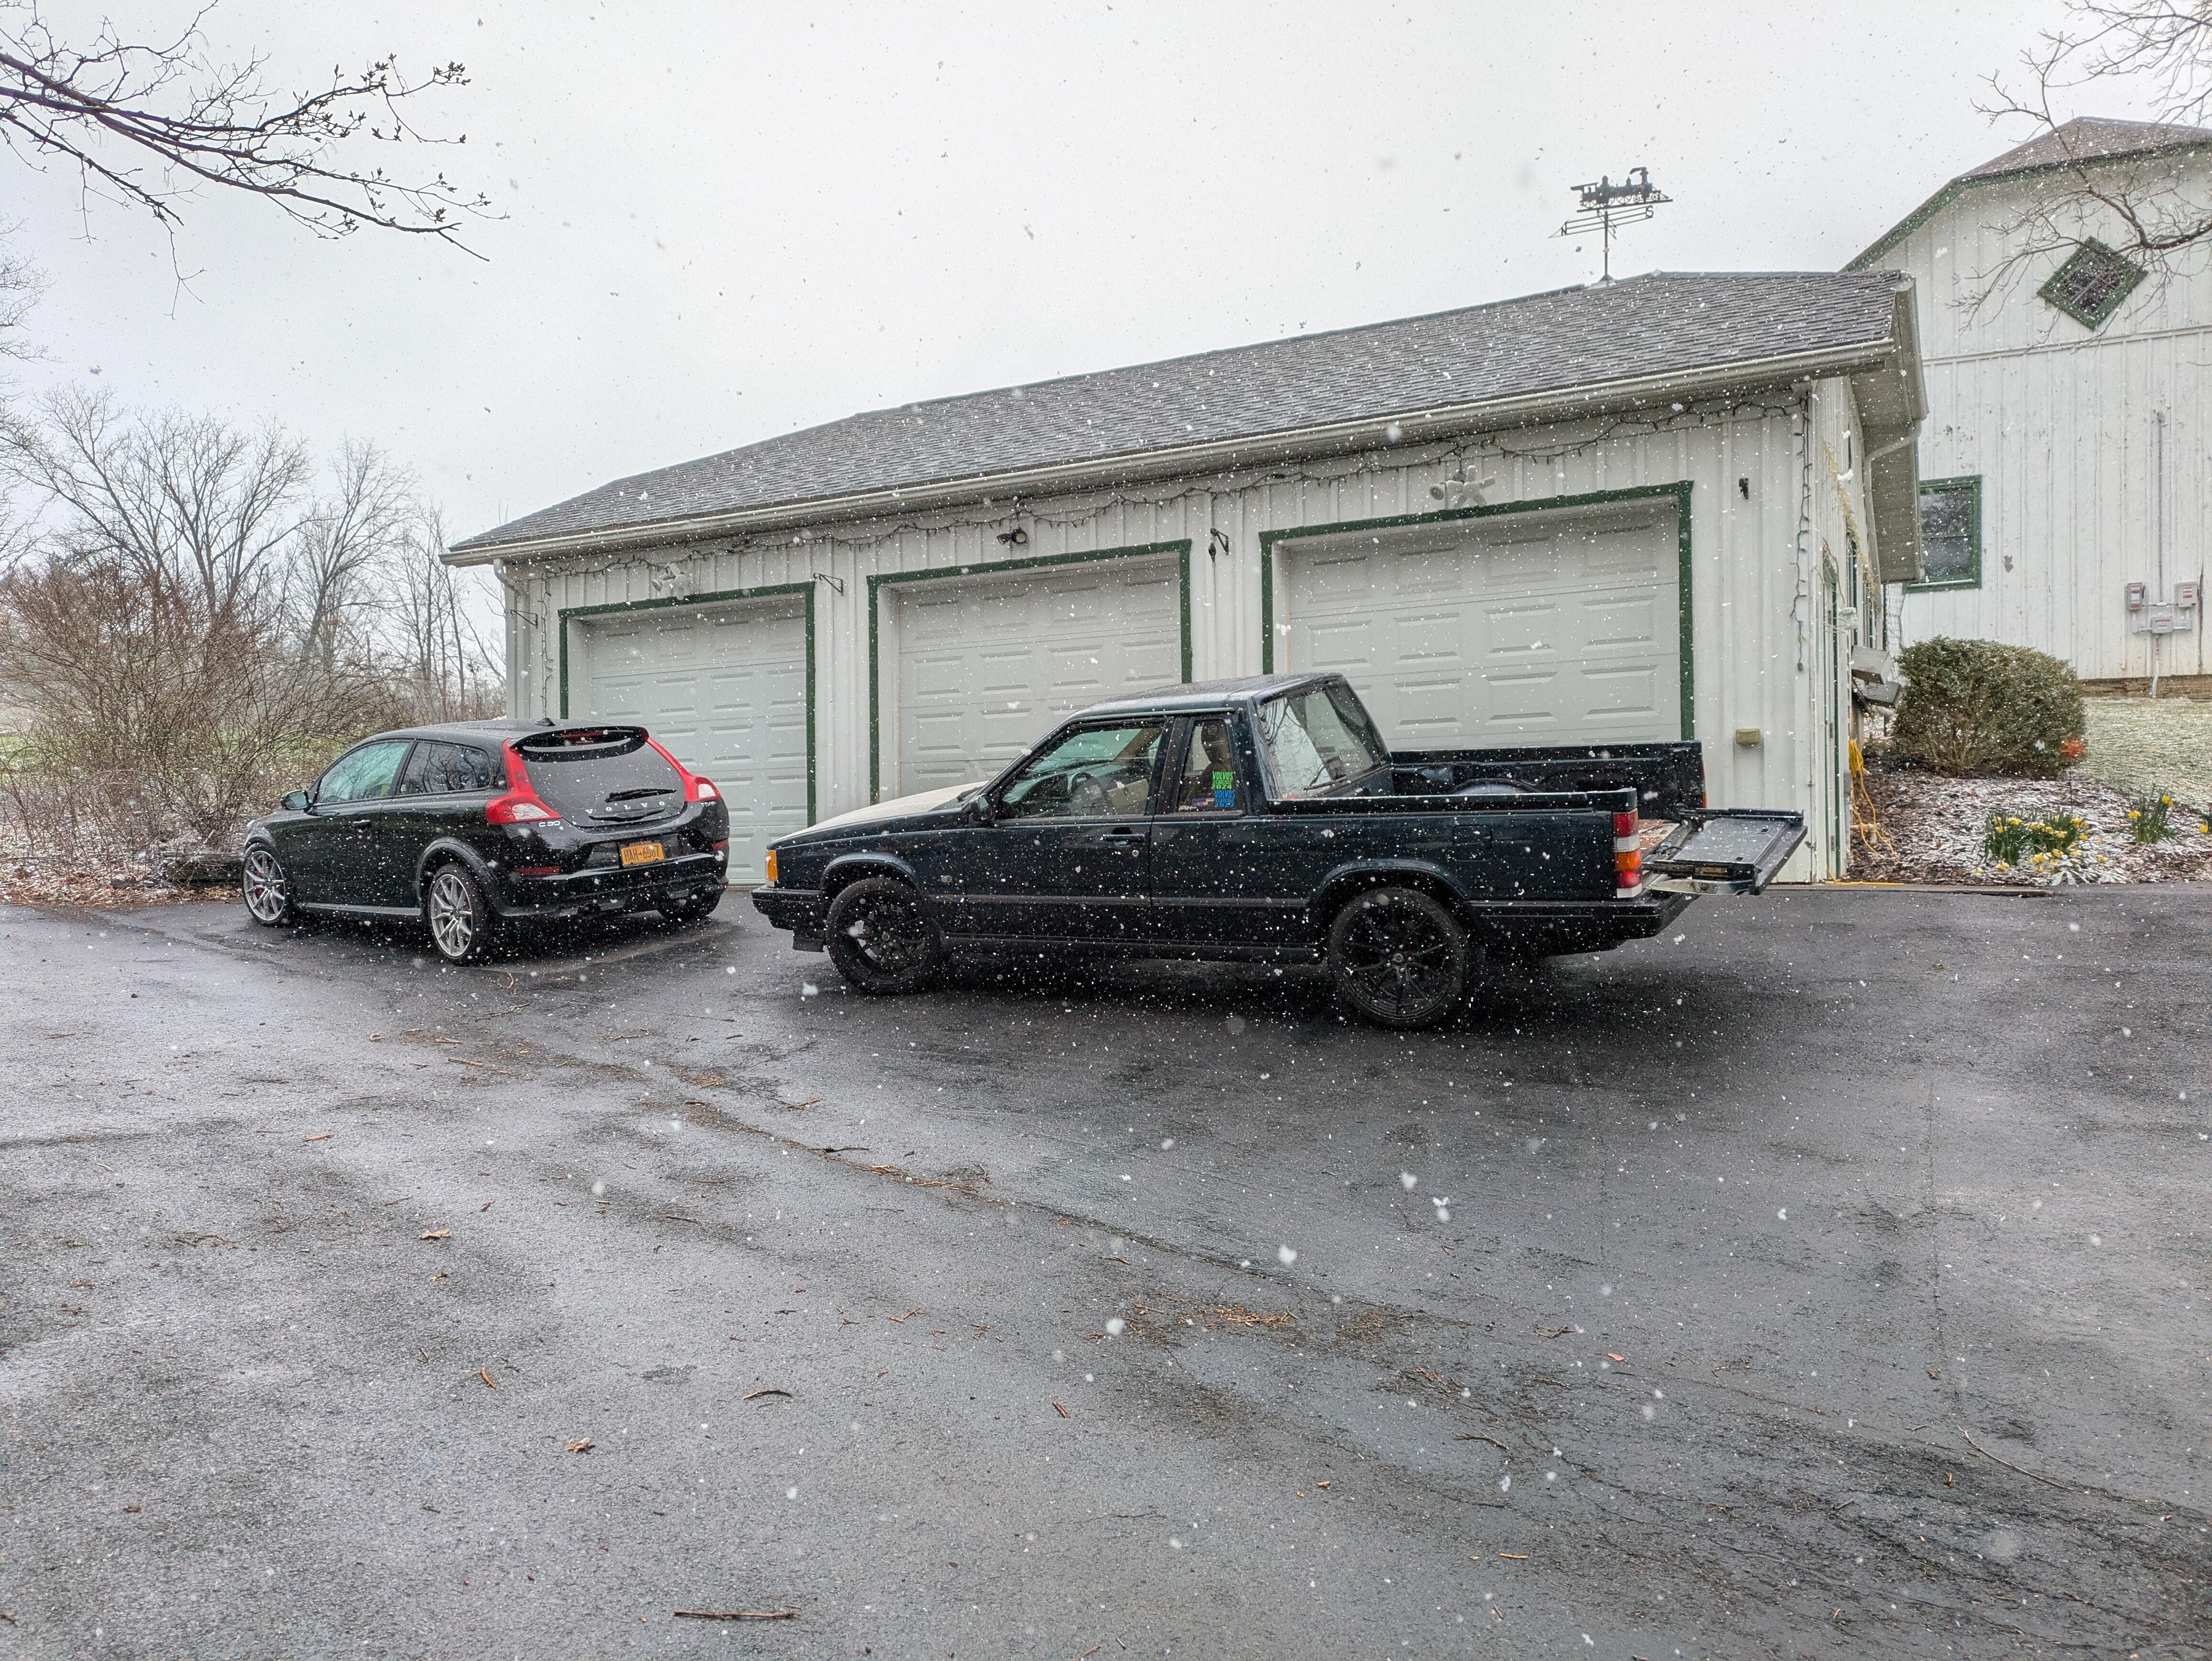
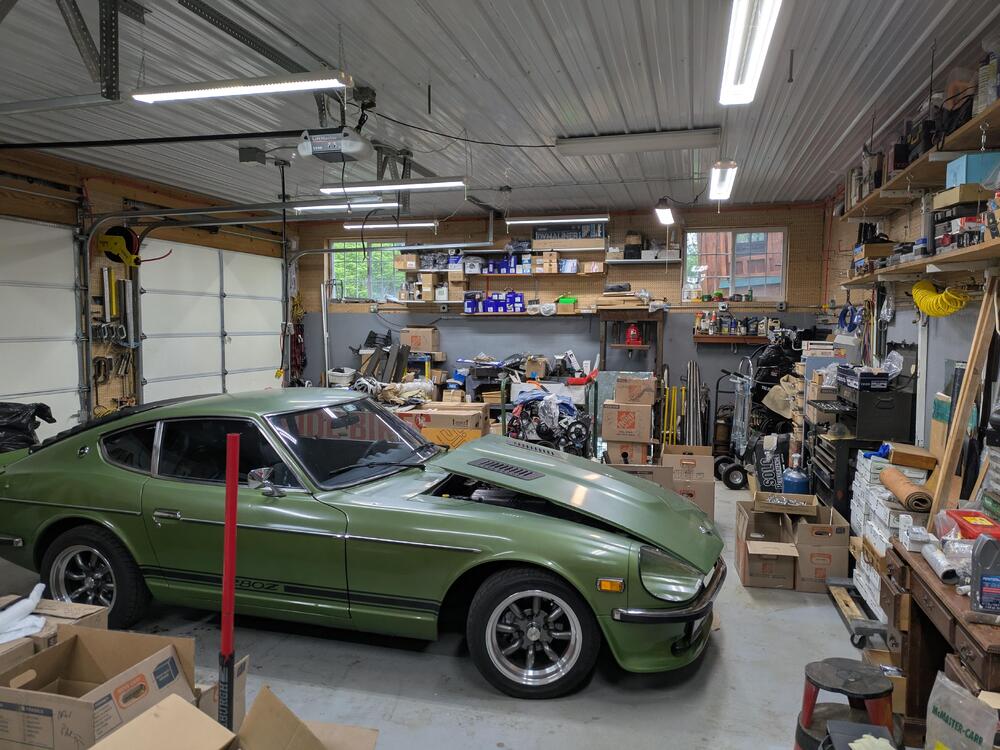
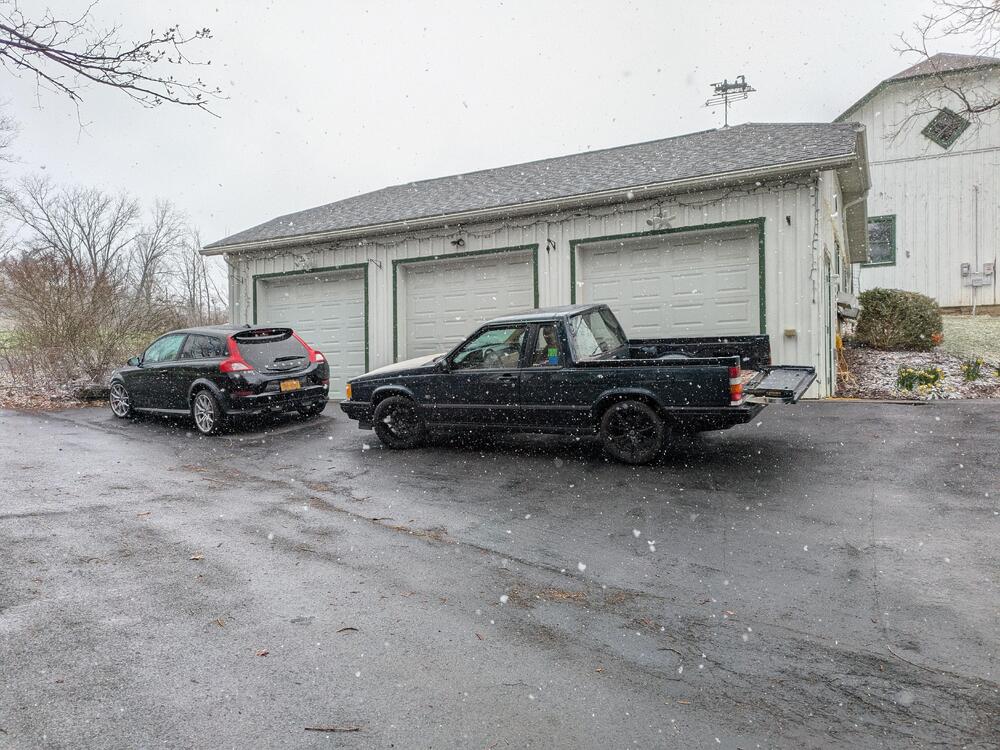
 Very cool! Looks like the new shop is a nice upgrade. Looks like you might have more acreage too...
 -
I think Yarb's thought might be it needs surfacing.. There are some chatter marks and possibly some blue hot spots too. Yarb, be me to it by seconds...
-
 IMO that needs to be machined and cleaned up. From what I can see you have hot spots.
 -
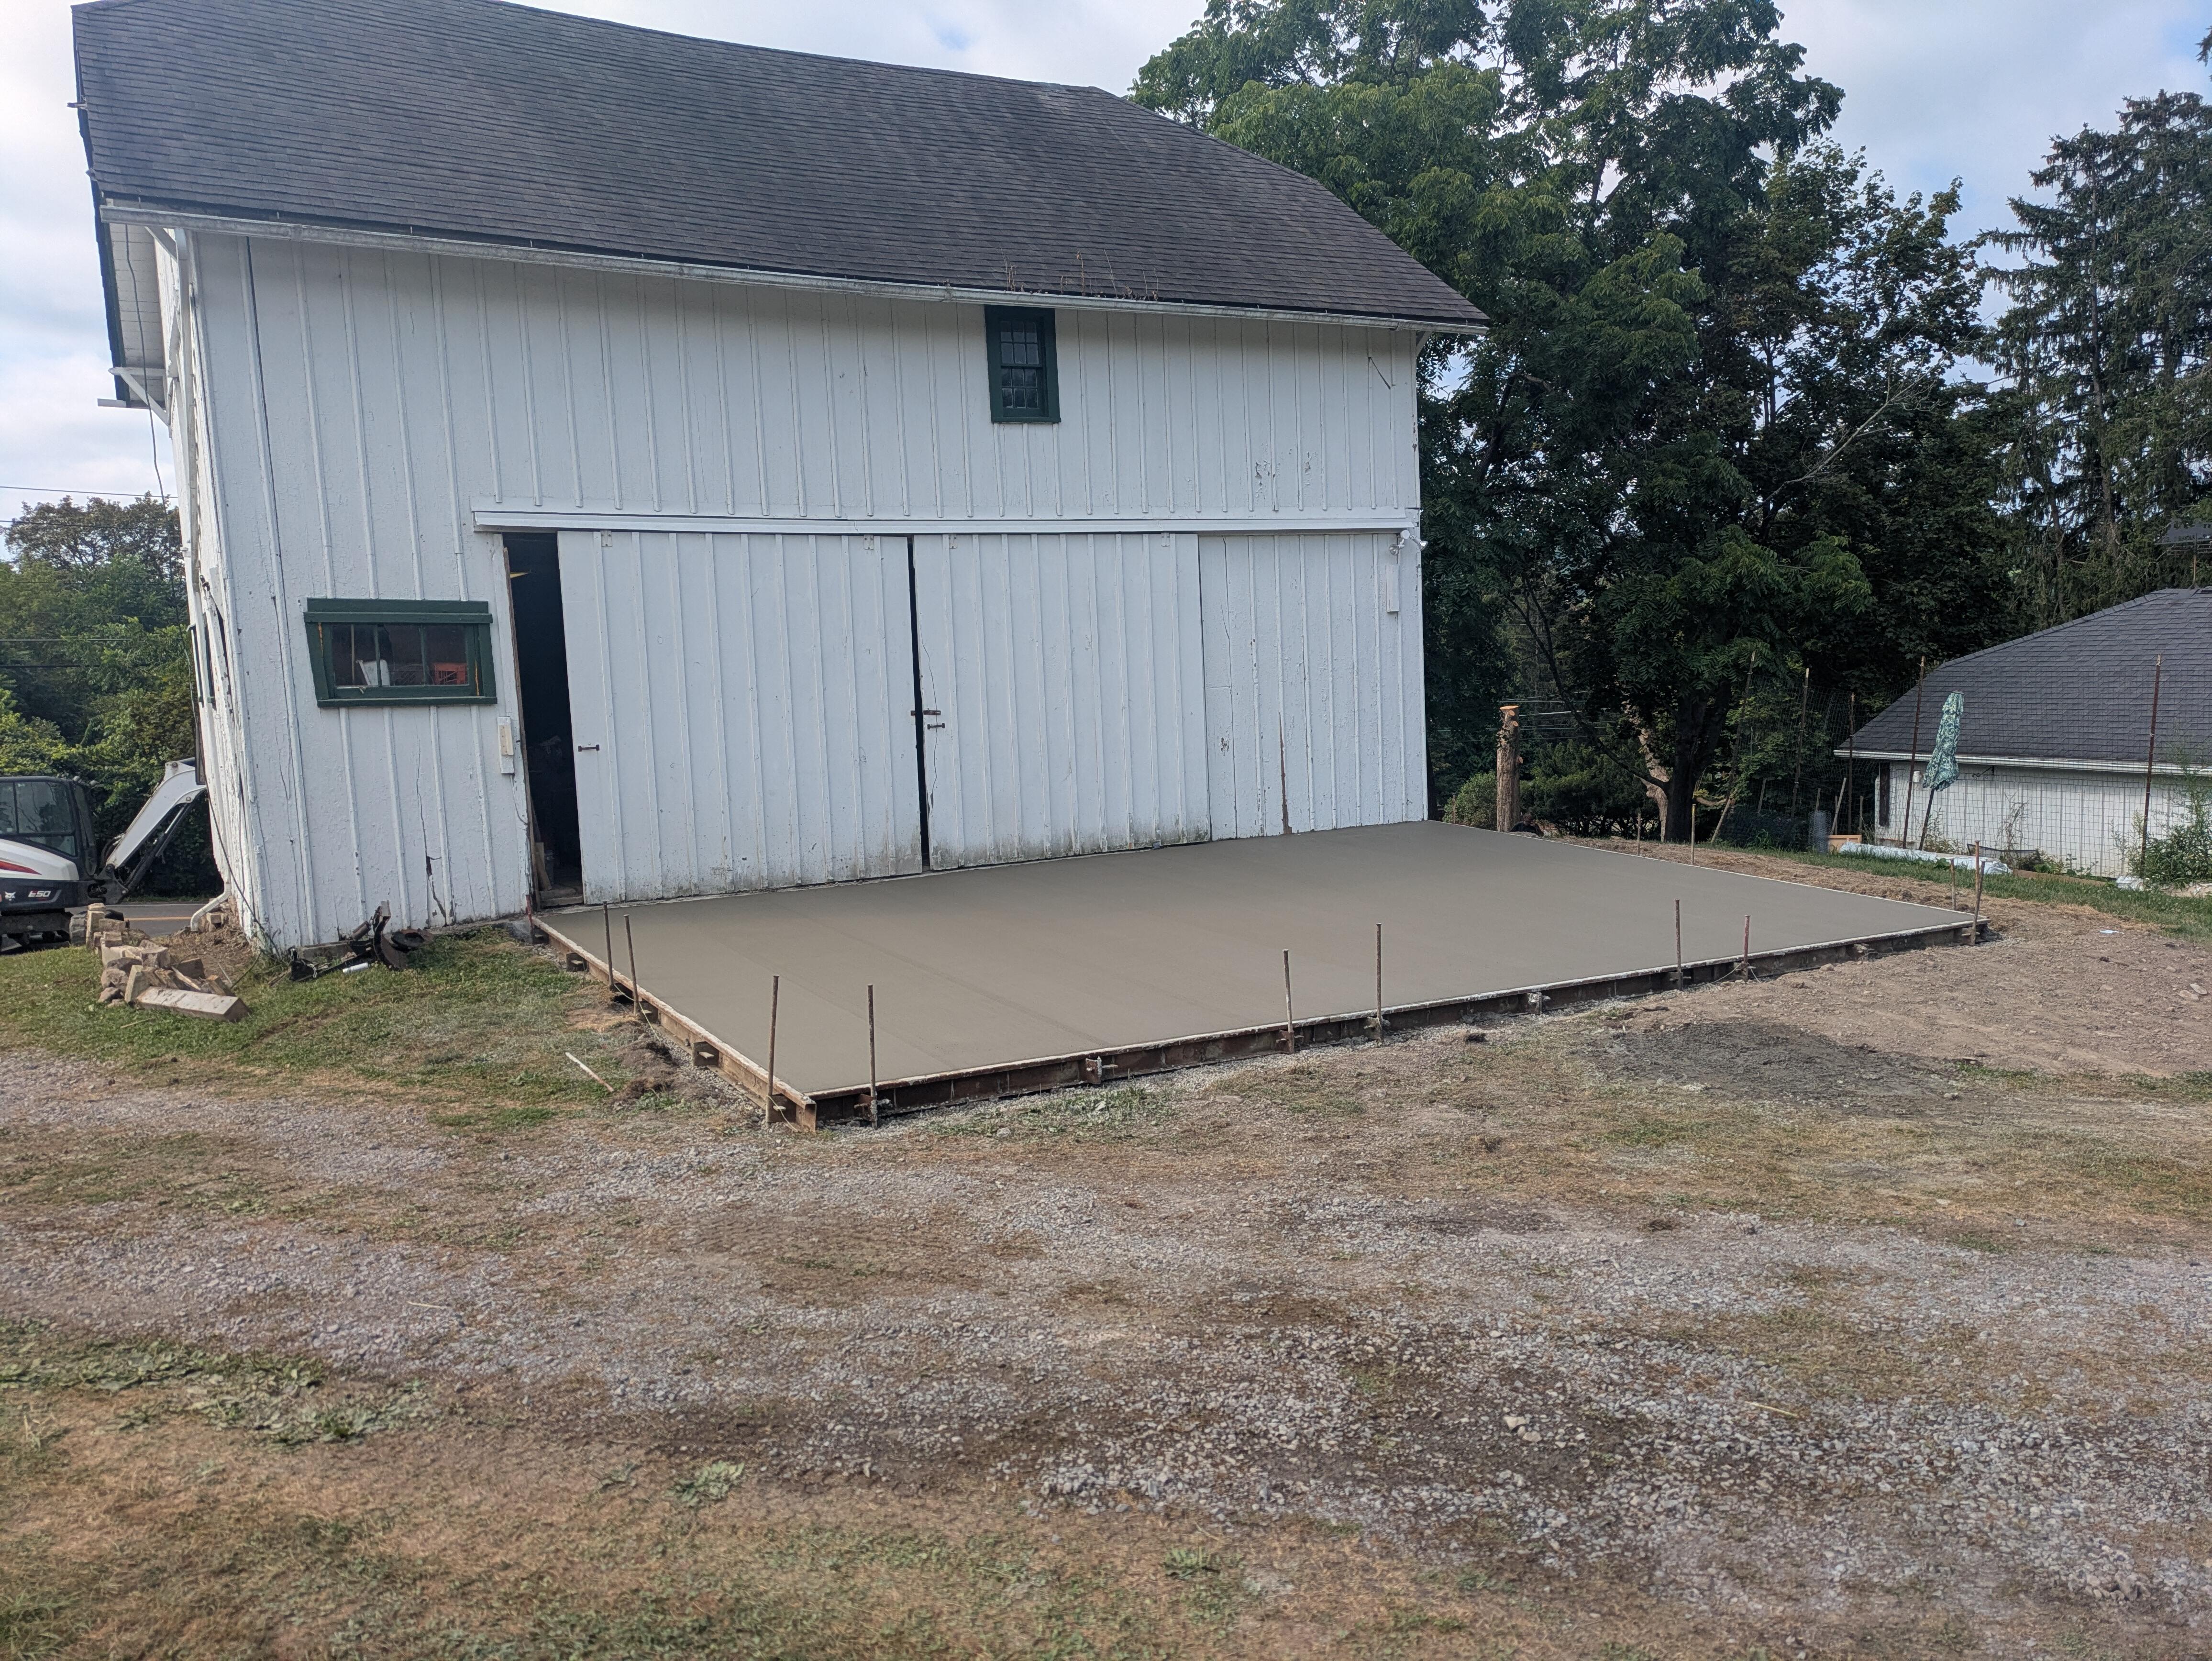
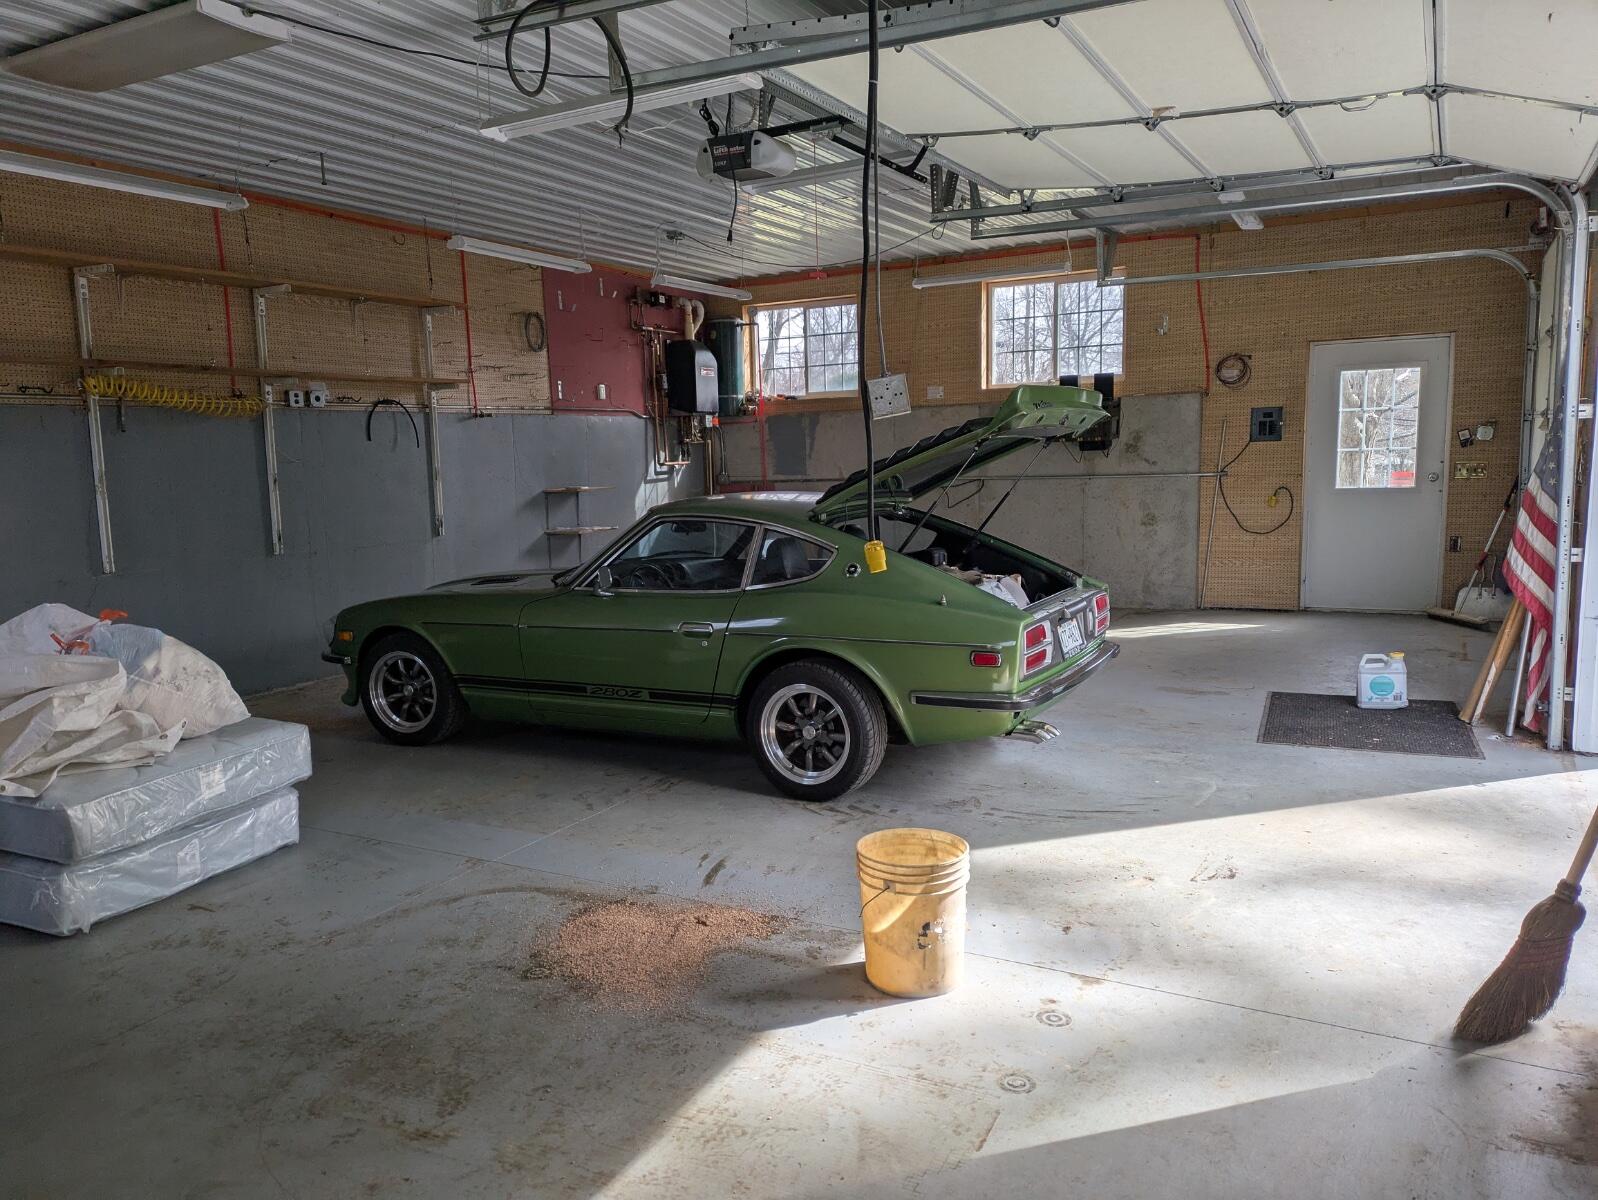
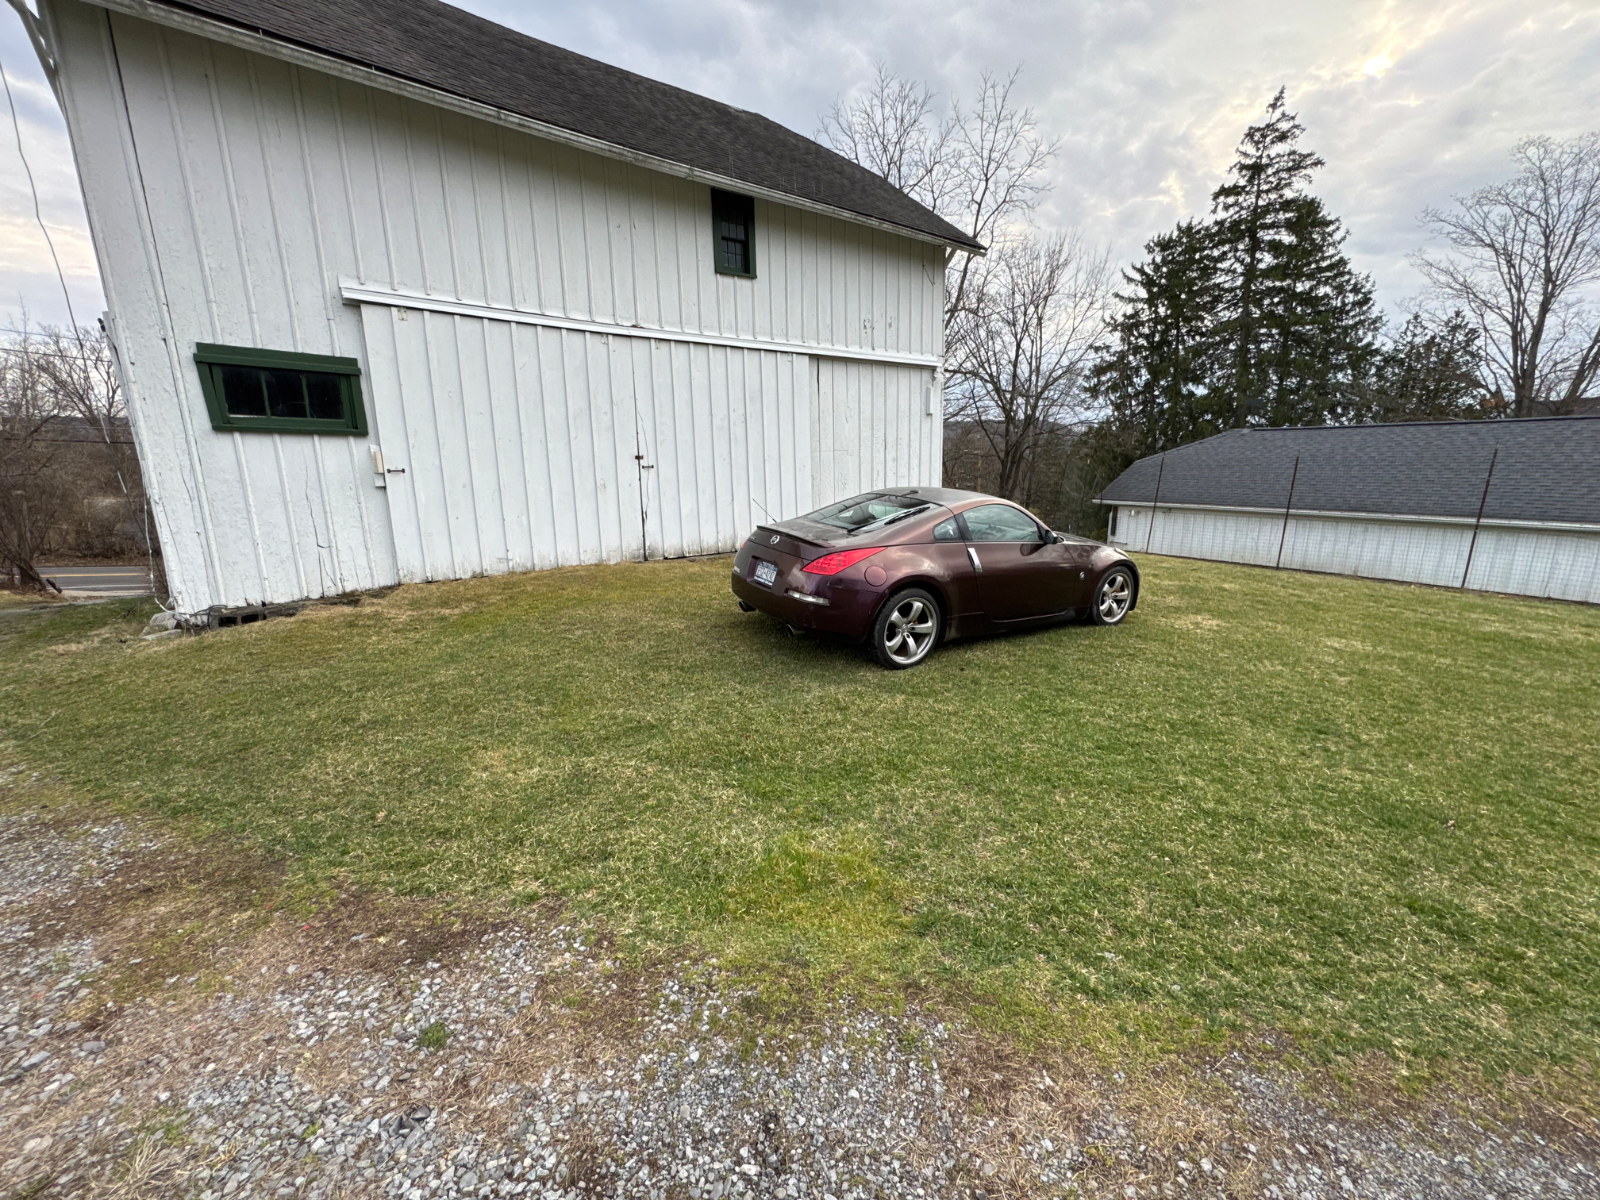
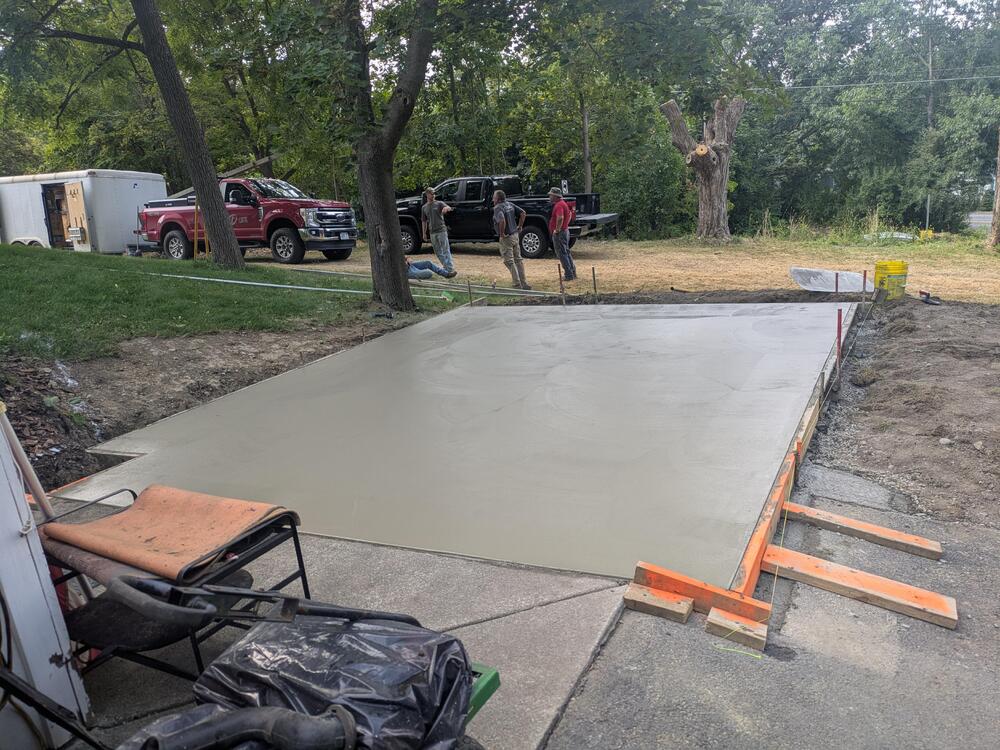
 Moved upstate to Ithaca NY back in April. Had the 350Z shipped up ahead of us, then took the 280Z on. a clear day. Still no work on the cars yet, still setting up the grounds, garage & house Garage was used as. workshop, so it has a couple of 240 circuits, air compressor lines & ports, and radiant heat. Little more cluttered now, still working on setting it up Added glass panels to each door for more light Outside garage back in April: Better weather Adding slabs outside the barn & garage for me to work on - there are no flat/level/safe areas on the property outside of the garage


-
Yes, it is quite heavy (over 20 lbs?).
-
You mean...rocket science?
- Yesterday
-
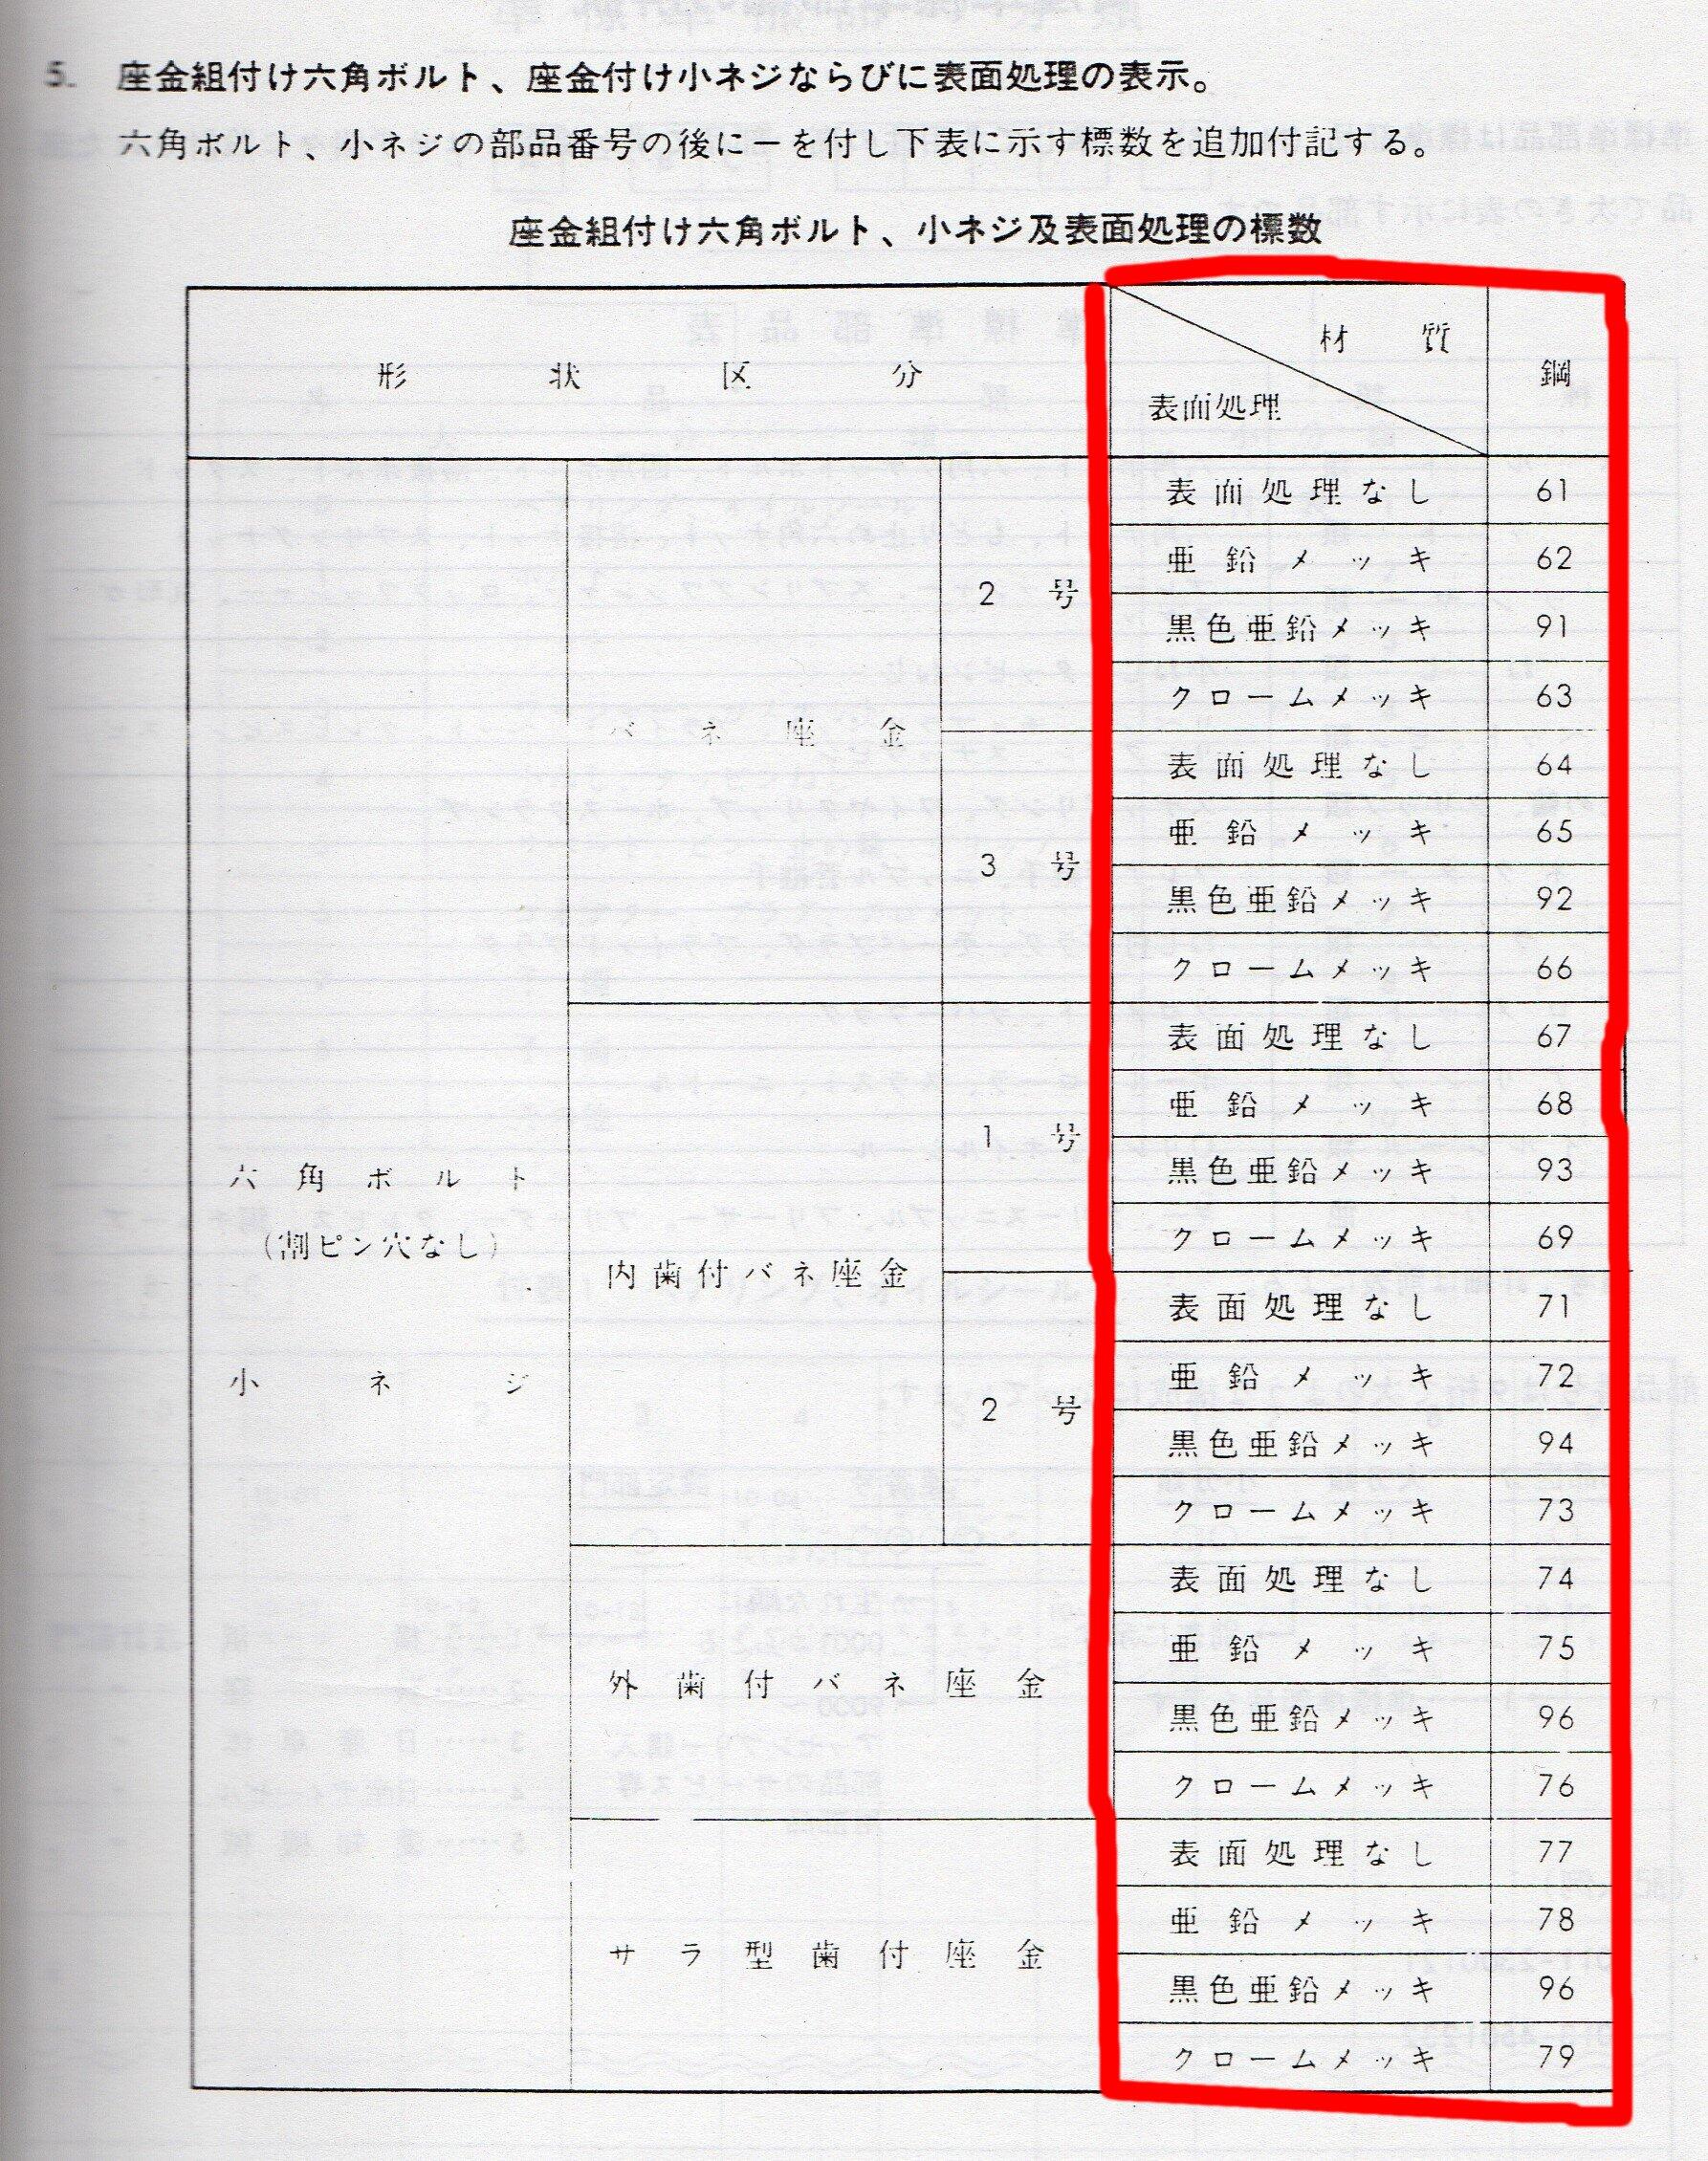
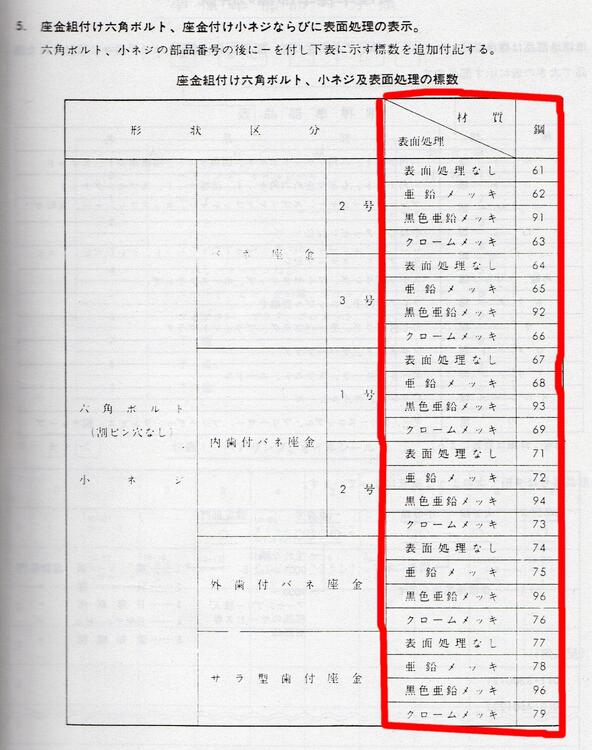
In Japan the use of Cadmium electroplating in auto manufacturing was officially banned in 1969. Before that it wasn't widely used on higher-tensile fasteners due to the phenomenon of Hydrogen embrittlement. Nissan (Japan's) own documentation for the S30-series Z's componentry - according to and conforming with N.E.S. (Nissan Engineering Standard) - states that most of the non-Chrome electroplated parts were Zinc ( 亜鉛 ) 'Aen' galvanized, with various passivated finishes. Here's just one example page of the quoted N.E.S. finishes for fasteners from the C-236 Nissan parts catalogue for the S30, HS30 and PS30 models: Heading translates as: 'Indication of washer-assembled hex bolts, washer-mounted machine screws and their surface treatments. The part numbers of hexagon bolts and machine screws are followed by a ' - ' and the characteristic in the table below. Washer-assembled hex bolts, small screws and their surface treatments'. I have roughly outlined the relevant example surface treatments in red. They read, from the top: NO SURFACE TREATMENT GALVANIZED BLACK GALVANIZED CHROME PLATED ...and this pattern is repeated for each sub-classification of fastener down the page. The Japanese for 'Zinc plated'/'Galvanized' is 亜鉛メッキ ('Aen Mekki').
-
Is that your flywheel?
-
 About 35 years ago, I was in the process of restoring a 240Z, as well as parting out another for spares. I took an assorted group of 10 or 15 nuts, bolts, washers and couple small parts off the Z's to our Materials Lab. "Our" being Honeywell Space and Strategic Systems Lab. A Materials Lab with men and equipment that supported putting men on the moon and probes on other planets. I ask the guys to tell me what was used for plating and corrosion protection, as I intended to have them re-plated. After testing them, they told me they were Cad. plated and given a yellow chromate conversion bath- and to be sure to wear a mask if I used a wire wheel ((bench grinder) to clean them up. Cadmium is very toxic and you don't want to breath any in. Given that the OEM fasteners on a now 50+ year old 240Z, treated with a little penetrating oil will break free and unscrew, without twisting off, is witness to me of Cadmiums use. That doesn’t happen with zinc plated fasteners in automotive use. In addition to Cad. plating having three to four times the durability of Zinc, Cadmium offers increased lubricity, so threaded fasteners release and unscrew. If you are not absolutely certain - best advice is to treat them as having Cadmium Platting..and be careful how you handle and clean them up.
 -
 Well done Ken. Perseverance par excellence! Dashboards are not fund to work on.
 -
Update: put the transmission back with the Dorman $6 clutch alignment tool for 24 splines. Installed 2 guide bolts (don't forget to put slots into them, otherwise you won't be able to remove them). The transmission was in 1st gear, I moved the rear shaft a little to help it ease into the clutch splines. It took 10 minutes. Here is my improvised flywheel hold tool (saw some guys on youtube doing this): Next is the driveshaft, refill the tranny and exhaust mounting.
-
 gort joined the community
 -
 Understood Darom! If you decide you don’t need them and want to get rid of them, just shoot me a message. Thanks!
 -
The OP implies that it ran when parked, but the pump and hoses indicate that somebody tried to get it running using a portable can on the fender or in the engine bay. Somebody either messed with it in the "year" (probably 3 or 4 in real years) it's been sitting, or the friend only had it running on a portable can.
-
Too bad the checklist notes weren't delivered with the cars. That would be cool to have today. I assume that people like zspert and Pierre are the Shop Reps? Who kept the Checklist documents? 1997 was well in to the copier and computer age. Any chance they're out there in copies or image form? I'm way over on the engine rebuilding end of the interest spectrum. It still seems unclear who managed the rebuilding of them. Did the Shop Reps just handle the shipping and receiving of engines to AER? Did they come back fully assembled, at least with heads, timing cover, fuel pump, etc., installed and torqued? Or did they come back in pieces and were reassembled at the Shop? Best to collect this information now, especailly in the States. Attempts are being made to create a new history, erasing the old. Somebody will realize what the Wayback Machine holds. It might not last.
-
Hi @kw906! Thanks for the interest. I haven't taken my car on a long ride yet to see if the poly mustache bar bushings are transmitting too much road noise. If the noise is there, I would use these serrated washer insulators instead of flat washers that came with my poly kit.
-
Darom, I would be interested in buying the old mustache bar serrated washer insulators if you are going to get rid of them.
-
You totally missed the point being made. Randy Jaffe was talking about 'factory-correct authenticity', even to the point of hose clamp orientation. He clearly thinks Cad was the original finish. https://youtube.com/clip/UgkxAwPdmHPp1GDcsSL09MAx51Ak2gUs4hRh?si=S2GAydRujBcJszu_ Put your own reading glasses on and pay special attention to the word FACTORY: On the other hand, you deserve special points for ""...that may have been the case in Japan...". LOL. Do you write one-liners for Larry David, by any chance? Edit: Ha ha! You edited your post! Backpedalling.