Zed Head
-
Posts
18,265 -
Joined
-
Last visited
-
Days Won
194
11 Followers


Zed Head's Achievements
")


-
CO had a good suggestion here. Stop messing around with that spaghetti-nest of wires. Confirm that you will be able to create spark with just the coil and distributor and coil and plug wires that you have. Disconnect ALL of the harness power wires to the coil. Let them hang, with the ends protected so that you don't have a short circuit. Start with a bare coil, no power or ground wires attached. Run a long wire from the battery positive to the coil positive post. Connect the wire from the distributor (the points inside the cap) to the coil negative post. Crank the engine over using the key or using a remote starter. You'll be doing what old-time car thieves do. Mess around with this setup until you get spark. The pictures of those nasty crusty wires and connections aren't helping at all. Simpify things down to the bare essentials. If you can't get spark with a single hot wire from the battery you'll never get it from any of those in that pile of wires.
-
Everything in this thread has been about that. The spark at the points is what causes the spark from the coil.
-
240dkw's comments raise a good point, which might/probably have also been raised by others (and which I missed) - you could see power at the coil with the key at On/Run, but then see no pwer at the coil with the key at Start. The Start circuit is different than the On/Run circuit. CO's "hot-wire" suggestion would have shown that. But another way to test it is to measure voltage at the coil posts with the key at Start. You'll need a friend or to set the meter up where you can see it.
-
Here's another thing that I had thought about earlier - is the distributor rotor turning when the engine is turning? Might be that all of the wiring is just fine but the points never open and close because the distributor isn't turning. You can check that by eye. You can also leave the distributor cap off while turning the engine and watch for spark across the points themselves. Maybe the coil is bad.
-
Maybe it would help to back up and do more of the basics. 1. Use your meter and set it to resistance or continuity. Place one probe on the engine block and the other on battery negative. This will confirm a good circuit from the battery through the engine block (Patcon's point above). You've already confirmed positive (power) but have not confirmed the return path, the ground. 2. Place a probe on the distributor body by the points and the other on the engine block, or even back to the battery negative. Confirm that the path is low resistance/continuous. This will confirm a good path from the distributor body back to the battery. 3. Place a probe on the negative side of the points (the side with no wire connected to it) and the other on the distributor body, the engine block, and battery negative. This will confirm an unbroken path from the points back to the battery negative. 4. With the key off and the points open, place a probe on the coil negative terminal and the other probe on the engine block or battery negative. Confirm that the circuit is open, non-continuous, very very high resistance. You might have a short to ground from the coil primary circuit. With the key off and points open the coils two posts should not have a path to ground. There will be no spark created if the coil is never de-energized (short to ground). There will be no spark if there is no current flowing (open circuit to ground). The presence of voltage does not guarantee current flow. An open ground circuit or a short to ground, on the coil circuit, will cause a no spark situation.
-
I was going to suggest a jumper wire to the coil. But, the above. With the cut wires, but still getting power to the coil with the key on, it seems like somebody has already bypassed the stock setup. Just saying...we can only work with the information relayed to us.
-
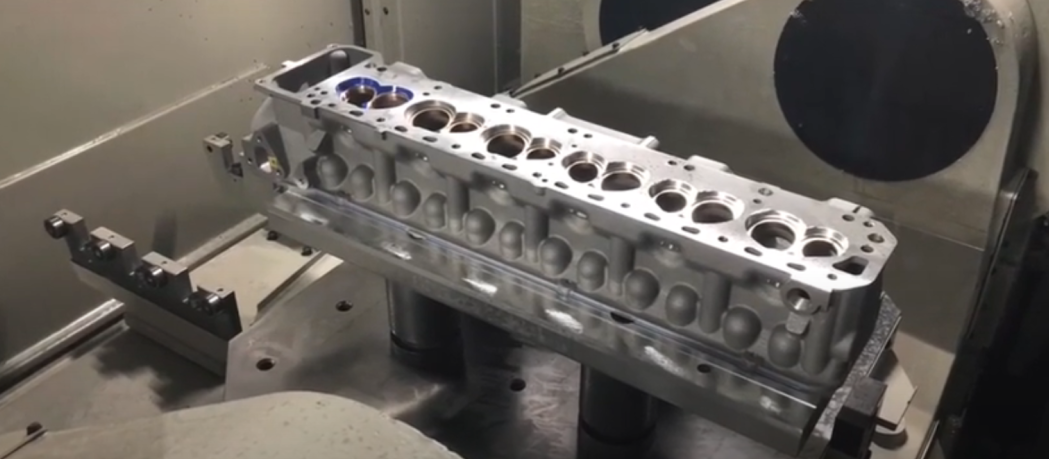
Here's the translated text from their page. :Let's create your ideal L-shaped tuned head using today's latest technology. At the beginning of 2021, such a project suddenly started. The L-type 6-cylinder engine has been loved both domestically and internationally for about 50 years. Throughout its long history to this day, there are many wonderful tuning menus that can be said to be the fruit of the wisdom left behind by our predecessors. The standard L6 with its turnflow and 2-valve design is a low-power engine that cannot be said to be suitable for a sports car, but once it is tuned, it transforms into a different engine that pumps out over 100 to 120 PS per liter. It has hidden potential. However, in order to achieve the ultimate L-type mechanical tune, several hurdles had to be overcome. I think it's safe to say that the two things that we found most problematic were the shaping part after argon welding was applied to the combustion chamber, and the port polishing that expanded the capacity to the maximum. They have the risk of thermal distortion of the head body due to argon welding to the combustion chamber, and trouble of penetrating the water jacket during port polishing and enlargement, and there are only a few tuners who can complete the process, and it takes years to complete the process. There was also the problem that it required a long period of time. In addition, the number of N42 heads in excellent condition has decreased year by year, making them valuable items, and the fact that it has become difficult to secure bass heads is one reason why the hurdles to tuning have become more difficult. If so, we would like to achieve the ideal combustion chamber shape and volume from the beginning, as well as the ideal port diameter and shape, while also providing sufficient port wall margin and optimizing the water jacket for cooling. If such a head could be designed and manufactured from scratch, wouldn't it be possible to free yourself from the depression mentioned above? This delusion, which could be described as a pipe dream, was just a pipe dream until the L Head project members gathered together. Here, we will briefly introduce the key points from the inception of the project to the completion of the head, and we hope that you will warmly watch over us as this grand delusion takes shape."
-
This has probably been mentioned already somewhere but I just stumbled across it on the Datsun Spirit web site. A new cylinder head for the L6. Can't find many fine details about how it differs from the factory casting. Some comments about combustion chamber volume and port shape. The Stage 5 engine - https://www.datsunspirit.com/engines The link from the DS page. You'll need the ability to read Japanese or Google Translate - http://www.pams-japan.com/30cafe/project.php Some video links. They seem to be focused on maximum noise. Drag racing.

-
Any more details about your setup? Just for fun. They make several different levels of engine. Gear ratios and RPM would be good to know also. https://www.datsunspirit.com/engines
-
Pull the wire from the distributor, set it close to a ground point, have somebody turn the ley to Start while you watch the gap. You should see a spark. A meter is the wrong tool for a spark test. Your distributor connection is obviously different than in this Youtube short. top of the cap instead of underneath, but you can figure it out. We all just need to hear from you that you've done this and nothing happened or somethng happened. We need something concrete to understand about what you're working on. It is a very common and well-known spark test procedure.
-
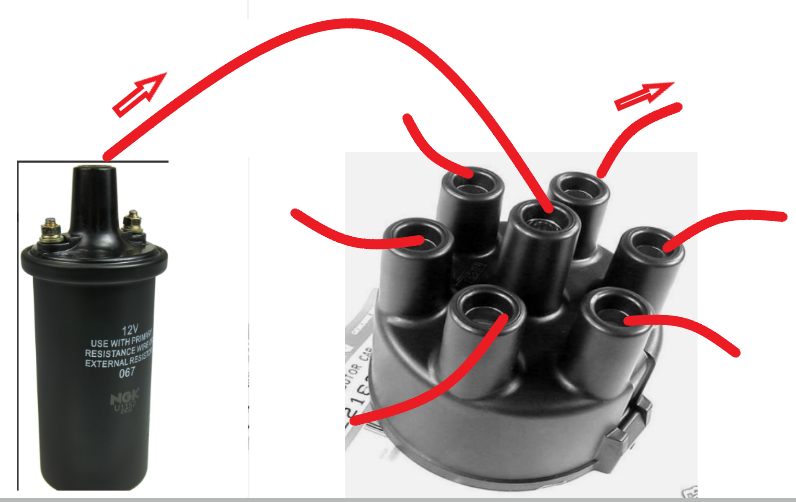
If "power" is coming out of the center wire of the coil - that is "spark". You're still not describing where, exactly, you are looking when you say "no spark". When testing just the coil and points you should remove the center wire from the top of the distributor cap, leave it connected to the coil, and do your spark test. Place the end of the wire close to a grounding point, like the intake manifold, close but with a small gap for the spark to jump. Then do whatever you're doing to look for spark, spinning the engine or opening and closing the points by hand. The spark from the coil passes to the center of the distributor cap and is picked up by each spark plug wire electrode as the rotor turns inside the cap.
-
 Thanks for doing all of that work and showing it. People that do restoration probably don't realize how much hidden rust there is in those cavities and seams. I'm still curious about what type of welding/brazing/soldering they were using to attach the pieces. The seam where the roof panel meets the C pillar outer skin looks like it's an overlap of formed sheet ends, the C pillar end going under the roof panel piece. So there's an area that might typically be brazed, with filler metal flowing in to the gap. But it also looks like some welding is going on between the two base metals. The distinction between welding and brazing seems to be whether or not the metal of the two pieces being connected melts or not. In brazing it doesn't and it's adhesion between two different metals. In welding the metals all melt and form a new alloy, a melt puddle, at the junction. The quality of the work reminds me of what my friend did when he brazed an exhaust system together on one of my old hot rods. A torch (flame) and some filler wire. Ugly but effective. Any chance you can show the seam along the drip rail? that's where the roof panel would be attached. I assume that it's a string of those "booger" beads.
-
What does "leaving" mean? If you have voltage at the coil there's no reason to focus too much on the wiring if you're only trying to start the engine. Give a better description of what you're actually seeing. How do you know you're not getting spark?
-
Do the points open as the distributor turns? And do they close completely? They have to open and close to create a spark. You can remove the condenser and try. It might be shorted internally.
-
Forums are give and take. It's your turn to give. Good luck.