Zup
Free Member
-
Joined
-
Last visited
Everything posted by Zup
-
Mike B-- Would that be Julie that you bought the windshield from?? Arne sent me the link to the craigslist listing and I e-mailed her. She said a guy was coming to look at it and if he didn't buy it she would sell and ship it to me, as it was still in original packaging. She E-mailed me later that it had sold. :disappoin The original price was righteous enough! I envy you left coast guys. You are so close to where the action is for Z car parts. :tapemouth Being a landlocked backwoods Z car nut is tough here in the Land 'O Swine!! :dead: Have you gotten it installed yet?? How'd it go?? Any pointers for the rest of us?? All in good humor---- :ogre: Jim D. "Zup"
-
Bonzi--- Very helpful as I too am going to need carpet. Thanks for the pictures and description----especially the mention of the metal carpet clips. I have inquired about these clips with Arne and Charlie Osborne, but neither was familiar with them. I have 2 but need 2 (or more) more. If anyone reading this has a line on them I'd appreciate it if ya'd give me a shout. Again Bonzi---thanks! This is the kind of feedback that really helps in making decisions about where to buy and what to expect! Jim D. "Zup"
-
Try and find a replacement module. At the very least, clean the case and terminals. Mine worked I thought, but never had the real pep that everyone talked about when I did the upgrade. The car would start and run but somehow I never was that impressed. It got cold here and the car got harder and harder to start, then wouldn't fire at all. It would turn over just great, but wouldn't fire up even with a little starter fuild. :mad: Talked with my trusted mechanic and he asked if I had a different module to use. As it turned out I did. I cleaned up the case really good and shiny, and used De-oxit on all the terminals before re-installing. Bam! Barely turned the key and it fired right up! :classic: These modules can get to the point that they become marginal and then quit working altogether in short order. Try and find/borrow another-----the difference is amazing (over points) when they work properly. Much hotter spark. Hope my experience that was very similar to yours helps. Be sure and repost how it turns out-- for others in the future. Jim D. "Zup'
-
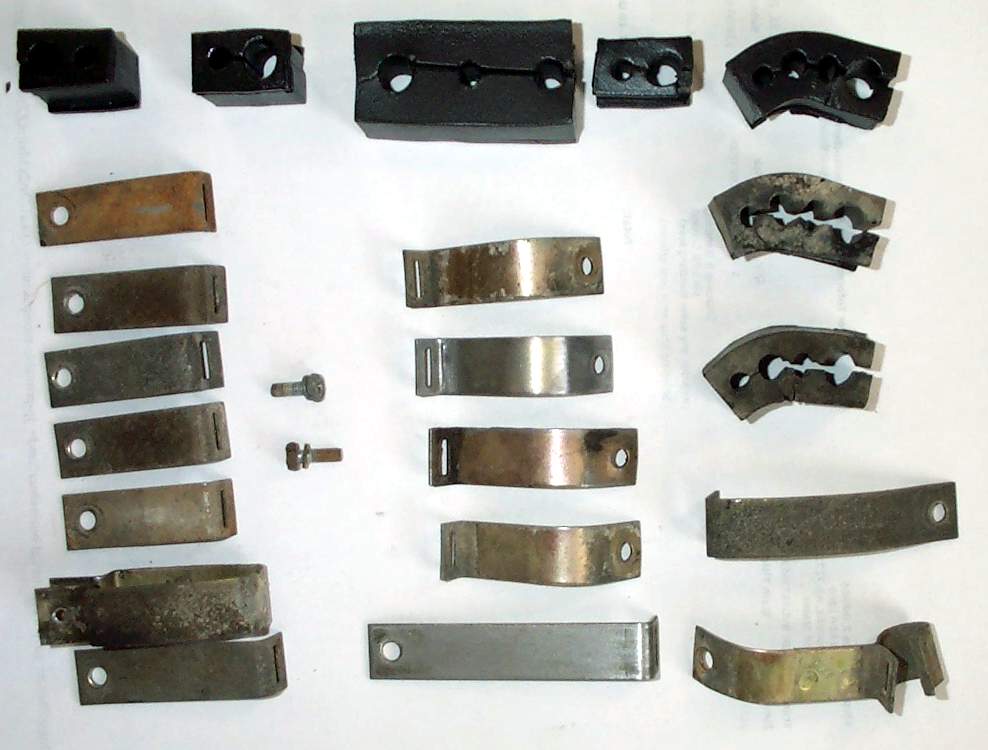
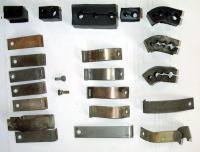
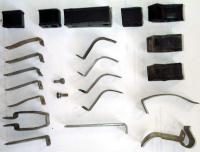
Here is a link to the sideline above about the rubber insulators/standoffs discussed previously. http://www.classiczcars.com/forums/showthread.php?p=212067#post212067 There was, and still is, interest in reproduction of these seemingly simple parts. (ME!! ) KTM did not have any luck. Will has about a billion things going on. :nervous: I liked JimmyZ's bandsaw/drill approach using hard rubber, but it needs to be 3/4" thick and it won't reproduce the ridges on the sides that the originals had to locate and secure the blocks in the metal clamps. Attached are pixs of some insulators that I cleaned up using laquer thinner and then sprayed with PlastiDip. Given several coats, it greatly improves the degraded finish and mends the imperfections (cracks and splits) in the surface with a resilient layer that is quite durable. Not perfect by any means, but I think you will agree it is a worthwhile improvement. The blocks that were applied without the splits are most difficult because of the needed masking steps to get a clean line at the transition between the rubber and the hard line. Rejuvenation of these small bits, is in my mind, one of the more difficult aspects of a restoration that looks reasonably well done and any suggestions or comments are appreciated. If someone steps up and reproduces these please keep me in mind. It remains one of those nagging items that I wish was available. Jim D. "Zup"
-
I ordered the Club parts CD on September 22 and paid for it thru PayPal but have never received the CD. :disappoin I contacted Mike G. about the problem on two occassions and received one reply that he would look into it, but never received any any follow-up response and still no CD. :mad: I appreciate this Club immensley and realize that Mike is extremely busy, but going very close to a month for fulfillment of a CD order is getting unacceptable. :sick: Is this outsourced to China???!!! :tapemouth Mike---if you see this----please, please, please send my copy of the parts CD. Anyone have an old scratched one they'd part with?? Jim D. "Zup"
-
http://cgi.ebay.com/ebaymotors/NISSAN-240Z-NEW-RADIATOR-70-71-72-73-1970-1973-2-4L_W0QQitemZ170107505107QQihZ007QQcategoryZ33602QQrdZ1QQssPageNameZWD1VQQcmdZViewItem#ebayphotohosting Quick search on E-Bay. Seems like a reasonable price for the unit and shipping. Looks right from the pictures and a toll free number to call. HTH Jim D. "Zup":bunny:
-
Hey Dave--- Noticed your in Siloam Springs----I'm over in Bentonville. I just took my 7/70 tank to TNT radiator in Springdale. They said it was too big to fit their boil-out tank. They didn't seem to want to do it anyway--- I'll be calling around to see what shops will consider it. If I get a good response I'll let you know. Otherwise i'll do it myself with the POR-15 kit. :nervous: Keep in touch----there aren't too many of us 240 ArkieZ'z around these parts. Jim D. "Zup"
-
Very good Mike!! I think we all know now that you'll be here at http://www.classiczcars.com for a while to come! We can't wait to see what you post up about as you go through these and begin the restoration/s---first off concerning those flanges! Also, my 7/70 is Vin #07032 to help confirm what has already been said by Dave and BRE-240. :classic: Let us all know if you are swamped with early parts you don't need---yeah sure----or if there is something you need----some of us may have it!! Anywhoo---all the best to you and don't forget to borrow Gary's spindle puller!! Jim D. "Zup"
-
Dave and all---- I'm the laggard that "Electrical Hero" Dave mentioned in the post above. Thanks to all of you that contributed to his thread to help answer his question. I have decided that running the wire to the driver's side would be best since it appears that the A/C compressor and clutch have been mounted there regardless of which style of compressor was used. (early piston York or later rotary Sandlin) Does anyone have pictures which show the mounting of these types? I have access to a complete York unit, but it is mounted to the passenger side. Will the bracket simply reverse for the driver's side? I understand that the rotary type Sandlin compressors are more efficient and more reliable, and as such I am leaning toward using it. Any thoughts and opinions from ya'll concerning the pros and cons of these installations are much appreciated! Thanks again. Jim D. "Zup"
-
ktm....... I too am sorry to hear things didn't go well, but do appreciate your efforts to date. These things need to be made and available. Anyone resto/refreshing a Z has a need for them. What is there that can be done to speed things along? I have some that are in reasonable shape, but sure don't know if they are perfect enough. I agree wth Carl about it..... they are too simple to be critical dimensionally---- Will was chiming in with having a go at making molds----- Tomohawk may have had the best solution---RTV and "get er dun" We need someone with a little time on their hands and a persistent streak in their personality to tackle it---Escanlon???!!! where are you!!!! Jim D. "Zup"
-
I thought you had mentioned something about it previously. I also thought that they could be the same length,---as you said---they all seemed to be tapped deeper than required. Getting those buggers out is not easy---especially the lower 3!!! :nervous: Lots of PB Blaster soak and a 1/8" dia. drill bit to get a hole started for the smallest E-Z out I could find and it usually ended with the screw head snapping off. That was generally O.K. as I could then remove the lense from the housing and attack the stub of the screw with a pair of needle nose Vise-grips to ease the screw on out. 50/50 for the course---out of 2 pair of lense I saved 1 pair by getting all the screws out without damaging the plastic bumps that are tapped for the screw threads. Stainless for sure this time-- and a dollup of clear silcone to boot over the heads as insurance against water penetration down in there. Just let me know what you want for the screw sets Will and I'll PayPal ya the amount. If you have several sets I would like to purchase a few, as I will have 3 of this type project going soon. Thanks for you reply and help as always!! Jim D. "Zup"
-
Does anyone know the metric screw size for the Parking Lamp/ Turn Signal Lense screws? There are 6 of them in each of the front lower lense housings. My screw gauge is a poor one for small fine thread screws---I.E. Chinese made :tapemouth Near as I can tell from trying they would be M3.5 and there are 3 different lengths depending on which of the lense studs they are to go into. 15.5 mm 17.5 mm 24.5 mm Has anyone ( Will, Escanlon, Beandip, Dave ) sourced these in stainless steel or brass as was mentioned in a previous thread about problematic original parts that could be improved? My previous ones were very rusted and from 4 housing/lense assemblies I could only get about 8 screws that came out intact. Thanks for any help! Jim D. Zup"
-
I have several as at one point I was obsessed with butterscotch panel disease. Let me digg around and see their condition and what all I've got and I'll get with you Reed and Enigma. Jim D. "Zup"
-
Mike B---- If you are serious, I've got an early map light complete and some other nice early parts. Send me a P.M. and we'll discuss it if you would like. I will be out of town on business for the firm from Tuesday early a.m. until Thursday evening, but could reply before or after then. If you want to keep it and just made the offer in jest I understand that too! Thanks for the hope! Jim D. "Zup"
-
Gary- I also wondered if any other board members had placed bids. I bid on it also. Came in 2nd. Not surprised though as I didn't place a high enough bid and knew it when I did it-------felt I had blown enough $$$$'s earlier when I won the bid on a set of American Racing Equipment Libre rims!! :classic: Was working on a center console repair when it ended. Just wanted it for the switches as the plate was quite a bit worse off than the one I have. Maybe some day another will appear for us to lust over---- I think all of your observations and comments are correct about it though. Jim D. "Zup"
-
Please count me in Will. My resto/refresh is looking more and more like a "who's who" of the ClassicZcars.com community with every passing day and in every thread---- the list of contributors is beyond my imagination of 2 short years ago! Many thanks to all---named or not---for all the tips, how-to's, advise, sources, reliable information---but most importantly INSPIRATION ROFL :classic: :classic: :classic: LOL Jim D. "Zup"
-
John Jeffry is a long time Z'er known as "gnozez" here on the forum. I've bought several parts from John---all reasonably priced, well packed and promptly shipped. He is a credit to the Z community for both his knowledge and his efforts to supply parts and repair/upgrade items to us all. Just doesn't get any better IMHO!! Jim D. "Zup"
-
Good idea Bo! I too have been wrestling with these rubber parts and have managed thus far to find enough to make do off my parts cars, but it could definately be done better. The rubber blocks with the split line that runs thru the holes are pretty straight forward. The one on the center of the firewall that curves slightly is the toughest, but shouldn't be a big deal to do from new molds. The ones that have me buffaloed are those for the brake and fuel hardlines that were installed on the line apparently BEFORE the fittings were installed and/or the ends were flared. These (like all the others) have raised outer edges that help to locate and secure the rubber piece to the metal clips, but unlike the others have no "split" so that they can be removed. They will slide horizontally along the line, and that is how I have gotten the line refinished around them. Unfortunately many of these have broken edges from becoming brittle over the years. New crisp edges on these would be really nice!! Soooo--If you do these, please consider making the ones I am talking about in a "split" style so they could be installed on an original line with the metal clip holding it securely. I'm really glad to see someone taking the initiative with good connections to do this, as it is another aspect that many if not all of us are having trouble resolving as we resto/refresh our Z'z. Please DO keep us all updated as to your progress. I know that I am in for a set if you can "git 'er dun". :classic: Jim D. "Zup"
-
slow typist at work
-
These are available from Courtesy Nissan parts: SKUFF PLATES http://www.courtesyparts.com/Merchant2/merchant.mvc?Screen=PROD&Product_Code=76942-S30 They are quite inexpensive now and they have a different finish than before. They are no longer clad in vinyl over the metal, but are a crinkle finished metal only, and mount with 3 screws versus the 5 that held my originals on. Believe me they are much less expensive at Courtesy compared to the outrageous prices some e-Bay sellers are asking in their auctions! Charlie Osborne commented recently in a phone conversation that since they are a Nissan part they would be a "correct" replacement, even though not exactly as original. Jim D. "Zup"
-
Niles made many of the electrical components on the Z'z----flashers, bulbs, sockets, relays, etc. and probably made fuses as well--- I have one fuse from the fusebox of my 7/70 with the inscription on the strip of paper inside the fuse that reads: 20A PEACE JAPAN In front of the word PEACE is a lightning bolt (The word Japan is under the word Peace----I couldn't get this spacing to come out right on this post) I would speculate that there was a PEACE Electronics Company in Japan that made them. They are constructed just as Arne described with the soft solder filled end caps . I though quietly to myself "What a great name for a company!" :classic: Jim D. Zup" ps If I can get a decent picture of it I'll post it up. FWIW
-
I recently purchased a new set of inner door panels from Jerry Barvinek.(ajaroslav) Jerry is a member of this club although he has not posted often. The door panels were very well made and virtually indistinguishable from the originals. The primary difference was the grain pattern of the vinyl was slightly different with a little less sheen. The chrome strip is perfectly done. The top of the door is done identically to the originals. All of the mounting holes are identical, and the mounting clips are included, taped in a small bag to the backside of the panels. Expertly packaged and shipped promptly. They may be recent NOS from Nissan---I can't say for sure----but they are first rate. I thought I would post this up to help anyone who is looking for new door panels. Jerry has sold these on e-Bay with a "buy-it-now" feature. His e-Bay store is NISPRO North America. They are not cheap, but they are worth it in my opinion and look much, much closer to the originals than any re-skin kit that is currently out there. http://cgi.ebay.com/ebaymotors/240Z-OEM-DATSUN-INTERIOR-DOOR-PANELS_W0QQcmdZViewItemQQcategoryZ6755QQitemZ120101125377 If this is not a proper use of the forum please let it be deleted with my apologies. Jerry is a great guy and I just wanted to expose his product to you guys with some personal comment as to the quality. PM me if you need more info. Jim D. "Zup"
-
Man alive David! That's some kinda ugly looking $hit coming out for sure!! I zoomed in on your picture and almost :sick: :sick: :sick: Please do give us an update on how this little experiment works out on your radiator. The before and after should be interesting indeed if it fixes this! Jim D. "Zup"
-
Matt--- My 2/73 build date 240 with 72 roundtop carbs is the same way. I adjust idle to 850 and after driving come to a light it's at 1000. I attributed it to the dizzy not having a working vacuum advance----but I don't really know. This is with ZTherapy rebuilt carbs from 98 so I am pretty sure it's not a throttle shaft wear problem! The car has had all of the emissions stuff removed----no ABV, no vacuum diaphrams for controlling the decelleration, etc. Recently rebuilt and runs very strong otherwise. I am left suspecting a slight bind somewhere in the linkages, even though I have lithium greased all the bellcranks and sockets/balls and adjusted the carbs many times it persists. Sometimes a foottap brings it back down, or a light engagement of the clutch, but not always. I still love it!! Let me know if you get the cure cause I definately have the same disease! :sick: Jim D. "Zup"
-
Bryan--- If you have a source, just add the grommet to my order for the pigtail cover and handbrake boot. Sure looks good to me. :classic: Thanks! Jim D. "Zup"