


Inf
Community Member
-
Joined
-
Last visited
Everything posted by Inf
-
I've hit a few birds in my time. I'm always reminded of the Merv Griffin episode of Seinfeld
-
I'm running some 205/60/14 yokohamas with no rubbing on stock suspension, 14x5.5 rims I believe. There were 215x55x14(i think? tires are long gone now) on before but I had a hard time finding that size at local tire stores. No rubbing there either.
-
 has this car been rolled over or something?
 -
My glovebox door has nothing about the key code written inside of it Just a sticker telling me permissible load and passenger limitation My key is getting worn to the point where I have to monkey around with it each time to get the tumblers to unlock any of the locks.
-
I think your locks should only be able to be locked when the door is shut. It is this way on my 72 at least. It was made this way to keep people from locking themselves out I guess. Yours sounds like something isn't right. I've never been inside my door panels so I wouldn't know where to begin really. The door unlocking by pulling the handle from the outside is not right at all obviously. I would just pull the panel if this happened to me. Maybe some malfunction will be obvious when you look at it. Do you have any manuals with diagrams of the lock/latch mechanisms?
-
I glanced through my manuals trying to see how the sending unit works, but they were pretty void of any real information about that. I'm guessing it has a different resistance value depending on where a float is located in a tank, maybe by some arm moving on a rheostat? Thats my guess anyway. You could maybe find out the resistances (from some obscure electrical manual or another member maybe? my FSM said nothing) that the sender SHOULD put out at full and empty respectively and get some resistors to suit those values and just power the gauge up on the bench and see if the gauge is the faulty part or the sender. It would make sense if the lower of the resistances is the 'full' value, and the higher is the 'empty' one. I suspect the gauge is simply a galvanometer with a resistor built into it within the case and that the current passing when 12V is applied changes the deflection of the needle (since the powered-off position is on the empty side, then full would be more current) I wonder if the part number for the sender is the same for the 240Z and 240K? Do you have access to microfiche for your 240K? That would certainly make things simpler to some degree
-
I'm starting my 3rd year of college and 1st year at the University of Texas at Austin (first 2 at UT Arlington) working on a bachelors in aerospace engineering. Should be done in 2 and a half years or so with this degree. Got set back a semester or so by some of my diff eq and EE courses not transferring as they should have!
-
Just did the same repair after seeing this post, worked great. I used 4 small zip ties. It let me take it off and advance 1 or 2 of the zip ties 1 or 2 clicks until it fit the way I wanted it to. A previous owner tried to fix it using some electrical wire at some point. He wrapped it around and used some pliers to twist the copper ends together to tighten it up. His repair didn't work near as well. Edit BTW, Kenny, I noticed that your head unit looks the same as mine. Panasonic CQ-C1300U? Does yours turn off properly? When I hit the power button it just acts like its shutting off but the backlight and button lights never turn off (turning it off while the car is still running I mean). A minor issue, the unit has worked well for me other than that
-
That should be looked at in terms of cross-sectional area of the pipe(s). The area of a circle is pi*r^2, so the combined area of your two 2" pipes is approximately (3.14 * 1^2 ) * 2 pipes = ~6.28 square inches for a single 4" diameter pipe 3.14 * 2^2 = ~12.56 square inches incidentally, for a 2.5" pipe 3.14 * 1.25^2 = ~4.91 square inches and 2.25" 3.14 * 1.125^2 = ~3.97 square inches That is of course a very crude way of looking at the issue of exhaust flow and besides getting an overall feel for the dimensional comparisons, is probably not important at all when compared to all the other factors involved. However, In regards to area in a single pipe setup your exhaust would be equivalent to : sqrt( 6.28 / 3.14 ) = r = 1.414" r*2 = diameter = 2.83"
-
I'm interested.
-
the guy on the show Trucks! on spike put one just like that in some chevy truck iirc, saw the episode a few months ago.
-
Personally, I would rather these kids learn their lesson without involving smashing into me or someone I know.
-
Not involved in this whatsoever, just figured i'd paste the actual link to save yall a few clicks http://cgi.ebay.com/ebaymotors/ws/eBayISAPI.dll?ViewItem&item=2486140779
-
i bet that pickup can pop wheelies like no other. someone must have swapped in a v8! (warning: sarcasm! see other thread)
-
I would make some comment about sarcasm being hard to detect online after that post proxlamus, except for the fact that so many 'special' people have been showing up lately talking about doing horrible things to great cars! I can certainly understand it becoming hard to sort seriousness from joking Edit : beaten by Carl
-
did someone say boobs in here?
-
I would check the timing, make sure the distributor is not in backwards, and that the cables are all in the right firing order, 1-5-3-6-2-4. one time i had it sorta run and it would backfire a bunch, and it turned out i did the firing order in the wrong direction around the cap :stupid: never had that problem, and who knows, it may be something with the fuel injection? i would check spark first though if i was having problems like that
-
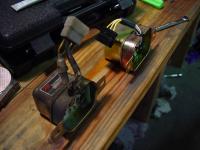
His site is here : http://geocities.com/zgarage2001/ It seems like he has changed his content though. He is no longer recommending replacing the 240z tach with the 280z, but rather with an autometer. Maybe others had some similar problems? I know of one guy on zcar.com who had the exact same problem as I am a few years back. I emailed him and actually got a reply, he eventually sold the car having never solved the problem. :disappoin I am thinking of switching to the autometer. There are some other things i'll investigate first, but it seems like when you're dealing with an old tach like this, there could be any number of things wrong with it that I dont even know enough to figure out.
-
I Connected it as it would have been connected in a 280z, as per brian little's instructions. Signal wire goes to - post on coil with inline 2200ohm resistor positive post to ignition 'on' +12 ground post to ground and made sure to leave the plug with the original inductive loop in the dash so that the coil would receive the +12 it needed since it goes through the loop that was formerly part of the 240 tach. As a side note, the 240z tach did the same thing as this one is doing, so now that i think about it, i should probably look for another problem. maybe a faulty pertronix unit? hrmmmmmm That will have to wait a while though since I am about to move to another city tomorrow.
-
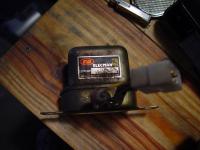
Can anyone tell me if this voltage regulator is original in my 3/72 240z? I bought a replacement at Napa thinking it might solve my bouncing tach problem, but it didn't. So i'm guessing this one still works fine. The replacement has the exact same housing and same style of plug. The one that was there to begin with also had an inline fuse on one of the wires. This Napa/Echlin replacement didn't. I replaced my 240z tach (which was shot anyway) with a 280z tach and I keep getting an erratic tach. It sits steady at idle, but if I really put my foot into the gas while driving, the tach will spike then slam back down to zero and start moving around erratically for a sec, then if i am cruising it will level off probably around the rpm I am running at. My theory was that the voltage being delivered to the + terminal on the coil was changing as a function of the acceleration of the alternator innards, which made the amplitude of the pulse on the - terminal that this 3 wire tach reads change as well. A new voltage regulator later, and it seems this theory has been shot down. Other things I investigated were -poor wiring on the signal line, ran new 14g wire, no change -poor ground connection, ran a new one, no change -'2.2k ohm' figure for signal line inline resistor being wrong? bought a rheostat for 0-10kohm and fiddled with it, 2.2k seemed the best since it kept the needle steady at a certain rpm, but no setting managed to get rid of the spike on acceleration. Well, this post started out just asking what the original voltage regulator looked like, and who made it, but it ended up taking a whole different direction. If anyone has any other ideas on what the deal with this tachometer are, I would be GLAD to hear it! I am running pertronix ignitor with a pertronix flamethrower coil with the ballast resistor in place. I tried the original coil, and it still did the same thing. I'm getting pretty close to giving up and just buying an autometer tach, but I want to keep an original looking set of gauges
-
There must be some switch from another car that will fit and be cheaper i would guess? Seems pretty simple, and almost all cars have them
-
Could you post some pictures to this thread?
-
I think I read some posts about it here, but I mainly remember people talking about it on zcar.com in the archives. Basically what they were saying was that when using heat to loosen up a fitting you melt some wax over it because the molten wax will penetrate the thread and wont evaporate like penetrating oil would. It worked alright, but it left me with lots of wax stuck to the casting. I wouldn't recommend it for this particular situation. I think the original air galley fittings are BSPP, I searched around and couldnt find any BSP fittings locally. I'm not sure what size plug you would need in BSPT, I ended up using some 1/8" brass NPT plugs (i think 1/8", could have been 1/4" though since I bought a bunch of each for plugging some other holes up, it was whatever hole is closer to the injector fitting size). I decided to do this after seeing some posts on zcar.com from regulars saying this worked out fine. It didnt actually seal up like it would have if the hole was in NPT, it actually went in sort of snug(probably due to thread interference), but all the way in nonetheless. I put plenty of permatex high temp anti-seize on. I figure if I have a leak there I can order some bspt fittings and swap it out without pulling the manifold from the car later. I thought about retapping the hole for an NPT plug, but after tapping the holes on the balance tube (soft aluminum) I figured tapping that cast iron by hand would leave me with a broken tap in the hole. Tapered taps start putting out a whole lot of resistance when you start to cut really far in. I called a bunch of places in the yellow pages (plumbing and hydraulic companies) and not one place had any clue what I was talking about when I asked about british standard pipe fittings. Apparently parker makes them, but they need to be ordered through some distributor for hydraulic parts. I think the biggest exhaust flow bonus by yanking this stuff altogether would be getting rid of the pipes that go into the exhaust ports. Seems like they would disturb the airflow a lot. Once you pull the fitting on the outside out, you should be able to knock the injector pipe out with a rubber mallet or something. (hitting it towards the manifold). Some of mine were pretty well rusted in there and took a lot of pounding, twisting with vise grips, and cursing to get them free.
-
Well if you're reading this after seeing the title I guess you either have done this or you're looking for a good laugh at my expense, or maybe both! I pulled the air gallery out of my exhaust manifold several weeks ago and used the 'wax and propane torch' method some have written about to losen up the fittings(this is on the bench mind you, NOT with the manifold on the head). Unfortunately I couldnt get all the wax off the outside of the manifold :disappoin , the roughness of the casting just let it grab on like im sure you can imagine. I figured i would just let it melt or burn off when i ran the motor. Fast forward to tonight, I finally cranked the motor after a long project (for me that is) and it fired up and ran, running pretty rough though since the carbs are all out of whack. will tune them tomorrow. After a few minutes the engine started to warm up, and i started noticing smoke coming from the engine compartment! :paranoid: I shut the motor off and went and looked, it was the wax burning off the hot exhaust manifold :stupid: . There's a lot of it, and it smells terrible : like the smell when a cheap candle smolders after you blow it out. Anyone have any clue about some sort of chemical, acetone or something like that to get the stuff off without having to burn it off? Pulling the heat shield and wiping down the manifold would be worth my time if I could avoid having all this candlewax smoke come off at me! If need be, i guess i'll just deal with it and let it burn itself off. Once I get the motor dialed in I need to sort out some electrical gremlins. My parking light control in the combination switch is shot (corrosion + heat damage due to resistance from corrosion), I tried resoldering the connections but its a no-go once I put everything back together. I think I might just macgyver in a radio shack rocker switch for now so that I can pass inspection. Can't really afford a new combo switch. Anyone have a spare laying around? VB's $169 is a little much for me after spending hundreds already on more important parts
-
I think maybe hauling it yourself would be cheaper IF you have the time. I think hauling an inoperable car would be some special service since most of the standard car haulers move cars off and on at each stop to get certain cars out and shuffle the remaining ones around.


