Captain Obvious
Community Member
-
Joined
-
Last visited
Everything posted by Captain Obvious
-
Because it's cheaper, and you can do it yourself in a matter of minutes without any special equipment. Think of it as a prototyping / tuning exercise. Solder the jets closed, drill them out smaller than you think you'll need, and then work your way up from there by drilling them out larger, a little bit at a time, until you get the performance you desire. Then once you've got that size nailed down, buy (or make) real jets that are of the size you found works best. I suspect motorcycle, "jet kits" are much more common than on cars, and certainly cheaper. Or you could spent thousands of $$ on machining equipment and then spend a multitude hours of unpaid labor making your own....
-
I think that when you're making "upgrades" you should start with the largest contributors to performance and work down the priority list from there. The problem is that things like cold air intakes are almost always starting from the wrong end of the spectrum. Pulling warm engine compartment air is not a significant detriment to your Z cars performance. Neither is the pressure drop across your paper air filter. Not until you've spent lots of money on your engine first. After you've done a bunch of engine and carb upgrades, THEN maybe you might want to turn your attention to something like a cold air intake. But with a stock or mostly stock engine? Nothing to be gained. How much time do you spend at WOT anyway...???
-
I'm no brake expert, but I believe your impression is correct. The only significant difference between the earlier and later 240 wheel cylinders is the location of the brake hardline where it connects to the cylinder. However, I'll offer up one additional option... In 77 they changed from the single piston floating cylinder design (70-76) to a much more reliable dual piston fixed cylinder design (77-787). And by swapping the brake backing plates and E-brake hardware inside the drums, you can upgrade to the later design and use the 77-78 cylinders. What's the downside? (There's always a downside...) You have to pull the stub axles to get the backing plate off. So if you're doing wheel bearings or something and have the backing plate off anyway, it's a convenient time to upgrade to the newer design.
-
Goose Chase!!! Just kidding of course and I do hope you find the right vehicle. Have you come up with any other alternatives other than a 280ZX or a 300ZX? I've highlighted some of my perceived issues with the 300ZX prior, but one thing I can tell you is that it would probably be easier to find a 300 in much better shape than a 280. Just beware of the ricermobiles. Walk away from anything with painted interior parts, fiberglass aftermarket body kits, or anything that mentions "neon" in any context. But surely there must be some other sporty T-top cars that are of interest?
-
Resistance is futile.
-
FastWoman, I hear ya loud and clear!! However, from my experience, if you're only 0 for 2, your journey has just begun! I trolled casually for a Z car for at least two years before I finally caught one. Short story is that I was slowly working on rebuilding one but was always keeping my eyes open for one for sale that was less (or different kind of) work than what I already had. I must have looked at forty cars before I finally found one that truly WAS worth stepping away from what I was already working on. And even then, it wasn't that it didn't need work, it just needed a different KIND of work. Became almost a joke... See an ad. Looks promising. Get in touch with the owner and ask him a bunch of specific questions like "Do the floors have any holes in them?" and get favorable answers like "No, the floors look great." Go to see the car and the floors has holes in them. WTF??? "Yeah, but they're small holes. Easy to fix...." I would get home from an unsuccessful excursion and my response become"Goose Chase!!" Because that's what it seemed like. Every car I went to see was a wild goose chase. "Hey, how was that car you went to see?" And I would proclaim "Goose Chase!!" So I don't know what the deal is, but my experience paralleled yours exactly. it seems like the people selling Datsun Z cars are collectively the most misrepresenting group of used car sellers I've ever come across. Ever. I don't know it it's optimism, denial, or desperation, but I've never run across a wider chasm of "difference of opinion" than I did when looking to buy a Z car. All that said, if there's anything I can do from the Philadelphia area, let me know.
-
Amateurs...
-
Cool. Sounds like that was the issue. Wonder what fried your original voltage regulator... What's your battery voltage now when the engine is running? You got a meter to check that?
-
-
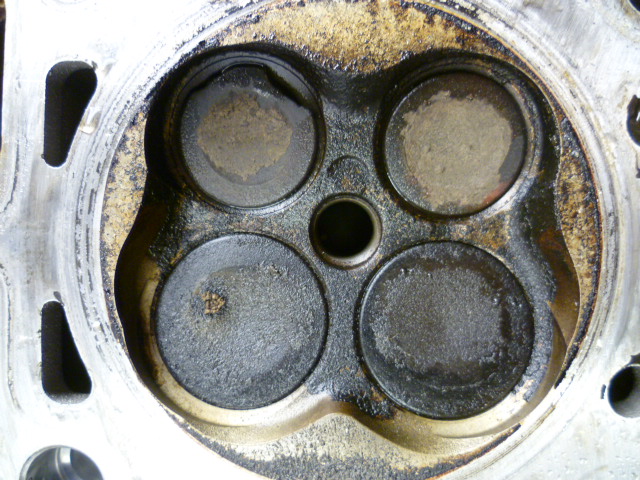
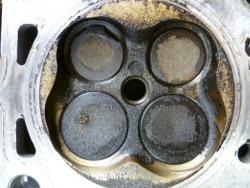
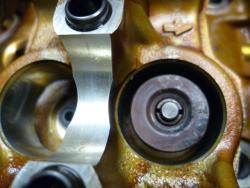
It's way cool, but honestly... Unless you're planning to do a whole lot of them and really need to save time, you don't need that magical whack-a-mole style tool for the Z car valves. Where that style of tool would really shine is on overhead cam direct contact tappet style valves where the whole spring is down inside the tappet guide hole and you can't get a grip on the spring coils because the clearance is too tight. Like the one in the demo video. How do I know? Because I spent last winter wrestling with the attached. Look at the upper left exhaust valve. That tool would have been a lot easier than the custom remover/installer that I made...
-
-
Seriously? That did NOT just happen!
-
It's not like I've done a lot of it, but I've used the third variety and it worked great: I think the second version works too and may be a little faster to use because you don't have to screw and unscrew it to compress the spring, but if you're not going to be doing a lot of these, it might not be worth the additional cost? What say ye with all the engine rebuilding experience?
-
Green coated copper, charred, fried and disconnected. I think we've found the smoking gun on your charging issues... Yes, I'm maybe ten miles north of Bala Cynwyd. Easy shot down Lincoln Dr. (assuming it's not rush hour...).
-
From what I've read (and as described by Zed Head above) the K&N filters are much less effective than the traditional paper alternatives. If that's the case, it would be a lot cheaper to replace your paper filter a whole bunch of times rather than pay for an engine rebuild because your rings or cylinder walls are worn. I'm no filter expert. Have you researched any effectiveness comparisons?
-
Haha!! Sounds like a plan! Osteopath, when you're fully back on your feet and are accepting company, let me know. I'd be happy to perform an autopsy on that device and figure out what it is. "C". Duh.
-
-
Chuck, Aren't you always there with parts? Here's to hoping I can make it too.
-
Well I'll be... I just measured a couple of the balls and came up with my (uncalibrated) mic in the shop and came up with just under .1250 for the ball diameter. So it seems they are 1/8 and NOT metric. I won't attest to the sub thousandth accuracy of what I measured, but it's clear that they are NOT 3mm or 3.5mm. One of the things I noticed when messing with these bearings a while ago is that they are not packed with a full complement of balls. I bet you could get at least one additional one ball and maybe more packed into the race if you wanted to. I assume Datsun left it a little loose because they didn't want drag there and it's a low stress/speed application. But the point is, if you get some 1/8 balls from McMaster and they're a tiny bit bigger than stock, they should still work. So it sounds like a plan! Order a baggie and let us know how it turns out!
-
I wouldn't hold out great expectation that dropping generic balls into an existing race would be trouble free. I also wouldn't hold out great hope that the balls in the original bearings are imperial dimensioned either. I haven't measured one, but I would expect them to be metric. I still have the bearings that I pulled out of that steering column. Most of the rest of the column is gone by now, but I saved the bearings for just such an occasion. I was planning to put one of the two into the top of my 280 column, but I'll still have one spare after doing that and you're welcome to it if you wish. So I'll measure the balls from my bearings and let you know what size they are, and failing being able to find a suitable replacement, I'll hook you up. You gonna be at Carlisle again this spring?
-
-
Once I had the shaft out of the center, I tapped the bearings out using a long wood or brass rod tapping from the far end. The bearings are press fits into the column tube, but it's not a very tight press. Work your way around the perimeter tapping gently and you can walk them out. Then once you get the bearing assy out, you can pop the retaining ring and lose the balls. So new bearings still available from Nissan?
-
That's really odd. I guess every location and mfgr has their own additive package and some of them are different enough to notice. Wouldn't be surprised if there were also govt regulations and requirements in the mix as well. And Thanks for the thanksgiving wishes.
-
That would be awesome. Maybe you can help me pull my dash. An extra set of hands would be well... handy.
-
The ported vacuum signal is how it was originally designed and I would recommend re-connecting it that way. The bottom line from the discussion above is that there doesn't seem to be any significant advantage to changing the Z's original port source to a manifold source. Once you're off idle, the port source is the same as a manifold source anyway, and you might be gaining some idle stability and have lower idle NOx with the port source. BTW - The ported vacuum readings you got above sound perfect. Highest just off idle and acts pretty much like a manifold source as the throttle plates open more. So why were you using a manifold source anyway? Did you do that or did the car come to you like that?