


Captain Obvious
Community Member
-
Joined
-
Last visited
Everything posted by Captain Obvious
-
For you guys having parts plated... Are you shipping them, or is it always a personal drop-off ordeal? I'm thinking... If you ship them boxes of parts, then maybe I could do the same. But if you are dropping them off in person, then I would have to be in the same location as you. I would like to have some parts plated, but I don't even know where to start. Looking to the collective for ideas.
-
I believe there are other factors at play as well, but as long as the problem is gone, it's hard to argue with success. I think I have a pair of RH needles if you would like to give them a try. PM me?
-
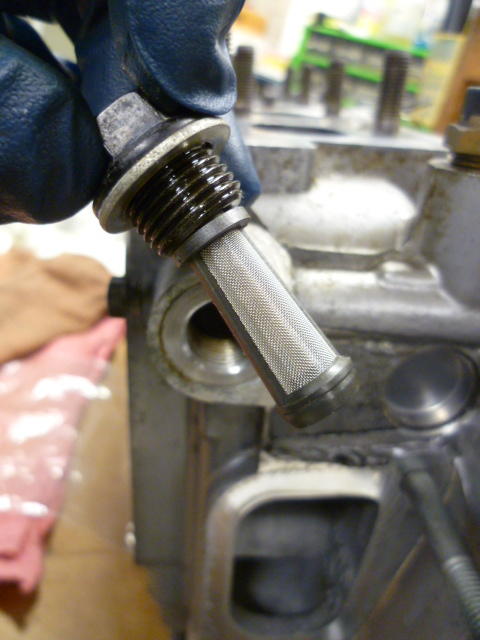
Yeah, it's a much cheaper and more forgiving than the original "crush to fit" Nissan style filter. I was poking around on ebay a little today and here's the parallel filter for Toyota's valve timing system. This one has fingers on the interior end that could be cut off if desired: And another shot of the Hyundai part. This one has that nice tapered seat at the interior end: The point is... The threaded hex caps are relatively easy to make. If you can find a filter with the open end that's the correct diameter to seal on the face down inside the carb body, you could have a cap made for the other end to account for a slightly different length. I wouldn't be surprised if there wasn't something out there that's close to what you need.
-
Gotcha. I am a little worried about vibration and the mounting scheme however. Do those bottom six holes mount to the engine at all, or are the only attachment points to the engine the three small tabs along the top that catch valve cover bolts? I'm EE and not ME, but I'm concerned that vibration will crack those three little tabs on the top and you'll have coils flying all over the place. I'm sure you have more experience in such things though. What are your thoughts?
-
Definitely try to press or tap it out. Maybe you'll get lucky and have it come loose pretty easy. I've made my mounts out of aluminum. Stainless would certainly be stronger and would probably hold a polish longer, but the aluminum is so much easier to work with and it polishes up nice enough for me. Here's an aluminum part before polishing. Stock plastic on top and my version on the bottom with surfaces as machined: And here's a part after a little polishing. As good if not better than the original:
-
Well I understand that the function is much more important than form here. I was just thinking you might be able to find something that didn't cantilever out so far from the block. I took a thirty second look on ebay, and it seems that 99% of the COP stuff is of similar form to what you already have. Designed for getting down between the cams of a DOHC head. Here's about the only one I found that was NOT like that. I think it's for a Lexus. Ebay item number 323710944016: One other thought... Since the long stalk on all of those DOHC designed COP modules is just an insulator so it doesn't spark to the inside of the tube... How about the prospects of cutting it down and shortening it? It's probably just Bakelite or something similar. And inside is some kind of spring or other conductor. You might be able to modify what you have to cut down the length? I've got that style on my Highlander and I've had them out of the engine a couple times. I even bench tested them, but never dissected one to that level.
-
Oh. Sorry. No disrespect intended then. https://www.youtube.com/watch?v=vmEV1d7RPvg Is it as simple as needing something (anything) designed for COP? Or does Haltech give you dwell specs that you have to match to their coil driver? Completely unrelated to this, I've been casually poking around with ignition stuff lately. Not sure I'm going to make any moves, but at this time, I've got more questions than answers.
-
Haha! I think it depends on your definition of "normal". If you mean "Do they all do that?", then the answer is "Yes." If you mean "Is it really supposed to do that?" then the answer is "No." It would be abnormal if yours didn't fall apart. Up for philosophical debate if the corollary to that means yours is normal. Anyway, jokes aside, that's the whole reason you're replacing yours with the newer design.
-
-
-
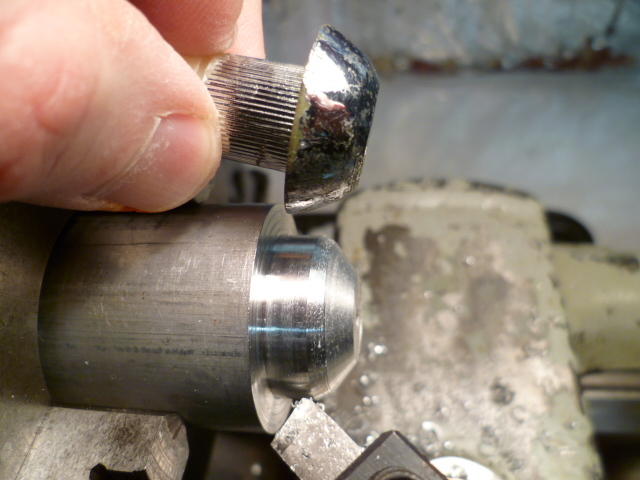
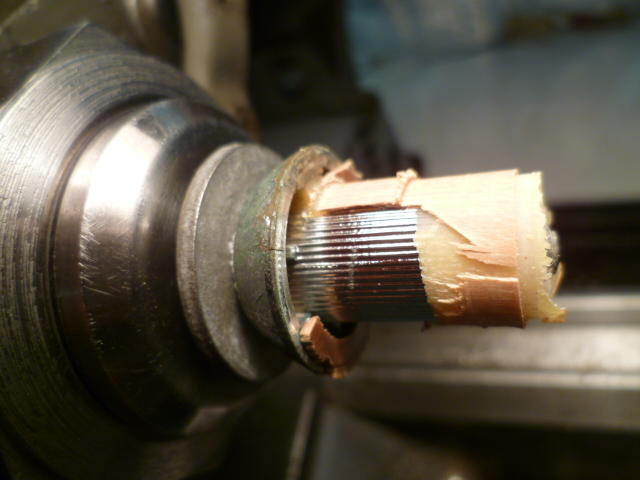
I've not had good luck getting the plastic chromed mount out. I had one original knob where the glue joint failed and that one was easy, but if you can't simply knock it out easy, then I don't have any suggestions. I've not been able to salvage both the plastic and the wood on the knobs and one or the other had to be sacrificed to save the other. Here's one where I saved the plastic: Sorry... That's all I got.


-
Cheaper AND some adjustment features. Nice!
-
That 2X speed is really unnerving. Sounds great though! Sounds angry! I suspect your Z is like most of the other 280Z's out there with a multitude of little issues that add up until it becomes a big enough of an issue to cause a problem. Things like dirty/worn/damaged/broken electrical connectors, vacuum leaks, previous owner's modifications, etc. And most of the electrical connection issues can be intermittent and come back at the most inopportune time. All that wiggling you did to the wires leading to the thermostat housing... None of that wiggling should have any effect. And if there IS an effect, you have questionable connections that need to be addressed. There should be no effect caused by wiggling anything going to the thermostat housing, the AFM, any of the injectors, or the fusible links. Here's hoping you put a nail in it, but just remember... If you have time to work on the car, clean or replace some connectors.
-
Forgot to mention... I took a couple minutes to look into the possibility of modifying the hex cap to be able to use injector filters instead of the original carb filter, and I came to the conclusion that it's not feasible. Using a custom cap with a recessed area to accept the closed end of the filter seems like it would work, but the problem is the other end. There diameter of the injector filter is just too small and interferes with the raised lip down inside the carb body that's supposed to align the non-cap end of the filter.
-
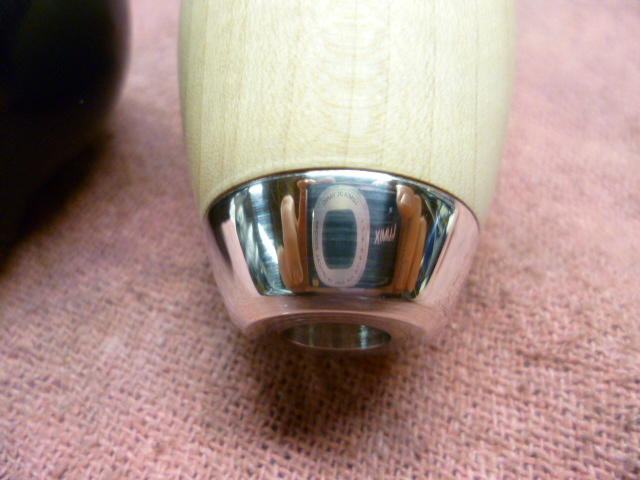
Beautiful work. It's so fun to be putting together clean shiny parts! Didn't want to clutter up that other thread, but thought you might like a pic of the last shift knob I made:

-
You are not alone... Last time I did that I sounded like Ralphie's Dad from A Christmas Story when he was working on the furnace.
-
Ahoy Dr. Dave! Makes perfect sense to me! I know your car is nowhere near stock. I was just curious if you thought there was some performance benefit to the changes above. I never even thought that beautiful fancy cross member might be cheaper than a stock replacement. Looks great!
-
Actually I believe there are two references being thrown around above... The original pic that Mike posted is from an animated TV series - "Avatar: The Last Airbender". But I'm not sure that Zup knew that and quickly turned to a Dune reference. I'm thinking that it was because of the glowing eyes (which featured prominently in the Dune movie). So Mike's original ref was from Avatar, but Zup's was from Dune. And then I tried my best to tie the two together as I'm a big fan of both.
-
Excellent! It's not unusual at all for this kind of thing to be multiple different issues culminating in a problem. Let's hope that's the end of this issue and on to the next! Because you know... There will be a next.
-
LOL!! Nice parts! So... Other than the obvious "because you can", is there a reason you changed the cross member and the oil pan?
-
Nice. I should maybe change that to be my avatar. Or would that be bending the rules? Ooops... Gotta go. It's Melange time!
-
Good results! So was there a thread here on the forum where you were working on fixing the WOT lean out problem with the SUs? I don't remember such a thread, but that sure doesn't mean it didn't happen.
-
What he said. Looking at the documentation, it appears that 77 and 78 share the same Nissan part numbers, but 76 is different. I do know that they started putting the altitude compensator device (module under the dash above the driver's knees) in 77. So that would definitely be a difference between the CA parts for 77 and 78, but I don't know why the non-CA parts would be different as well. Also interesting that the JECS numbers are the same for 76 through 78. Anyway... Sorry. but I honestly don't know what all the differences are, so unless someone else does, the safest thing would be to get one from 77 or 78.
-
Nice. And cheap too! I've made a number of shift knobs to date, and I wouldn't sell them at that price. Of course, mine are better. Those ebay knobs look OK from a distance, but the shift map is the stumbling block. Well worth the money though if you don't need something closer to original!
-
So yes... It sounds like your TVS isn't closing properly. That won't cause your car to die while driving though. Hard to make out much from that video. The audio is so bad that I can't tell what's going on. I can't make out if you are cranking the engine, or if it starts or not. I've got no video experience at all, but it would help (me at least) if I could hear the sounds of the engine.


