jfa.series1
 Subscriber
-
Joined
-
Last visited
Everything posted by jfa.series1
-
 This was fresh in my mind because I just installed new bulbs last week! Roll tape.
 -
If the 280 cases are mounted the same as the 240, you should see four phillips head screws at the four "corners" of the case backside. These are all you need to remove to get the complete case to fall back into the fender area. As mentioned above, it is easiest if you remove the wheel to get easy access to everything. If you see small nuts on posts, don't touch - those are the posts that secure the headlight bucket to the fender, probably three of them. Re-install tip: push the four screws through the rubber gasket before moving the case back into place. Wiggle each screw to locate the captive nut and finger start the screw. Good luck. Jim
-
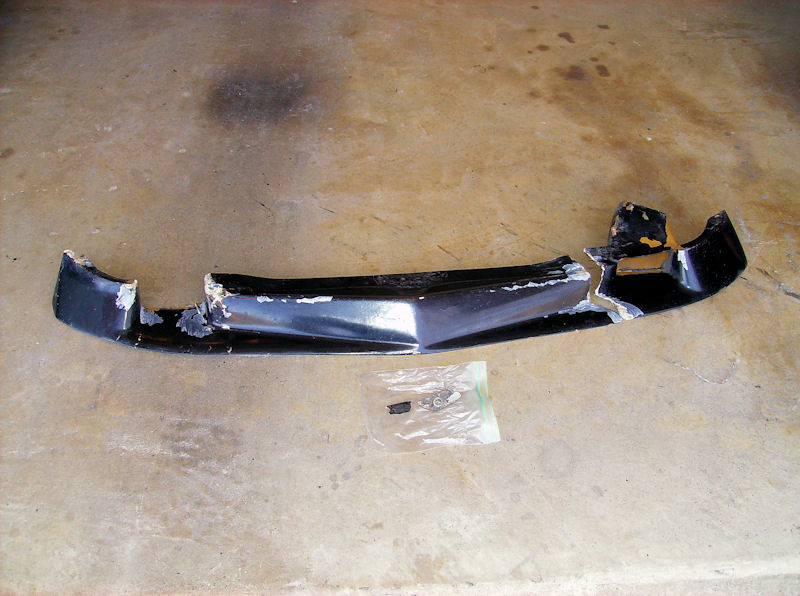
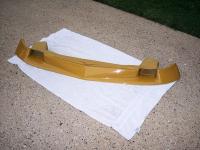
This is what happens when a spook on a lowered car encounters water in a flooded intersection. Years ago, it was ripped from the car and I recovered it after the water was gone. The right side duct was lost and a significant shatter at that point, a complete break at the left side duct, and all mount points were damaged. I removed the left duct and used it to model a foam form for the right side replacement, then did extensive glass layup to repair everything. A successful Humpty Dumpty story.

-
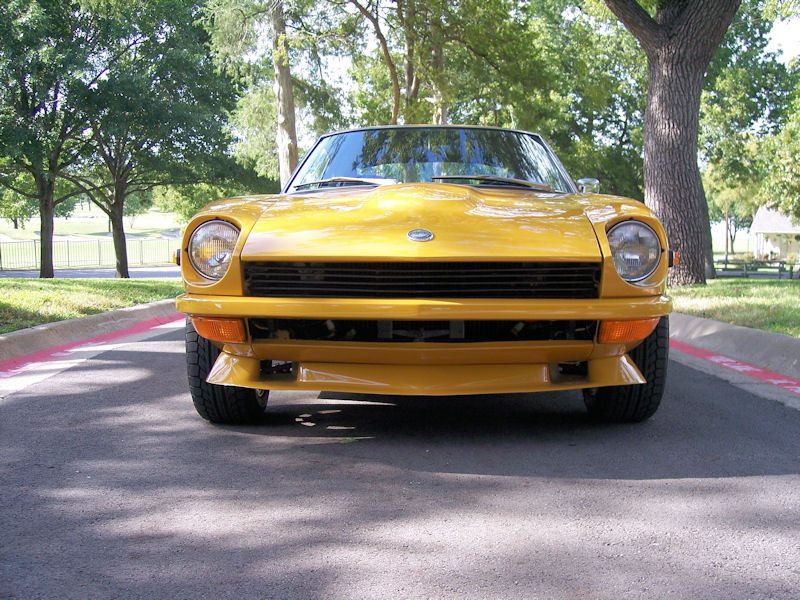
Stephan, My Spook is a 1st-gen BRE model, used only in the 1970 SCCA competition. The design was revised to your model beginning with the 1971 season. If you have any doubts on the authenticity of my Spook, check out the vintage photos for sale on the BRE site. The John Morton car for 1970 has my model on it. I suspect the 1st-gen version did not generate adequate downforce and was more of an air dam, thus the revised version. Jim
-
Mike, In checking the BRE site it looks like the 240Z wreath design was extended beyond the bra and car cover. They currently have a key fob and cap pin, alas... no grill badge like they offer for the 510.
-
Check out this link (just like 26th suggested). It looks like the C Prod badge is NLA, hold on to that rarity. http://www.bre2.net/mm5/merchant.mvc?Screen=CTGY&Store_Code=B&Category_Code=funstuff
-
You might have a bearing problem that is showing up with the change in loading from the brake engagement. The drums are the same for both sides.
-
Since it was running fine a couple of months ago, you probably have a fuel issue as pointed out above. Don't start taking things apart just yet, check out everything above. Good that you checked for spark. Do a visual on the carb linkage and choke actuation to make sure everything is moving properly. Don't grind on the starter for long periods or it will overheat and burn out. Keep us posted.
-
Get rid of all the surface rust you can possibly reach. Use small wire brushes, small chisels, pointed objects - anything you can come up with to get it out. Be aggressive and thorough. If your evap o rust is a phosphric acid product, follow directions and ensure it has time to work. A plastic spray bottle usually works well for application. Rinse thoroughly and let it dry for a day or two to get all the moisture out. A hair dryer can help with all the cracks and crevices that WILL retain moisture. POR-15 does not require a primer over acid-washed metal but follow all directions carefully. Don't get it anywhere you do not want painted, including yourself. To paint over it, use a self-etching primer, then your color coat. Been there, done that. Patience pays off. Good luck.
-
There are no teeth or gears in the dizzy set-up, only an offset slotted shaft to mate with the oil pump shaft. So, a deeper inspection might help: have you had the oil pump off or the timing chain? If the timing chain, you might be off a tooth there, whch gets transferred to the oil pump and then the dizzy. If only the oil pump, it must be reinstalled with the engine at TDC to get the correct shaft positioning. All is covered in the FSM. Some futher disclosure of any other work you have done might be a big help in getting you thru this.
-
-
Only a side-by-side listing of the component parts of the two kits will answer your question. You will still end up purchasing a few items individually no matter which one you go with. Be advised, unless otherwise specified, both sources get their components from Precision Replacement Parts (PRP). The PRP items are generally nice products but have a history of poor fit for the doors, windshield, and hatch glass. The genuine Nissan parts for the doors, windshield and hatch glass are still available and have a perfect fit. Kia Sportage door gaskets have also been used on S30 Z's with excellent results (I have them). Vintage Rubber makes excellent replacements for all items, they are pricey. Search the forums and you will find a wealth of info on this topic. Good luck.
-
Very nice upgrade and well done - a bit more authority on that front end.
-
Justin, Welcome to the group, always glad to hear of a younger person taking up the "cause". Adding another 920 Gold survivor to the world ain't so bad either - but then I'm a bit biased! If you decide to check out the motor first, I suggest you have an external supply of fuel to supply to the fuel pump, don't attempt to supply from the onboard tank - you know it is nasty inside, right? Otherwise, be patient and keep a "needs list" updated as you remove each item from the car and decide to reuse or replace. Don't hesitate to ask questions of the group, everybody loves to help. Jim
-
Also still available direct from Nissan.
-
Reddat strikes again - high priced used parts and exhorbitant shipping fees.
-
With apologies to the USMC, we are "the few, the proud, the OLD".
-
Welcome to the 40-year club!!! Great looking car and great ownership story. If you are not in Carl Beck's original owner's registry, by all means get over to his site and submit an application. There are a few commonalities in our respective ownerships: my selling dealer had already added the BRE 1st-gen Spook and spoiler to the car when I first saw it. I later switched out the exhaust manifold for the Interpart 3-2-1 version and also installed the Mulholland springs and shocks. The springs are still on the car; the drivetrain is refreshed but esentially still as-delivered.
-
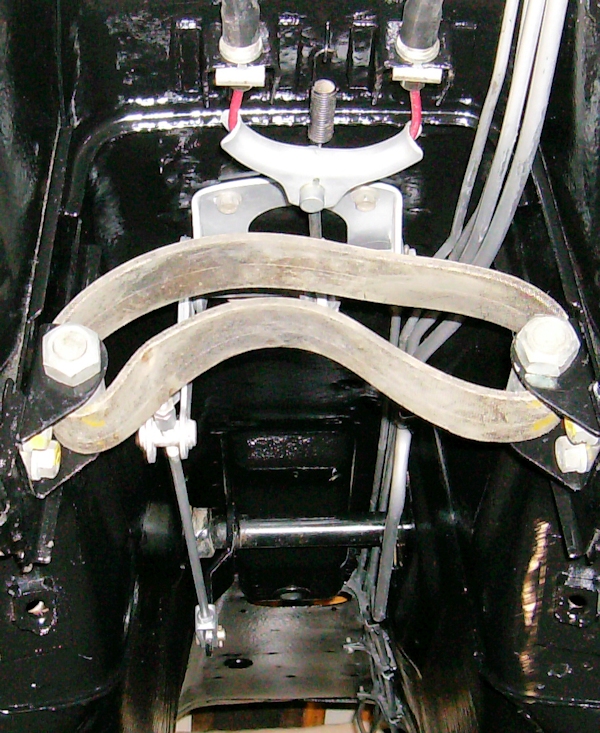
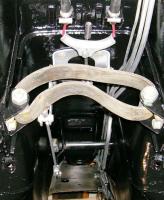
Before ordering parts, check all areas of the ebrake cable for any signs of wear, rust, deterioration of the outer cover. Replace now if damaged. When parts in hand, get the car up on a lift. Pull the driveshaft and possibly the safety strap over the nose of the diffy to get room to work. After everything is installed but BEFORE getting the driveshaft back in, lower the car and check the ebrake handle operation and travel range. If needed, raise car and adjust the long rod, recheck ebrake handle travel. When all is feeling good, lock down all the rod connections, reinstall safety strap and driveshaft. "Drift Away" as the old song says.
-
Hi Dave. +1 on the welcome. Tell us a bit about your ride and your plans for it.
-
"Who's the leader of the band that's made for you and me? M-I-C K-E-Y M-O-U-S-E". Sorry Lee - having a senior moment there! The pic I posted IS the unit in working order. As to the Vespa cable - a marriage of Japanese and Italian can't be all that good in this instance. The Vespa cable might not be strong enough for the load. More critical - if you run it from the ebrake handle to the yoke, it will be at an angle that will put undue pressure on one side of the ebrake cable, i.e. not balanced pressure to both sides and both wheels. My $.02 - you get what you pay for! Jim
-
Here are a couple of clubs in your area that have a great interest in S30's and can help you network in your search. The CT club is the home of Lucky 13. Connecticut Z Car Club - http://www.ctzcc.com/ Z Car Club of Rochester - http://www.zccr.net/main/index.php
-
Thread hi-jack alert!!! The recent exchange is not only off-topic, but getting into a tone that is personal, non-constructive, and inappropriate to the forum.
-
There are two rods for the ebrake - a long one from the ebrake handle, a short one for the cable yoke. Did you bust both or just one? Any pick-a-parts in your area? This will not be a typical aftermarket item, may still be available from Nissan.
-
Bryan - see post #9 above. Jim