jfa.series1
 Subscriber
-
Joined
-
Last visited
Everything posted by jfa.series1
-
 You don't say what series car you are shopping for but I can add a +1 on MSA's service. Also, no prior experience with BD but I intend to order from them soon. With that said, don't limit yourself to considering MSA and BD. For hard parts, hoses, belts, electrical, ...etc. be sure to check RockAuto.com. - also excellent service and killer prices. MSA sells a lot of Nissan products so check Courtesy Nissan's site courtesyparts.com if you know your Nissan part numbers. If you need specific help, Butch and David at the parts desk really know their stuff and provide excellent service. Hope this helps. Jim
 -
P/N 65157-N4400 is still available thru Nissan. Courtesy's website has it at $3.10 each. Jim
-
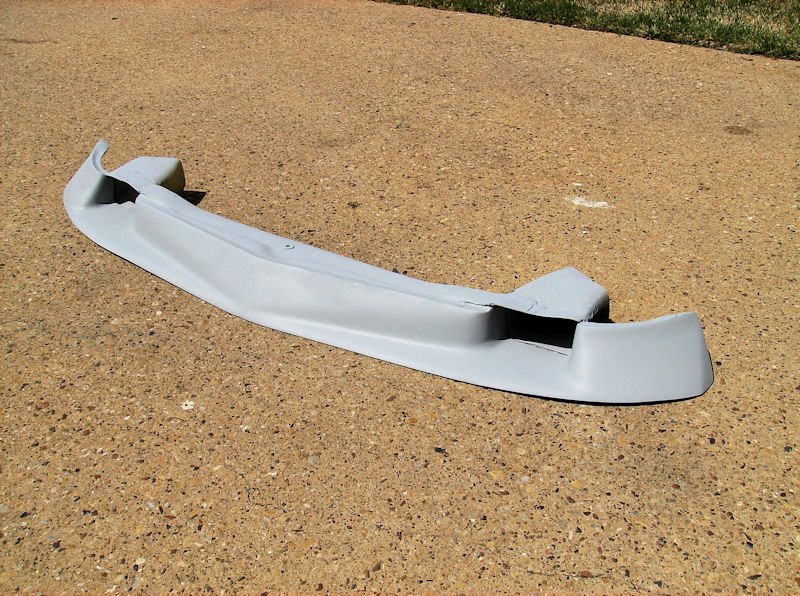
For maximum visual impact, painting a spook or airdam in body color will probably get the job done. Going with black will be a lot more subtle. Interesting that you mention the BRE Spook. My car was delivered with the first edition spook from BRE (photo). You can see it on the John Morton 1970 car in the old pictures for sale on the BRE site. By its appearance, this design probably had more air dam qualities than downforce. It was replaced in 1971 with the more traditional shovel design now associated with a BRE Spook. My spook has been restored and is getting a body-color finish as part of my car's repaint. Jim

-
Yahooo! Yet another beautiful Series 1 in 920 Gold. Gotta love 'em - but then, I'm a bit biased. How about a VIN and build date? Jim
-
Here's another welcome from another original owner. Let us know what is happening with your car. +1 on the request for pics, how about a VIN? Jim
-
Personalization is just that - making changes to your car to suit your sense of taste and expression. The Cobra is a fine example of some minimal design elements for street use that do not compete with its race heritage. But, look closely at the Cobra - there are no indentations or other features on the body to accomodate bumpers. With that said, our 240Z's were designed for wrap-around "bumpers", even though they provide little more protection than the nerf bars on the Cobra. Look at your fenders and you will see the holes and depressions in the rear fenders that must be attended to if the bumpers is removed. The same is true for the front bumper. Even the rear facia is not really designed to be naked and would probably need a bit of attention. Not that my approach is perfect but here is a thought for you. I am going with a smoothed rear bumper - no holes, no rubber, no bumper guards, no over-riders. It is being painted body color for a monochrome look (same treatment for the front). I like the horizontal line the bumper adds to to the rear facia / valance area and I do not have to worry about cleaning up major body panels to remove the provisions for the bumpers. The car is not yet back from the paint shop so I don't have pictures to post. Hopefully within a couple of weeks. Just a thought - but do what YOU like for your car and not what others say is right. Opinions are like belly-buttons, everyone has one. Jim
-
Same as the top side: POR-15. Follow clean and prep directions, apply paint and top off with the color of your choice. Jim
-
Just added mine to the file.
-
Also available at Banzai Motorworks. Check out "Customer Requests". http://www.zzxdatsun.com/
-
Here are a few more sources: Interior vinyl and carpet: Seatz Manufacturing http://www.seatzmfg.com/seatz/index.htm This is from my quote almost one year ago: Since you have a 1970, I'm sure you will want new upholstery which comes closest to the original. Our kit with the correct insert material vinyl is $250 for the pair. We also sell this kit with a different (less costly insert material which is a good substitute but not exact) for $220. The Webbing kit for the seat bottom is $40. If you want new molded foam, cost is $200 for all 4 pieces - 2 bottoms and 2 backrests. Our sectional carpet kit for the early 240Z (5 piece) is $140 in Black Loop. We also make the Diamond Vinyl kit for the Trans Tunnel, Riser & Shock Towers / Wheel Houses - $200 complete with new panel board pieces. Also Door Sill Vinyl for $40. Mechanical and electrical parts: RockAuto http://www.rockauto.com/ Authentic Nissan Parts: Courtesy Nissan http://www.courtesyparts.com Courtesy has access to the old Nissan online parts catalog, they are very good at locating hard to find parts for the old Z's. Restoration and hard to find bits: Banzai Motorworks http://www.zzxdatsun.com/ If you need a parts catalog, here is an online version: http://www.carpartsmanual.com/datsuns30/DatsunFairladyZIndex/tabid/1543/Default.aspx Hope this helps. Jim
-
John, My car is out for paint, expected back in about 3-4 weeks. How about a get-together with Keith at my place when I welcome it home? I'll PM you with my contact info. Looking forward to seeing your L28 transplant and I think you will like Keith's car. I promise I will not plan this as a work party for my ride. Jim
-
I can't confirm or deny parts compatability and no prior experience with this vendor. But... if you cannot get good service (or any service) from these folks, I recommend you contact Courtesy Nissan in Richardson, TX. David and Butch at the parts counter have many years experience with Z's and are very resourceful with the old cars. Courtesy does a large international business and can probably help you with all your parts needs. Hope this helps. Tell them Jim Arnett sent you! www.courtesyparts.com david@courtesyparts.com Jim
-
Hi Smash and welcome to the neighborhood. Looks like I was buying my car the year you were born (purchased 03/31/71). Mine is also going thru a complete resto right now. Member Zed2 lives just up the road in Plano with an early '70 car. Maybe we can get togther sometime and compare experiences and cars. Jim
-
Michael, I recommend you contact member Thorsten Link who also lives in Germany. He has purchased and imported a Series 1 car from the U.S. Here is the link to his profile. Good luck with your search. http://www.classiczcars.com/forums/member.php?u=22294 Jim
-
Eric, In addition to the alternator and adapter upgrades, here are some other electrical upgrades you should strongly consider. I am listing those from MSA for convenience, some may be available from other sources such as Dave's headlight harness. Headlight relay and harness: http://www.thezstore.com/page/TZS/PROD/SRC19/12-4651 Parking light relay and harness: http://www.thezstore.com/page/TZS/PROD/SRC19/12-4652 Fuse box (70-71 long pigtail): http://www.thezstore.com/page/TZS/PROD/SRC19/50-5011 Fuse box (72-73 short pigtail): http://www.thezstore.com/page/TZS/PROD/SRC19/50-5010 I have the fuse box, it is a nice piece of work. Hope this helps. No affiliation with MSA. Jim
-
Eric, My understanding of this is that these are two distinct upgrades. The 280 alternator is a direct swap for the 240, you get more 50% more juice with the later model if you make no other changes. I presume the adapter you are talking about is the replacement for the mechanical voltage regulator, another stand-alone upgrade. I think the posts reporting problems were from some time ago, I don't know if problems continue with otherwise stock wiring harness. FWIW, I'm planning both upgrades (already purchased) and additional electrical upgrades such as the harness to shift the headlight load away from the combo switch. None of these are yet installed, no real-world experience to report. Jim
-
Have you checked with a PPG dealer for your paint code? I had no difficulty getting my 920 gold mixed directly from their computer formulation. Jim
-
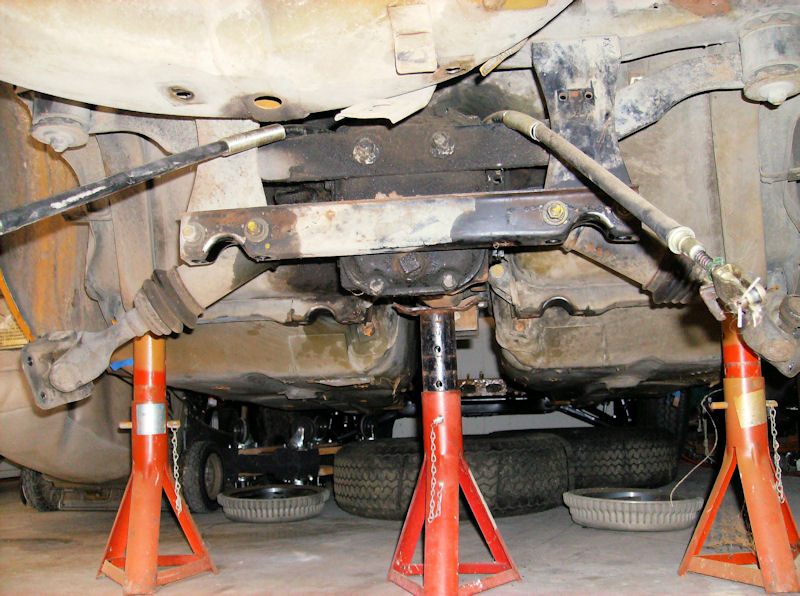
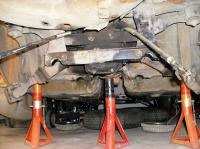
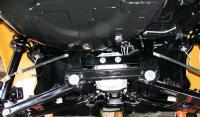
Definitely a bent suspension part and big time impact to your alignment. Here are a couple of shots from my resto project. The "before" image shows the part very clearly with no LCA attached. The "after" image is a bit busy but the part is visible. Hope this helps. Jim
-
Here is a quote from the MSA site: "If you own a 70 240Z you’ll have to use steering knuckles from a later car (71-78) to use these ball joints, because the 1970 uses a smaller ball joint which is not currently available." Currently available balljoints should fit the steering knuckles on your '71 car. The catch may be in your build date. If it is a '70 date, you probably have the smaller steering knuckles. Contact Roger at the Z Barn to get some used knuckles like I did. The cost was $50 plus $10 shipping. http://www.zbarn.com/index.html Jim
-
But... as the man says, no 240 data on that tab.
-
Nothing too grandiose - just finish the total restoration and have it sorted out and back on the road by May! - The car is still at the painter, the four month estimate is now 6 months and counting, but - at least it got painted Christmas week. - The engine rebuild is complete. - Suspension rebuild is complete, front and rear. - All interior components are on hand except new carpet. - Most of the engine bay bits are on hand. Hope my timeline is doable! Jim
-
I just hit the link Mike posted on 12/15, it worked fine. Jim
-
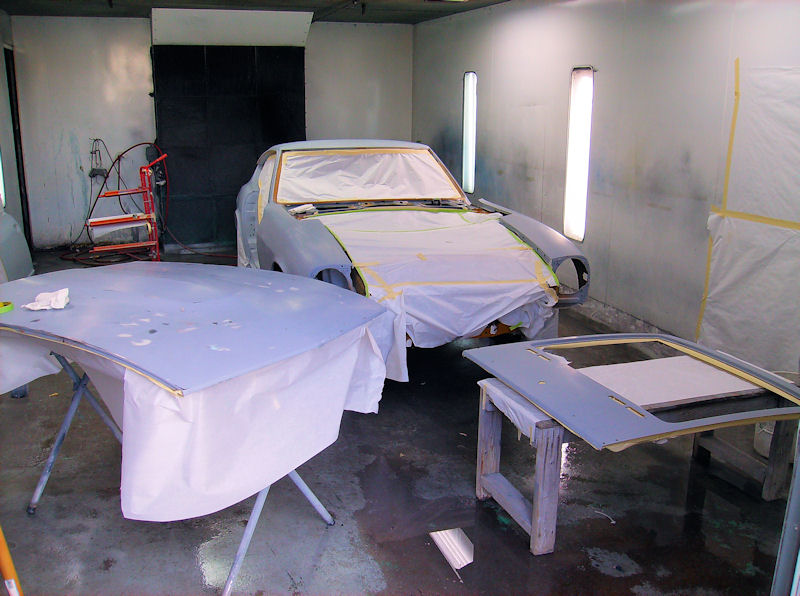
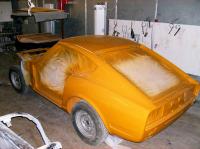
I got new paint (920 gold)!!! Major completion point of a total restoration. Whoo Hooo! Jim

-
With my car as an example, here are the components: A five section looped carpet set (think of the horizontal surfaces) - footwells, floorboards under the seats, rear deck. Pebble-grained vinyl strip along each rocker panel. Diamond-pattern vinyl on the tranny tunnel, the vertical bulkhead behind the seats, the suspension towers in the rear. I think all of these materials are available from Brian Rolfe at Seatz, restoration quality. Jim
-
Correction in terminology - gland nut, not flange nut. Thanks Chris!