Namerow
Community Member
-
Joined
-
Last visited
Everything posted by Namerow
-
-
What about the top insulators for the suspension struts? Have these become NLA? FWIW, I've often wondered just how much these insulators affect ride quality and cabin (road) noise levels and whether 50 years of aging affects the resilience of the rubber core to the point where they're worth replacing. I know that lesser parts on the car made of rubber tend to become rock-hard with age and there's always lots of chatter about the latest idea for a chemical treatment to soften them up. Another thing that nags at me is whether new-old-stock rubber parts of this type suffer from the same aging effects simply by sitting on the shelf for the same period of time as the ones that have been out on the road. I guess the only way to gauge the importance of the strut insulators would be by doing back-to-back measurements on the same vehicle and road after swapping out the old insulators for a set of 'new' ones. That's probably never going to happen within our small community of Datsun Z owners, but I wonder whether anyone has ever done this kind of comparison test with some other vehicle?
-
Yes, of course. They say that memory is the second thing to go I'll update the table. And a repro of the lid (less hardware) is now being offered by Steve at www.240zrubberparts.com It's the ashtray that remains NLA. Complicated shape to reproduce. A mold would be difficult. 3D printing may be the only route.
-
Mike at Banzai Motorworks (Marlboro, MD) has offered fully-trimmed door cards for many years (1970 - 73 models). Website shows them currently priced at $305/pair and available in black, red, white or butterscotch. Includes the molded-in chrome trim strip. Mike's products are usually highly faithful to the originals, so I expect that these will be accurate and high-quality. www.zzxdatsun.com/catSoftTrim.php Charlie Osborne at Zedd Findings (Kingston, ON, Canada) has,, likewise, offered fully-trimmed door cards for many years, although his products are restricted to the 280ZX niche market. http://www.datsunzparts.com/doorpanels.html There may very well be other vendors who offer similar products, or products for different model years.
-
Can't help but thinking about what happened to the doctor in China who called his government out over its failure to confront reality.
-
Summary of what we've heard so far... Part Category Suggested by Suggester’s Comments Diff Front Mount (insulator) – ‘early’ type (PN 55415 E4102) Drivetrain Namerow No convenient workarounds that preserve originality of ‘early’ driveline layout. Hatch Glass Glass S30Driver Getting difficult to find in acceptable to pristine condition. Side Window Glass Glass S30Driver Getting difficult to find in acceptable to pristine condition. Carpet underlay pieces, cut-to-shape from OE-spec jute material Floor Coverings Gav240z Correct material not readily available and not pre-cut Sound deadener pieces (cabin side of firewall) Floor Coverings Gav240z Correct material not readily available and not pre-cut Carpets in correct, loop-style Floor Coverings Gav240z Carpets in correct material not readily available Rear quarter panels Body Panels Gav240z Closest available is Tabco’s partial patch panel Roof panel Body Panels Gav240z Required to fix cars cut for sunroof. Re-pop panel not available. Rear valence panel (aka rear ‘apron’ / ‘roll’ panel) Body Panels Gav240z Available re-pops fit OK but are not accurate in certain details. Ashtray – ‘early’ type Interior Gav240z ‘fragile’ Center console – ‘early’ type Interior Mike Fuse box cover plate – ‘early’ type Interior Mike ‘Nismo’ fuel pump mounting bracket Body Parts Mike Not an OE part, but…
-
Parasol Paints in Toronto, Canada (www.parasolinc.com) will custom-mix a vinyl paint to perfectly match your color. Send them a small sample of vinyl from the underside of a seat or cut from the back hem of a trim panel. A 1/2-inch square will do. You'll need 1 qt. to do the dash and centre console (estimated cost of US$100/qt, shipping extra). I had them mix up two quarts the match my butterscotch seats (sourced from Banzai). The color match was spot on, the product applied very nicely, and it has held up very well over the years (no lifting or peeling). Parasol's vinyl paint is applied with a standard-issue HVLP spray gun. It's water-based and the gun cleans up easily, provided that you do this right after you finish spraying). You'll need to apply at least 3 medium coats to cover a black surface with a light brown paint. Regardless of whose vinyl paint you end up using, you will need to be relentless in your prep work. All traces of silicone (ArmorAll, etc) need to be removed or else you will get major 'fish-eye' when you try to apply the paint (and you can't just wipe the crazed vinyl paint off and start over again). SEM offers a pair of cleaning products for a two-step process. Effective (if used properly), but not cheap. Parasol offers their own line of cleaners.
-
My 70 Z is a US car originally from Colorado (VIN in the 003500's) and it has the plastic 'clamshell' wiper motor cover. It came to Canada late in its life, so unlikely that the motor and cover were replaced with a 'Canadian-market' item. I think that this design was replaced by the bag for a few reasons: easier installation into the cowl cavity during vehicle assembly better protection of the motor from rain/snow less expensive to produce
-
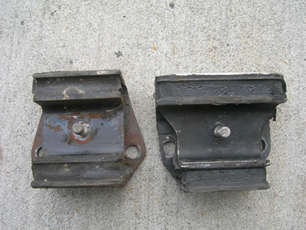
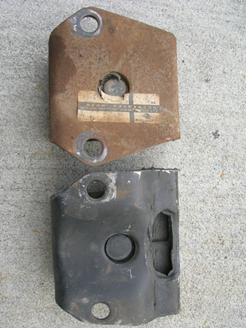
Thanks for spotting this. You're right. I've gone back and edited the captions for photos #2 and #3. The early-design mount is identified by the non-rectangular shape of its outer plate. Sorry for the mix-up.
-
If that's an early-style diff mount and still in as-new condition, it's worth $$$ . But if it's, "correct for my car 2-72", then it's the new style mount and can be safely left laying around in your garage.
-
Is that a roof panel I see on one of those racks? If it is, and if you don't mind the climb, it would be interesting to get a thickness measurement off that piece. I can't see it being less than 0.8mm, but it would be nice to know for sure. Hard to get this measurement off an intact car, unless it's been cut for a sunroof. Not urgent, but maybe when you better access develops.
-
After 12 or 13 beers with the boys at the local and then a couple of shots for the road, it probably seemed like the right thing to do.
-
Excellent! Nice parts storage rack, BTW.
-
So: Two sets of well-executed/well-documented measurements with different results. They aren't quite apples and apples, though. CanTechZ has measured Series 1 front/rear fenders and floors and gets a pretty consistent 0.8mm result.. ConverTT has measured Series 2 door skins and gets an equally consistent result of 1.0mm. Others have reported 0.032" >> 0.8mm) for a couple of other panels : jfa.series1 for the front inner fender apron (i.e. engine compartment side wall), and me for my Series 1 front valence panel. I have a theory (untested and unproven so far)... ConverTT's photo of his Series 2 door where the outer skin has been cut off provides a great view of the side impact bar (and I use that term with some reservatyion when it comes to the piece used in the S30's doors ). As near as I can tell, that Series 2 impact bar looks exactly the same as the ones in the doors of my Series 1 (SN in the 3500's). And yet, it was always my understanding that those side impact bars weren't part of the early cars. Or maybe that was only the case for the early early cars? Or maybe my car is wearing replacement doors from a Series 2? Note that the online Parts Manual shows a change in part numbers for the two doors as of October 1971... although that doesn't really explain whether anything changed in the design. My theory, then: Is it possible that Nissan neither added nor changed the size of the side impact bars, but instead simply increased the thickness of both the outer door skins (and maybe the bars, too) from 0.8mm to 1.0mm? There would be a certain logic to this, because Nissan probably could have left their tooling unchanged and just changed the thickness of the panel stock. @ConVerTT Can you please take some measurements on a rear quarter at the opening for the side marker light? @CanTechZ Can you please take a measurement on one (or both) of your doors? Say, at the opening for the door handle? failing that, maybe on the lip the mounts the upper chrome moulding? If time permits, I'll do the same later with the doors on my car later today (I want to make a start on my income tax return this afternoon ).
-
A few of the well-known Z-car parts suppliers offer a rear valence panel that might meet your needs. However, I recall reading recently that the existing replacement panels aren't 100% accurate in certain details (e.g. shape of the cutout for the exhaust tip). Maybe that's what you're alluding to when you say that the panel isn't available?
-
That cowl area looks remarkably clean! Lucky for you because all reports indicate that it's a really challenging area to repair. Your #1 photo is a nice reference guide for the shape of the foam panels that were added by Nissan as a running design change -- I believe in response to problems with the panel buckling if it was leaned on too hard (service techs, owners, bystanders) or, more likely, if it was stepped on (shippers). The on-line parts manual doesn't really provide any clues about the date when the wiper motor cover was replaced with the bag. Perhaps when the wiper motor was upgraded for a faster sweep rate in January 1971?
-
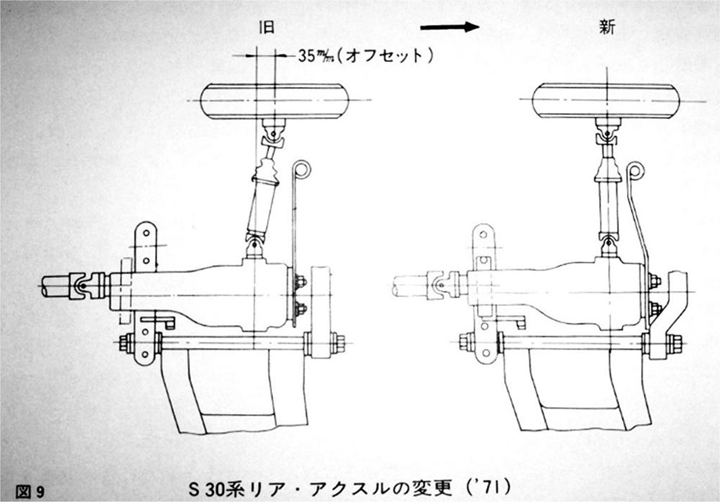
No, you're not crazy (although we should perhaps let your wife comment on this ). The answer, I think, lies in the fact that there is also a difference between the 'old' vs. 'new' designs for the diff's front crossmember. The locations for the bolt holes changed. I have never seen anyone produce a proper sketch in plan or elevation view that makes the differences in all of the bolt hole and mount stud locations obvious (and I'm not about to try). However, I have never heard anyone come up with an easy fix for replacing the early-style front diff mount (and don't forget that this issue has been in play now for about 40 years). According to my notes, here's what needs to be replaced in order to 'fix' things so that the newer-style mount can be used: · Diff Front Crossmember · Diff Arrester Belt Brackets (lhs & rhs), bolts, and sleeves (the design of the belt itself was not changed) · Moustache Bar · Suspension Lower Transverse Crossmember (new design was dished and bowed outwards towards the rear so as to clear the rear of the diff case) · Driveshaft (the S2 driveshaft is 20mm longer) · Moustache Bar Rubber Bushings, sleeves & hardware (might not be mandatory, but the PN’s certainly changed)
-
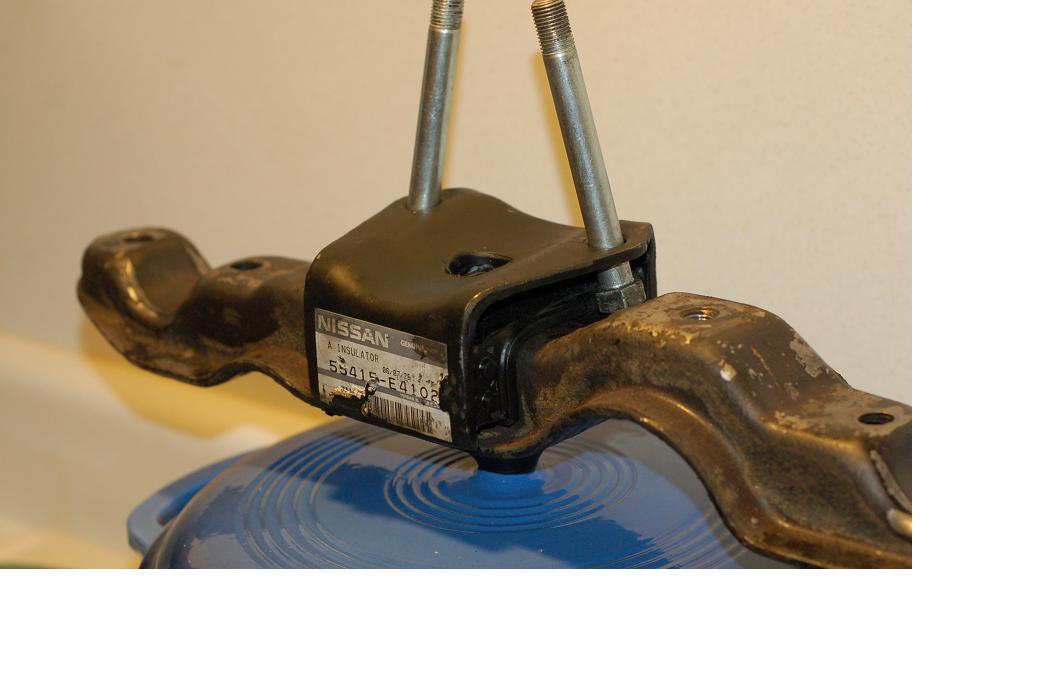
I thought that our CZCC members might like to contribute their thoughts here. Who knows? We might inspire someone out there to start making some of these items. My nomination would be: Differential Mount Insulator for the early-design cars with angled rear halfshafts (Nissan PN 55415 E4102) This part was used up until 71-06, so it was installed on about 30,000 Z's. If 5% of those cars are still in running or restorable condition, that would mean there's a ready market for perhaps 1,000 of these early-style diff mounts. To the best of my knowledge, there's no way that any of the later-style mounts can be modified to fit. Typical owner solutions seem to be either: replace all of the diff carrier pieces with conveniently-available, newer-design parts (expensive, and not correct for a proper restoration) ignore it and pretend that running with a worn-out original mount isn't a problem Given that the metal parts are usually quite salvageable, perhaps all that's required to restore the mount is for someone to reproduce the rubber core. With a new core, it would be a fairly simple matter to burn out the worn-out original, clean up the metal, and then glue a new core (should be fine, given that the bonding area is big and the joint wouldn't experience any shear loads -- just compression/tension). Early-style mount on the top Early-style mount on the left (apologies for not being able to provide photo credits)

-
Seeing the curve starting to flatten is all very nice, but it really only addresses the issue of exceeding the healthcare system being overwhelmed. When we start to go down the backside of the curve, what then? Here in Canada, the number of reported cases stands at roughly 80 per 100,000. That's less than 1/10th of one percent. Even if that number is low by a factor of 10 (and it may very well be), it means that 99% of the population has not yet been infected and therefore lacks immunity. I see no reason to believe that American figures will prove much different. If we/you decide to just, 'Let 'er rip' (see Donald Trump playbook), that curve is going to un-flatten in a hurry. No easy answers here.
-
The last of those three shoe styles is worrisome.
-
Meticulous measurements, backed up by supporting info re panel originality and paint application, so pretty hard to argue with. I am inclined to agree, then, with your conclusion that the factory panels appear to have been made from 0.8mm sheet. That sits right in the middle of the spec range for 22-gauge. How do we reconcile this with @ConVerTT's values of 20-gauge for the door skins?
-
Thanks for the additional efforts. However, it's just hard for me to believe that the factory used a thinner sheet for floor pans than what they seem to have used for body panels like the rear quarters. At least, that's what your measurements are saying (i.e. 1.1mm for the rear quarter panel vs. 0.8mm for the floor pan). It's worth noting that the difference between 1.1mm and 0.8mm is just .012" (sorry for the switch from metric to inches, but most of us understand tolerances best when they're in thousandths of an inch rather than tenths or hundredths of a millimeter). How thick is the factory primer and paint? Or maybe that's an aftermarket paint job on your rear quarter? We're left two possibilities to ponder: 1. The factory floor pans really are made of thinner sheet than the factory body panels. or, 2. One (or maybe both) of your measurements (floor pan vs quarter panel) doesn't represent 'reality'. Maybe your quarter panel measurement was too high because the metal wasn't bare? Or maybe your floor pan measurement is too low because you accidentally abraded away some of the metal in the effort to get rid of the paint? Maybe both? In inches, you have the rear quarter panel and front fender measured at an average of 1.1mm, or 0.043". As I mentioned earlier in this thread, that would equate to a thinnish 18-gauge. Your new 0.8mm measurement for the floor pan works out to 0.031" which would suggest really thin 20-gauge is right in the middle of the spec range for 22-gauge.. FWIW, I continue to like 1.0mm (0.039") for the factory floors and body panels because: a) 0.8mm sounds too thin, and; b) 1.1mm seems like an illogical (off-spec) choice that would have struck the Nissan engineers as being not only more expensive to buy from the mill but also adding 10% more weight than 1.0mm and requiring higher stamping forces. That said, it's interesting to see ConverTT's report that the Klokkerholm rear quarter repair panels are made from 22 gauge! As always, comments welcomed
-
Table updated to show revised (refined) measurement for the lower front frame rail reinforcement piece... Panel Location Measured Thickness (t) Source Gauge (derived from ‘t’) Gauge (reported) Source Front Apron (engine compartment) 0.032” Jfa.series1 20 20 Grannyknot Tabco repair panels (all) 20 Manufacturer ConverTT Klokkerholm repair panels (rear quarter) 22 ConverTT Thick-gauge panels & pieces (which ones?) 18 2manyZs kmack Lower Front Frame Rail (OE) 0.050” Carl Beck 18 18 ConverTT Lower Front Frame Rail (ZeddFindings) 0.062” Namerow 16 Lower Front Frame Rail - Reinforcement plate (‘pocket’) at front crossmember mounting point 0.0787” (2.0mm) AZStory ~ 14 Upper Front Frame Rail (‘horn’) 0.054” Carl Beck ~ 16 Front Valence Panel 0.032” Namerow ~ 20 Front Crossmember 0.076” Namerow ~ 14 Door – outer skin 20 ConverTT Inner Rocker Panel 18 ConverTT Radiator Support 18 + 20 ConverTT Floor Pan (OE) 0.044” CanTechZ ~ 18 Floor Pan (ZCar Depot) 0.045” vendor ~ 18 Floor Pan Bottom Rail (ZCar Depot) 0.060” vendor 16
-
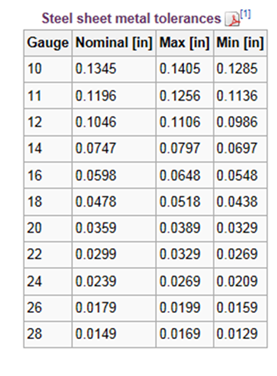
Point noted. However, 14-gauge sheet can be anywhere from 0.0697" to 0.0797" so your measuring gauge (sized at the median thickness of 0.0747") could register a 'no-go' even though the piece actually was made from "14-gauge" steel. More likely, however, is that this piece (like most of the other steel used in the S30) was made from sheet steel rolled to the metric standard by a Japanese steel mill. It seems very like that this doubler/reinforcement piece was stamped from 2.0mm stock (which nominally converts to 0.079" and would therefore likely register as 'too thick' for your measurement gauge's '14-gge/0.0747"' slot). Note also that 12-gauge is a big jump up in thickness from 14-gauge... 0.1046" vs. 0.0747", so an increase of 0.0299"... which is almost 1/32". From your picture, it doesn't look like your there's a mismatch of 0.03" between the S30 part and the 14-gge slot in your measurement gauge. It also looks like your 12-gauge slot would be way too big... All things considered, then, I like "14-gauge" for this part because it's very close* to what is most likely the real truth -- which I think is 2.0mm. (* 2.0mm/0.0787" vs. 14-gge/0.0747", so within 5% using the nominal design thicknesses). My purpose in starting this thread was to create a reference chart for selecting the right** sheet thickness to use for panel repairs. Since very few of us (in Canada and the US) have convenient access to metric-standard sheet steel, the best guidance for repair panel thickness comes in the form of 'gauge'. I suppose I could add a "mm" column, but that would confuse the heck out of everyone. (** Let me qualify my use of the word 'right' by adding that there's sometimes an incentive for using a thicker steel than the factory did. A good and common example is the bottom rail ('support') for the floor pans, where some owners choose to go with a thicker-than-factory steel and go full-length in an effort to better tie the front and rear sections of the 'chassis' rails together.)
-
Not that the metric system doesn't have its own moments. Consider the standard for determining the metre length unit. The basic unit of length in the metric system; it was originally planned so that the circumference of the Earth would be measured at about forty million meters. A meter is 39.37 inches. Today, the meter is defined to be the distance light travels in 1 / 299,792,458 seconds. Based in science? Yes. Intuitive? Not hardly. I like the definition of the kilogram better: The kilogram is almost exactly the mass of one litre of water. Consider, by contrast, the definition of the inch: The old English ynce was defined by King David I of Scotland about 1150 as the breadth of a man’s thumb at the base of the nail. To help maintain consistency of the unit, the measure was usually achieved by adding the thumb breadth of three men—one small, one medium, and one large—and then dividing the figure by three. During the reign of King Edward II, in the early 14th century, the inch was defined as “three grains of barley, dry and round, placed end to end lengthwise.” At various times the inch has also been defined as the combined lengths of 12 poppyseeds. Makes one pause when considering the implications of having a 427 cubic inch engine in your car.?