Zed Head
Community Member
-
Joined
-
Last visited
Everything posted by Zed Head
-
No editing allowed, so here's another post. A picture of the guts. You might also check the wires at the AFM sensor haven't rubbed through their insulation, causing a short. A piece of heat shrink, or tape or some glue might solve it.
-
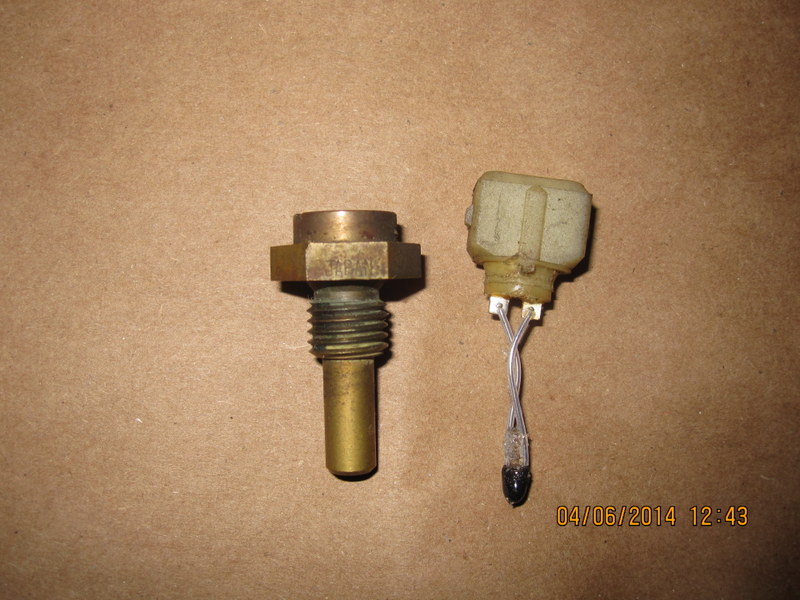
I accidentally ripped apart a coolant temperature sensor trying to get the plug off. It came right out of the top with the EV1 connector attached, just minus the threaded metal portion. The actual sensor is just a blob of semiconductor on two pieces of wire, surrounded by a gel, probably silicone, inserted in to the brass housing. If you have an old coolant sensor it might be worth an experiment. I'm sure it would have a fast response time out of its housing.
-
I think that Fast Woman may be right and you have weak pump volume. But I wonder if the volume is low because you're pulling air in to the pump. There's enough gasoline getting in to keep a seal in the pump mechanism and let the pump work but it's pushing mostly air instead of fuel. Or the fuel is sitting at the bottom of the system, back-flowing in to the pump to let it hold pressure. Maybe. Check your fittings in to the pump and the filter and its fittings. Or a quick test would be to disconnect the inlet hose to the pump and run a hose without a filter to a gas can. Make sure the hoses seal tightly.
-
Check your cam lobes (a flat one will cause an intake backfire - check lubrication while you're in there), valve lash (a loose one is like a flat cam lobe), and fuel pressure (lean mixture cause backfires). Those things are always good to do in general.
-
It may be that the things you listed are not all related. Following FastWoman's logic, what happens if you just let the pump run alone for the same amount of time it would take the engine to die, but without the engine running. Is the behavior the same? That would separate any engine heat, injection issues from the general weirdness. Just let it run, it won't hurt it, that's what it does when you're driving. And are you running a stock fuel rail and return line?
-
There are a few threads from the past about the solid state MSA regulators. They were kind of sensitive, apparently, and failed quickly. Hate to say bad things about a sponsor's product, but not all of their products can be perfect. Your signs point to a bad regulator.
-
A backyard check valve solution might be to gut a broken pump with a good valve and place the pump body in-line between the working pump and the filter. Or take the check valve and find the fittings to fit a hose barb and just insert it in-line. I have an old check valve and pondered using it with my aftermarket FPR that leaks down but the pressure was on the wrong side to use it that way. Just some options, if you have a pump that works well and is installed. If you insert the valve low in the fuel system, the leaky part of the fuel system should stay full from gravity.
-
Did you leave a comma and a word out? "tapped quickly against an exposed terminal from the centre post of coil" You want the center terminal to be close to ground so that it can spark. About a spark plug gap's width away. You could also put an old spark plug in the center wire and place it's electrode to ground. That's where the spark will happen. Then tap the jumper from negative directly to ground, away from where your center terminal is set up. You'll get a small spark from the negative jumper and a bigger one from the center terminal. The next step, or it could be the first, would be to disconnect the negative side of the coil from the ignition system. Have only the jumper wire connected, then do the tapping. If your ignition module is shorted out, it won't let the coil circuit be broken, so there won't be a spark. I have to warn though, that damage could happen when messing with sparks and electricity. I don't want to take you down a bad path, where you fry your ignition module while testing it. Thinking about your problem, I remembered the Pertronix module can be damaged if the key is left On without the engine running. It may be what happened to yours, and it could happen while you're testing. I would stop and reconsider. The things that I do may not be suitable for general consumption. http://www.pertronix.com/support/tips/ Here's another link from Summit racing. It's for the Ignitor II but it mentions look for signs of overheating on the module. http://static.summitracing.com/global/images/instructions/pnx%20ignitor%20ii%20tests.pdf
-
I had a GM HEI module that started generating tiny weak sparks that wouldn't start the engine after I forgot to put two spark plug wires on before starting, after doing some work. It was hard to decide it was bad because the spark was there, just weak, but I had a spare module and know that electronics don't like stray electricity. Installed the new module, no other changes, and was back in business. You can test the coil using a jumper wire on the negative terminal. Set the main coil wire up at a good spark distance. Connect a wire to the coil negative, turn the key on, then tap and remove the wire to ground quickly. Each tap should generate a strong spark. You'll be mimicking what the module does. Odd aside - when you add "ing" to mimic, you also add a "k". Weird.
-
It's good to have a plan.The F54 is just an engine block. Here's a calculator that someone created that's really handy for seeing how different combinations of parts work together. OZDAT.com Engine Design Utility
-
EuroDat's talking about the fourth picture down in your first post. Take the lower left valve/switch out, the plastic one, it's not used on your system, and replace it with the new coolant sensor (if the threads are correct, they might not be). Your engine should not really be driveable at all without that sensor. The fact that it is means that it will probably run worse when you install it. Other things have probably been messed with to get it to run. One of those two plugs in your hand in Post #4 is probably the coolant sensor plug. It's supposed to be connected to the sensor. It's critical to proper operation. You have some work ahead of you. Those new parts will probably not do the whole trick but they'll get you closer.
-
No offense but you haven't even described your starting point. Swap from what, in to what?
-
Are you running points or Pertronix ignition?
-
What is the resistance on the coil? The 1972 points coils had a resistance of 1.5 to 1.7. Looks like the resistor is 1.6 ohms, as you saw. So total resistance on the primary circuit would be 3.1 to 3.3 ohms. Maybe you have a low resistance coil and you need more resistance. Or a different coil. Sorry, I might be confusing things. It's better to give too many facts rather than one at a time. If everything is right in the ignition system, it might just be bad tachometer. Has the tachometer ever worked correctly?
-
Why did you get a new resistor? What's the resistance of the coil you're using. You're not giving much information. I've read that the 240Z tachs require a certain amount of current in the wire to the tach. You might have too much resistance on your primary circuit. Maybe you don't need that resistor.
-
I think that your user name is putting people off. Edited. Removed some words.
-
Initial timing really depends more on the advance curves of the distributor that is being used. If you have a reman. distributor with different weights, springs and vacuum advance canister than factory stock you probably wouldn't want to run factory initial timing. Just an observation that could be overlooked.
-
Thanks for that reference. The latest NHTSA recall report though, blames it on the the keys. Do you have something from earlier? The general situation has the look of everyone trying to cover their asses, including the government watch-dog. Pretty sad. Recalls & Defects | National Highway Traffic Safety Administration (NHTSA) http://www-odi.nhtsa.dot.gov/owners/SearchResults?searchType=ID&targetCategory=R&searchCriteria.nhtsa_ids=14V047000
-
Thanks for posting, they all count. So far, only one person with headers and EFI has posted, siteunseen, and he is the only one who doesn't have the problem. Wish we had more EFI and header people who would chime in. On the accumulator patent - That's a good find. The same reasoning was probably used by Nissan to develop the five second timer relay on the fuel pump circuit. It night be a typical covering-the-bases patent though. Filed in 2005, published in 2007, but no data on actual engine restart effects, just some pressure-time curves. With an FPR on one side and a big reservoir of fuel on the other, the net effect is to use fuel as a cooling agent. Hot fuel gets pushed through the FPR, back to the tank, and is replaced by new cool fuel from the accumulator. Interesting that they called out the 10% ethanol blend. Thanks for the link, the other citations in the patent will be some good rainy day reading.
-
-
Uh oh, we're stomping the same ground. I think that the 77 still has its manifold, although the transmission is gone. But it's actually a 78. It would have the round port manifold, which would cut the corners on his ports, if he has the 76 N42 head. I think that I've seen that 76 too, I have a vague memory of an old moldy car. I think that it still had its engine and parts. Maybe.
-
Curious to see the crack, if you could post a picture. I have a leak that seals up but was confident that I had sealing surfaces. I suspect that I also have a crack but won't know for sure until some future date. There are five parts to the exhaust system - a pipe from the manifold to the anti-resonator, the anti-resonator (I'll call it the AR), the pipe from the AR to the muffler, the muffler , and the tail-pipe. The MSA pipe might connect to the AR or it might require custom piping. The guys at MSA will answer your questions if you call. There's someone down here that has some MSA headers for sale (not me), although he says round-port when they should be square - Datsun Headers Make sure that you know what type of head you have. Parts get swapped, and there are square ports and round ports to be aware of.
-
The nicoclub links aren't compressed. Open the 1976 or 1978 engine Fuel chapters. Whoever did us all a huge favor copying all of these FSM's copied all of 1977 in to one huge file. The others are split into chapters. The xenon files are zipped, so you would need an unzipping program. Look between the first two spark plugs, at the bottom of the head and see what is molded there, It should say N47 but might say N42, P79 or P90. I wouldn't worry too much about original engine. They're all very similar.
-
Those wires are called "fusible links", which I think is a translation from Japanese which could also be meltable wire. But the big red one looks like just regular wire built as a replacement. See the links below and look in the Electrical chapters. I have to guess that you have a ZX engine with a Cylinder Head Temperature Sensor (CHTS), because there is no coolant sensor n the picture of your thermostat housing. Plus that "water pump connection" looks like a typical "thermal vacuum valve" from the ZX's. The sensors do the same thing, from different positions. Post a picture of the sensor you replaced, it doesn't seem visible. Download an FSM from your year of car and read the Engine Fuel chapter. Download the Fuel Injection Guide from the xenon link and read it. Get a multimeter and a fuel pressure gauge and get some numbers. Adjust your valves and your timing, etc. Lots of fun things to do, each will make the engine run better. Datsun Service Manuals - NICOclub XenonS130 - S130 Reference XenonS30
-
Don't forget RockAuto.com if you have time to wait for shipping and buy enough to reduce shipping costs. And Amazon, it's surprising what's available there. It really depends on the part and how long you want it to last.