


Zed Head
Free Member
-
Joined
-
Last visited
Everything posted by Zed Head
-
 That makes sense then. Good luck. On that note - just curious - but if you reach in to the car and push forward, backward, or sideways on your fuel cell, will it move? The two strap system looks like it could use a bit more engineering. And, safety-wise, the tank is inside the cabin of the car, which is generally a bad thing. Leaks, hoses torn loose (they're exposed on the outside), and accidents can all expose everyone inside to raw gasoline. Sorry to pick, but it is what it is.
 -
I thought the car already had an RB25 installed. You might rethink the RB part. It's an exotic engine from an exotic land and costs exotic money to get it done and maintained. Lots of extra work just for "RB". No offense to any RB guys that have already done it. It's a challenge, but not a good one for someone who doesn't have a load of cash to spend on it.
-
My theory about the diff clunk has been that it's the diff mount metal dropping down and contacting the crossmember metal. So, even though the snubber might stop the lift, it might not stop the compression downward. I ran some tests when I had clunking, by stuffing pieces of rubber inner tube in to various areas. One was to jam it in to the gap inside the mount, which will lift it and stop it from dropping. If it works, you need a new mount, like the transmission mount. The other cause of clunking is bad u-joints.
-
That was prime time for California Datsun. Is it one of his? Known for sandy parts. Part of the shining process.
-
Might be a 280ZX L28. They run much higher advance and that timing tab has an extra 10-15 degrees over my 76, with AC, pulley. The pulley diameters are different than mine also. What are the block and head numbers? F54 and P79 (or P90) are ZX. Edit - except 79 and early 80, which are still N42 and N47.
-
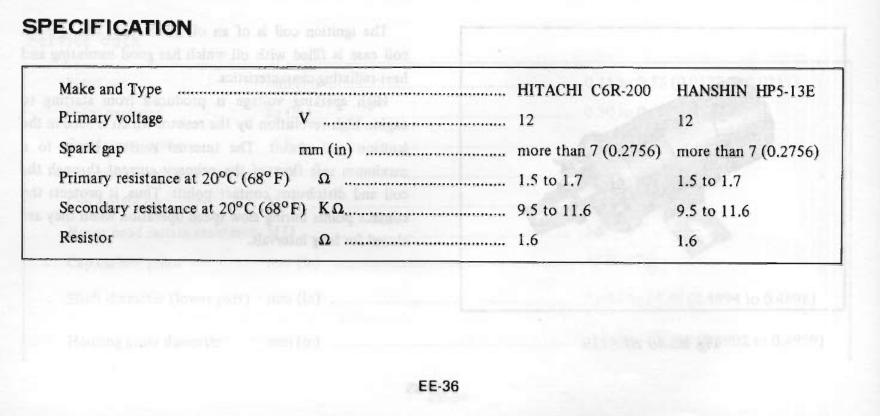
Everything looks right. Sounds like your old coil just went bad. Your MasterPro coil is right on spec., should work fine and last long. 246Blue won't like it, but it's the world we live in. Google says lots of good things about that coil. Here's the 1972 specs. which should be common across all of the points ignition systems.
-
If I recall the 240Z circuit right they have the a resistor before the tach and the coil is after the tach. Seems a weird way to lock the tach and coil together in to one circuit. If I had a 240Z and had this problem I think that I'd run a separate power wire to the coil, in parallel with the tach, and then add a potentiometer (rheostat, whatever) to the tach circuit. Use a resistor or the coil itself to determine overall coil circuit resistance, and the potentiometer to control the current through the tach. Seems like the main problem is getting the right amount of current through the tach. I don't know if the problems described are too much or too little. If it's too little then this wouldn't work. SteveJ, or CO, or Mark M or Dave WM or one of the other guys that thinks about electrons alot might have some thoughts on it.
-
Mike LOVES these kinds of problems. @Mike
-
It's called a "float" bowl because there's a float inside that moves up and down to seal the fuel inlet and maintain a certain fuel level. A floater in a bowl is a whole different thing. Your fuel direct from the tank doesn't look terrible. There shouldn't be crud in the float bowl though. A simple filter before the carbs should keep the fuel clean to the carbs. Silicone on a carb float bowl is almost always bad. It means somebody did a half-job. You don't want any broken gaskets on the carbs either. I'd get some new gaskets and clean and reset those carbs to spec. myself. then reinstall them with a good fuel filter to keep things clean. Just for starters.
-
To Detroit or England (shipping docks)? Thought your brother was going to hoon around Michigan for a while. Interested in what it takes to get it to England. Could be educational. That floorboard rust is still wet. Leaks! Common.
-
What are the specs of the new coil? Is there a brand? Matching the parts specs is the key. You haven't provided much info. Are you sure it didn't say "external resistor" not "external regulator"?
-
Here's a thought - maybe the wheel is hanging lower than normal. The insulator could be busted or the shock might have abnormal travel. Take a picture of the wheel hanging from distance so we can see the gap. Or maybe some members have an idea of if that hose mount on the strut looks low or not.
-
Looks strained to me. Is that with car on the ground or hanging in the air. Car on ground will be different, might be okay. I browsed around Rockauto and they show 10.3" as front length for 1972, Sunsong brand. But 12.12 for 1976 (280Z), Raybestos brand. Raybestos front for 1972 was 10.19" though. So your length looks right for the year but you could add 2 inches by switching to a 280Z hose.
-
I know there's at least one member in Georgia that likes to get out and about and he's a carb guy. @SteveJ Before you drop the tank, just disconnect the line before the fuel filter, get the pump to run if you still have an electrical pump and see what comes out. Use a 2 liter soda bottle so you can see it. You'll know in a few seconds if you have an obstruction in the tank. Or measure at the carbs. See if the float bowls are full. Maybe that's what you meant by "carburetor twitching"? And yes, your car did come with EFI. Check your engine numbers to see if it's still a 2.8 liter or a swap. And 1976 still put the engine serial number on the metal plate by the clutch MC. Compare those.
-
I have mixed feelings about the whole thing. I've never liked the Photobucket links because they're usually slow to load. And sometimes people let their accounts lapse or go dead and the links disappear anyway. I've always thought it made sense to load them on to the site that you post on. No offense to all y'all Photobucketeers. The internet is kind of like a big old tree. Branches will die and fall off and eventually the whole thing is going to fall over. Paper books will become like gold.
-
Test the coil resistance, even though it's toasted now. I'm not sure that voltage out is supposed to equal 6 volts, the thought comes from people calling it a 6 volt system. Your resistor resistance is actually higher than spec. but it also rises with current and temperature. Might get a lower number when it cools down. Seems more like your coil just crapped out. What's the brand? You can also overheat ignition parts by leaving the key at Run, if the points are closed. Maybe somebody was playing the radio at the upholstery shop, using Run instead of Acc?
-
Photobucket's management is incredibly short-sighted and doesn't understand their customer base at all. Weird. $400 today could be $800 tomorrow. They don't even understand why people are upset. http://www.denverpost.com/2017/07/06/photobucket-complaints-over-charging/
-
Will the next guy's bearing be too loose? Just a thought. Still a fan of working within the tolerances. The bearing is the replacement part. Still, good to know if you're in a time-bind.
-
Most of us here recommend taking measurements if you can. You can measure power and ground for the electrical components. Check for spark. Check for fuel in the float bowls for carbs, pressure if it's EFI. Watch the gauges, for signs. Your car should have electronic ignition if it's stock. Watch the tachometer when it dies. If it drops to zero but the engine is still turning because the transmission is in gear, that's a sign. If it's an automatic, it's a bit more difficult. Guessing and replacing can actually cause new problems, then you're in a bigger puzzle with more unknowns..
-
I'm not seeing the junk yard Audi suggestion fitting with the $350 custom axles. You lost me. The CV still needs to be bolted to the flanges, inboard and outboard. $50 per axle, with an endless supply, and some adapters might be worthwhile.
-
Hey, I replied to your zcar.com thread too. (You really shouldn't post on two threads at the same time. Give one a chance...) Compare the 1976 illustration with 1977 and you'll see that what I described there actually is right. Nissan removed a spacer per groove in 1977.
-
Do you know the dimensions? Length at at least. Maybe you're on to something. People have messed around with Pathfinder front axles because they're short, but it's a lot of work.
-
Good eye. Honsowetz says that when people do that they usually open up the oil passage in the block to increase flow to the head, to supply both. His has been working so it must be right enough.
-
Neil Young's style is hard to comprehend, let alone rate. You must be listening wrong.
-
He hasn't been signed in since March. I'll give him an @Dave Patten
