


Zed Head
Free Member
-
Joined
-
Last visited
Everything posted by Zed Head
-
 Your biggest rust concern in New Jersey is salt from de-icing compounds. I spent a few years in Philly and my Pathfinder foot rails were rotted out in just a few years. Avoid the roads after weather cold enough for the DOT to start spreading salt or magnesium chloride.
 -
I'm sure it reduces the wear on the stock mount by a lot since the stretching motion is minimized. And with less lift, a worn mount might not clunk. When I was messing around with mine I actually had a snubber on top for a while, snugged way down. The nose was clamped top and bottom. I got lots of gear whine in the cabin then. The other benefit to using the GM transmission mount on the top is that you can remove your rear suspension without the diff nose hanging. Which barely matters of course since you can't roll the car around anyway.
-
It should be a straight across super-easy swap. The only difference you would see is in 5th gear, if the 80 has the .773 ratio. 5th gear would be farther from 4th, which makes it a bit less usable, but will drop a few RPM on the highway, for a smoother engine and better mileage. But you should verify that it hasn't been swapped in the past, using the signs 7too mentioned. The speedo gear lock-down screw, and the exhaust hangers. If the 80 car actually has the older 5 speed then you will notice the difference.
-
He'd be back to about a 75-77 engine with the N42 head. That would work. Maybe someone blew a head gasket on a turbo engine and just converted to NA. Might be also that somebody just swapped the damper over from an 81.
-
Forgot to say that the clunk probably comes from the diff dropping back down on to the stock crossmember mount after it lifts up. So you really need a new or good quality factory mount along with the snubber, to avoid the clunk. Many people have found that just paying the $70-80 for a new factory mount solves the clunk. It's so hard to tell that the factory mount is no-good anymore though, that the simple fix is overlooked. The other, original, reason for the RT mount is that it's stronger. Ron Tyler designed it to stop breaking the stock mount on his small-block chevy swapped 240Z. I built mine cause I like building stuff.
-
I have the polyurethane GM mount like wheee!'s and the PU mustache bar mounts. My experience is that it's the mustache bar mounts that transmit most of the gear whine in to the cabin. I was able to reduce that noise dramatically by creating a small air gap at the bushing. Typically the bushing is clamped tightly in place and that allows vibration to be transmitted. The differentiation in usage is that wheee! and me are using the system as a mount. Diseazd is using his as a movement snubber, or strap replacement.
-
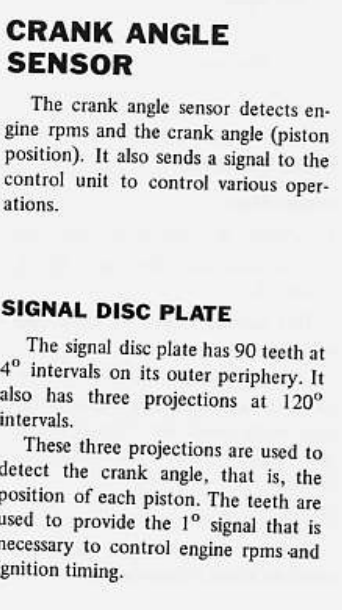
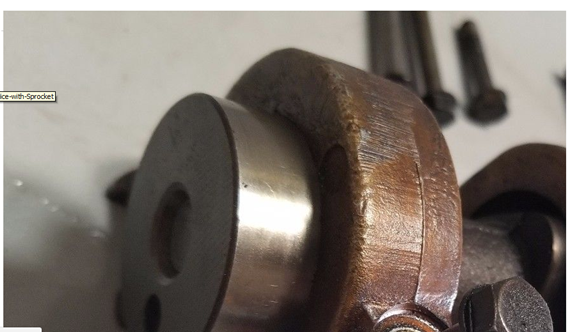
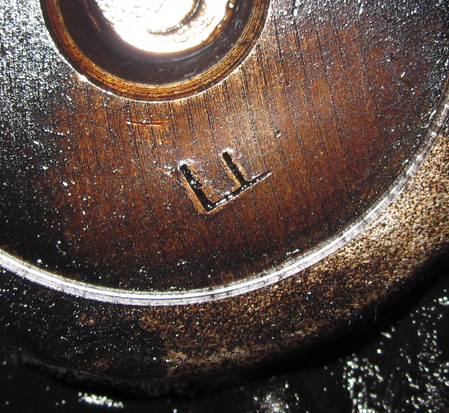
Looks like the bumper duct tape needs replacing. The 81 280ZX turbo engines used a crank trigger. But they had 90 teeth, and three teeth. How many teeth does yours have? Not sure how it would work with the 280Z EFI system unless the PO rigged it to use the three. Are you sure it's active, not just an artifact? Edit - actually my brain just restarted and I realize that it wouldn't work with the 280Z EFI because there would be no timing control. Anyway, looks like a fun project.
-
Might be worth an offer for someone that needs parts. Looks like there's a shift lever in the tub. https://portland.craigslist.org/wsc/pts/d/datsun-series-5-speed/6330093961.html
-
Forgot to say, not mine...
-
Needs 10 mm bolts. https://portland.craigslist.org/clk/pts/d/datsun-200-mm-240z-280z-rear/6336185395.html

-
The big nut is commonly called a "gland" nut because in the original application there is a seal (aka gland) ion the inner edge, keeping the fluid inside the strut tube. With aftermarket shocks, it actually is a retaining nut. It fastens the shock body to the strut tube. As I described originally. If you don't see threads, you'll have a loose shock body inside the strut tube. People might use those isolators, but I don't think that they are a factory piece. http://www.carpartsmanual.com/datsun/Z-1969-1978/axle/rear-suspension
-
Looks nice. You didn't supply the CL link. Eight cities on the MT CL - https://geo.craigslist.org/iso/us/mt Found it. There's no VIN. Everyone loves a VIN - https://missoula.craigslist.org/cto/d/datsun240z/6307724018.html A bit worn. Is it yours? Or Anita's? $25,000.
-
#1 - If you're saying that there's no flat to fit the D-shaped slot in the insulator then something is wrong. The KYB's are a bolt-in. #2 is normal. The nut is seated on the top of the shock body inside, clamping it in to the strut tube.
-
The one thing that you haven't tested is the center wire itself. Make sure it's good, low resistance continuity, and the terminals are firmly connected. Your coil resistance values look about right.
-
The intake ports seem very smooth and round. Maybe some work has been done. Does it have a matching intake manifold?
-
Test a small area with MEK or acetone. If it's a lacquer it might come right off. I think the tank is made of nylon (polyamide) which should be okay as long as you don't soak it in solvent. Found a nice reference chart, if you don't have either of those. Nylon 6 and 6/6 are similar. http://www.plasticsintl.com/plastics_chemical_resistence_chart.html
-
The piece underneath the bumper and grill, that gets scraped on the parking bumpers and shrubbery, is often bent. The painted part that's hard to reach when you're washing the car. Worth a look. My local wrecking yard calls it a gravel pan, but I don't know why.
-
Those plugs don't really look that bad. All six electrodes are fairly clean and look like they've been working. #4 looks worst but still looks like it was firing.
-
I used to struggle with getting the lower half of that clam shell off of the column until I realized that the trim ring on the ignition switch will pull back about 1/8 inch. The extra room allows it to slide off pretty easily. Agree with Dave that more testing would have made things more clear. Still not really clear why the "slow turn" worked, and why you saw spark, but it wouldn't start. There's only the ignition relay and the starter motor involved, unless somebody modified your wiring. Won't be surprised if the problem reappears.
-
There is one last test you can run to be sure. Leave everything as you have it. But disconnect all of the wires from the negative post of the coil. Then attach one of your jumper wires to the negative post. Make sure that the other end of the jumper wire is not touching anything, and turn the key On. Take the end of the jumper wire and tap it to ground. If the coil is good you will see a spark at the spark plug on the valve cover. If something is shorted out on the coil's negative post wires it can also stop the coil from working. The circuit to ground has to be made AND broken. If you have a short it won't get broken.
-
atlanticz's site (where's formerly Blue been anyway?...) has cam specs listed. That eBay cam might be an M. Or a W. Doesn't like Nissan really spec'ed a top or bottom when stamping them. Mine's an F. But, either way, the specs are not radically different. Probably the way they are mainly for emissions. It will certainly work, but you might be leaving a few horsepower behind. Might not even notice. http://atlanticz.ca/zclub/techtips/cam/index.htm
-
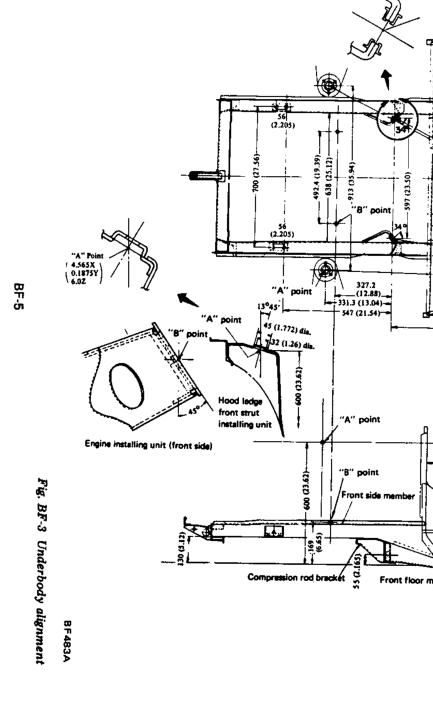
I didn't study it too hard because all of the lines and numbers and words make my head hurt, but it seems like the info might be in the Body chapter. Might have to make some assumptions about how engineers/draftsmen think. Looks like they only show one, which might mean they're both the same. And I don't know if there's enough in there to fully answer the question. Here's a sample...
-
I would use the center wire from the coil, as Chas mentioned, not a spark plug wire. You can stick a bolt in it or maybe a spark plug. Then you'll get six times as many sparks, if the coil and ignition module are okay. If you still don't get any spark, connect a small wire to the coil's negative post (Chas's suggestion again), turn the key on, and tap the other end of the wire to ground. Have the center wire of the coil, with something metallic in it, close to ground, about a spark plug gap away. You should see a small spark there and a big spark from the end of the center wire of the coil. You will be essentially acting as the ignition module, making and breaking the coil power circuit. This test will narrow it all down to the coil. As Chas said, if you don't get a spark with this test your coil is bad. When you did the test below, what you did was connect the two leads to essentially the same point. The coil negative is connected to the battery positive post, through the coil, then the positive post and the wiring. Every thing looks about right on your measurements. Do the test with the wire on the negative post. Connect the wire, let it hang in space, turn on the key, tap-spark-tap-spark-tap...is what should happen. Your injectors should click on every third tap also. It's a simple test of the ECU and wiring, in addition to the coil
-
Could be bearings or bushings. People do swap in the CV axles. Take a picture underneath from the back and we can tell you what you have. There are simple things that you can do while you're waiting for the AZC package. The disconnect is in the transmission itself. Everything still spins though, just no power transmitted.
-
CO, I sent it to rcb. Hopefully it works for him. I'm sure that another will show up somewhere. I'll keep my eyes open.

