


Zed Head
Free Member
-
Joined
-
Last visited
Everything posted by Zed Head
-
 In the end it boils down to comfort level. I made a tiny paper protactor once to measure an angle on small small part. Just took a short time with paper, pen and a big protractor. If that was my engine I'd probably do that. I trust the angles and would be comfortable putting everything back together that way. Some of the forum people could probably design and build a chain tool that allows the chain to slide by so the tensioner pop-out problem doesn't exist. I saw on another forum that some guys built a little jig to hold the sprocket where it would be on the head and mounted the sprocket on it on top of the block to hold the chain tight. Probably doable with some wood. If the common wood or plastic tensioner is tight the chain will ball up underneath it when you turn the crankshaft. And as we all know, the more bolts you remove on these high mile engines the more bolts you'll break. Anyway, good luck to him whatever he decides to do. Here's another one - remove all of the rocker arms so that the valves are all closed. Put it together, turn it to wherever it needs to be to see the marks. Adjust, then reinstall rocker arms.
 -
The tensioner popping out. "Need" is subjective. He probably hasn't been back yet because he realized the tensioner popped out three weeks ago.
-
That's what the marks on the engine parts are for. Notches, grooves, pointers, to verify correct cam timing. If you go slow you can turn the engine by hand once it's together. If you're really strong you could probably bend a valve by hand, but you'd have to have hands of stone to not feel the initial contact. Odds are he'll get it right the first time. I think I did some math once and found that one chain link is like 7 degrees or something like that. If he takes the front cover off he could end up on a whole trail of "while there" fixes and replacements. Front seal, water pump, timing chain is probably worn, probably break some thermostat housing bolts so better have the drill and Helicoil ready. Don't damage the damper rubber while pulling the damper... Many possibilities. Kind of comes down to risk/reward.
-
The car looks great. If you have pictures of any paperwork that you have, and the car's ID tags, that would be fun to see. Some people get really caught up in the numbers, and as you can see, there are still open questions about how the cars were built and how they got distributed around the US. Even with the paperwork there will probably still be arguments about whether it's real or not, what "model year" it is, what "series" to call it, whether Bob Sharp touched it or not. Good stuff. See if you can find a Bob Sharp fingerprint somewhere on it. Remember also that anything original to when the car was built might add more value than being shiny and clean. Patina, provenance, history, whatever. I wasn't kidding about the fingerprint.
-
He could also turn the camshaft the few degrees to match the damper pulley. The key to not damaging a valve is that the cam timing matches the crankshaft timing. If he's 30 degrees advanced on the crank the cam should be 15 degrees advanced. Then install the sprocket and chain. The chain is what actually controls the cam and crank relation. There's basically two steps involved here. 1. Get the head on with the valves in the proper position to not hit piston tops. 2. Get the sprocket and chain on so that the crankshaft can be rotated without valves hitting piston tops. Keep those two things in mind and come up with a solution. People have used a pipe or lever to hold up the sprocket and chain while they moved the crankshaft. The big risk now is having the tensioner pop out. Then he's in a whole new world. The tensioner really really wants to pop out of its hole. Many possibilities.
-
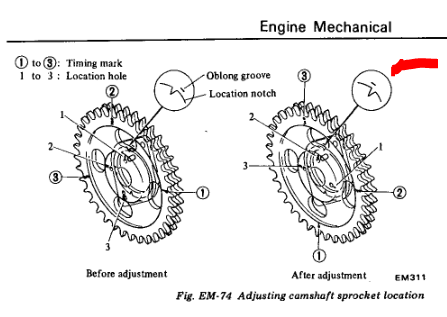
Just thought also that you can put the sprocket on to the head temporarily to line up the notch and groove. A little more precision than just having the cams pointed up. If you're worried.
-
I forgot about that. I'll bet your timing mark is within a few degrees of zero right now. I'd go ahead and put the sprocket on, remove the chain holder, then rotate the engine slightly by hand to get timing mark to exact zero and to get the chain tight, to see how your marks line up. I can tell by your piston positions that the timing mark is close. Your valves will have plenty of room. Just go slow.
-
Yes. Once the sprocket is on it's not needed. But if you need to adjust the sprocket put it back in. It can be difficult to get the sprocket on even if everything is right. Good luck.
-
From zcar. https://www.zcar.com/forum/15-cars-sale-1970-83-240z-260z-280z-280zx/418412-1970series1-gmail-com.html
-
Set the damper pulley ignition timing mark on zero, it's almost there now. Install the head with the cam lobes up on #1 as you described. Then install the cam sprocket so that the notch and groove are aligned as shown in the FSM. You'll probably have to turn the camshaft slightly to get the sprocket on. Since your timing chain is worn you might have to use the #2 hole on the sprocket. Make sure that the driver's side of the chain, the straight side, is tight, and the damper pulley mark is on zero, when you compare the notch and groove positions. Once you get those three marks lined up you can spin the engine with no fear. That's the basics. That's why the marks are there.
-
-
Are you running resistor plugs with resistor wires? I'm no expert. And I can't really tell which wires you mean are the secondary wires, or what "pulling kilovolts" means. Anyway, the oscilloscope traces would be interesting if you could paste them in over here. Pretty sure that some of the members here are electrical engineers and would like to see them.
-
Edit - I just saw that you're using the gap recommended for points. Can't see the traces without becoming a member of the other site. What gap are you running? The Mallory Unilite is not a "high energy" ignition system. It is electronic but runs the same plug gap as a points setup. http://documents.holley.com/mallory_instructions_unilite_distributor_37_38_45_47.pdf
-
If you're going to do wheels and brakes, and suspension, you might consider dropping everything as an assembly. Struts, control arms, axles, diff will all drop as one sub-assembly. Drag it out and the nuts and bolts will be easier to get to.
-
"Recently rebuilt" could mean almost anything. I'd get details. Primer can hide a lot. And Houston is next to the salty Gulf. Not sure they don't have rust problems too.
-
Looks like it might be. The N3500 number doesn't show up on any of the 240Z - 280Z diagrams. Maybe its the ZX gasket.
-
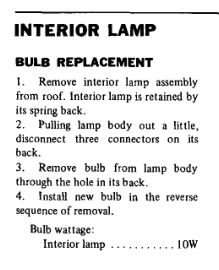
I posted this before but be careful when pressing on the lens. Mine lost its last bits of flexibility in just a few years. Shattered in to bits. Here's one factory bulb change procedure. They didn't have it in the early FSM's. Found it in 1976. Might be different for earlier. Looks like it just pulls out then has to be unplugged. Spring retention.
-
This one should work. http://www.carpartsmanual.com/datsuns30/Datsun-Z-Index/Engine-280Z/Manifold-Egr/From-Aug-76 https://www.nissanpartsdeal.com/parts/nissan-gasket-manifold~14035-p7100.html https://www.google.com/search?client=opera&q=14035-P7100&sourceid=opera&ie=UTF-8&oe=UTF-8
-
The CL ad looks legit. But. The phone number comes up as Skykomish Lodge in Washington state. Beware. Might be a phisherman. Or it might be a mistake. John? Good luck to anyone who tries to buy it.
-
People use "glass packs" all the time to replace the resonator. If you replace it with pipe you'll probably get drone. Glass packs are pretty cheap. If you post a picture of the damage we could probably tell you how to put it back together. https://www.google.com/search?source=hp&ei=MqfDW5KcAoSv0PEP96WAoAE&q=glass+pack+muffler&btnK=Google+Search&oq=glass+pack+muffler&gs_l=psy-ab.3.1.0l4j0i10l2j0l4.1477.8563..8751...3.0..0.116.1042.22j1......0....1..gws-wiz.......0i131j0i22i30j0i22i10i30.Mq2b0NCN5cY
-
You're off by $80,000 and behind the times lonetree!!!! John is watching. He fixed the Contact link. The price will be rising soon.
-
One other thing to be aware of is that when the seal wears really badly it can then wear a groove in the driveshaft slip yoke. There's a metal spring inside the rubber seal that can wear through. Metal on metal then. Your leak looks like a bad one. If the owner pulls the shaft and finds a groove you might want to wait on the repair. The 240Z slip yokes are replaceable. Good luck.
-
MSA does a fair job of matching their parts. Not sure why you'd want to second-guess them. Is their a part number on their gasket? If the metal ring lands in the gap between the exhaust liner and the head then it won't do much. You do have an N47 head right? The specs on the page you posted say 75-78 which covers square port and round. Something seems off.
-
You said puddle but didn't show one. Unless that blank video has one in it. Some video formats don't make it through, probably a phone thing. Gear oil has a distinctive smell. That rear seal is known to wear. Did he buy the car for you or is it his?
-

Important Information
By using this site, you agree to our Privacy Policy and Guidelines. We have placed cookies on your device to help make this website better. You can adjust your cookie settings, otherwise we'll assume you're okay to continue.