



AZ-240z
Supporting Member
-
Joined
-
Last visited
Everything posted by AZ-240z
-
Wiring harness re-wrapping : MGB & GT Forum : MG Experience Forums : The MG Experience Isn't google great?
-
2 Rolls Factory Electrical Non Adheasive Wiring Harness Friction Tape M | eBay
-
I used plasti-dip to restore a couple of the retainer tabs found predominantly under the hood to secure the wiring harness. Two of these tab's spot welds had broken loose. I just stripped the original plastic coating, recoated with plasti-dip, painted with car color, and re-secured tabs using body panel repair grade epoxy instead of welding for a very easy repair. Looks perfect, lasts a looooooooooong time. Also, if you can find "loom tape" which was originally used on wiring harnesses and has no adhesive backing, in lieu of electrical tape, and,once you learn how to secure the loose ends when wraping with loom tape, it looks perfect and doesn't end up a dirt attracting, sticky harness. FWIW Dan
-
I just noticed this thread for the first time. I have a pair of "new-in-the-box" Koito bulbs marked 6024LH, as well. But, the important information is on the boxes. The part number on the boxes is "02260-231KO". Checking this part number on my trusty parts CD shows this number to be good up to 07/73 for our cars. Hope this helps. Dan
-
Steve, its hard to see the actual color match, but I'm sure it is very close. Looking forward to actually have the opportunity to purchase some of your very nice looking efforts. Dan
-
Brian, talking about Rebello, air dams, and stuff, if you haven't taken a look at this "Petrolicious" youtube video, have a look and enjoy. It is the first time I have seen Watanabe wheels as they really should look on a very nice built-up car. Dare to Be Different in a Datsun 240Z | Articles Dan
-
From another "Purists point of view", (I'm currently in recovery and attend "Purist Awareness" meetings twice a month;)), It looks perfect, the orange/red highlights are very evident. I second just putting it back together and enjoy! Detail work is what set a car apart. Don't settle for 20' or 10' perfection, 1' to 2' is so much more fun and rewarding. Now, let the fun begin! Dan PS: Brian, take a look at your attachments, side by side of color chips and car. In the natural light it looks like your car is a perfect match to the original shade.
-
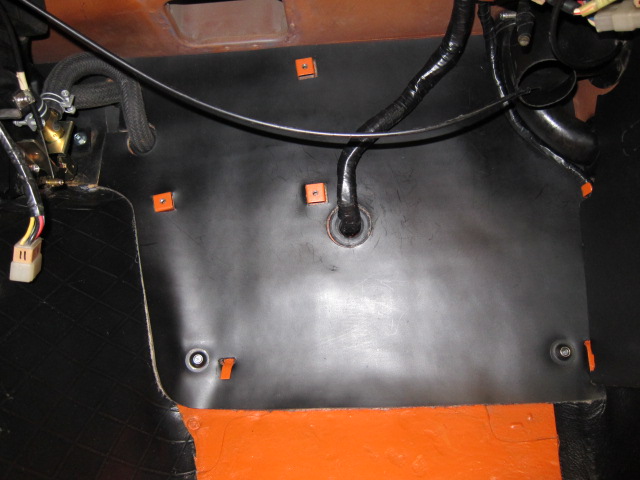
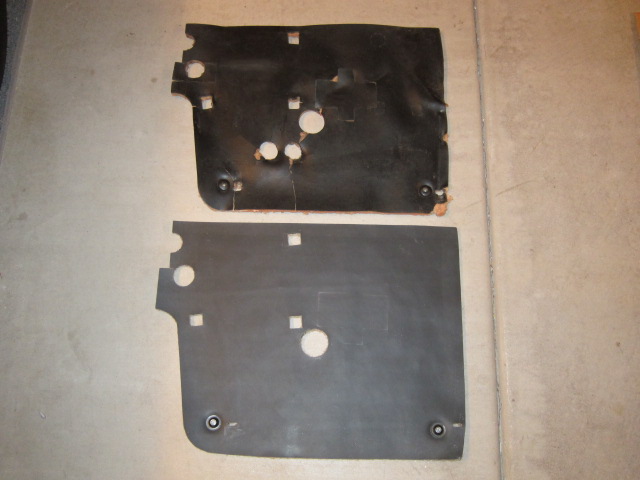
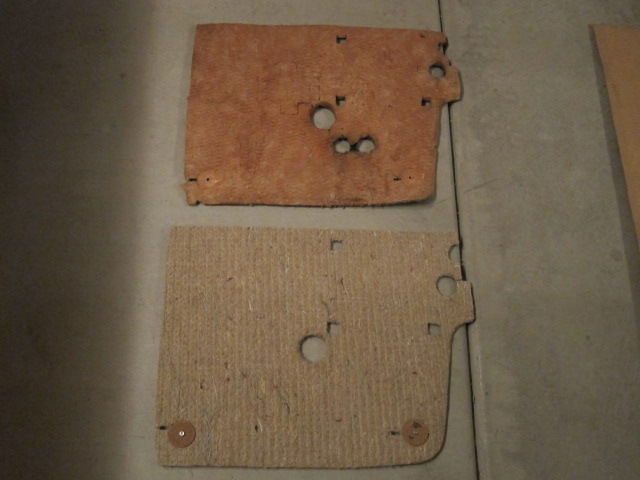
Hi Mike, There is a local upholstery shop that will give me, but I alway pay something, a pint of there yellow upholstery contact cement, or glue, which they use in a sprayer for there purposes. The firewall has a number of tabs which hold the firewall insulator in place, nicely, but I paint both the firewall and jute with this glue, allow it to tack up, and then press it into place for a smooth and secure installation with the metal tabs. When I was able to find the sheet of black butyl material with the peel-off adhesive backing, and source some original horsehair jute, the creation of the insulator went very smoothly, and looks totally original when installed with the edges exposing the jute backing when looked at closely, just like the original. One of the most useful tools I have used when accurately cutting material from carpeting to jute to butyl sheets is a large, and very sharp set of upholsterers shears. Nothing looks more homemade than ragged edges. These beauties cut easily, precisely, and makes anything look factory. Thought I'd throw that in as a possibly helpful aside.
-
Alan, after taking a closer look, I believe you are absolutely correct. Probably 15 years ago, I order a faceplate for my early 240z. What I received was that radio delete storage pocket. I did hold onto it for several years but finally just gave it away. Not my best decision!
-
26th-z, Looks like the car in your picture also has the radio-delete storage pocket installed. Were cars delivered with this delete option anywhere, that you know of, or does that compromise the shift knob argument? I do know that this delete storage pocket part could be bought over the counter in the US.
-
When I picked up my car from the dealership 42 years ago, they had already replaced the wooden knob with an Amco leather covered knob with a red, white, and blue medallion inserted where the shift pattern normally is. I, then, purchased a little shift pattern plate, can't remember if it had an adhesive backing or little screws, and placed it on the console. I would say that your shift knob is Amco aftermarket. Dealers would put as much aftermarket stuff on new cars as they could to tack on every possible chance for a higher profit.
-
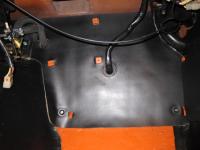
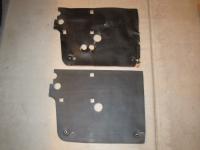
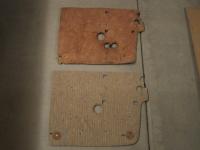
Newport Upholstery Source - Automotive Hardware Mike, The triangular piece is the female snap which is mounted on the backside of the carpet. This piece is fastened to the carpet with a retainer ring with three barbs which is on the front of the carpet. The above address should show these pieces sold by Newport Upholstery. The male snap ring mounted on the front of the firewall insulation is held on with a phillips head machine screw with a large fiber washer and small flat washer and nut on the back. Hope this helps. Dan By the way, using the original male carpet snap mounted on the firewall insulation, I was able to reproduce a very nice firewall insulation piece for the passenger side. Went to my local collision repair center and purchase a piece of black butyl, spl., with adhesive backing. Don't know the mil thickness but will check if interested. It duplicate the original very well. Then purchased some original jute from Newport. Made a pattern from original insulator, cut out the butyl, fastened it to the jute, and cut jute to pattern. Fastening the carpet snaps from old insulator was a "Snap", with new carpet snap pieces from Newport, and can't tell the difference from the original insulator.
-
Also, to tack onto 26th-z reply, from the first picture, it appears to have the series 1 quarter panel 240z emblem, and, from the rear interior picture of the hatch, it looks like the plastic hatch finisher panel is the early vented style. So, without venting, I would assume that the hatch has been replaced with the series 2 hatch with the series 1 verticle defroster glass, and interior finisher panels, etc., transfered to that later hatch. Look for rear end collision damage.
-
Steve, if you need an accurate color match, I may have an oLd red insulator that you can borrow. let me know. Dan
-
Thanks, Steve. They (the clear defroster wire boots) look good and definitely are very obvious, especially when burnt or discolored! Very nice work. Dan Steve, just as a point of interest, the brake booster insolator donut, as originally produced, I believe was made out of red rubber, on early cars anyway. I am not 100% with this, but am pretty sure, and would welcome any more accurate info.
-
Steve, Do you have any of these clear defroster wire boots available for sale, and the asking price, if so? Also looking forward to the choke cable firewall grommets when have them in original, early style. Thanks for all of your efforts with these projects to re-create hard to find parts. Dan
-
I'm just going to have to chime in. The later, angled version is probably still available, or can be found without too much difficulty, I am sure, in NOS condition. The only reason to want one of the early grommets, without the angular modeling and flared end of the nipple, as it seems to appear in Webmasinic70's photos, is because that is what it was "originally" for early cars. Forty year old rubber is going to dry rot and split. I can wait for the sake of acquiring a good reproduction of the authentic item. New rubber bends. Dan
-
Steve, just a couple of observations. Looking at webmanic70s picture, it looks like the nipples have split from the angular stress of the cables, and, it doesn't appear to have a lip molded into the ends of each nipple as you did with your sample. Are you sure the originals were molded with the upward slant of the nipples like the more recent grommet style? I'm probably not seeing this correctly, but just needed to ask. Too bad that someone doesn't have a good, original, example for comparison. If I can source one, I'll certainly post any helpful information. Many thanks for all of your work in providing a much needed source for important, original parts. Dan
-
I'm probably not going to explain this well, but here is my reasoning. With the window open, or down, there is a venturi effect at the window,. ie., an area of low pressure resulting from outside air passing over the car which will tend to draw the cabin air past the drivers seat and out the window. This area of low pressure created inside the car will draw air into the car's cabin from any orifice that is not properly sealed,. ie., worn or missing grommets, worn or ill fitting weatherstripping around doors and rear hatch, tail lights, body seams at edges of rear deck flooring not sealed, leaking fuel filler tubes, hoses, and hose clamps in the right quarter panel void, and the list goes on. Any number of the correct grommets and floor plugs are readily available, either NOS or aftermarket and well worth the cost. I removed all of the interior plastic finisher panels, carpeting, and anything else I suspected might hide a leak. All grommets, weatherstripping, and plugs are either NOS or, when NOS was not available, reproductions, and along with the use of 3M body seam sealer, I have no intrusion of gas or exhaust smells in my restoration. I believe there are any number of threads that give very good explanations of this problem discussed in the past. The down side of all of this, is, I cannot shut any door or hatch without cracking a window. Dan
-
Jerry, I fully understand, and that is good information about the reproduction bottles. I just bought a set of the very early NOS door weatherstrip WELTING (big bucks) on ebay. Although my welting was Nissan, and correct, (same as kats has on his blue 240z) it was the later welting. The early welting (first time I have ever seen the early welting anywhere) has a little smaller cross-section profile and a slightly bolder texture. Each door also uses two separate pieces of welting, an A and a B section with the ends cut on a 45 degree bia for a perfect fit. Now, every morning I just sit in the car admiring my new, more correct, welting. So, I totally agree, Jerry. There is really nothing better than NOS when you can find it. Dan
-
Jerry, Nice job on the refresh! Just thought I would mention, for those whose bottles and motors are too far gone, Banzai Motorworks now sell very nice repros for, I think, $195. I have no interest in this product, just passing along info to those who aren't farmiliar with the current market of products available from various sources. Dan
-
Jerry, Go to "OK Inspection Decals" thread started by Mike B on 08-22-09. It has what I think you are looking for. If I knew how to post the address for this thread,I would have done it so. Not very computer literate but I going to get my son to do some tutoring. I just plugged that thread into the search function which took me to pages of associated threads. You will find this thread there a couple of pages in. DanHope It works for you Jerry. Is the weatherstrip the early style with separate welting, or is it the later style with the welting and weatherstrip fused together in one piece? To see where it may be binding, sit in the car with a sheet of paper and concentrating on the front part of the door opening. Place the paper against the weatherstrip, starting maybe at the top of the window frame, and hold the door closed to the point it starts to bind and see if the paper slips out easily, or if that is the place it is binding. Do this progressively around the front half of the door,weatherstrip interface until you find where it is binding. Next, I would make sure that the welting is firmly seating on the body pinch-weld all the way around the door. I am trying to remember another difference in early and late weatherstripping. I think that the one-piece, welting/weatherstrip combo, incorporated a flap of rubber that covered the windshield post jamb area. If that is what you have, make sure that the binding isn't happening in that area. I also recall that this later weatherstrip is a little thicker along the bottom door threshold. I think that on later zs, the bottom of the door was shaped slightly differently along this threshold area, but I could be wrong, or that might be a problem area. I believe that this one-piece combo welting/weatherstrip was using after 7/74. Anyway, Jerry, I am just kind of brainstorming and thinking out loud. If any of this makes sense for things to check, I, again, hope that my past experiences can be of some use. When I read what you have done and how you have done it, I feel like I'm looking in a mirror. Dan

Important Information
By using this site, you agree to our Privacy Policy and Guidelines. We have placed cookies on your device to help make this website better. You can adjust your cookie settings, otherwise we'll assume you're okay to continue.