Leaderboard
-
ramsesosirus
Free Member2Points367Posts -
motorman7
 Subscriber
 2Points2,226Posts
 -
sweatybetty
Free Member1Points1,119Posts -

siteunseen
Free Member1Points15,115Posts


Popular Content
Showing content with the highest reputation on 05/28/2016 in all areas
-
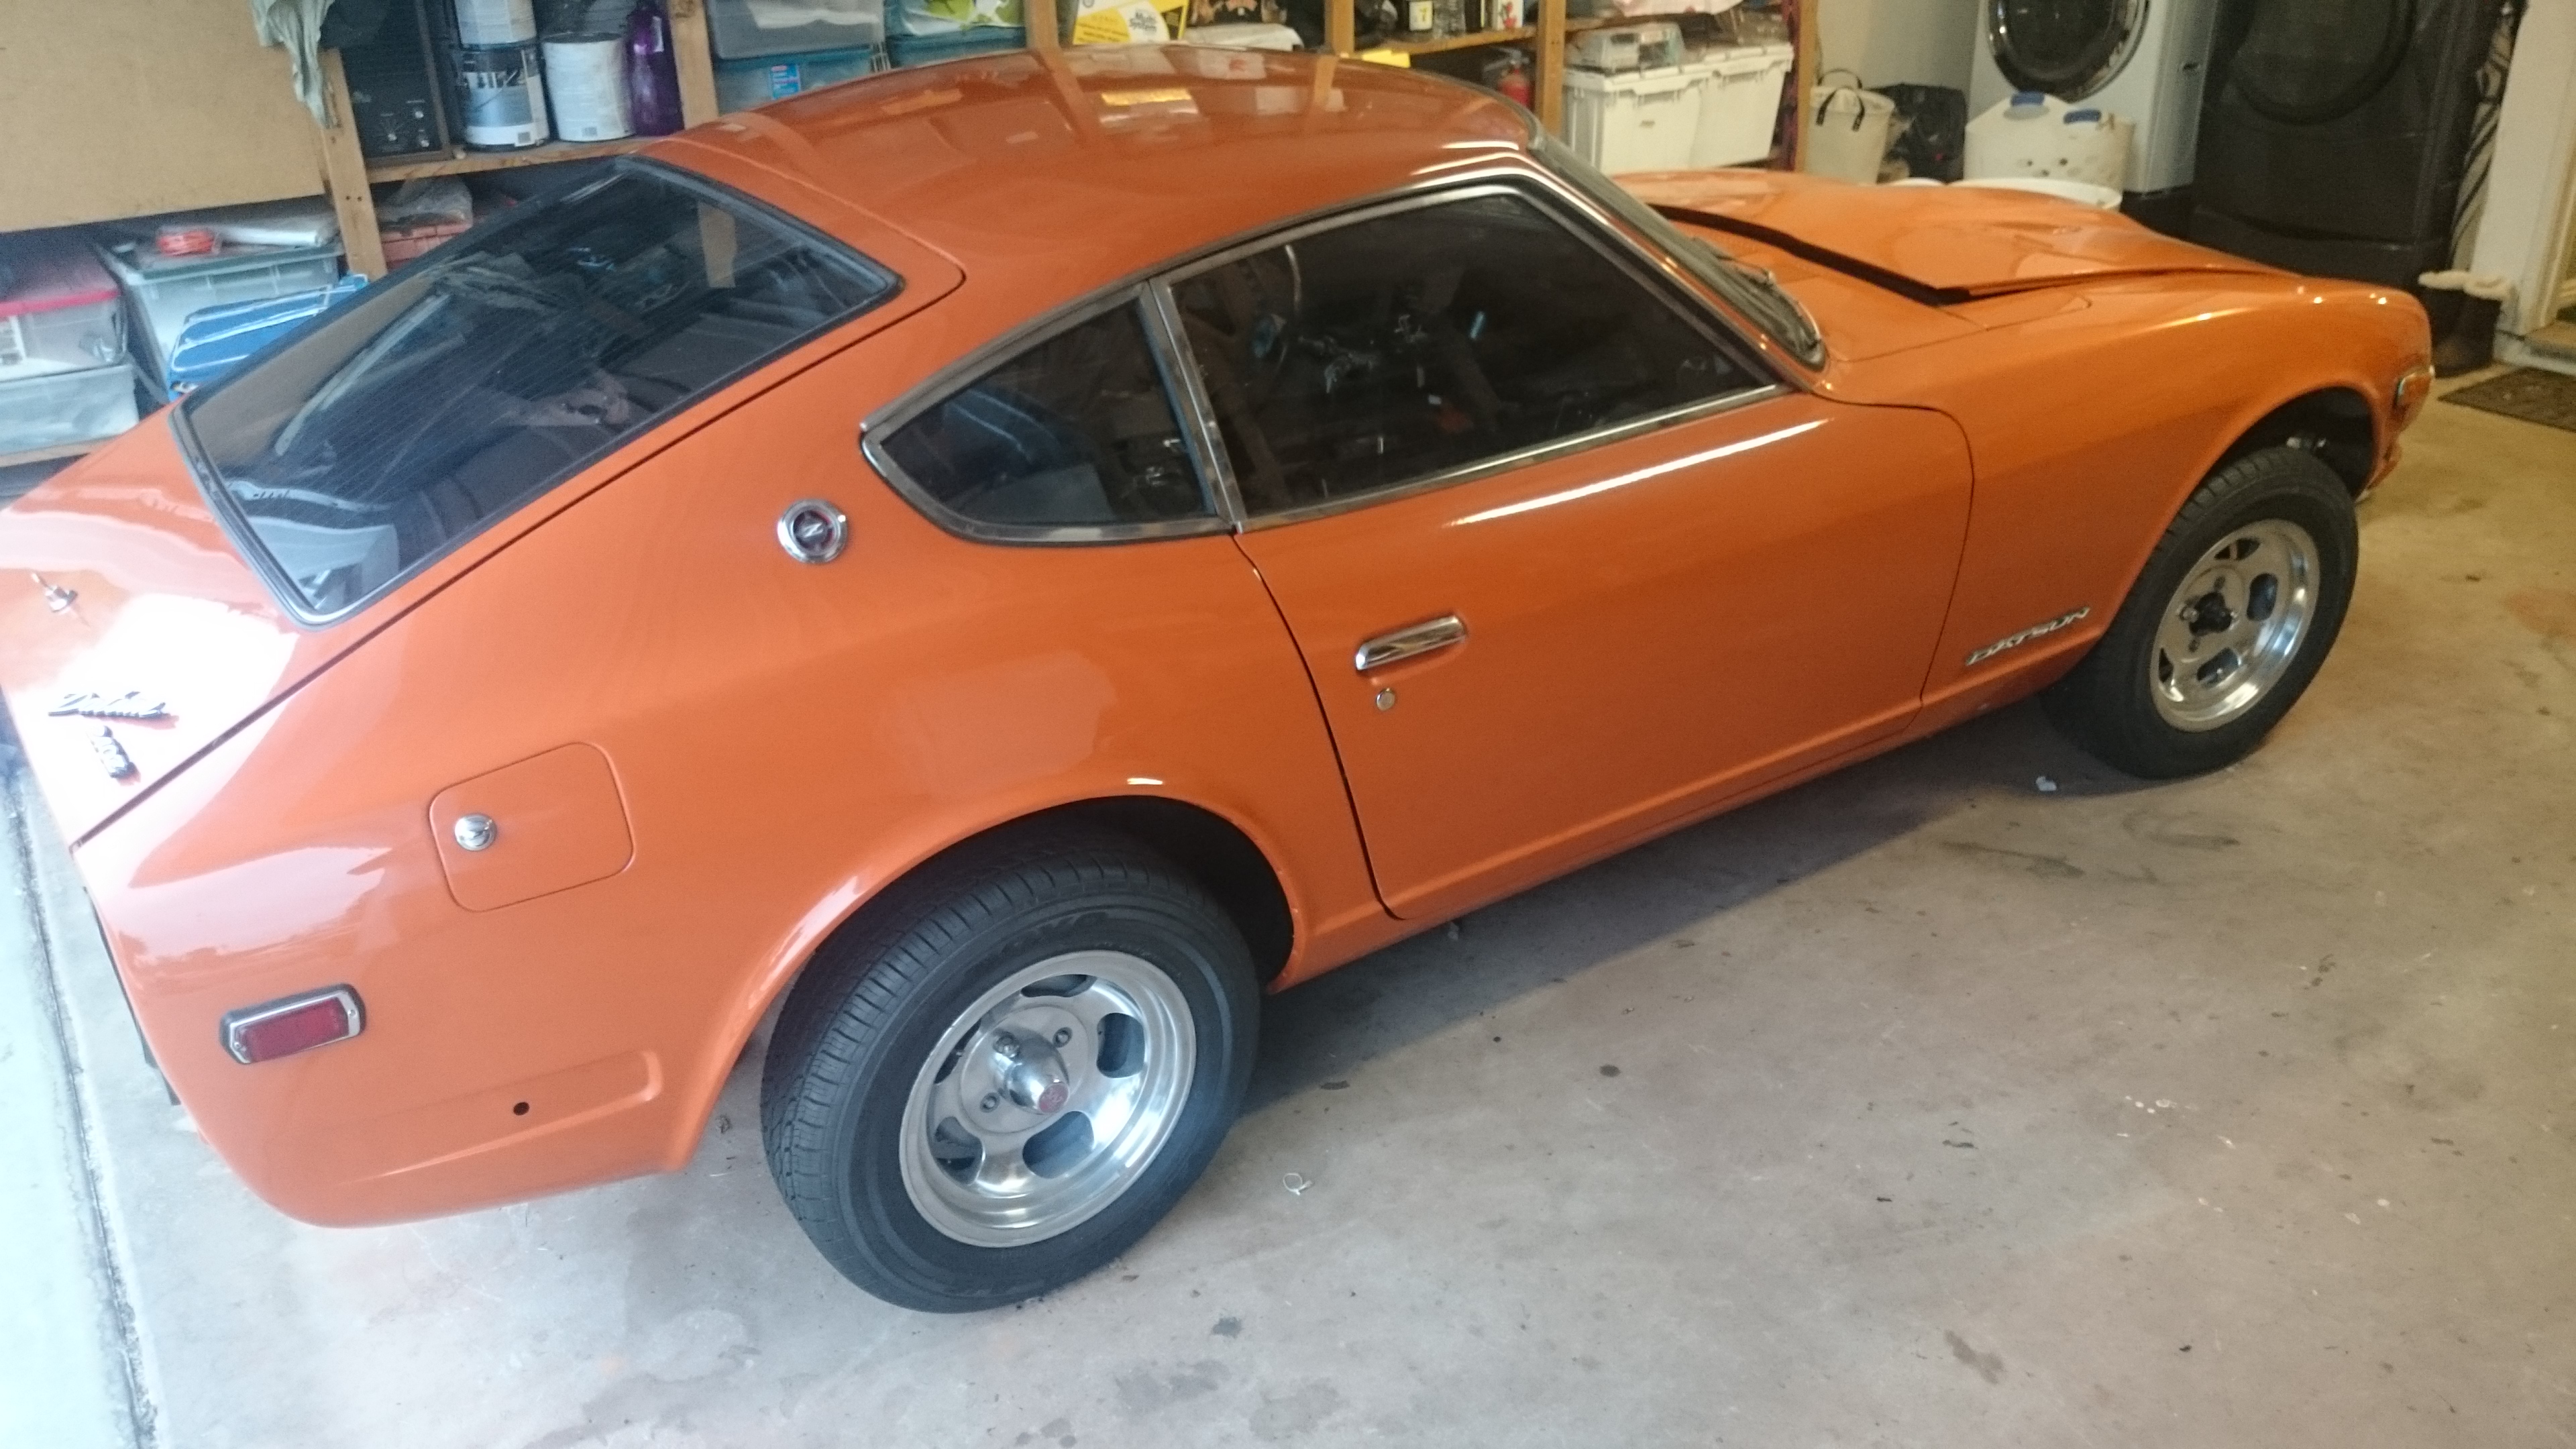
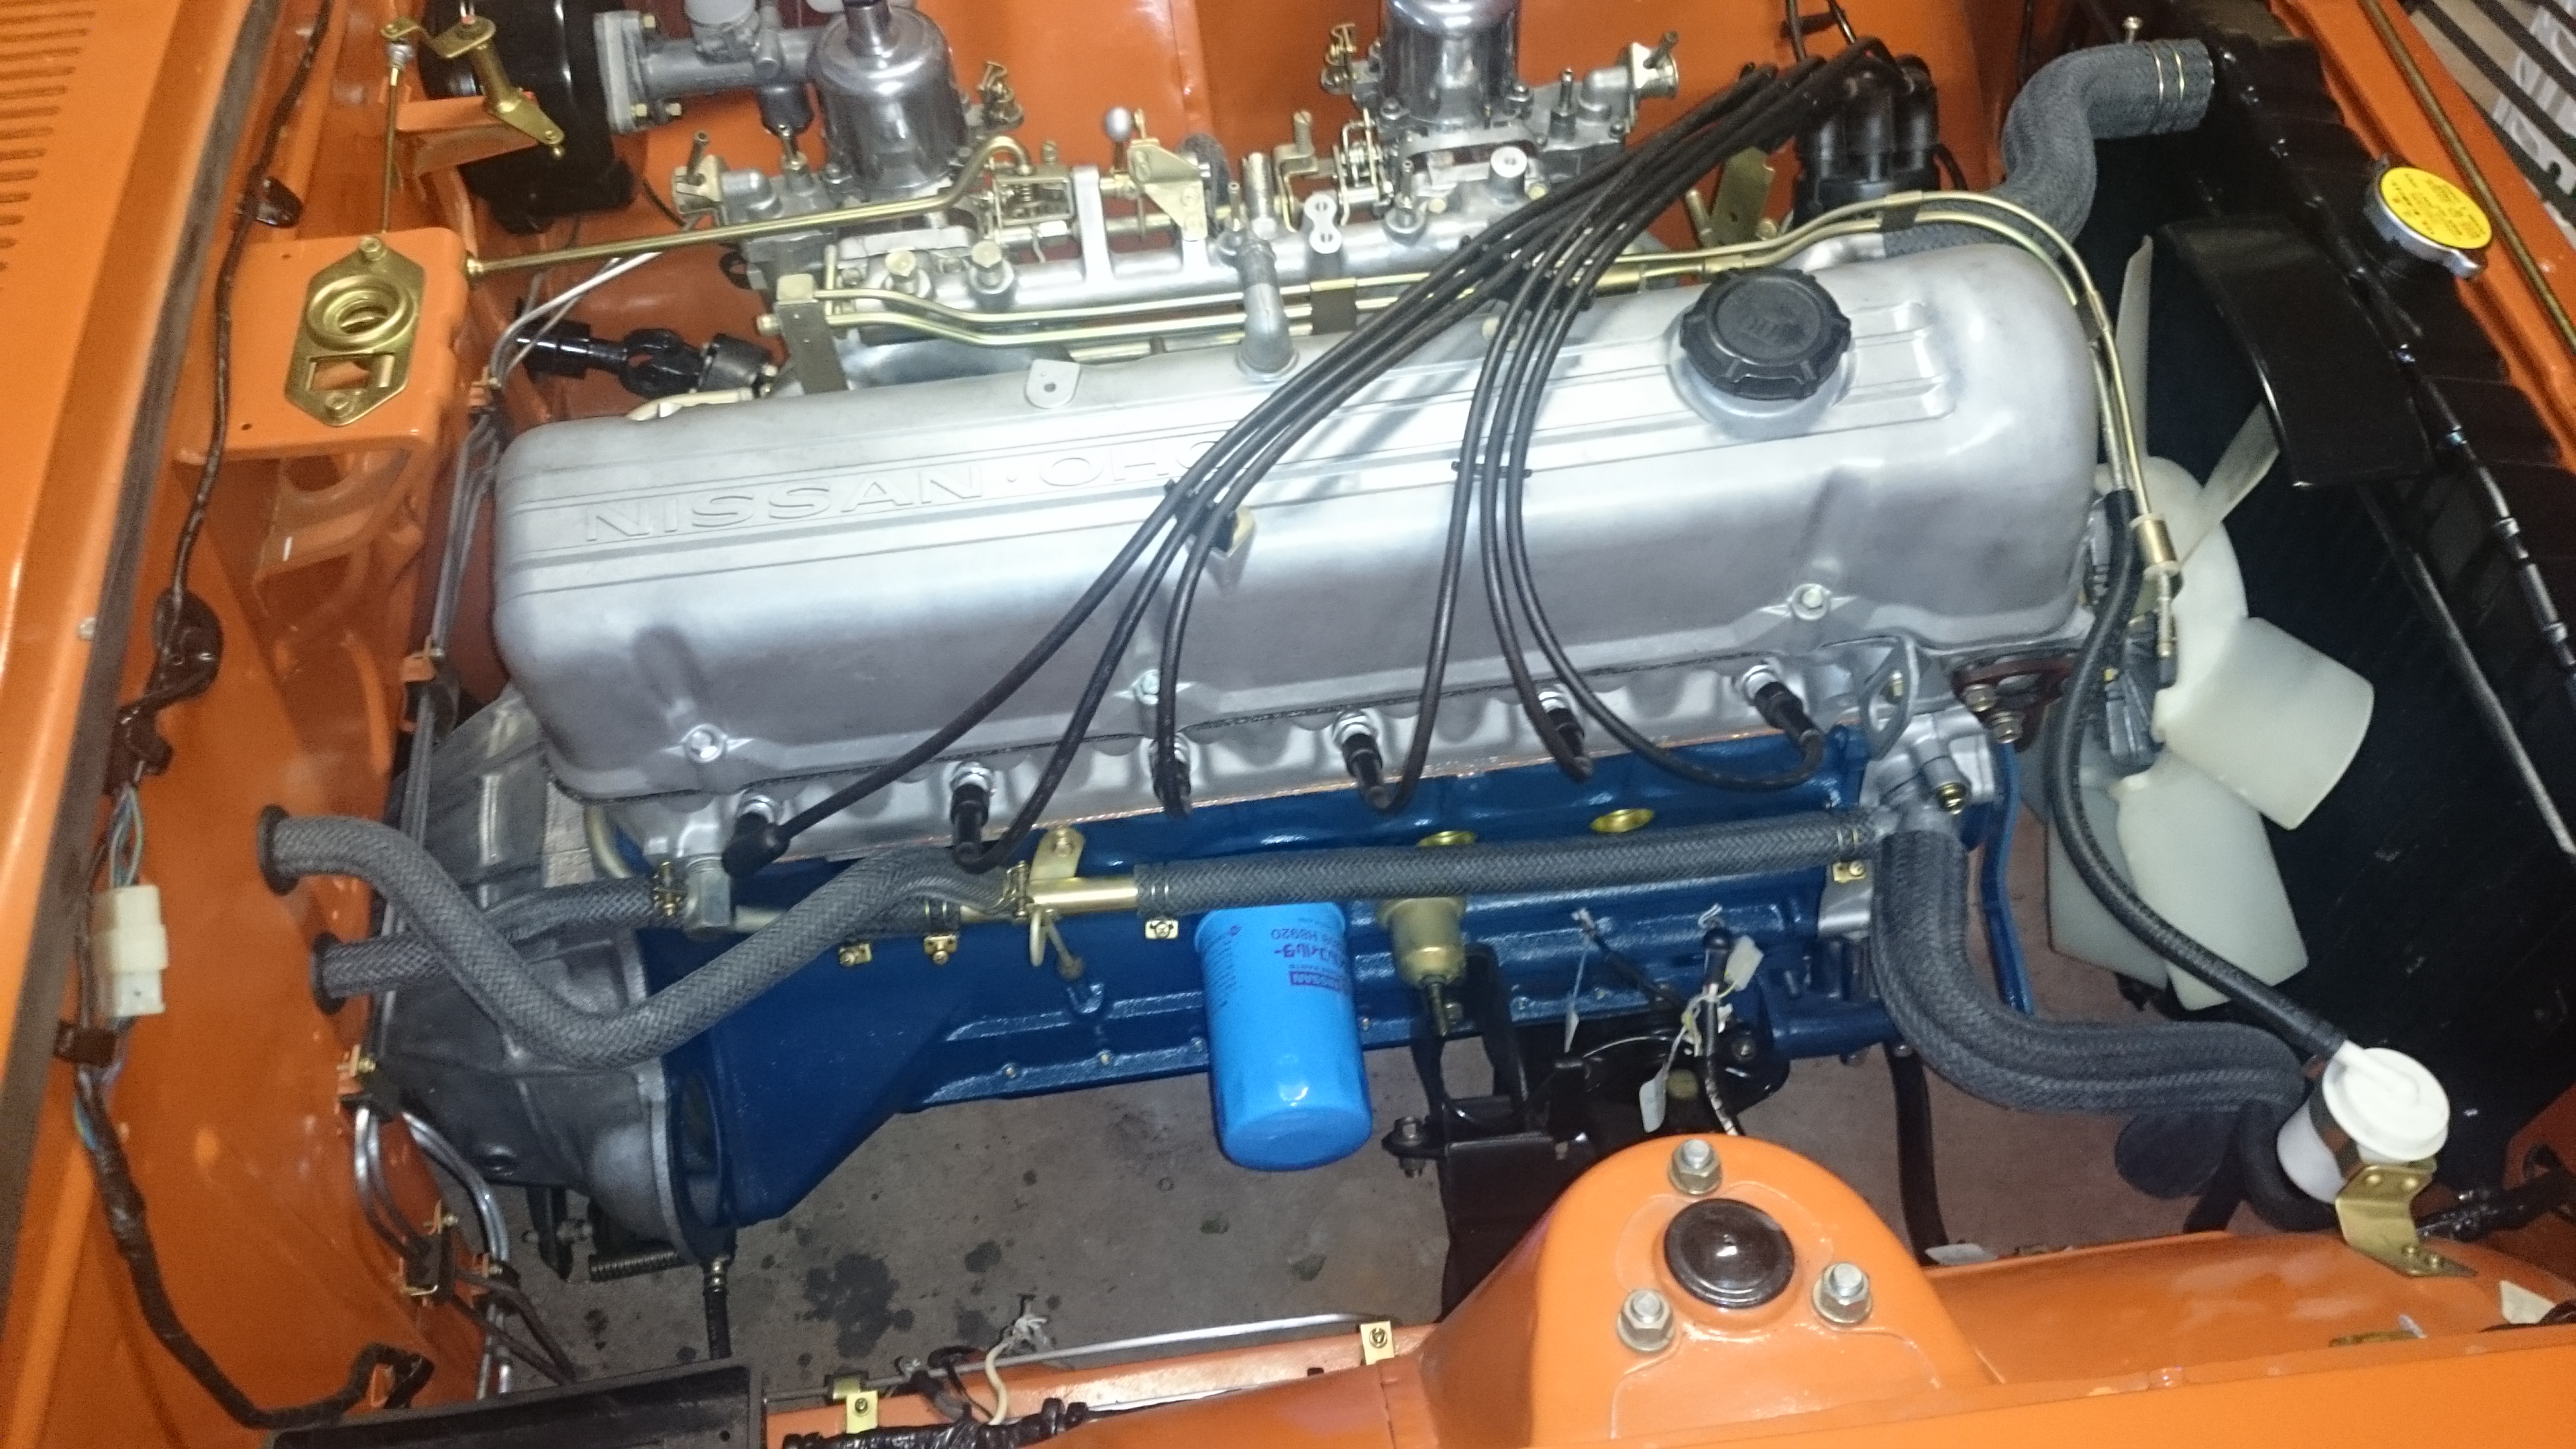
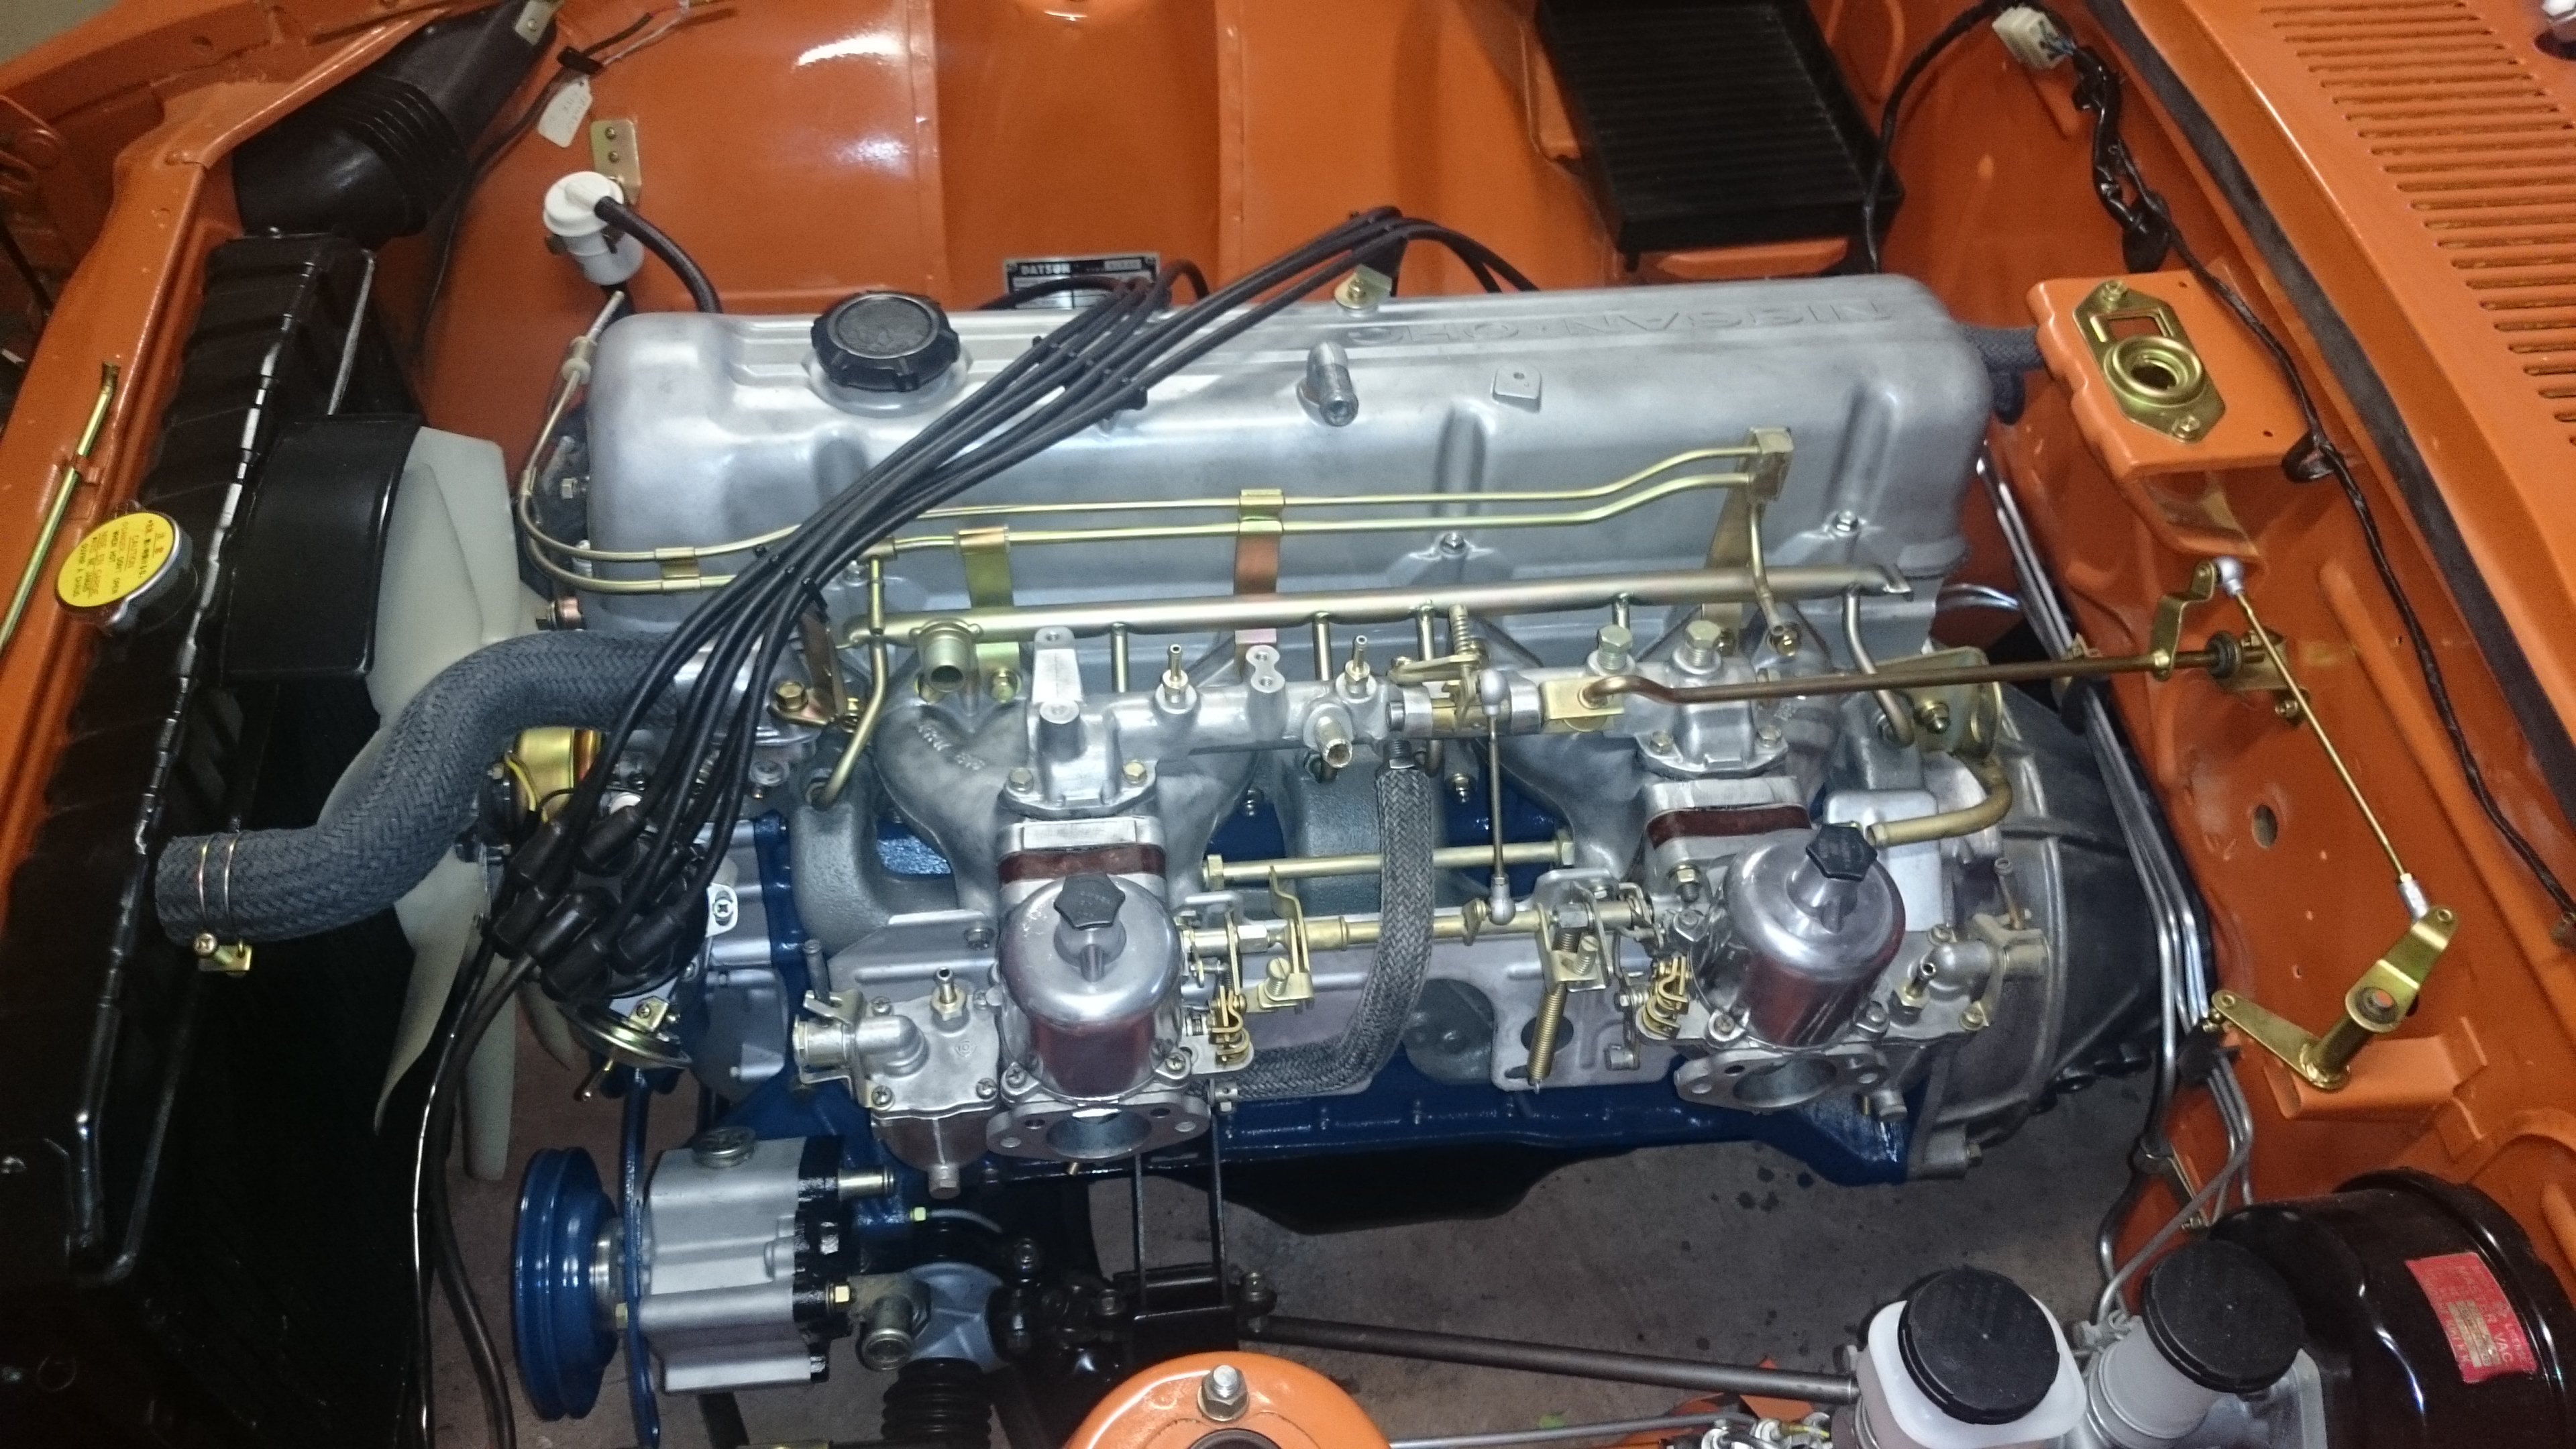
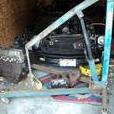
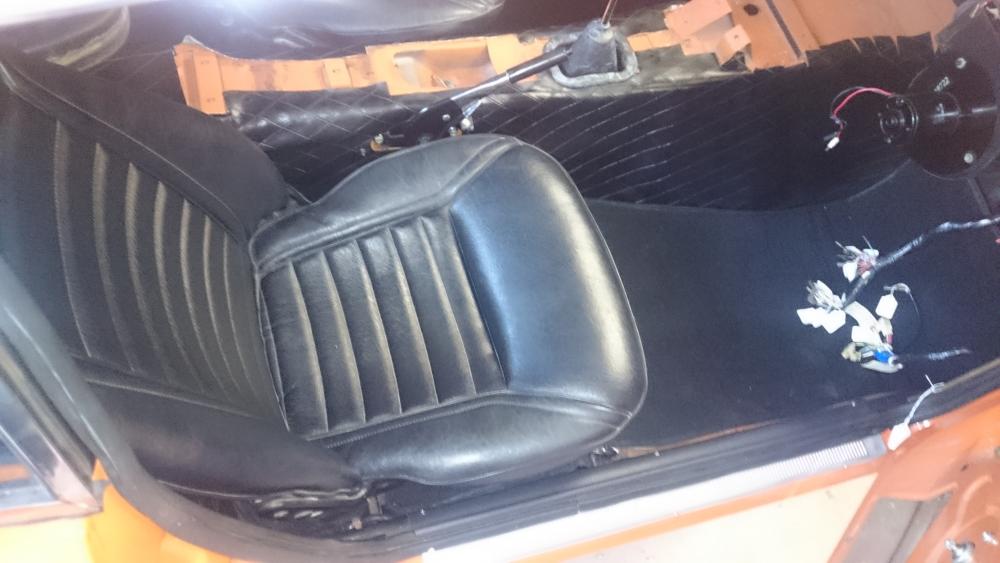
2 pointsHere are a couple updates until the thread is restored. Got the carbs cleaned up and mostly installed. Got new braided hoses from Jay at http://jdm-car-parts.com/. Jay does a great job with these hoses. The quality is amazing and they look great with the wire clamps. Will continue adding parts to motor. Also doing a bit of interior work.


 2 points
 -
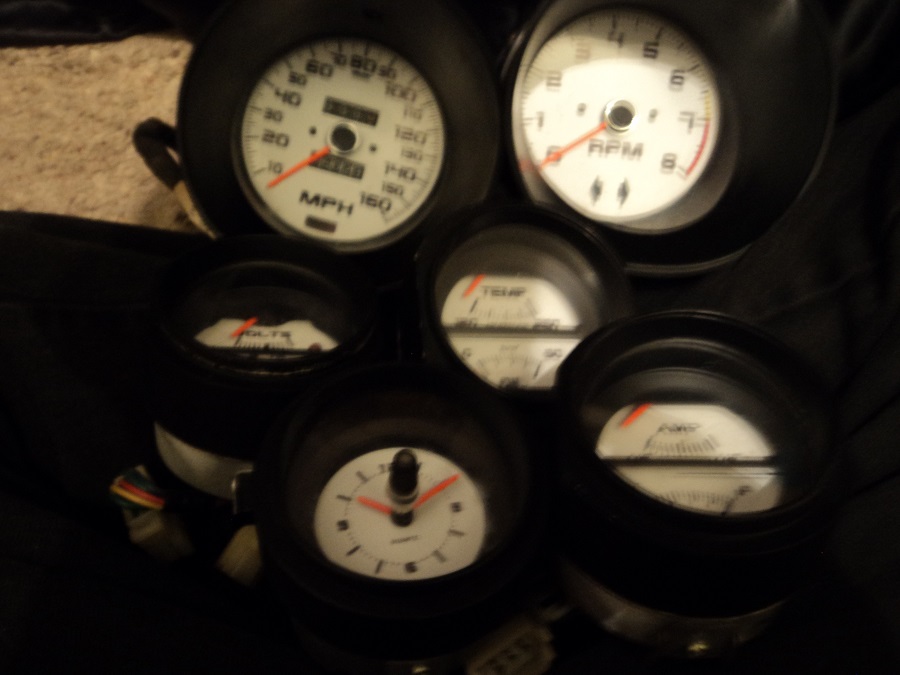
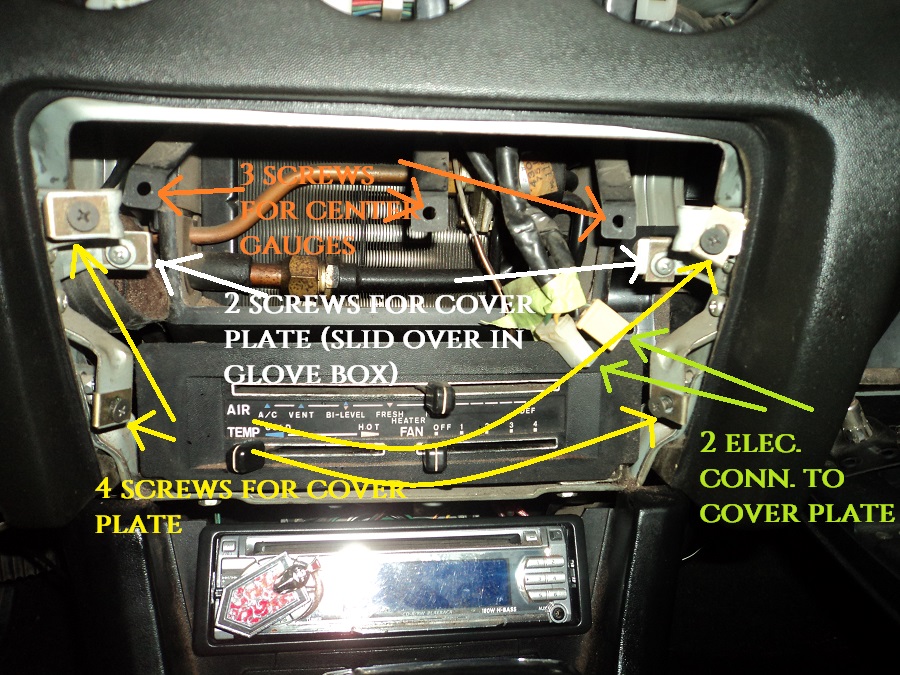
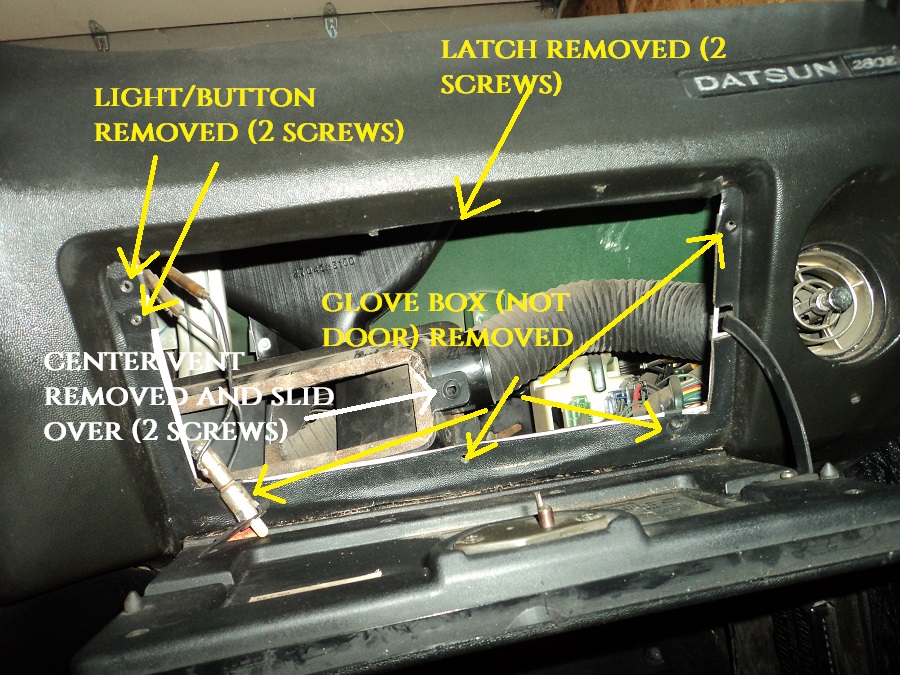
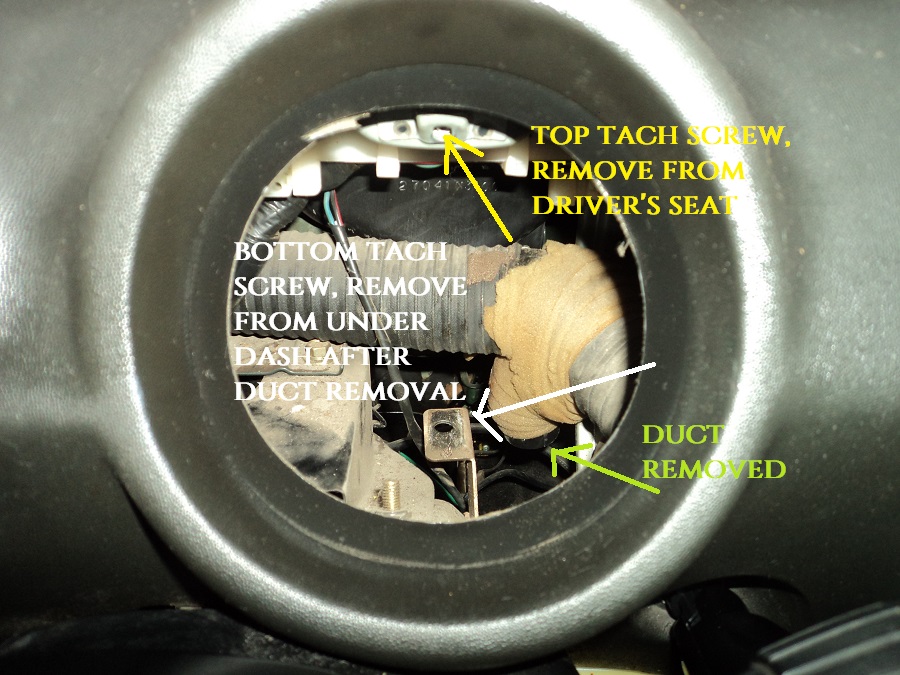
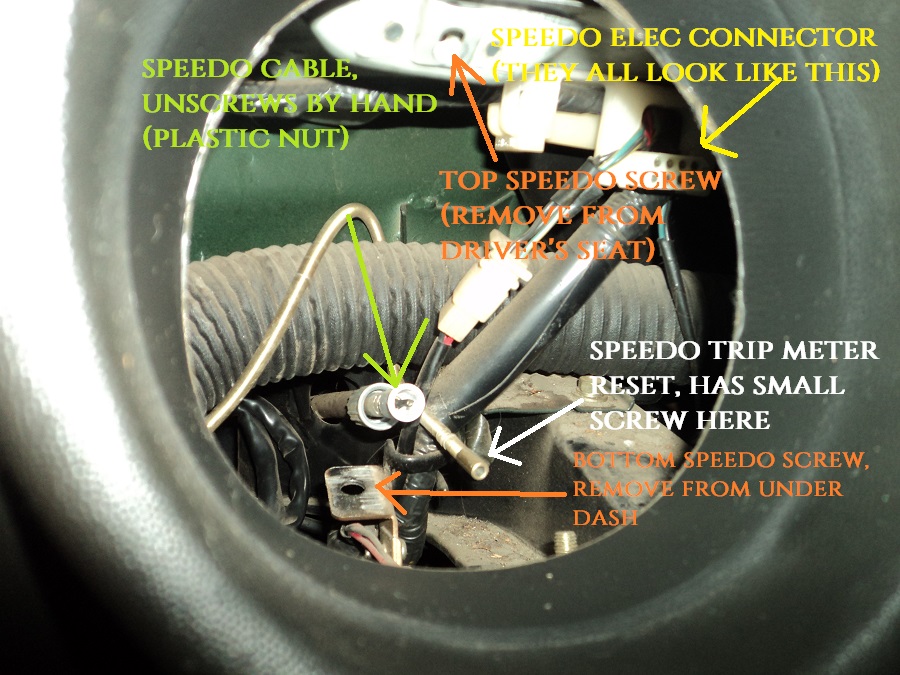
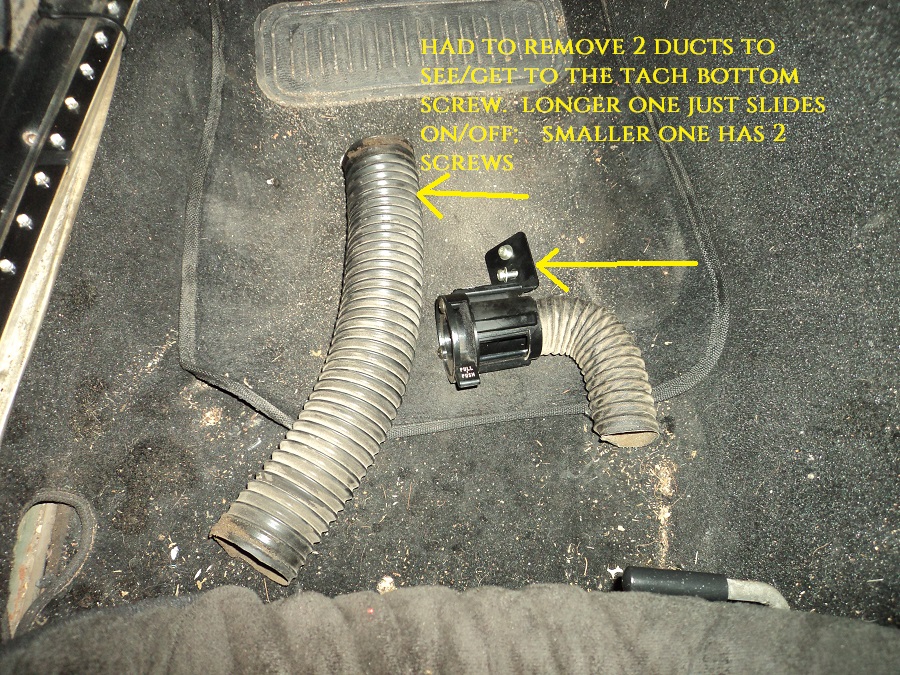
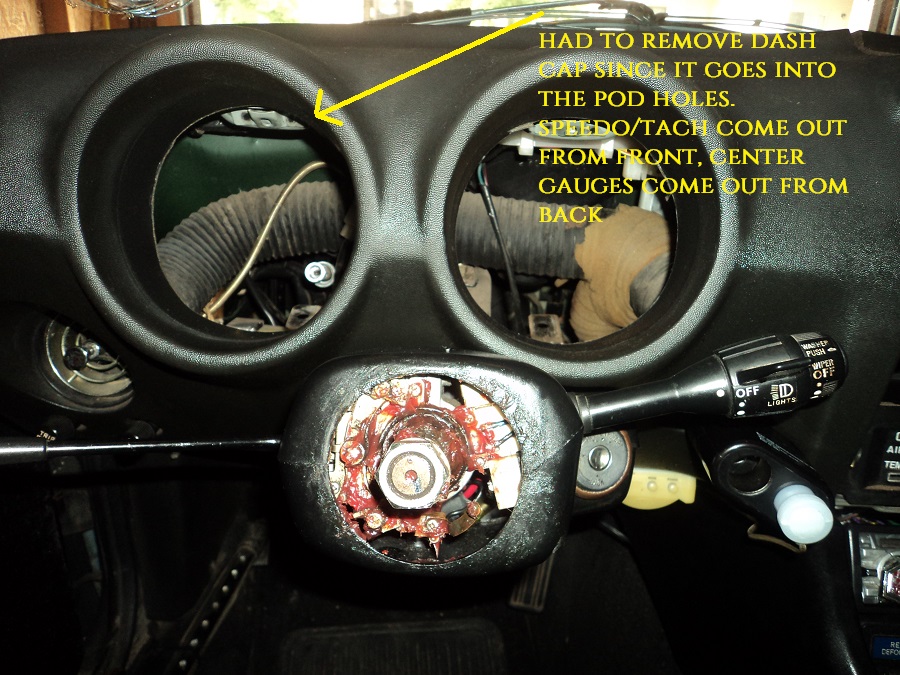
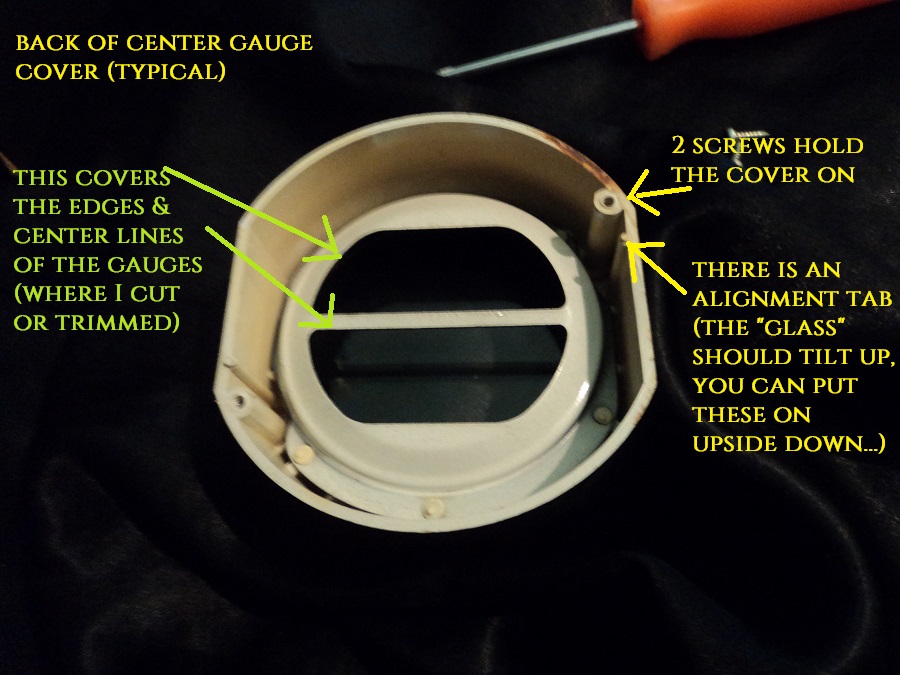
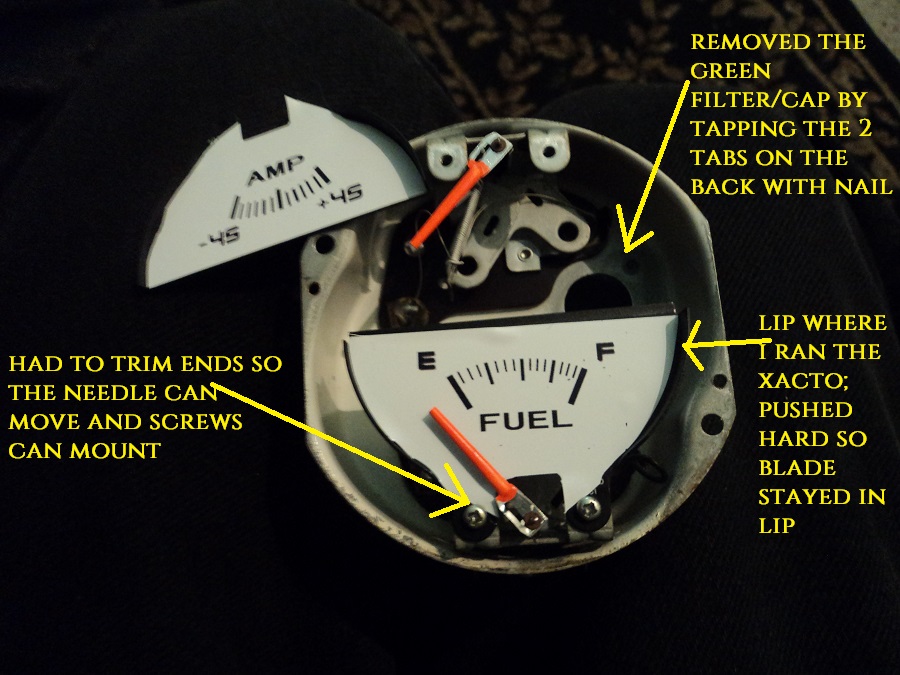
2 pointsI had a set of white face overlays from the z connexion for awhile, but was deterred based on the difficulty of the task. Well I went ahead and went for it, and got it all done in a few hours without any major troubles. Sorry the picture quality sucks. I will do better for an installed picture... I am waiting on new bulbs to arrive before installing them, and making sure they work. More on that later.... For anyone contemplating this job, or removing gauges, etc.. Here is what I did and found: (I've never done this type of work before in the dash FYI) I have a dash cap/cover. I had to remove it it to get the speedo and tach out. They come out towards the driver. Luckily mine wasn't glued down to the dash. I didn't remove the column plastic cover, but I should have and will need to remove it to re-install the dash cap. It is a tight fit near the column. You do not need to remove the dash to get at the gauges. 1. Look at the FSM. it has great images, instructions and details of the dash and gauges. Also my Chilton's had the same image of the dash. 2. Disconnect battery (always). 3. Remove 4 screws on the sides of the HVAC cover plate, disconnect the wire connectors. I had 2 connectors. 4. Remove the 2 screws holding the center vent in place, they are also located on the sides. Remove the ducts from the center vent (If still connected...) I had 2, one on each side. (I try to put the screws back where they go for easy recall). 5. I had to remove the glove box to get the center vent out of the way. I could not get the center vent out through the middle opening. I removed the screws for the latch, the the light, and the glove box "holster". I didn't remove the actual glove box door. I supported it so it didn't hang down low freely. i slid the center vent to the side. 6. Each gauge has one screw on the bottom which connects the "hanging" bracket to the car. For the 3 center gauges, just remove this lower screw, massage the gauge back, and down, and disconnect the electrical connector for each. They are on tight, but came off pretty easily by squeezing the side tabs by hand. Electrical connectors are right behind the pod hole for each. The center gauge (fuel/volts) has 2 electrical connectors: one mounted and one loose) (See above photo) 7. Remove the steering wheel. Really makes the Speedo and tach removal easier. Not sure if they will even come out without doing this. 8. Remove the dash cap, if you have one. I don't think the speedo and tach will come out with a dash cover on, the cover overlaps them in the round ports. 9. Remove the screw at the top of the speedo and tach, respectively. You can get these 2 out easily from the driver's seat. 10. Lay down some blankets/pillows/old coats. Get a good flashlight and phillips screwdriver. You will be in an odd position to get the bottom 2 bolts out for the speedo and tach. Haha. Watch out for the steering wheel shaft if you removed the steering wheel. It hurts. 11. On your back, under the dash, there is one screw holding the speedo on, and one screw holding the tach on. I had to remove a duct vent to see the tach one. (The one that can be opened/closed and is screwed to a bracket under the dash, didn't know it was there before...) They bolt to a bracket and are not too hard to get once you see them. 12. Back in the driver's seat, do the tach first, reach under and push the tach forward. Undo the electrical connector. Again, same type as the center guages, I held both sides to make sure I didn't crack anything, but got them out by hand pretty easily. Push the tach out towards the driver. 13. Now the speedo. Without the tach, you can see the tripmeter cable. It has a very small screw holding it near the back of the gauge. Try not the strip it, it's on there pretty tightly. Now unscrew the speedo cable by hand. Now remove the electrical connector, same as all the other ones. Push out from the back towards the driver. (See the photos above) 14. Take a moment to appreciate what you just did. I reveled in the fact that I was holding some gauges that had not been touched by human hands in 40 years!!! Success!!! FOR GAUGE FACE INSTALLATION: There are other write ups for this around that are good. Basically you have to remove the screws holding the clear cover on. And the screws holding the faces on (unless you want to try removing the needles, no thanks...) You have press down hard on these as to not strip them. Don't ask me how I know.... I highly recommend practicing first. I had a spare gauge from the junkyard. And the kit I bought had spare overlays, depending on if you wanted volts or amps. A new Xacto blade is also a must...The overlays are close, but I ran the blade along the edges/lip of each face to prevent lifting. I had to cut the overlays in half for the 3 center gauges. They come as one overlay, but can't be installed as one, due to the needles. Do your best to get a straight and centered cut. Remember the gauge face had a divider that will cover the cut. I used the stock metal gauge face as a template, and a cutting edge. NEW Xacto blade!!! NOTE: I USED A "PRACTICE" SPARE JUNKYARD GAUGE. THE SPARE WAS AN OIL/TEMP ONE, BUT MY SPARE OVERLAYS WERE FUEL/CHARGE. THAT IS WHY THERE IS NO RED CHARGE LIGHT. I JUST WANTED TO PRACTICE. I MARKED THE GAUGE SO I WOULDN"T USE IT These overlays are vinyl and good quality. But you can only re position them once, maybe twice before they aren't that sticky. I started on the middle, since I had a straight edge cut. Then pressed down and out, towards the edges. Then cut the edges by pressing the knife into the "corner" of the stock face. It has a lip. These lips are covered when installed, so don't worry about perfection. Again, a NEW Xacto blade is paramount to get good cuts. A bad cut will tear the overlay. Even if they are not EXACTLY positioned perfectly, as long as they work it should be fine. I don't think the difference between a gas level of 10 vs 10.1 gallons will matter much. You get the idea... Don't forget to cut the hold for the charge indicator light also. I did an "X" from the back, then put the Xacto in there and turned it round and round. Got a nice round hole. You have to remove the clock hands. They just pull off, straight up. The clock overlay was slightly smaller, and didn't quite reach the edges. But it is not very noticeable with the face cover on. I also put a few drops of sewing machine oil (clear) on the clock gears to see if it will get it working. I turned the clock thing by hand, spinning the spinny thing that drives it, and it does in fact turn and move the hands, but we'll see if it starts working again... I verified that the time changed when spinning the spinny thing. This is the technical term! Haha The Speedo and Tach needles need to come off, as well as the two small screws in the center of the faces. Remember where they are at when removing, I did both of mine at zero. I did this by hand. Pulled straight up (the black round covers came off the first try...) I kind of expected the needles to break, but they didn't , and I didn't seem to bend the needle pin either. I pulled up pretty hard with my finger and thumb, then it popped off. I thought it went flying, but it had stabbed me in the finger under the nail. Watch out!.. Don't get blood on the white faces. Unless you like that sort of thing, might be a unique touch... Haha We'll see when I install how they work.. Some use a fork or similar tool to remove them, I like to use my "feel". I painted the needles orange with model car paint. Look great, dried quick. Use one of the very small q-tip looking brushes specifically for model cars. Put a piece of paper or something under the needle, over the gauge in case you miss or drip for the center 3 gauges. The speedo and tach and clock needles/hands are off, so painting them requires a steady hand and something to lean them on to dry. I used a plastic coffee container lid, leaning the end of the needle on the lip of the lid.. Installing the speedo and tach overlays is tough, getting everything aligned. But use the center hole, and screw holes as a guide. Also the speedo and tach have the brights and turn signal cutouts too. I was happy with the placement results. Not perfect, but nothing is. I wanted the turn signal arrows to be aligned more than the center screw holes. I had to pick which one, as it did not seem that they would both align exactly. With the screws back in, you can't tell. But tightening the screws with the overlay underneath will twist/distort the overlay by the screw. FYI. The speedo has a very small "needle" that the indicator needle rests on at zero. I pried it back slightly from the back, smoothed the overlay to it, then pressed it from the back, punching through the overlay. It easily punched through. I was pleasantly surprised by this. The needles go back on the same way, straight down. Don't press too hard. Don't forget to pop (or glue) the black round caps back on there. Screw the screws in. Not too tight or you will distort the overlay vinyl. I put the needles back on at zero, which I where I removed them. Some suggest putting them on at the max, then letting them return to zero. Not sure about this, we'll see if what I did worked... Main points: It's not super difficult. Follow the FSM images and instructions, they are exact EXCEPT for the center vent and the speedo/tach needle removal is not in there... The dash doesn't need to be removed. The dash cap does, if you are doing the speedo and tach. Clean/dust the stock face plates good. I have a few bubbles from specks of dirt. Live and learn... Might poke them with a needle to get the air out.... Practicing on a spare guage is VERY helpful, as is installing one of the spare overlays. A sharp Xacto knife is nearly a must have. Change the bulbs while they are out. I ordered some blue incandescent bulbs online. I don't want to rewire or mess with LEDs right now. Remove the green "cap filters" if you want. They just pop out when you tap the tabs, with a nail or something. Don't tap out the ones for things like turn signals, brake, etc...These will come out easier if you do this while the faces are out. I didn't decide to change the bulb color until later, so I will have to remove the speedo and tach faces again to get the green filter cap out. Unless I can figure something else out. I REALLY don't want to press my luck and remove the needles again.... Well I hope I haven't missed anything. It is a tough job for sure, but more tedious than difficult. Dealing with small, fragile parts like these requires patience, and a steady hand. Hope to get these installed this week when the bulbs arrive... I'll be back...


 2 points
 -
1 pointDo I get a cookie or something for breaking 500? I think my goofy arse has the high score? I'm working on 500!1 point
-
1 pointThe some types of black electrical tape adhesive will turn to a nasty sticky goo when exposed to some types of wire insulation, oils and heat. It may not be a problem here but I have had to repair and clean up that sticky mess before, not fun. Quality tape is worth the cost.1 point
-
1 pointHope you haven't left yet. Forgot to say that the guy at the counter could't find it, but I think that he might have been faking computer literacy. He couldn't find any cars earlier than 1978 either, but there were about 10 out there. It's on Row 30. White.1 point
-
1 point
-
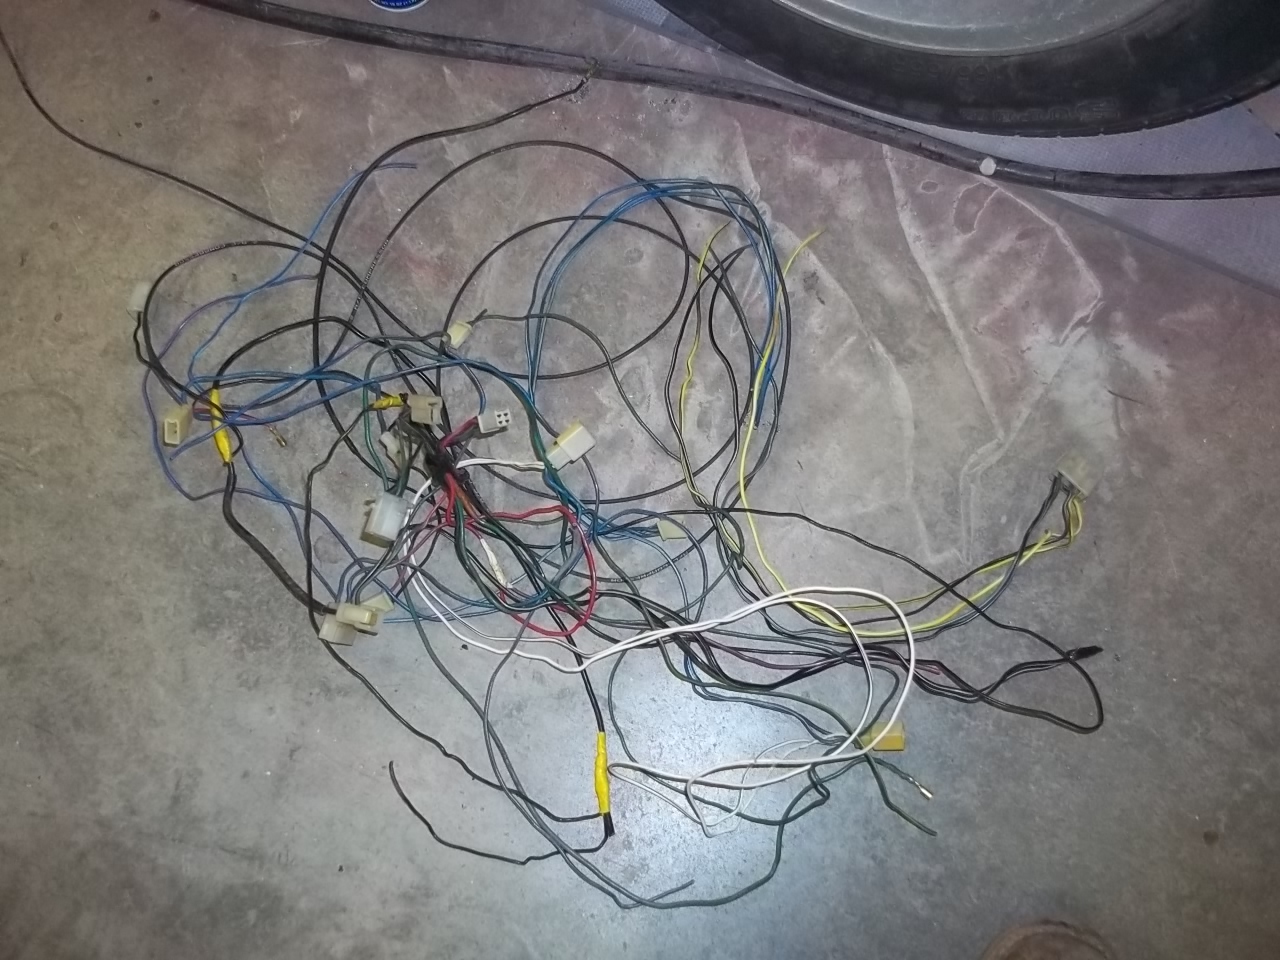
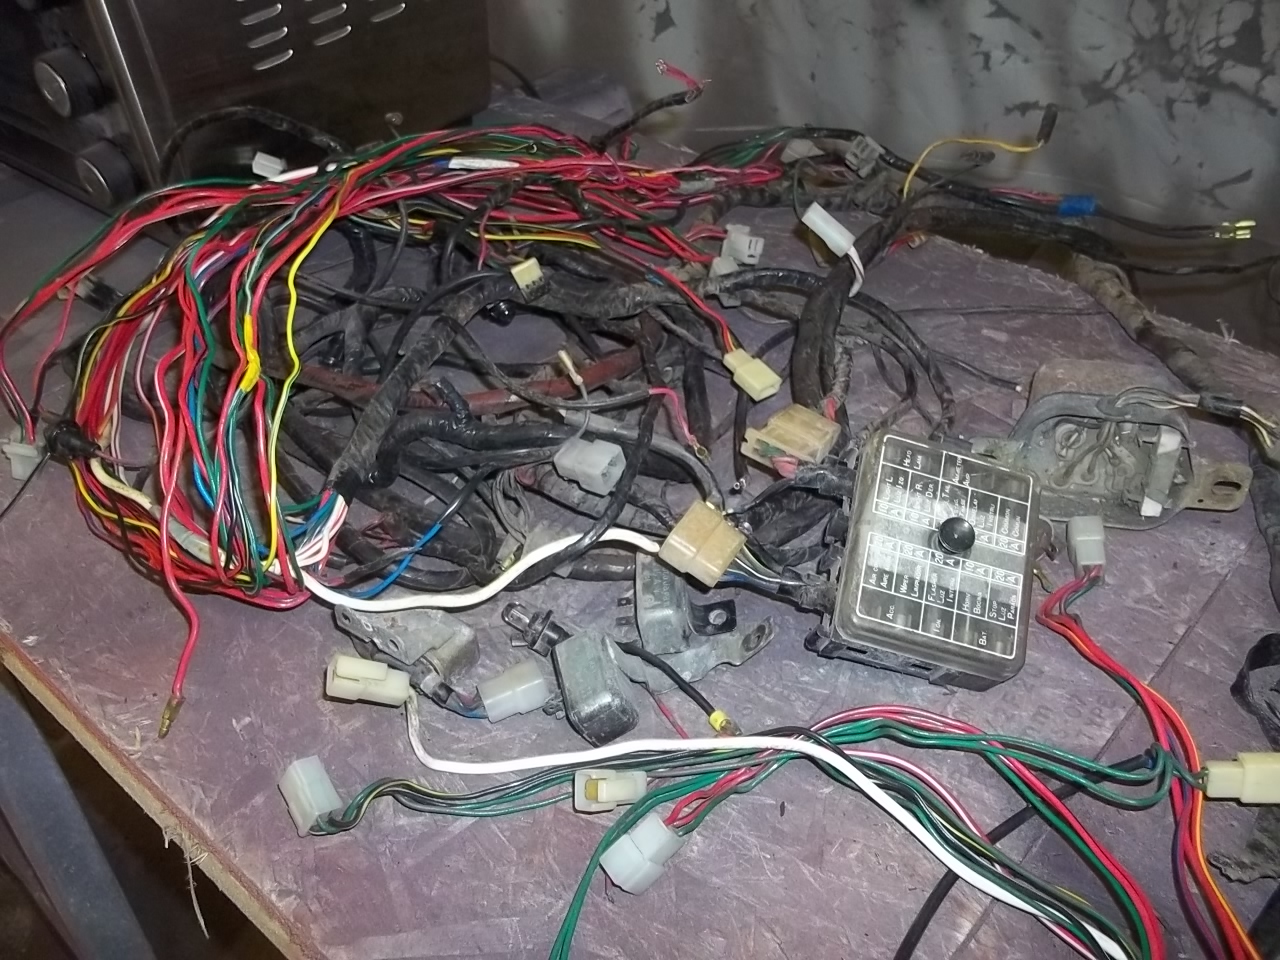
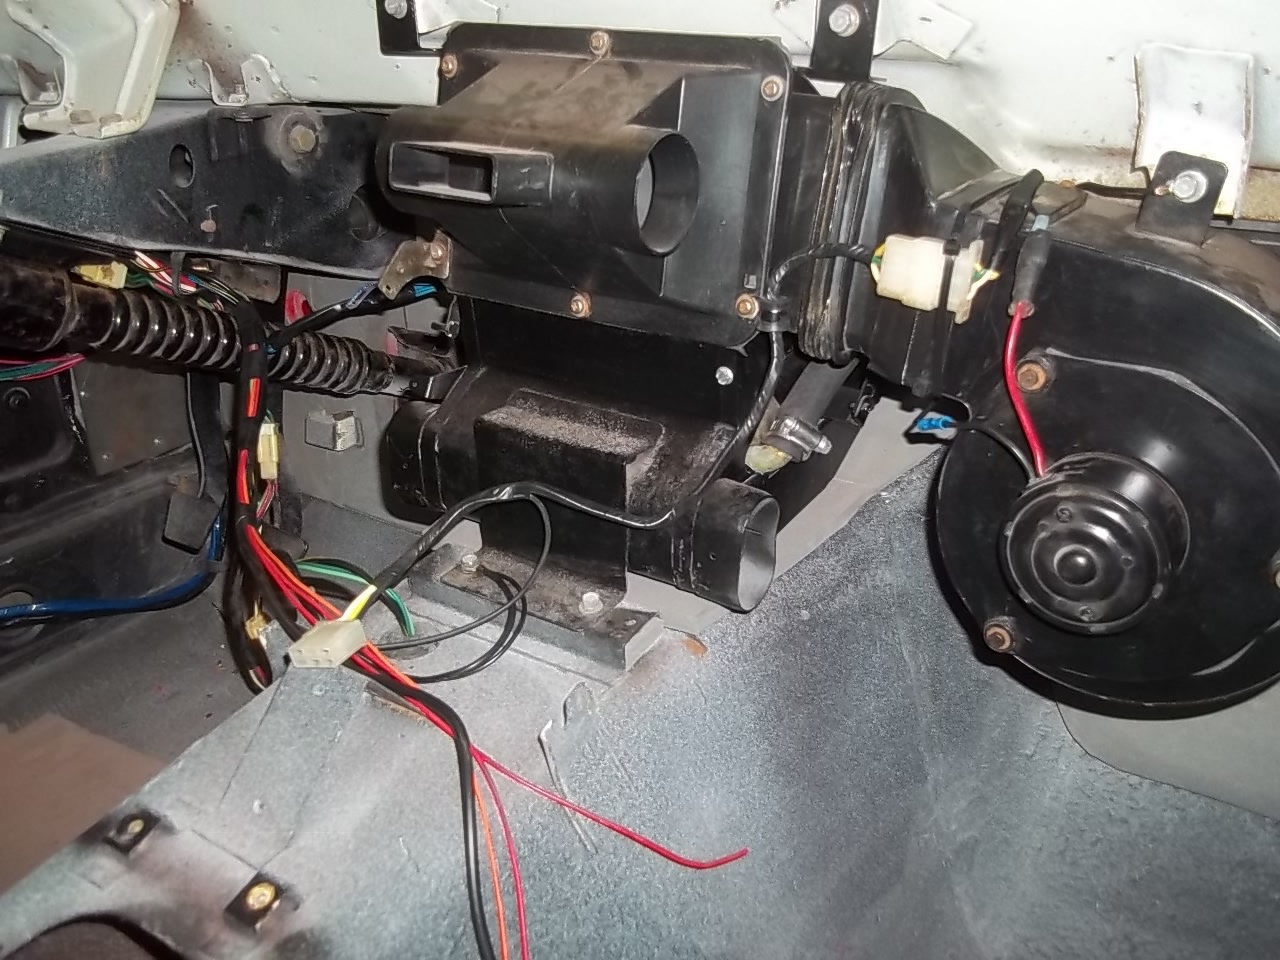
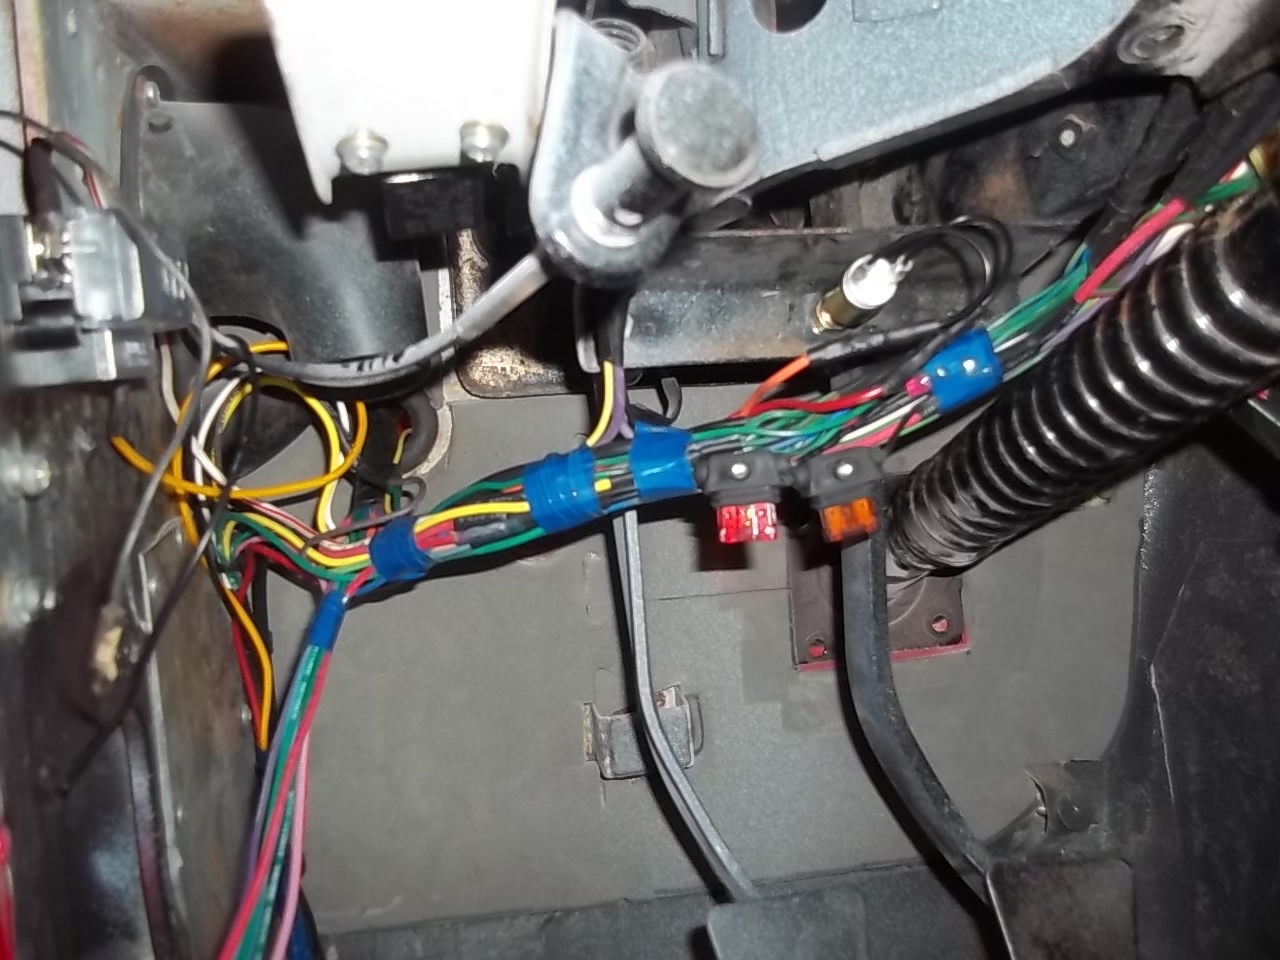
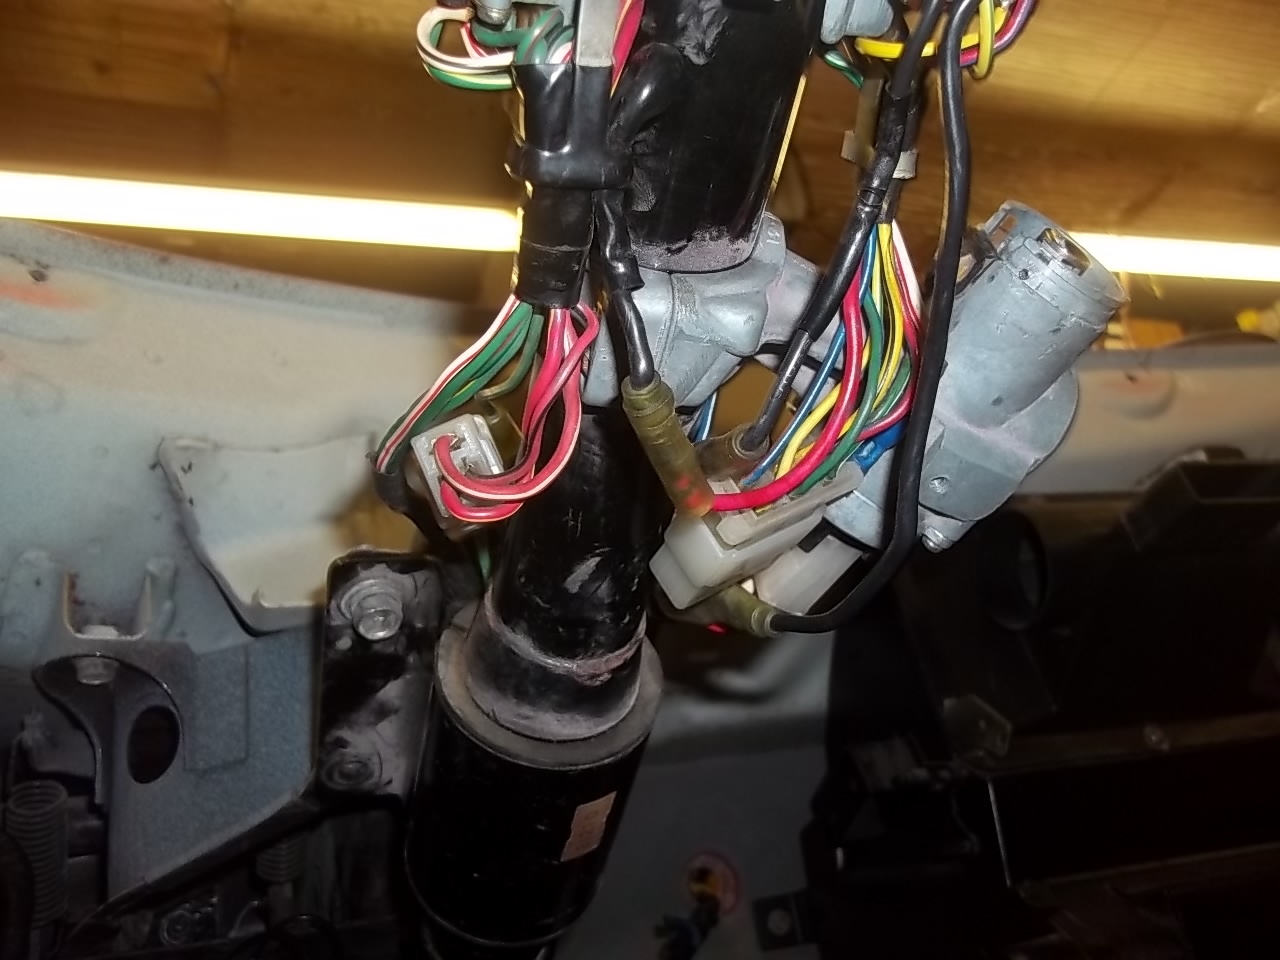
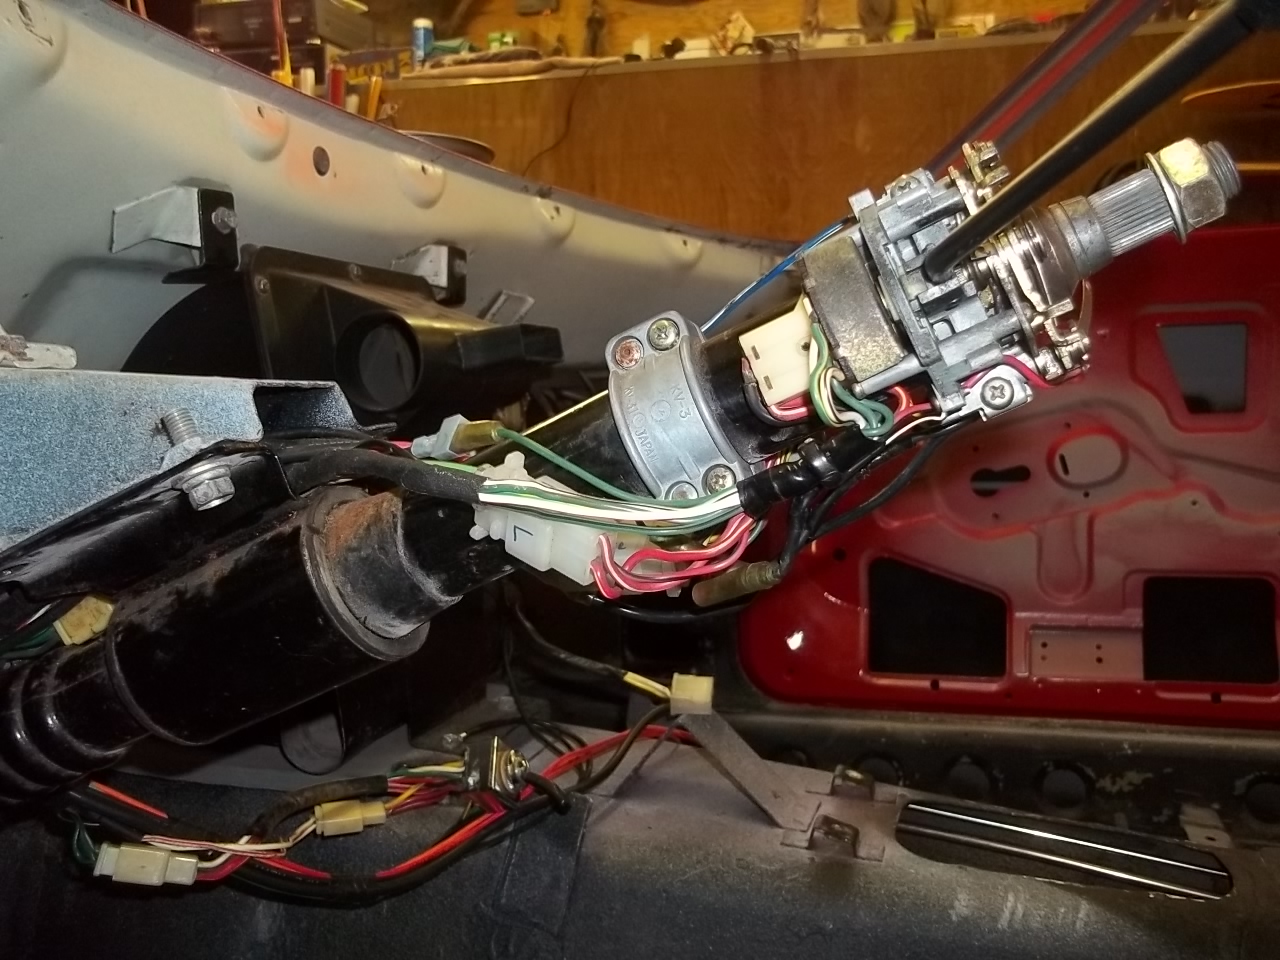
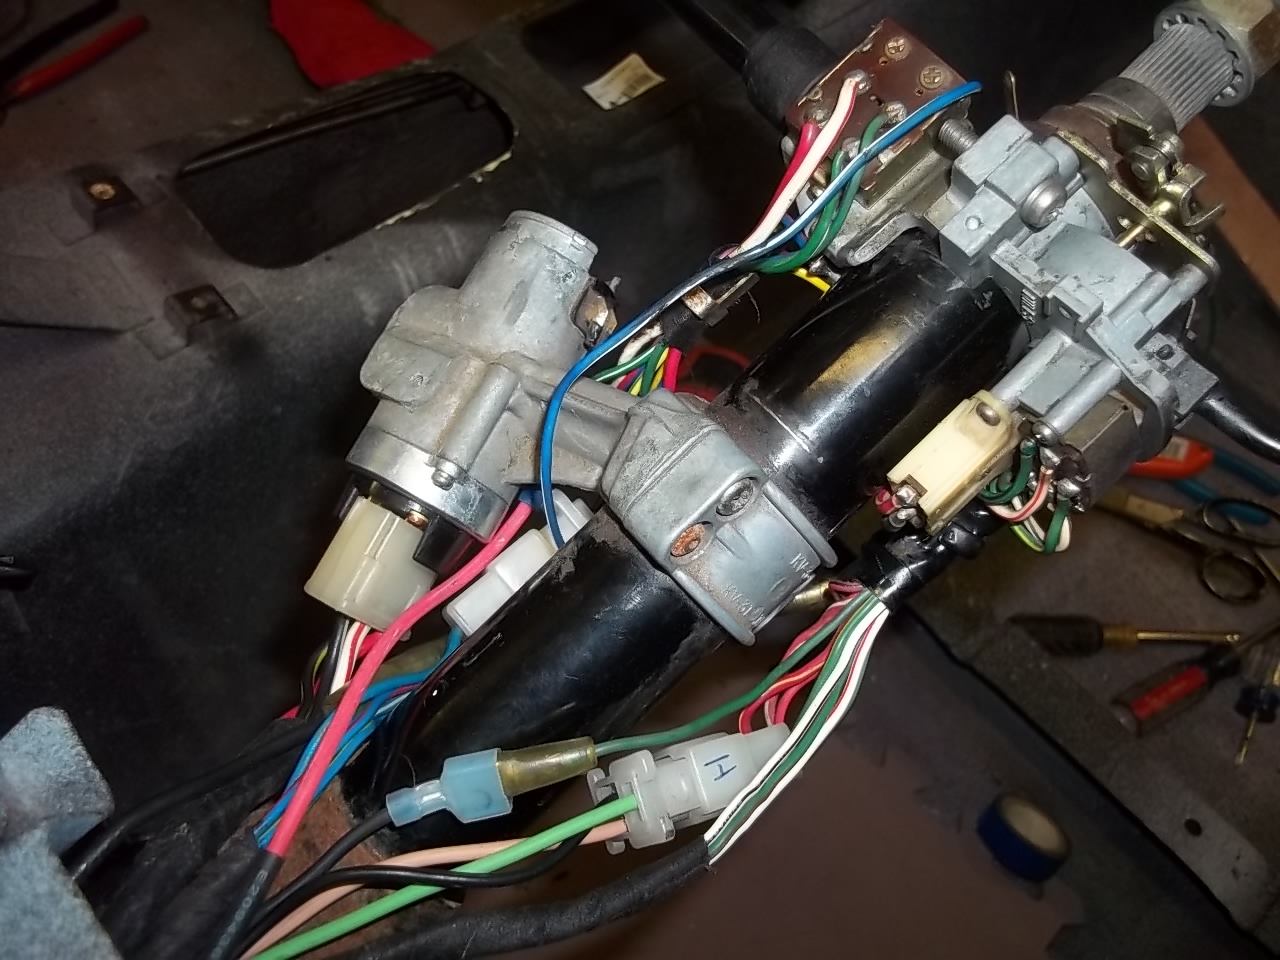
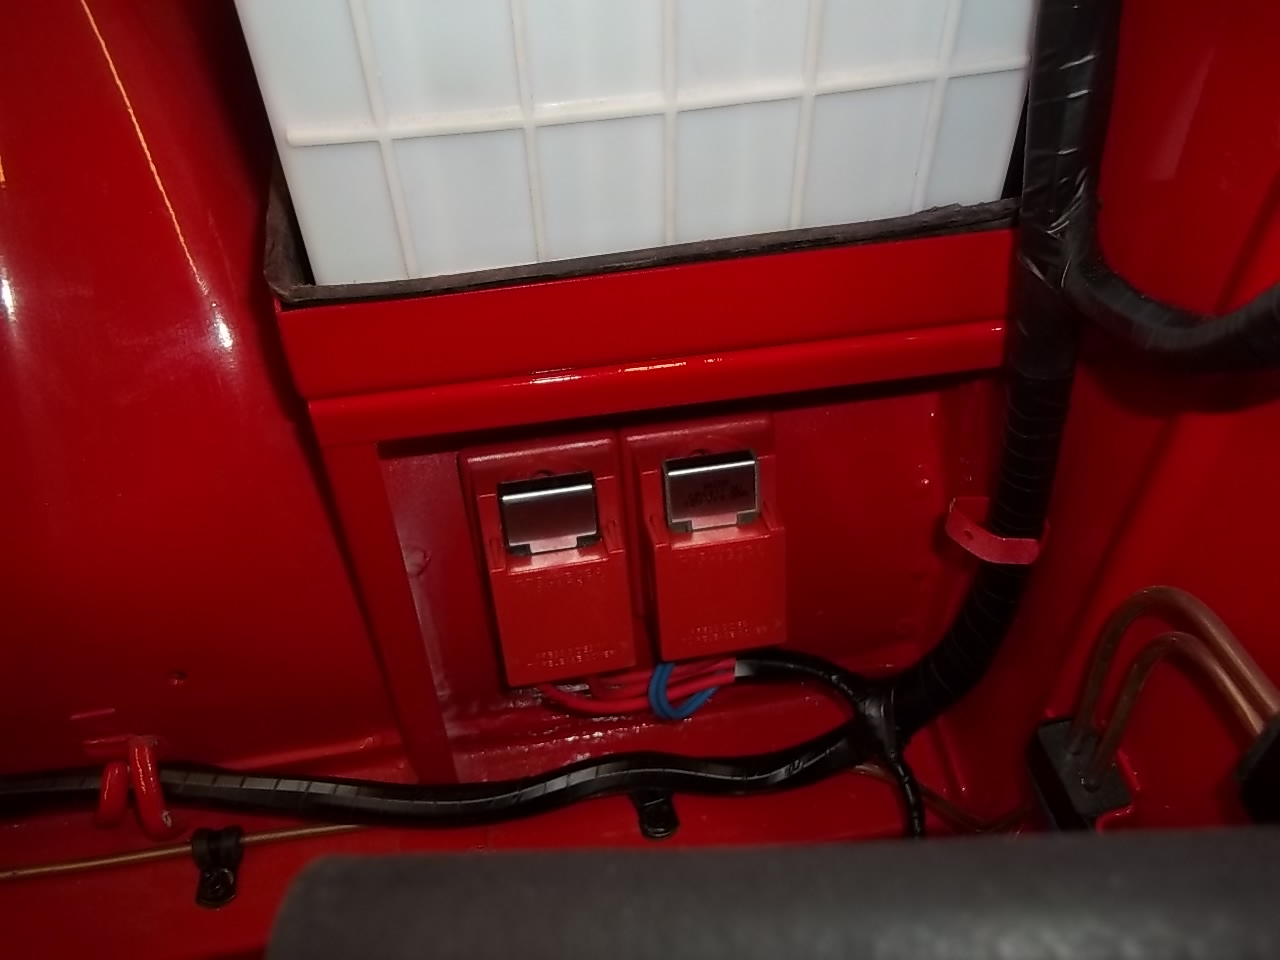
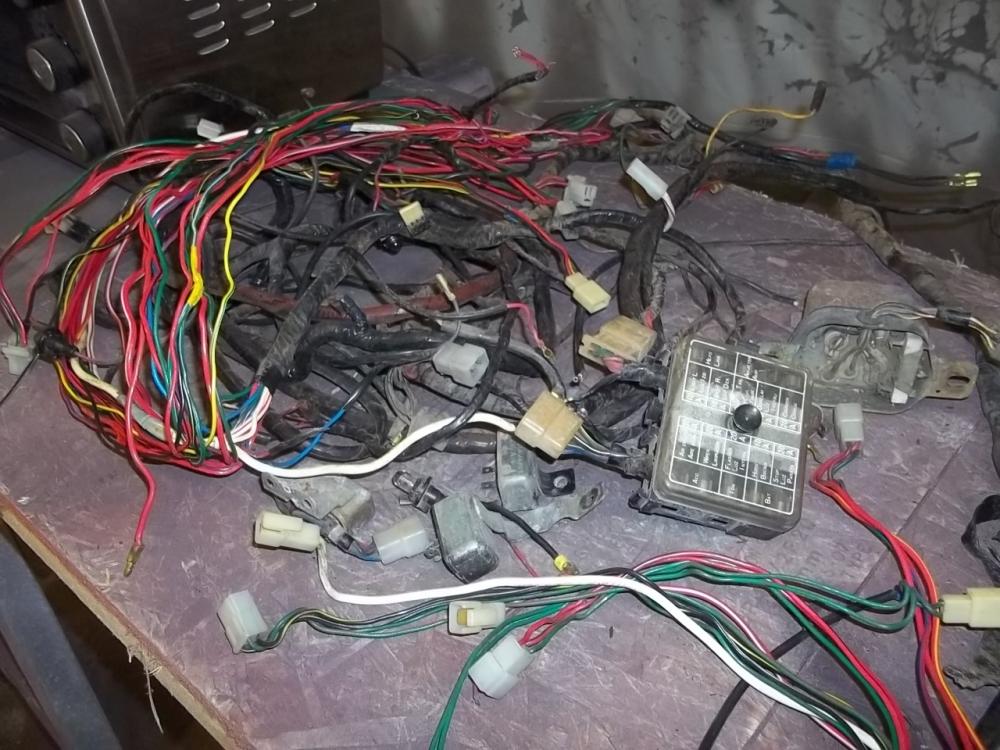
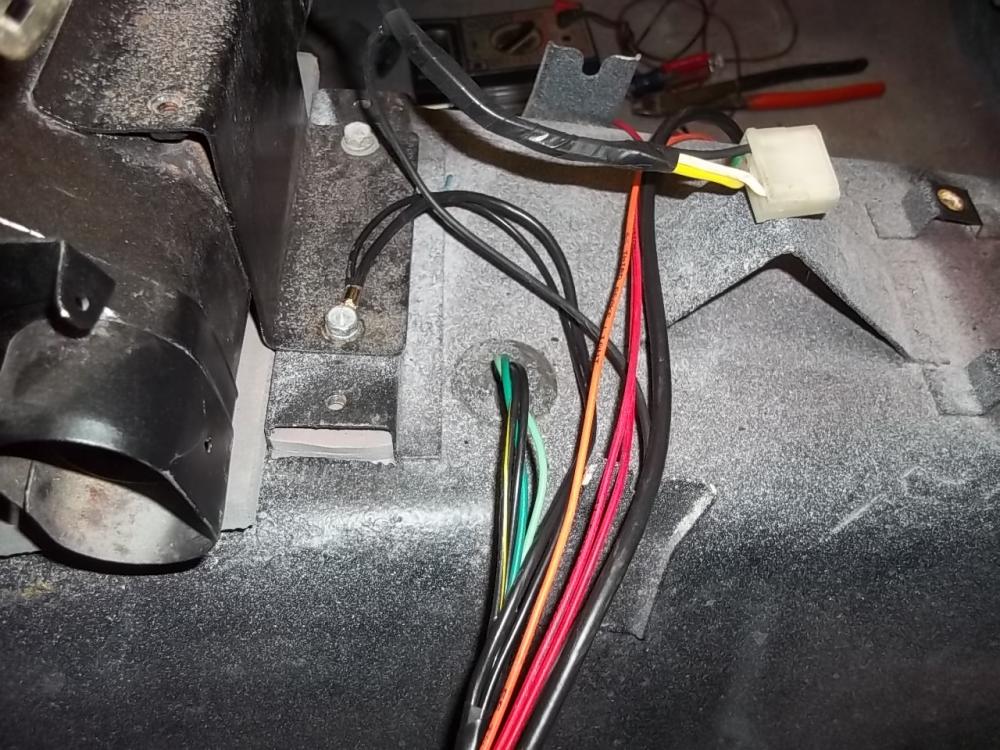
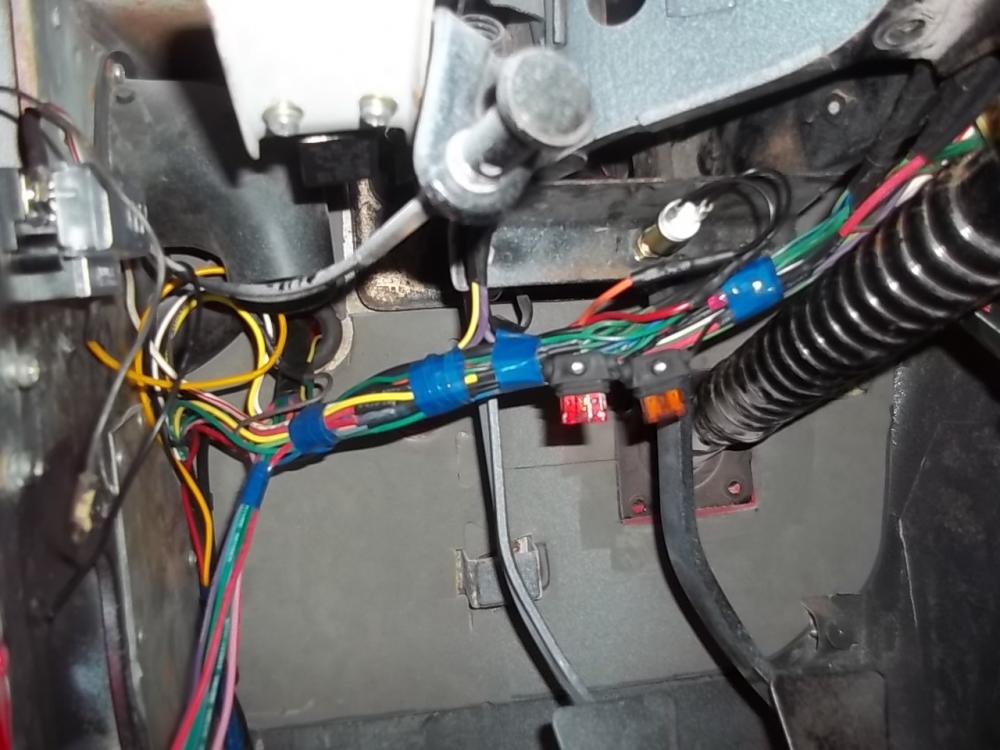
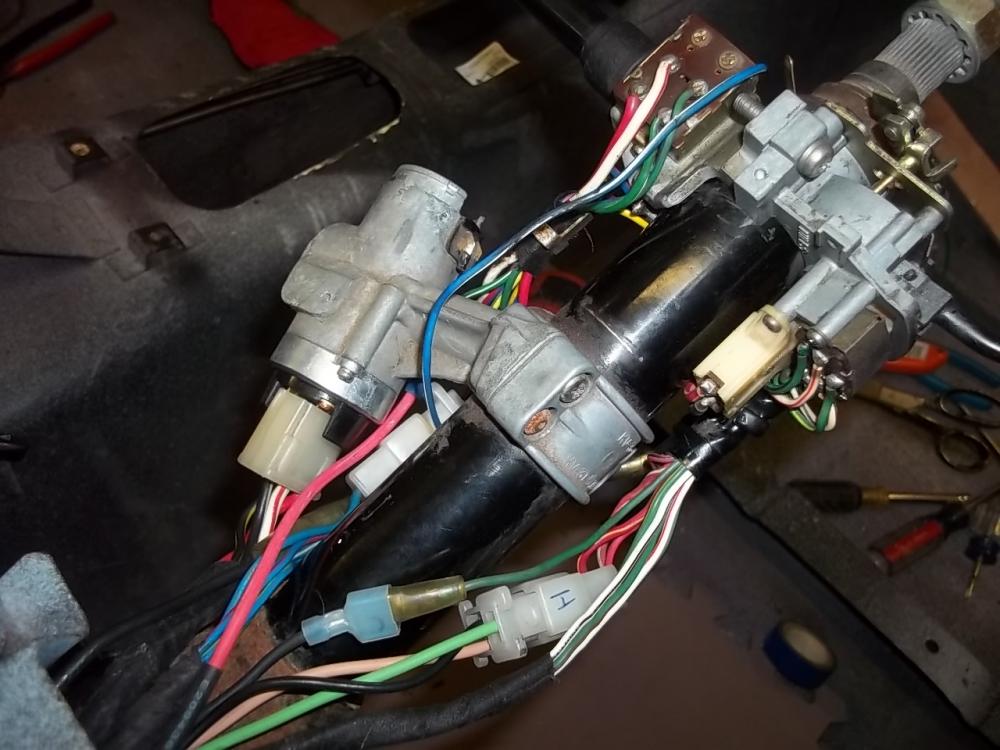
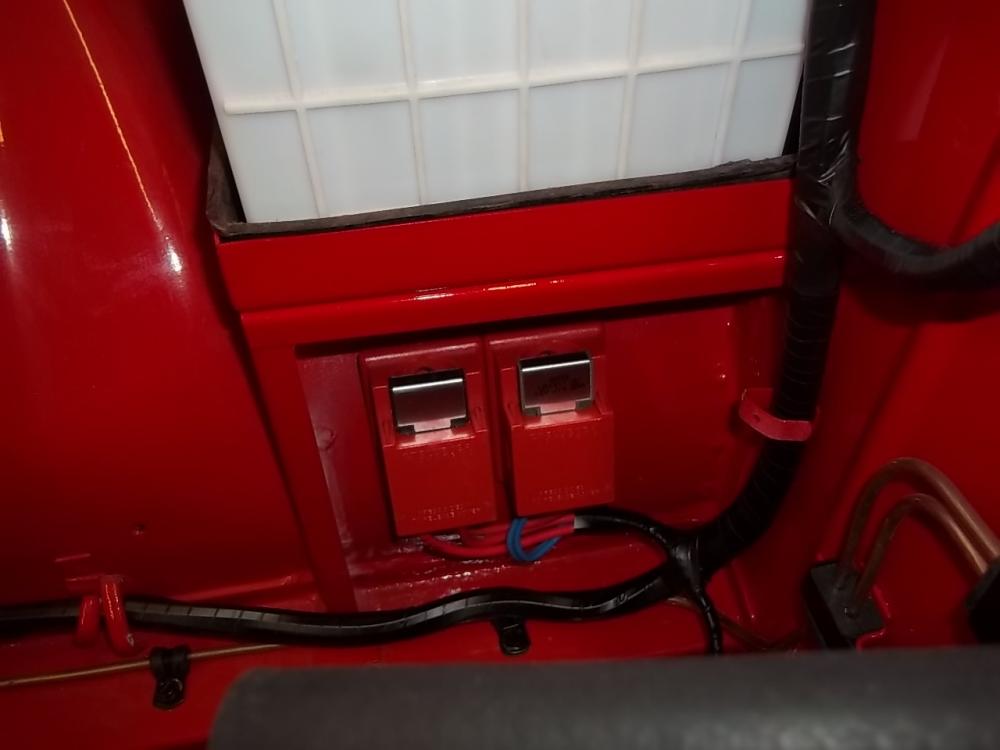
1 pointwell, i now have the major part of the wiring done, and everything works integrating the old and new was the biggest challenge. wipers, turn signals, heater and headlights all work as they should. some more pics here are a couple of pics of what is left over of the original harness. look at all those connectors! heater, radio,back up lights, e-flasher and neutral switch wiring close the back up and neutral switch wiring go through this rubber plug in the trans tunnel. the ground wires are for the wipers. i am going to install a ground stud there so i have room for those radio ground wires also under the column. still need to tidy this up. just making sure everything works first. the new harness does not have a fuse for the tail lights, so i had to add an in-line fuse. i cant recall what the other one is for. steering column wiring all hooked up and working. main power supply and headlight circuit breakers installed. these are auto reset. the main is a 50amp and the headlights 30amp. about $12 each


 1 point