Leaderboard
-

Zed Head
Free Member5Points19,227Posts -

siteunseen
Free Member3Points15,114Posts -
Captain Obvious
Free Member2Points10,081Posts -
FastWoman
Free Member2Points3,039Posts


Popular Content
Showing content with the highest reputation on 06/06/2015 in Posts
-
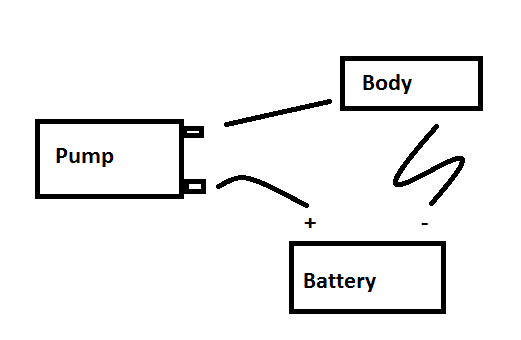
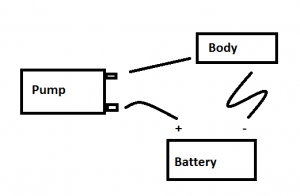
2 pointsSince you have a wire directly from the battery, you can test the pump separately from the rest of the harness. Make another shorter jumper wire and connect it directly to the car body. Then disconnect both wires from the pump, connect your positive wire from the battery to one of the terminals, doesn't really matter which one, then touch the wire that's connected to the body to the other pump terminal. You should see a spark, showing that the circuit back the battery is complete, through the pump motor. The pump will either spin or it won't. If it doesn't, you might as well tap on it with the wires connected to see if you can break it loose. I think that the ring terminals on the wires are different sizes. Positive is small.
 2 points
 -
Yeah, that's my life too. I spent untold hours this past off season putting in headlight relays, a starter relay, and converting over to the internally regulated alternator. My Z's headlights work, it starts when you turn the key, and the alternator charges the battery. Just like before I did all that work. But I know....2 points
-
1 point
-
1 point
-
1 pointHard to tell what exactly you jumped, and connected. Did you jump the AFM switch, or did you run a jumper from the battery? If you jumped the AFM switch, then you had power at the pump and grounding the negative terminal should have turned the pump. If you ran a jumper from the battery, then you'd want to be sure you had a good circuit through the pump to ground. You said you took both wires off of the pump but it's not clear what you reconnected after seeing sparks. If you have a small mirror or can get your eye n the right place, I think that the + and - are molded in to the plastic by the pump terminals. Also, one is smaller than the other, but I can't remember which is which.1 point
-
1 pointMost of the hardware under the hood is new. Manifolds, t-stat housing, valve cover, motor mounts, etc.. Alternator, starter and tranny bolts were replated.1 point
-
As regular reader, you might know i plan to bring a few panels and stuff to professional paint stripping soon so i'm preparing a few things. Talked to my bodyshop guy yves, about this and he recommanded me to open the fold at the bottom of the door to get all the rust removed and see how it looks inside. As he's the professional and i'm not i do whatever he says. First i needed some special tools. An Unfolding plier for bodyshops and a spotweld-romver drill. So this is how i started. Rusty buttom of the door but otherwise nice (note pictures are mixed up from two different doors, so don't be confused, one is a lot better then the other door is..) First removed the rubber sealing above the seal / fold with a small spatula. Then it looked like this: Then decided to remove old rust, debris and paint with a scotch and brite CSD disk. This are brilliant for that kind of work: This was the result: Next i removed all the spotwelds with the drill (sorry, forgot to make pics) and then started to unfold the fold with the special pliers: Worked out really great and after only 30 minutes the door looked like this (after another cleaning with the CSD Disk). So the doors are ready for paintstripping now1 point
-
No thanks, Randy. I'll take the high road, and abbreviate my disappointment; returning them to you would be a leap of faith. Caveat emptor George1 point
-
1 pointWow!! What a difference changing the phasing made. Car was super snarky when cold and you had to play a " tap Dance " on the accelerator pedal just to keep it running. I just did a rough adjustment on the phasing , but now car runs at 1,500 rpm when cold and then slowly settles down to a nice " rumpety " 1,000 rpm idle as it warms up. ( 280 duration cam in car ) . Will check timing figures tomorrow. Was up til 2:00 AM trying to figure out why AC is intermittent.1 point
-
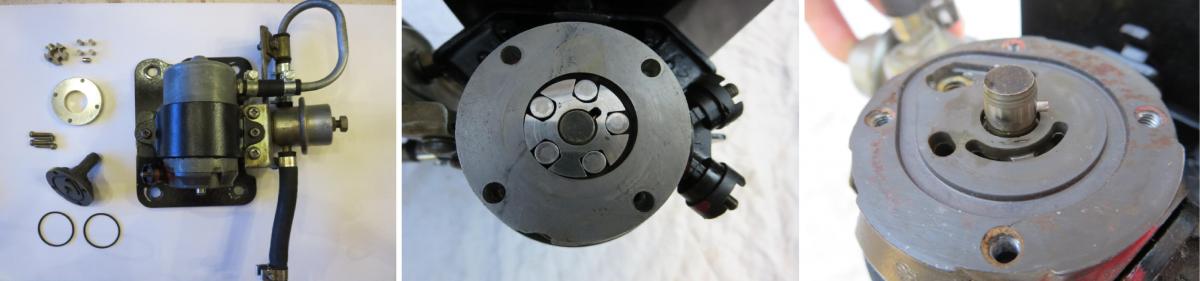
1 pointNice pictures. I wouldn't be surprised though if he had an aftermarket pump. Have to crawl under and see. Running the pump backward might break it free if it's jammed. Not sure if the stock pump does this, but the aftermarket pumps run fuel right over the electric motor. So moisture and crud can screw that up also. A new aftermarket pump is about $100 at the parts stores. Looks like other places are having sales though. The Airtex E8312 is a common one. http://www.amazon.com/Airtex-E8312-Electric-Fuel-Pump/dp/B000DT7Y7K1 point
-
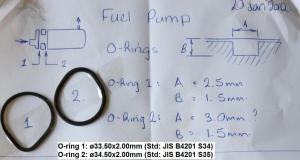
1 pointHere is my fuel pump. It will give you an idea what it looks like inside. Its a pretty simple design. Make sure you note the order the parts coma apart so you can rebuild it in that order. The 2nd photo is a calulation for the o-rings I used on my pump. If you need new o-rings make sure you use Viton or NBR material. I prefer NBR because of the hazards associated with viton if exposed to very high temperatures like fire. You never know... Chas

 1 point
 -
1 pointI haven't taken one apart but Blue has. http://atlanticz.ca/zclub/techtips/fuelpump/index.html1 point
-
1 pointI wouldn't tap on the fuel pump. You can crack a permanent magnet. If it's really jammed up, I THINK you can disassemble and clean.1 point
-
1 pointI'm guessing sugar or something else that's not supposed to be there, in the gas tank. The common way to test fuel pump operation and check for pressure is to remove the small yellow wire from the starter solenoid, then turn the key to Start. The pump will run but the engine won't turn. Assuming that your system is stock. If you have the later 1978 style safety system, I've heard that removing the oil pressure sending unit plug will allow the pump to run with the key On. That's easier for testing pressure since you can leave the key On. A simple way to check which system you have is to look at the oil sender plug. Early only has one wire, late has two wires.1 point
-
1 pointWhen you turn the key to "start," you can run the fuel pump for up to 5 sec. It sounds like when you let the key return to "ON" or "IGN," your pump might not continue to receive power. It may run just a few sec on the fuel pumped when you were cranking the engine. Ordinarily, the fuel pump is designed to shut down when the engine stops running (a safety feature). The strategy for detecting a non-running engine changed throughout the years. If your '77 is designed like my '78, this shut-down occurs when there is neither alternator output nor oil pressure. Either alternator output or oil pressure will enable the fuel pump relay. But check the FSM for your year to make sure. To get from point A to point B, you could "hot-wire" your pump. Run a wire from the + post of the pump to the battery, and it should whir away, enough to get you home to a location where you can take your time debugging the issue. But be warned: If you get into an accident, and if the integrity of your fuel system is compromised, your fuel pump could spray fuel all over the place, and you could die in a ball of flames, along with everyone around you. The safest route is just to have the car towed. Or perhaps you're on good enough terms with your ex that you can take your time debugging the problem where the car sits now.1 point
-
1 pointTake the hose off the bottom of the metal fuel filter behind the radiator on the passengers side. Put it in an empty container and spin the motor over. Gas should come out. Go to a parts store and buy a new filter. If gas doesn't come out let us know. Cliff1 point