Leaderboard
-

siteunseen
Free Member2Points15,114Posts -
rossiz
Free Member2Points1,109Posts -
Captain Obvious
Free Member1Points10,081Posts -
djwarner
Free Member1Points718Posts


Popular Content
Showing content with the highest reputation on 03/11/2015 in all areas
-
2 pointsWhat do y'all think? I've tried to get it as close to a P79 as I can. It's not perfect by no means but I'm getting sick of grinding and polishing the combustion chambers. I'm going to port match the head to the manifold tomorrow. Then soda blast this weekend and give it to the machinist Monday, so I have time to make corrections that somebody can point out. thanks for looking and critiquing Cliff2 points
-
Currently i'm working in my little-basement-workshop almost daily trying to get all the small details right. So here's an update on all the small things i did lately: 1) Zcarnut over at the JNC Forums pointed out that my Steering rack spacer was mounted the wrong way. After checking a few pictures i could confirm. Why you wonder? Because the drawing in the exploded-view and Manual is wrong. Damnit However i've corrected that now: 2) Added those washers that are mentioned in the manual as well but did not fit properly and were not installed on both cars originally. But somehow i like the look of these and think it's better to not have the nut directly on the rack so i like this solution and had them reworked to fit my needs (Not torqued in the pictures so thats why it looks loose ) 3) Next i installed the Kameari Engine mounts. Before: Specs from the Manual: And done - love how everything comes together slowly 4) I'm currently preparing a load of parts for powdercoating so i decided while i'm at it i will also put the Diff mount baseplates into this even if i'm not sure yet if i will reuse them or replace them with something like the "technoversion Diff mount kit". Before: And after: 5) And last i felt like my last Steering colum disassembly somehow was a bit of a fail. Lucky me i have two sets of almost everything (the advantage of having to cars to choose parts from ) So i repeated the whole thing with the Second steering column and this time used proper professional tools (aka the Spanner-extension-bits and a wood hammer, as seen on the Top). Worked way better this time without any damage: 6) I wanted to remove the bearings from the Lower part of the colum as well but this item is not ment to be removed i think... There is nothing mentioned in any manual about how to get this thing out.. so i tried on my own.. But ended up with a damaged bearing and cover cap. (See right). So i decided before destroying the nice one (left) as well i might get this sandblasted carefully and repained i stead of powdercoated. because powdercoating needs a lot of heat to burn the colour in and this woud destroy the bearing-rubber-seal and by using paint this probably would be possible. Have to check this but so far this is my best solution...1 point
-
1 point
-
1 pointback when my car was built, getting "chipped" meant seeing ponch & john in the rear view mirror...
 1 point
 -
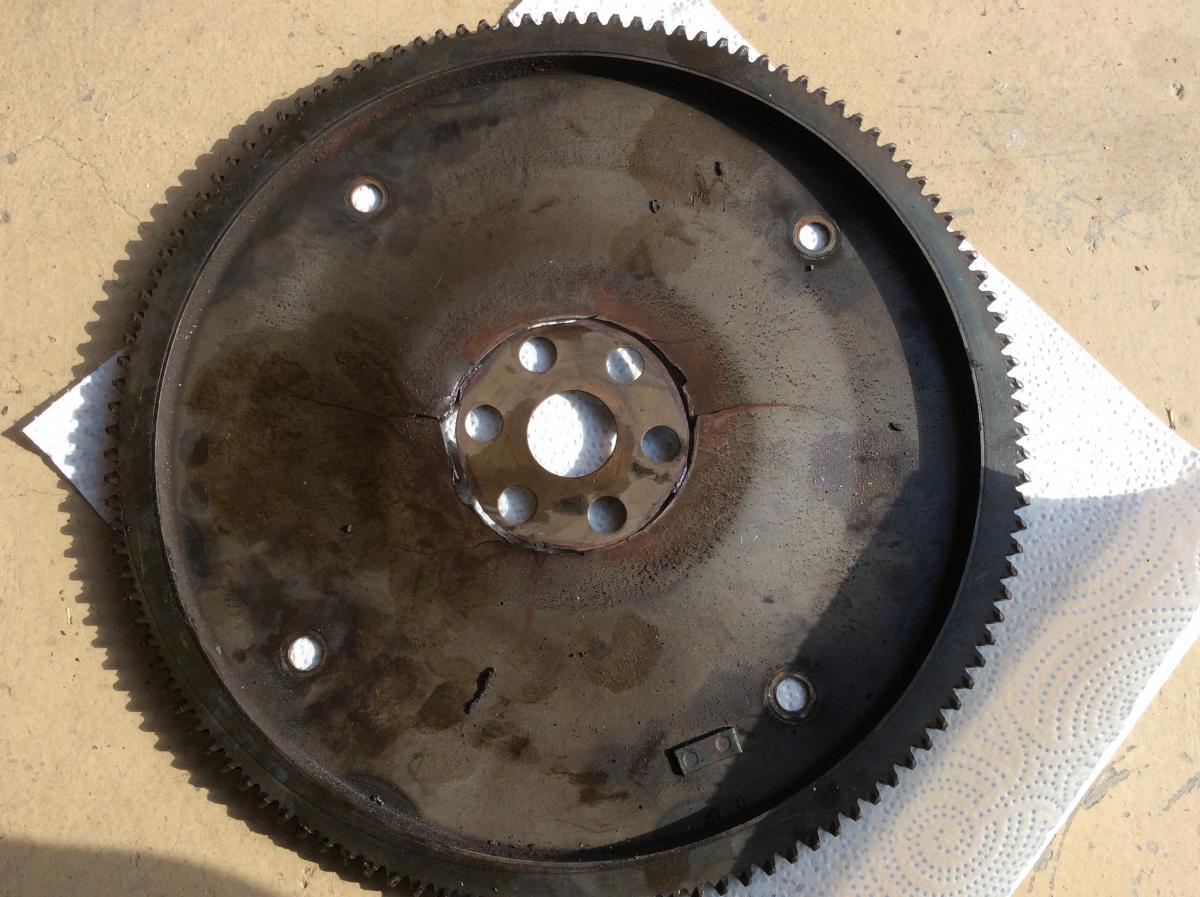
The 3N71A Transmission was slowly eating the low-reverse return spring to the point the car wouldn't reverse uphill when warm. I found a 3N71B out of a 280Z and set about removing the old and installing the new(er). After dropping the old transmission, I took the time to thoroughly inspect the flex plate and found some radial cracks 180 degrees apart. Fortunately, the new transmission came with the flex plate. A second surprise came when we removed the backing washer. There was a circular crack with a substantial gap just underneath the washer. There is perhaps two or three points of contact. I can't tell whether the crank had spun the portion on the backup washer, caught and re-welded itself into place, or if the crack just hadn't finished the full circle. The car drove normally and this came as a complete surprise. Who knows what evil lurks in the hearts of our beast. The only other problem in the installation is a failed diaphragm in the vacuum modulator that is getting replaced tomorrow. Has anyone else experienced a similar failure?
 1 point
 -
1 pointFor popping out of 5th gear you can pull the spring (with ball) out of the main plate in the gearbox.. it is sitting behind a bolt.. take a new spring or make it a bit longer with help of a side cutting pliers..(just give it a pinch between the windings, not cutting ofcourse..) just a few mm longer will do! Mart1 point
-
1 point
-
1 pointIn case you want one other thing to check before you climb back under the car to take a closer look at the fuel pump... The AAR (you know what/where the AAR is?) is wired in parallel with the fuel pump. You can pop the connector off the AAR and probe the connections inside to see the same signal that the fuel pump should be seeing. Put a little noid light across those two terminals if you get energetic. Something you can see easy from the driver's seat. So just like the fuel pump, the AAR should have 12 volts across it's two terminal connections: - any time the key is in the START position, and/or - any time the key is in the ON position and there is air flowing through the AFM. So, if you've got power to the AAR at the correct times, you're looking for a bad fuel pump or connection to it. But if you're not getting the correct signals at the AAR either, then you've most likely got a problem with your FI relay. Just thinking it's easier to check for that signal standing up at the front of the car instead of laying on your back under the rear of the car. And, unfortunately, rossiz is correct that his trick with the oil pressure signal won't work for your year. That only works on 78's.1 point