XYZ
Free Member
-
Joined
-
Last visited
Everything posted by XYZ
-
 I'm looking for some feedback on the difference/preferences between the K & N air filters VS. the Longflo air filters VS. Stock. Anyone know where to get a braded hose kit (brakes) for less than $120?
 -
Mini-Me- Stop humping the laser!
-
Hi gang- I prepairing to do the toyota caliper brake upgrade on my Z. I have a couple techinical questions about this upgrade. 1. Did anyone go with the 300zx rotor upgrade and what problems did you encounter?? I've read that doing the larger rotor requires having a spacer made to accomodate the caliper and keep caliper-to-wheel interference at bay. Will this change the offset on wheel selections down the road? 2. If the only upgrade was the caliper (no rotor change) did you need a spacer or did you simply rework the back plate and the 'S' shaped brake line. Did anyone get rid of the backing plate? 3. I've been reading about an air duct system that directs air onto the rotor to better cool it. Any thoughts or experiences? Apparently there's an inexpensive system using some dryer duct and bubble gum (just kidding). The dryer duct needs to be mounted on some brackets and fastened. Where and how? I know there were some recent postings on this topic but not covering these questions. I'm going to go to braided hoses and probably leave the stock master cylinder. If anyone can think of anything else besides the parts and a little elbow grease please share. It's always easier if you know the insider tricks! Thanks a lot for any input. P.S. -Since the rotor can be changed out is there a rotor that fits early Z's that has a five bolt pattern instead of 4? (this maybe a dumb question but...) and if so what happens to the rear since it's a drum brake system? P.S.S. If anyone has links about this subject other than washington z club I would appreciate it if you could post them. P.S.S.S. Sorry this is so long!
-
Thanks for the feedback. We'll have to see what happens.
-
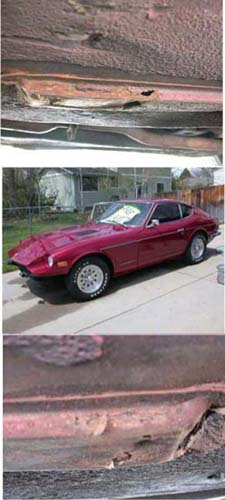
I have not checked the battery tray area or the spare tire well. The bottom pict shows a hole on the slant of the frame that I can stick my finger into about a half inch or so and seemed as though some metal was peeling away. I didn't go any further until I got a comfortable feel about these rails. The rust does appear at the rear of the rails and there's another spot I forgot about above the rails in the rear part of the front wheel well that is about the size of a shoe, a clean hole on both sides. I have no Idea how easy/hard that would be to replace. I did pull up the carpet and it seemed solid and from underneath there wasn't much for 30 years.
-
Hi gang- Came across this 73 yesterday and just had a look at it. It's pretty nice looking on the outside, repainted over lime green. I've attached some picts of the underside. Specifically the twin I-Beams that have some rust. I guess my question is for the right price say $1500 or less is this worth looking at? The rust worries me and part of me says just turn and walk away as these are the main structural areas with damage. Any feedback would be great.

-
If you can get a catalog from victoria british, there are a couple of videos in the back of the catalog for $20. the one I have is the general tune up video (there's also a 6 hour video on just su carbs). Anyway this video is a homemade deal but goes over tuning the early z and starts out adjusting the valves. I thought it was worth the $20.
-
There's a cool site someone posted a little while back, it's a wheel size calculator. Here's the site, WWW.c5-corvette.com/tirecalc.htm FYI, in regard to the cost of the rims, I priced centerlines, billet series (any of them and was quoted $215/rim with the correct offset etc. thru discount tires. There pricy, but I like the look of ceterline better than the panasports. Don't know about weights or anything though. Turns out a 16" rim with 50 series is almost exactly the same diameter as a 14" rim with 70 series (stock) tire. I'm pretty sure this is stock. If it's not someone will let me know.
-
If you can find/get an address,the more specific the better, you can go to the county assessors office and do a search for ownership on the property. That's all public record. It's not to hard to find the real owner, but if the place is leased to someone else that could be harder, especially if the owner is out of state or a corporation or trust or something. You can sometimes do this search over the internet too depending on how good the county site is. Good luck! It looks like a little treasure trove you've come across.
-
check out the thread on Need front end advice. There's a some discussion about this topic and a website for general info and specifics to this question.
-
Yep. looks like it exists already.
-
Mike- Just a thought, but since this is a computer based club what about a mouse pad with the club logo on it?
-
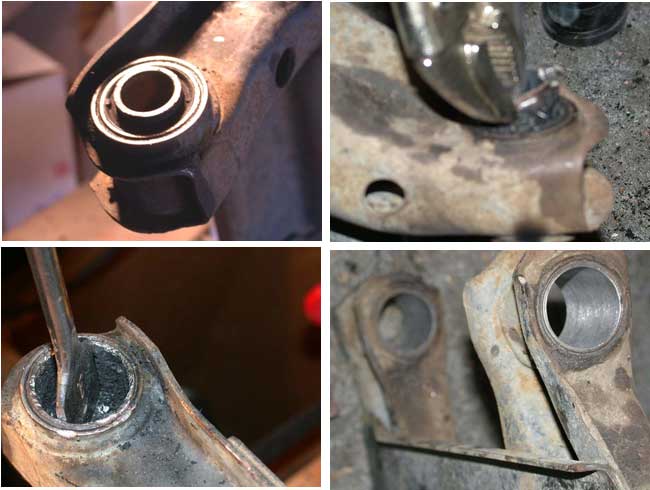
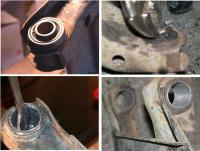
I thought I might share a few things I learned recently when replacing my bushings on my rear control arms. First, grease the hell out of all the bushings, inside and out and all the sleeves too. I learned the hardway. I had to remove my control arms twice as I forgot to grease the first time. I learned a trick to removing the spindle bushings on the outer control arm while making my swap from stock to urethane. The bushings are actually pretty easy to remove once you figure it out. I've attached some pictures to help describe what I did. I started by drilling the rubber to loosen it a little (I'm not sure if this really helped or not but it's what I did) next to the inner sleeve. Next, I attached some vicegrips to the sleeve sticking up. I then heated the sleeve from the underside and interior with a propane torch for a few minutes. Once the rubber started to soften, I used the vicegrip as a fulcrum to pull the sleeve up and out of the rubber. The vicegrip popped off a few times but as I kept heat on it the sleeve slid right out. Then I used a drill with a 1" paddle bit and drilled out the rubber. After that, I placed a hacksaw blade through the remaining bushing and cut two grooves about a quarter rotation apart through the sleeve making sure not to cut into the control arm. Then I took a flat blade screwdriver and started working on one of the grooves until the sleeve let go. The heating and drill took about 5 -10 mins and the hacksaw part took about 10-15 mins. each. Unfortunately, I didn't refine this process until my last bushing. I think it would have gone pretty quick for me had I known a good way to get these bushings out. There is a similar technique in How to restore your datsun z-car but you must hack through the rubber and two layers of metal. I think removing the inner sleeve and drilling was easier. After cleaning up the opening I greased everything, I mean everything and attempted to reinstall the CA. That's when I found out another trick. The urethane bushings I used, by suspension techniques, have collars on them that reduce the opening of the CA by an 1/8" or more. I couldn't get that thing back on. After an hour plus of fighting, I got pissed off and cut off the collars on the inside part of the CA with a knife and the CA slipped right back into place. You'll notice in the photo's the original bushings don't have a collar just a sleeve. Unfortunately, I don't have a picture of the bushings so if you haven't seen them the collar part might not make sense. I'm not sure if what I did was right, but the way it sat without my cutting the collars off meant I wasn't driving. Everything seems to be working fine and the new bushings are basically the same now as the original bushings. Hopefully, someone might be able to use this stuff and speed up there bushing replacement. Also, I'm no mechanic so if anyone wants to chime in with other observations, great.
-
I like the original Z logo design on the front and back, just above the cups. I also agree about the collegiate hat style. For what it's worth...
-
When I got my Z this past summer my insurance agent would only cover it for the basics required by Colorado ie.. no replacement value. I was told I had to get an appraisal to set the replacement value for the car if I wanted that type of coverage. I am currently in the process of switching companies and now have the car listed and covered (pending underwriter approval) as a show car with full coverage and just about the minimum deductables. This knocked off nearly $300.00/yr for coverage too.
-
Try www.shox.com They have the lowest prices I could find for the suspension stuff. I also tried stricklyz, motorsports industries, victoria british and www.nismoparts.com but shox.com was the lowest. Do make some calls because prices where all over the place. AS an example, I saw Eibach springs anywhere from $280.00 down to $209.00 for a complete set.
-
I've been looking for about three weeks now for a good looking set of wheels. Pretty far and few between. The only things I could find that I like are centerlines and I'm not totally set on those. I was quoted $215.00/wheel and 5-6wks lead time for dealer. I thought I had found some really nice rims by superlite but they were more than centerlines. I've searched the net as best I can but the biggest problem is when you try to search for a Z they don't seem to exist. Good luck. If you find something maybe you can post it to help the rest of us wondering aimlessly through the world of wheels.
-
I'm not sure where this pin is that your talking about? I saw a pin that I had to drive up and out that held the transverse link pivot bolt in place, is that it? Or is there a little pin holding the bushing and sleeve inside the control arm hidden in rubber? Just curious as you can tell this is my first bushing replacement.
-
Thanks for the info- in response to some of your questions on the rear control arm, my reference to the upper bushings means the larger units next to the differential (I'm not the best with the terminology). The lower bushings for me are the ones next to the wheel. I removed the control arm in about 10 mins. but it was the small bushings themselves that I wasn't interested in tackling immediately. Do I drill them out between the sleeve and the outer shell? How do I clean up the inside of the control arm once that stuff is out? I don't have any air tools but I do have a small propane torch:D I assume these buggers need to be completely lubed up as well? The steering wheel shimmies quicky back and forth at these upper speeds. I have replaced the steering coupler, the tie rod bushings, the endlinks on the sway bar and the rack and pinion bushings. The only thing in the front not replaced is the control arms and the bushings relative to the struts (coming soon). With all that's replaced I figured it was the alignment?!? I plan an upgrade on the brakes (maybe sooner rather than later) but I haven't done the bearings or the brakes at this point. The steering wheel used to shudder between about 35 - 45 mph (not quite as feaverishly) and then go away. Now it shimmies/shudders at a higher rate of speed, closer to the speeds I like to drive.
-
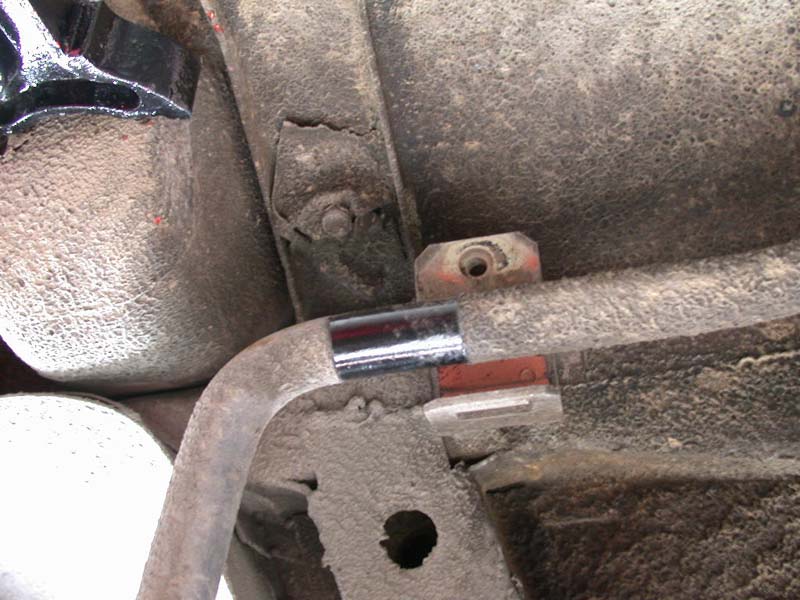
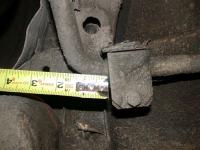
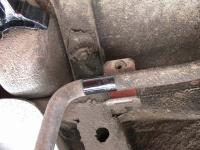
Here's another pict with a tape measure on it for reference. I think the first picture is pretty clear as to the location of the bracket. You can see the clean spot where the bushing was before I replaced it.
-
Daniel- Here are a couple of picts of my swaybar location on my Z. I have a 260 if that matters (I don't think it does?). I hope this helps you. This isn't the easiest place to get a good photo.
-
Okay- My saga continues in the bushings replacement process. A few questions to throw out there. First, I just did the upper bushings of the rear control arms took it out for a drive and now my rear end squeaks like a new shoe. I saw in a past posting that the bushings should be greased which I did on the inner sleeve but not the outside of the bushing. Did I miss the boat here? I didn't grease the outside as I figured I would collect dirt and debris like a magnet. Second, I did not replace the lower bushings in the rear control arm as they were in pretty good shape. Other factors considered were that they are pretty small bushings and I didn't have the tools to do a respectable job removing them (or the patients). Should I expect any problems by leaving the old bushings? Third, can the front control arms be dropped/removed similarly to the rear control arms without messing with the strut tower and if so exactly what all should be greased on the urethane bushings? Finally, I replaced the bushings for the rack and pinion steering but have not yet got the thing re-aligned. On my test drive besides my new squeak, the steering wheel shudders as it approaches 50+ mph. I'm assuming this is due to miss alignment as it did not shudder at the speed previous to my tinkering. Any thoughts?
-
Someone last week posted a similar question about lug conversions and a website was given as a resource. www.modern-motorsports.com. This site has a little information regarding adaptors for a Z to a Honda bolt pattern which is listed as 4 x 100 or 4 x 4" for the Honda wheel. Maybe this will help you. If you email the site they should respond pretty quick. I was looking into Honda wheels as well and I got a respond about this adaptor in a day or two.
-
Daniel- I have not worked on the rear yet, however, looking at the end links in the kit, there was 4 provided and they were all the same. I don't know about the stock end links and if they are all the same or not. Hope this helps.
-
FYI - I contacted Energy suspensions regarding modifying the sleeve for their endlink bushings. Removing a 1/4" of sleeve will have no negative effects on the performance of the bushing. I was glad to learn this. After talking with a few people who have messed with these bushings they recommend a large C clamp or ratchet strap to compress the bushings to start the nut on the bolt. Or do what I did and cut it!