


240260280z
Free Member
-
Joined
-
Last visited
Everything posted by 240260280z
-
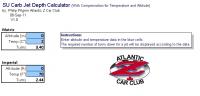
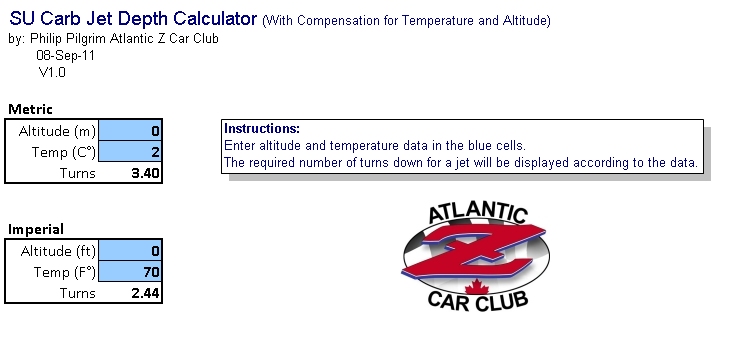
 The chart shows the absolute depth of the jet: i.e. The number of turns down from the very top. For this chart to mach your carbs, you need your carbs set up correctly with factory parts and also in good working order with no worn or out-of-spec parts. With respect to which way to turn: 1. When it is colder (denser air and more stuff to burn up), you need to add more fuel; so the jet must be lowered to expose more "hole/orifice" gap between needle and nozzle as this exposes more fuel. 2. When you drive higher in elevation (thinner air and less stuff to burn up), you need to reduce fuel; so the jet must be raised to expose reduce "hole/orifice" gap between needle and nozzle as this exposes less fuel. So in a cold morning you need more fuel than on a hotter afternoon.... so the jet is lower in the morning and higher in the afternoon. I would just set it in between both and be lazy FYI my opinion on daylight saving time is for everyone to move 30min then just leave it
 -
I am about to stat modeling the flat top SU so I decided to model the jet depth to get my head back into the game. It has been a while since I had such output. Here is an xls tool that models the graph. I will probably make a visual basic tool shortly for fun and eventually a java version when I get around to setting up a new tech tip website. Note: This is a Microsoft Excel (XLS) Tool Enjoy: Hitachi Jet Depth Calculator 240z260zSUJetDepthCompTool.xls
-
Be brave, it is not really all that bad. I would recommend removing the rear plastic finisher in front of the lights as well as the rear passenger side plastic panel. (This will let you see the evaporation hoses and the plastic condensing tank. It may be a good idea to remove all of the hoses above then drop the tank and pull the hoses down with the tank. you can then decide what to do. btw the best way to seal the two hose passages (tubes projecting from the rear deck floor) is to use 1" and 1-1/8" heat shrink. (1" is recommended for both and I used it but I will improve the recommendation
-
Congrats on 10 years! That is a great achievement. I see your company highly appraised so many car web sites that there is more than just "Z" in your domain! Please share some photos with us of funny moments and your facility, tools, staff, most interesting works (like the triple SU's for example) etc. if you can. It would be nice to see the face and output of ZTherapy.
-
The tach signal goes through the distributor. My guess is a loose electrical connection (behind tach, or ignition key or at distributor , and or vibration in the drivetrain/oil spindle.
-
Glad you are not my dentist
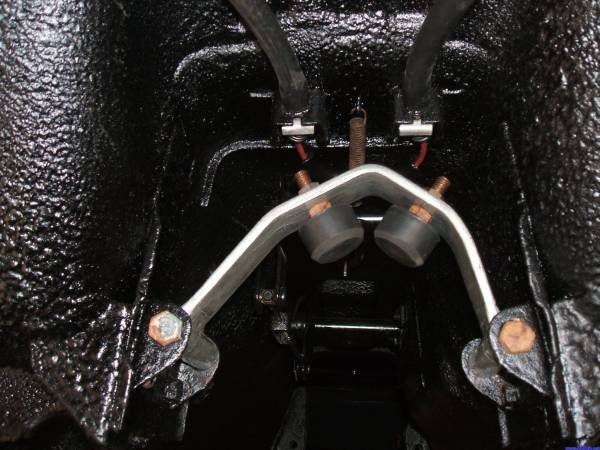
No, unfortunately they are not. Early Z's have proportioning valve in back integrated into a T junction, later have it in front as a separate device on the fire wall. The distances to the differential pressure switch may have also switched with brake master and booster changes over the years. I just did all the lines in a 240z and from that experience, I would recommend you pay someone who can do custom lines to do your car.... not a brake shop but rather someone who is an experienced restorer and has a good intuitive sense about 3 dimensional space and geometry AND has a good flaring tool. Use the best line you can afford. I recommend this stuff (twice the price) http://www.fedhillusa.com/
Secure the strut and use a big plumbers wrench on the nut. Put a pipe on the wrench if you need leverage.
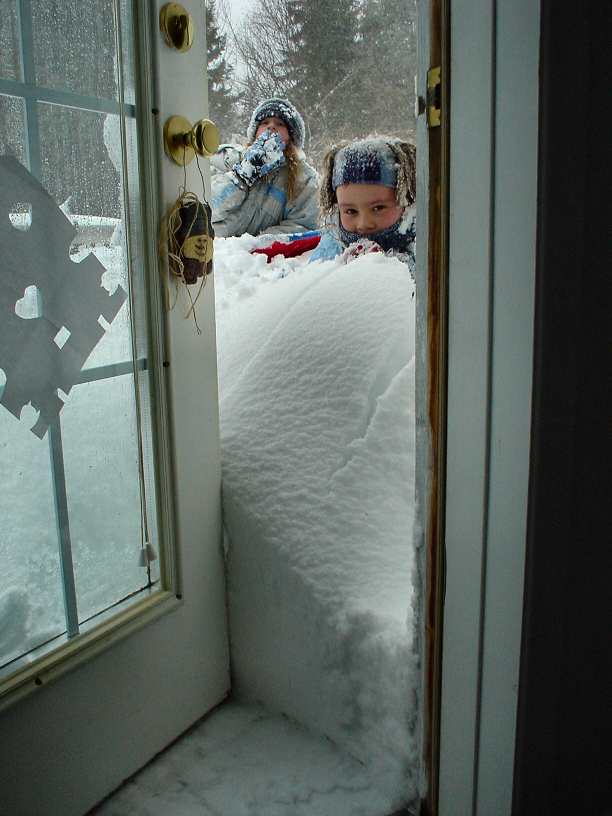
For winter driving (in areas where there is winter), the minimal requirement would be snow tires. If there are cycles of freezing and thawing (like the day and night thaw, freeze where I live in Atlantic Canada) or black ice occurring in the shadows (like in valleys by rivers in Alaska) or simply in an area where climate change is causing more icing than the past and the highway maint. crews and equipment are not able to cope, or you change elevation a lot then consider studded winter tires. Also learn how to: react in a skid and throw the clutch rather than the brake brake before turning skid recover the concept that some vehicles may have 4WD but all have four wheel brakes clear show off vehicle before travelling fresh air is needed to stop cabin window condensation
There are less expensive ways to lower a z besides coil overs Performance springs is a common 1st step.
Rav4 98 to 2005 4X4 w. studded winter tires.


 Lifted from the net. One is from one of our member's Ian.
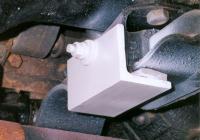
 Hi Ian, Love your car pics on another Z site I browsed earlier! I just checked and he used new rubber tubing and essentially put two pieces longitudinally along the length of the needle then clamped this in a vise (squeezing a hot dog). The rubber prevented damage yet it grabbed the needle. As well, the vise jaws grabbed the whole length of the needle thus distributing the force evenly and preventing any bending.
But what if Nissan engineers designed a "leaky" check valve using pressure differentials and orifices to get the job done...we need to go exploring
Here is a flat-top/round-top-ish manual for a Hitachi carb HJL38W: http://www.ratdat.com/images/posts03/HJL38W.pdf
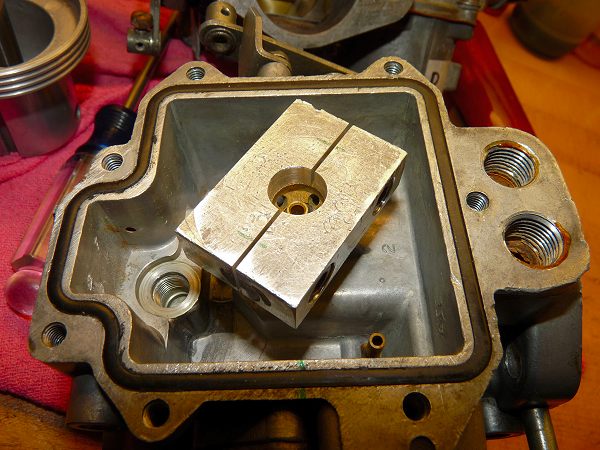
Here is a shot of the roof with your jet depth tool: It looks like a screw stop for the choke valve in centre. I also see two drilled passages (with light from above) on each side of the walls that seem to go up to the piston area .... but what is the hole in the front upper left? Is that associated with the vacuum break?
Hi Ian, Love your car pics on another Z site I browsed earlier! I just checked and he used new rubber tubing and essentially put two pieces longitudinally along the length of the needle then clamped this in a vise (squeezing a hot dog). The rubber prevented damage yet it grabbed the needle. As well, the vise jaws grabbed the whole length of the needle thus distributing the force evenly and preventing any bending.
But what if Nissan engineers designed a "leaky" check valve using pressure differentials and orifices to get the job done...we need to go exploring
Here is a flat-top/round-top-ish manual for a Hitachi carb HJL38W: http://www.ratdat.com/images/posts03/HJL38W.pdf
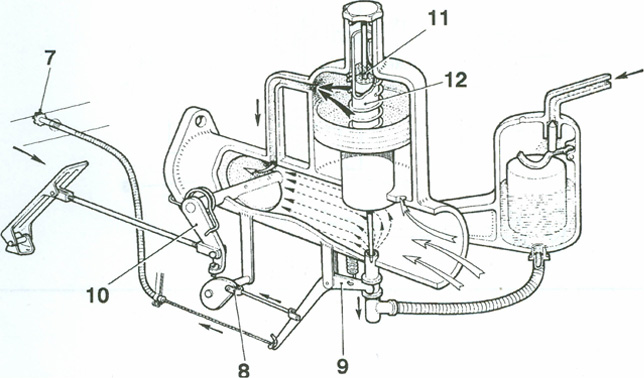
Here is a shot of the roof with your jet depth tool: It looks like a screw stop for the choke valve in centre. I also see two drilled passages (with light from above) on each side of the walls that seem to go up to the piston area .... but what is the hole in the front upper left? Is that associated with the vacuum break? Another nice drawing for the site. It nicely shows how the air pressure/depression pushes/pulls the pistons.
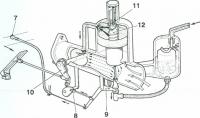 $15 and worth it: http://www.autozone.com/autozone/accessories/Tools-Garage-and-Equipment/Remote-Starter-Switch/_/N-25eo but I made mine from a $5 Volkswagen horn and spare wire and spare connectors.
Interesting read on popular hotrodding.com: source:http://www.popularhotrodding.com/tech/0611phr_the_secret_life_of_carburetors/index.html The Accelerator Pump Under idle and cruise, a considerable amount of vacuum exists in the intake. This vacuum reduces the boiling point of the fuel, causing it to vaporize much easier under the prevailing high vacuum conditions than under low vacuum. This useful characteristic helps fuel distribution considerably during idle and cruise. When running down the freeway at 2,000 to 3,000 rpm with 15 inches of vacuum, a lot of fuel being drawn into the engine is vaporized well before it reaches the cylinders. Standing on the gas pedal completely changes the situation. When the vacuum transitions rapidly from a high value to near zero, fuel held in vapor form now condenses into liquid onto the manifold walls. Although a fresh charge of air is entering the engine and carrying its associated fuel, the engine, for a moment, still goes very lean. This is due to the fuel that was contained in the air suddenly clinging to the manifold walls, and for a moment at least, going nowhere. This causes an enormous flat spot that the engine simply will not drive through. To offset fuel condensing on the walls, an accelerator pump system is added. This squirts additional fuel into the intake to cover the would-be hole. A basic schematic of a typical pump system is shown in Fig 11 (see p. 91). In this example, a piston is shown injecting the fuel, but most often, the function of the piston is carried out by a spring-loaded diaphragm such as in a typical Holley carburetor. Calibration of the accelerator pump system is carried out by jets to control the rate at which it goes in; various springs, cams, and diaphragm sizes are used to control the amount that is injected and the duration of the injection phase.
I found this on Zcar.com. It matched my interpretation of the drawing of the power valve on paper but exploration of the air and fuel lines is critical to understanding its function. My thinking is that during a throttle-up transient, the spring unloads and squirts fuel into the air stream as opposed to being to be sucked into it.... but I have no details of the control circuit yet....but I bet you are correct with the vacuum threshold I should have brought my mighty vac yesterday.
Dang that fuel bowl reminds me of a weber! Could you do me a favour and post the volume/capacity of the flat top and round top carbs if you have a chance? That would be good info to float (pun) on the net for racers.
Thanks! my friend "Cptn Obvious" on this forum, is a superb investigator and data gatherer with great attention to detail. Plus "he has a lathe" (in joke). I know he addressed removing the jet by making a special tool, and also returning the jet to correct depth by another special tool but I do not know if he addressed the dreaded stuck needle. I would guess he would make a custom clamping tool like the one he made for removing the nozzle (in photo below) that grabbed the needle at the shoulder (in the groove). Some threaded holes in the clamp could be used to turn bolts that pulled the needle out in a similar fashion to the threaded holes in brake drums and pulleys that help removal. Heck a few holes in his jet clamp could turn it into a dual function tool! Thanks for the Brasso tip. Now I need to get me a set of flat tops to work in parallel with the Guru! Did I mention that he has a lathe?
$15 and worth it: http://www.autozone.com/autozone/accessories/Tools-Garage-and-Equipment/Remote-Starter-Switch/_/N-25eo but I made mine from a $5 Volkswagen horn and spare wire and spare connectors.
Interesting read on popular hotrodding.com: source:http://www.popularhotrodding.com/tech/0611phr_the_secret_life_of_carburetors/index.html The Accelerator Pump Under idle and cruise, a considerable amount of vacuum exists in the intake. This vacuum reduces the boiling point of the fuel, causing it to vaporize much easier under the prevailing high vacuum conditions than under low vacuum. This useful characteristic helps fuel distribution considerably during idle and cruise. When running down the freeway at 2,000 to 3,000 rpm with 15 inches of vacuum, a lot of fuel being drawn into the engine is vaporized well before it reaches the cylinders. Standing on the gas pedal completely changes the situation. When the vacuum transitions rapidly from a high value to near zero, fuel held in vapor form now condenses into liquid onto the manifold walls. Although a fresh charge of air is entering the engine and carrying its associated fuel, the engine, for a moment, still goes very lean. This is due to the fuel that was contained in the air suddenly clinging to the manifold walls, and for a moment at least, going nowhere. This causes an enormous flat spot that the engine simply will not drive through. To offset fuel condensing on the walls, an accelerator pump system is added. This squirts additional fuel into the intake to cover the would-be hole. A basic schematic of a typical pump system is shown in Fig 11 (see p. 91). In this example, a piston is shown injecting the fuel, but most often, the function of the piston is carried out by a spring-loaded diaphragm such as in a typical Holley carburetor. Calibration of the accelerator pump system is carried out by jets to control the rate at which it goes in; various springs, cams, and diaphragm sizes are used to control the amount that is injected and the duration of the injection phase.
I found this on Zcar.com. It matched my interpretation of the drawing of the power valve on paper but exploration of the air and fuel lines is critical to understanding its function. My thinking is that during a throttle-up transient, the spring unloads and squirts fuel into the air stream as opposed to being to be sucked into it.... but I have no details of the control circuit yet....but I bet you are correct with the vacuum threshold I should have brought my mighty vac yesterday.
Dang that fuel bowl reminds me of a weber! Could you do me a favour and post the volume/capacity of the flat top and round top carbs if you have a chance? That would be good info to float (pun) on the net for racers.
Thanks! my friend "Cptn Obvious" on this forum, is a superb investigator and data gatherer with great attention to detail. Plus "he has a lathe" (in joke). I know he addressed removing the jet by making a special tool, and also returning the jet to correct depth by another special tool but I do not know if he addressed the dreaded stuck needle. I would guess he would make a custom clamping tool like the one he made for removing the nozzle (in photo below) that grabbed the needle at the shoulder (in the groove). Some threaded holes in the clamp could be used to turn bolts that pulled the needle out in a similar fashion to the threaded holes in brake drums and pulleys that help removal. Heck a few holes in his jet clamp could turn it into a dual function tool! Thanks for the Brasso tip. Now I need to get me a set of flat tops to work in parallel with the Guru! Did I mention that he has a lathe? The 5th fusible link (For the EFI System) is at the +pos battery lead where it connects to the battery post. It can come unplugged easily. It is labeled "EFI Power connector" by the fool who made this drawing:


Important Information
By using this site, you agree to our Privacy Policy and Guidelines. We have placed cookies on your device to help make this website better. You can adjust your cookie settings, otherwise we'll assume you're okay to continue.