EuroDat
Free Member
-
Joined
-
Last visited
Everything posted by EuroDat
-

-
The exterior panel is held by a row of plastic "rivits" along the top. To release then you push the small center pin through the rivit. Pick it up later when the panels are off. They are not the best design. See link for detail rivit http://www.thezstore.com/page/TZS/PROD/classic08a03h/40-3961 http://www.zcar.com/forum/10-70-83-tech-discussion-forum/60598-how-do-i-remove-those-plastic-rivets.html The rest of the surround is actually held in place by the tail lights themselves. You need to remove the taillights with the panel. To do that you need to remove the inner panel to get access to all the nuts. 10mm spanner and 1/4" drive socket set. You will also need to remove the number plate light and center panel. I take it you have done this or they have been damaged by PO trying to remove them without doing this. The chrome bezels are available through a member on this site, but I can't remember his name. They are expensive, but the quality is good from what I read. Try searching for rechroming. The outer surrounds are NLA through nissan. If you are very lucky to find a dealer with old stock or you have to hunt them down and find the best you can get. Chas Edit: Found threadhttp://www.classiczcars.com/topic/44336-rechromed-taillight-trim-and-misc-plastic-parts/
-
China keeps getting a bad rap, but in the end it simply supply and demand. If someone wants to buy cheap $^!#, someone else is going to make it. If there is no market for expensive "high quality" then poeple will stop making it. Its now a problem we, as a whole, have created.
-
The fact that you can't alter the system to improve emmisions is really hard to understand. I would have more trouble with that than the $200. Seems like they are using the emmisions as a way to get older cars of the road, which doesn't fit with the pre 1976 exemption to the rule. Im lucky in that area. We can do what we want to the engine as long as you don't increase capacity, like install a V8 etc. Chas
-
Last year they changed the rules here. Before I only needed an inspection every 2 years and I could drive the whole year round tax free. Now I have to pay an extra €120 per year and I can't drive it during December to March. If I want to use it in those months it will cost me €572 per year. Above all that I still need to paas emmisions no matter what. . It feels like your getting shafted, so to speak, but $200 doesn't sound all that bad. If its going to cost heaps to get it under the CA limit this could be your "cheap" way out. A lot cheaper than mega squirt, a lot less hassel and less cost than selling the 280Z and trying to find a pre 1976 in as good a condition. Chas
-
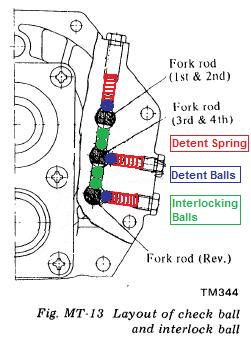
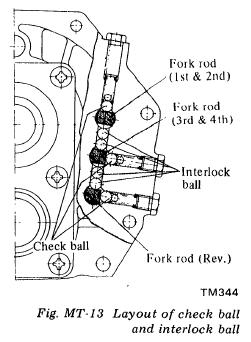
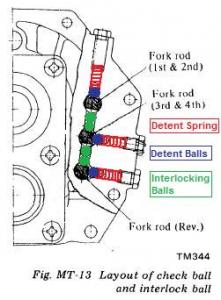
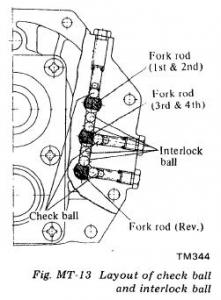
I would do all three. Go all out and spend the $1.74 :: The springs and balls are all the same, you caný mix them up. It won't take much longer, maybe 10 - 15 minutes. You will probably spend more time jacking the car and putting it on stands then changing the springs. Forget the interlock balls. You can't get to them anyway without dismantling the transmission and selector rods. Btw: Its hard to stuff this up other than throwing the all parts in the bin and driving it without them. Even then it would just pop out of gear more often and every now and then drip a couple drops of oil. If its still worrying you, just have a couple of beers and go for it Sketch with springs coloured red. Chas
-
They are there to mount the coat hocks. I think they call them coat hocks anyway. I don't have a photo, but can take one if you need to see what I mean. Edit: Looking closer at your photo, its zoomed in which made it hard to located its position. Seems further back just before the hatch struts. If I remeber correctly mine has two impressions their, but no hole. It must of been an option. Don't know what? Chas
-
Thats my biggest fear and whats holding me back at trying this on my dash. When winter began I almost gathered enough courage to do it, but my TIU gave up and kept me occupied.Now you are this far, you may as well try to repair it. If it sucks at least it will be a good back fill for the dash cap. Chas
-
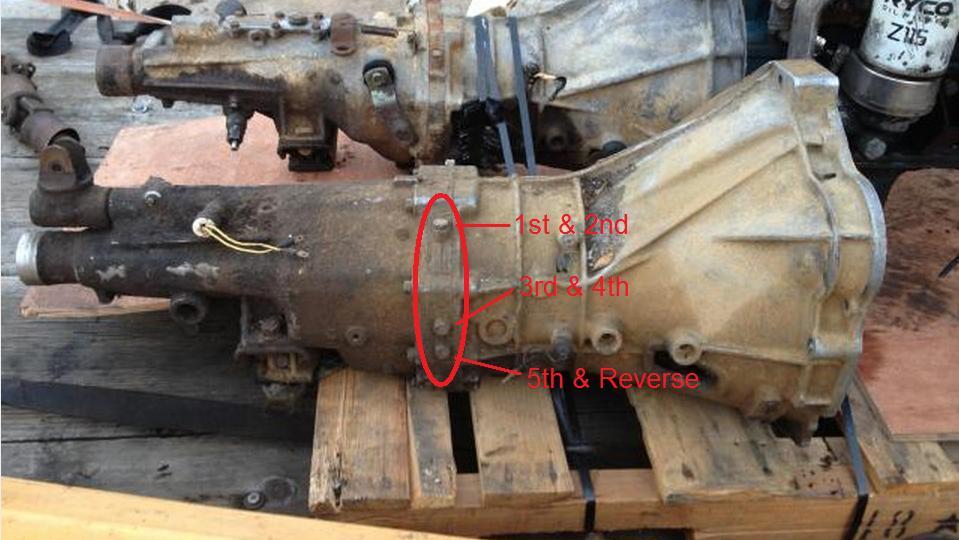
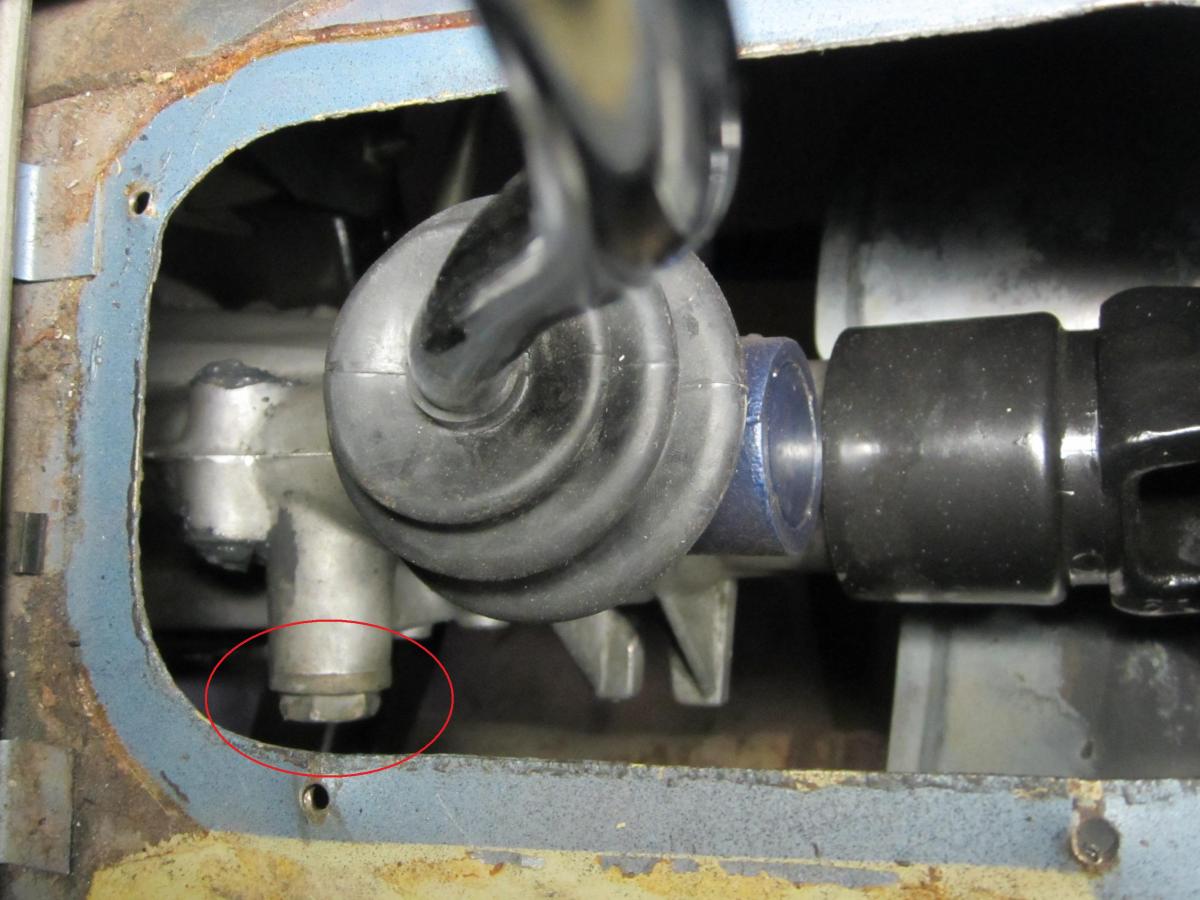
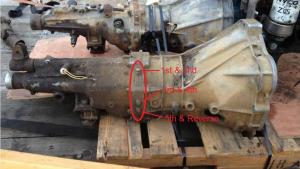
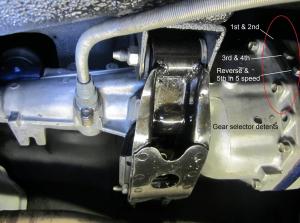
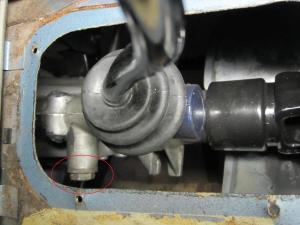
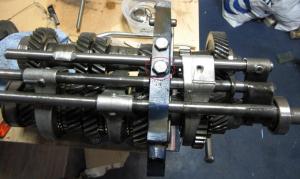
Im not sure whats not clear. If you follow the manual and you should be fine. The manual describes it with the tranny out of the car, but you don't have to drop the transmission or drain the oil. All three detent springs are acessable from the passenger side of the transmission. Its the metal plate where the front and rear transmission housings come together. If you climb under the car and look just forward (6 inches) of the transmission mount you will see them, two on the side and one from the top. Unscrew the caps, remove the springs and catch the balls when they fall out. It may leak a little oil, but not much. The springs won't shoot off anywhere, but if you are outside on the ground you use a blanket or something like that to help find them if the fall on the ground. One last photo of a FS5W71B, but the detents are the same. Chas
-
Steve, Im far from a specialist on these heads, but wasn't there 3, some say 4, different E88 heads? They often quote the earlier head as having similar chambers to the N42 and the later having emmision chambers. You are running an E88 in your set up. Maybe you can shed some light on the subject? Like always with the internet, if you search long enough, you end up knowing less than when you started. I have read about two variants on the L24 and some even refer to a third very early E88 that more or less has the same chambers as the E31. The L26 had the later emmision type with the bigger exhaust valve. If you consider them as 4 versions, the first two have the desired chambers with good quench and the last two have the high emmission chambers and poor quench. That is why people often recommend the N42 becuase it has a similar chamber design and quench to the early E88 and already has the larger L28 valves. This might influence the decision on which head to use. As a general rule, they seem to line up as follows: I The E31 and the very early E88 came with the 4 screw SU carbs. To +/- aug 71 II The "normal" E88 came with 3 screw carbs and the carbs had water heating. To +/- aug 72 III The "emmision" E88 came with the flat top carbs on the L24. IV The last "emmision" E88 came on the L26. Having an L28 with dished pistons, I would be inclined to at least consider the option of searching for a N42 head and maybe trade or sell the others. If the E31 wasn't malested and still original it would be worth a lot to the L24 guys. That would give you around 8.4:1 CR.
-
A bit of trivia for you guys. The theme music was originally used in the film "The long kiss goodnight" in the hotel scene where she finds the gun in the suitcase. Chas
-
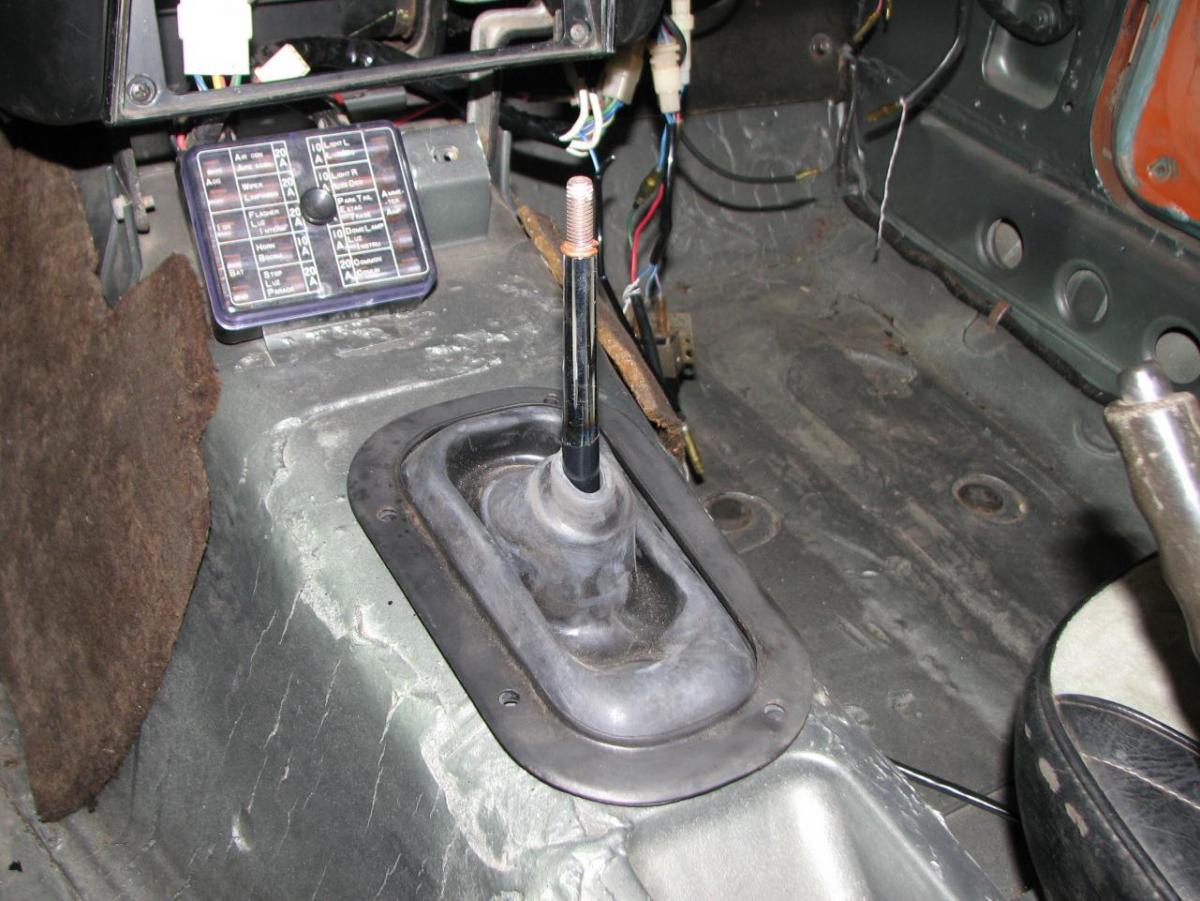
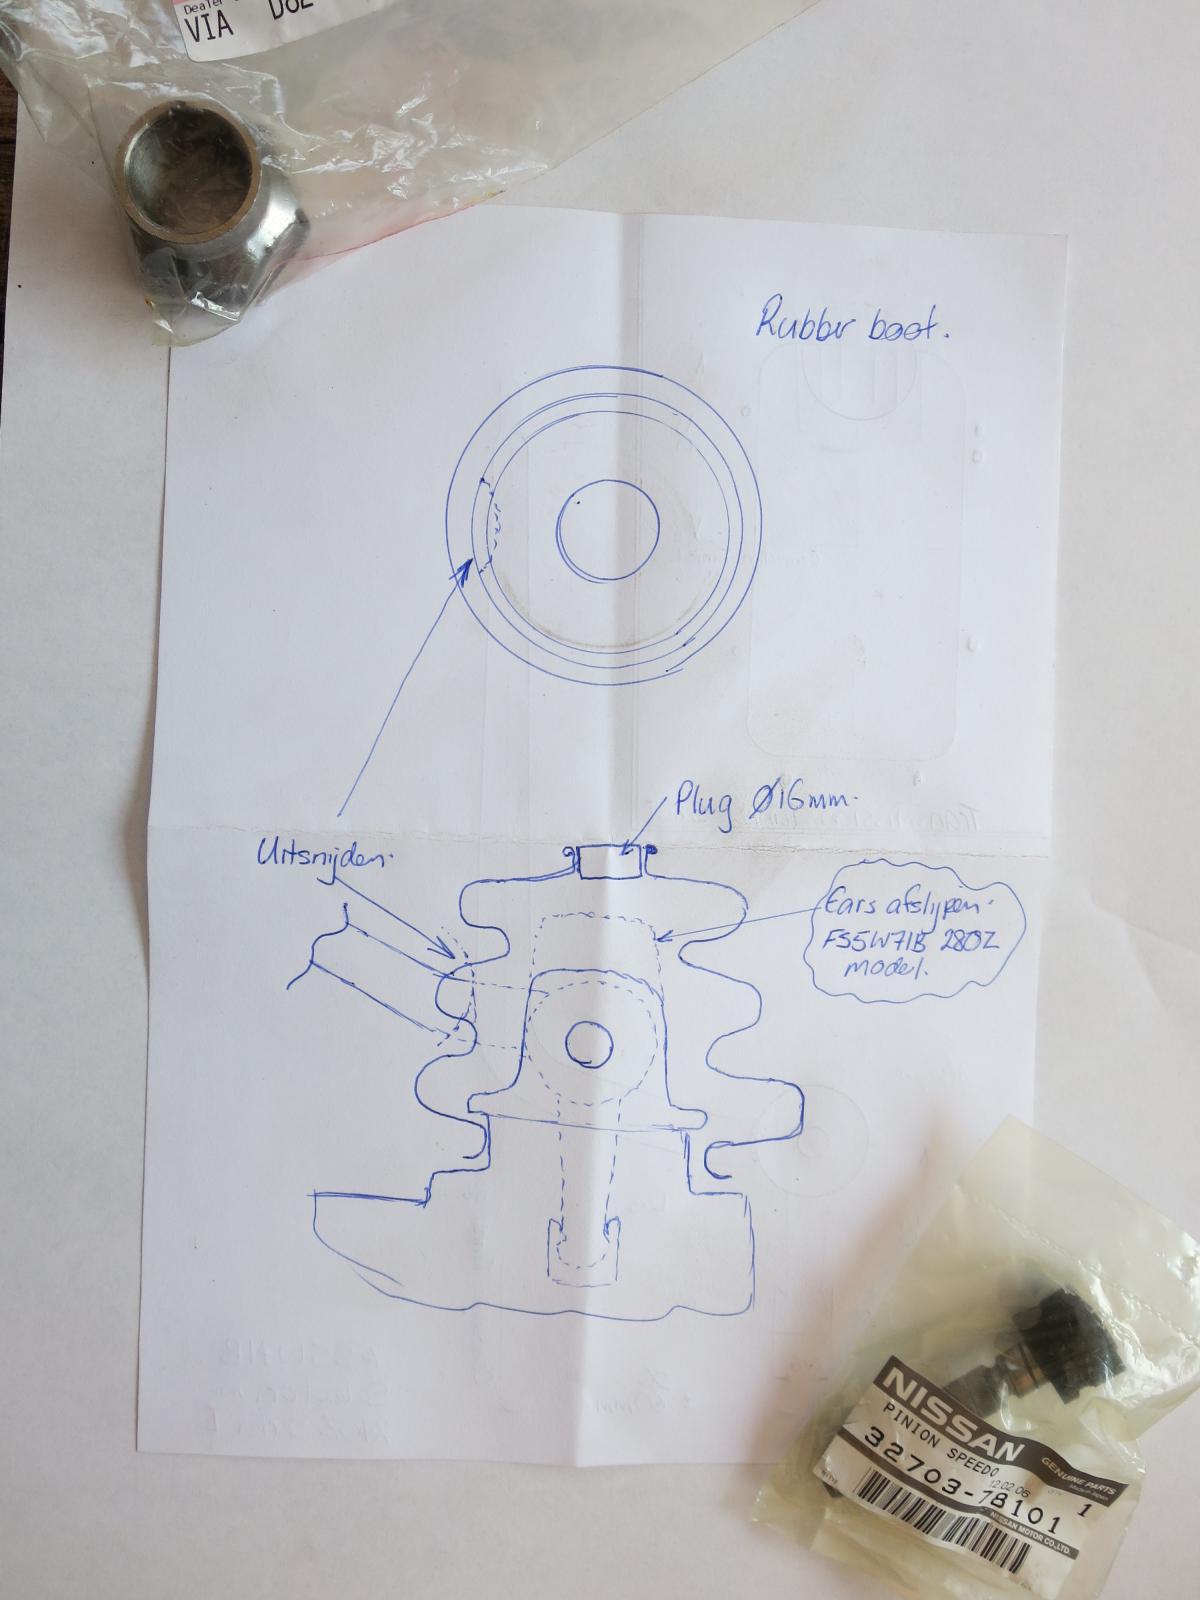
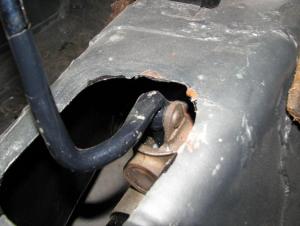
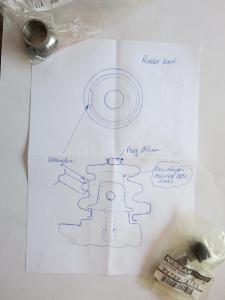
Hi Brian, I can't remember where I found the photos, but I like the way it was done so I saved them. Nice to know it possible to modify without welding. We opted to cut and weld to get the extra clearance. It had a new transmission mount which pushed is very close to the tunnel. He also had the guide with the extra long ears, which needed grinding down for clearance and described in the second sketch. With some modification we managed to fit the rubber boot. It needed a cable tye to hold it on the guide flange, but it seals it well. It worked well until he sold the car and the new owner rolled it into a ditch Did you fit the rubber boot when you finished the modification? Chas
-
Chris. I have a long way to go before Ill be any sort of master. I make my fair share of mistakes. btw. Thanks for posting photos of your mod to the console. I havs read about it, but never seen one done before. Chas
-
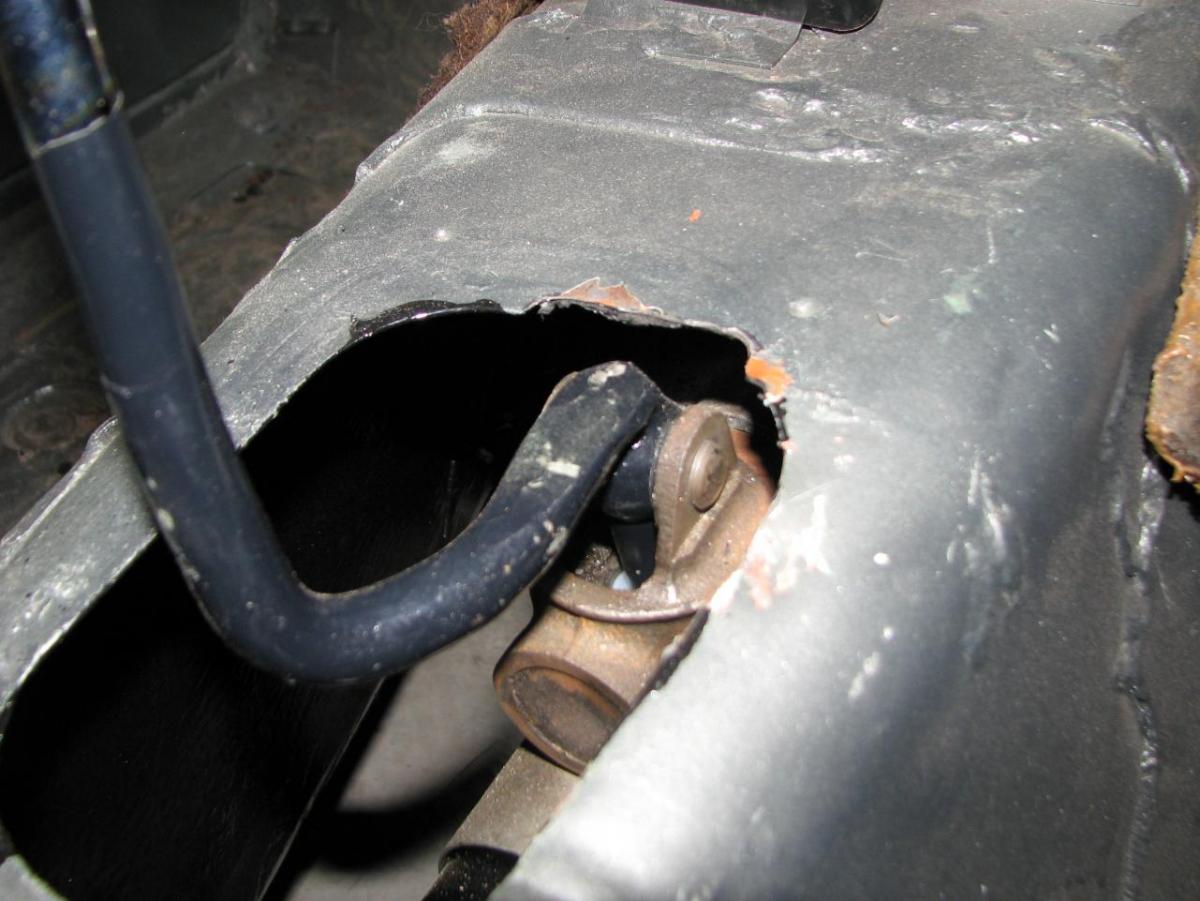
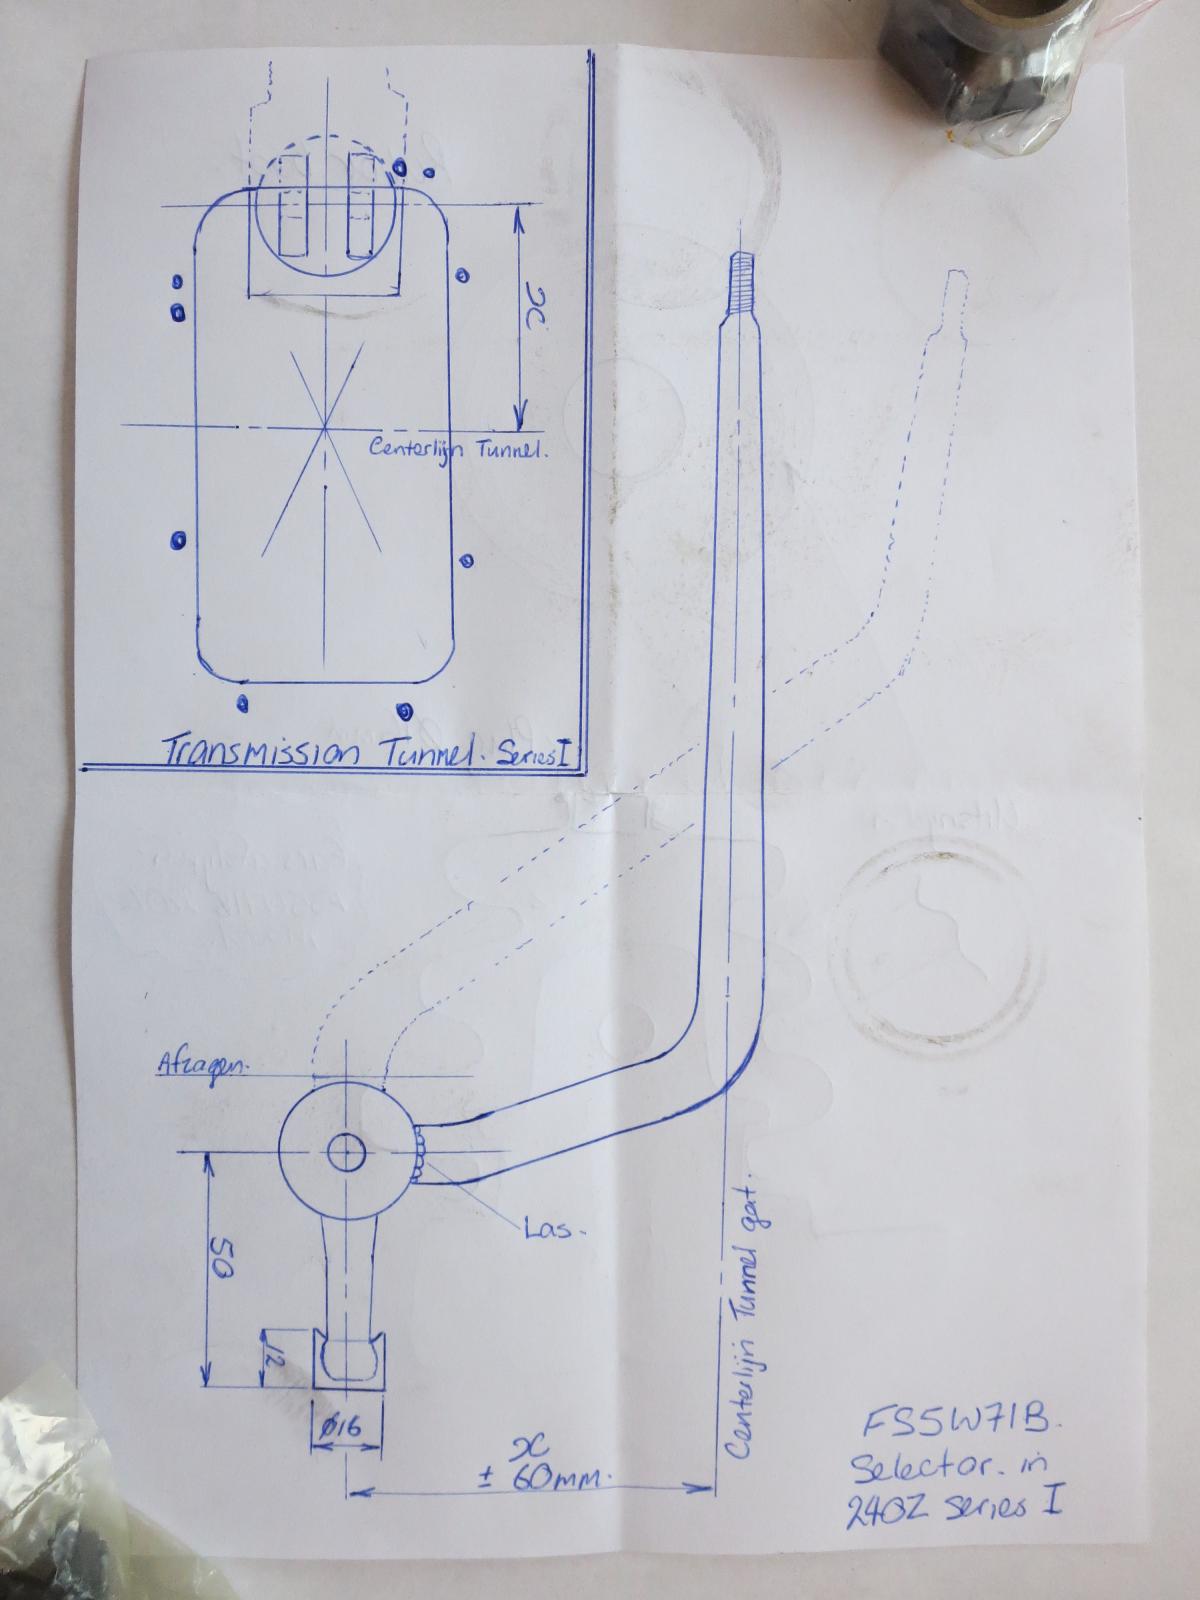
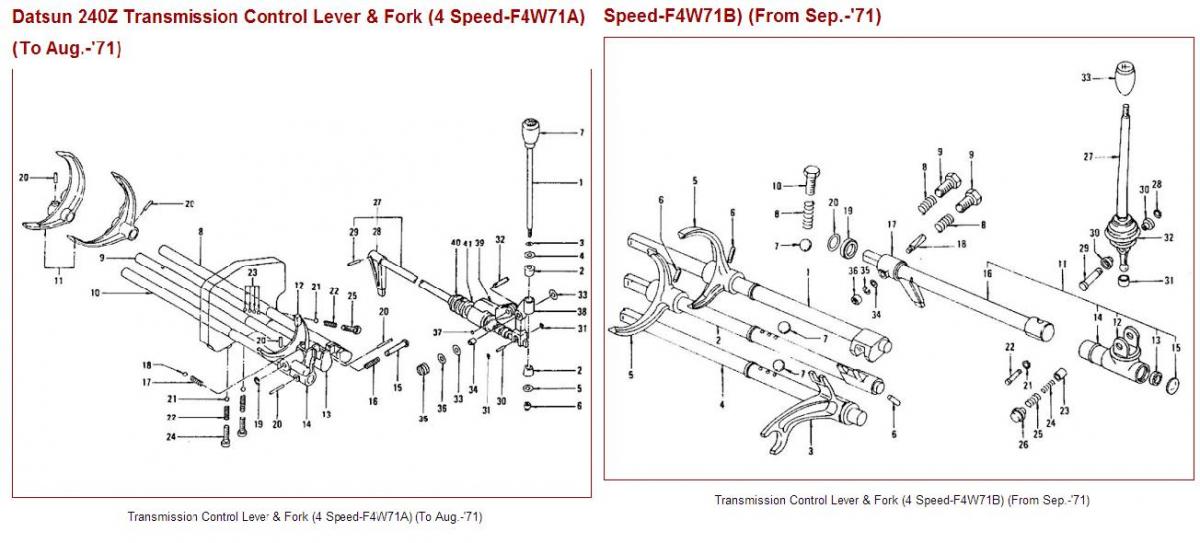
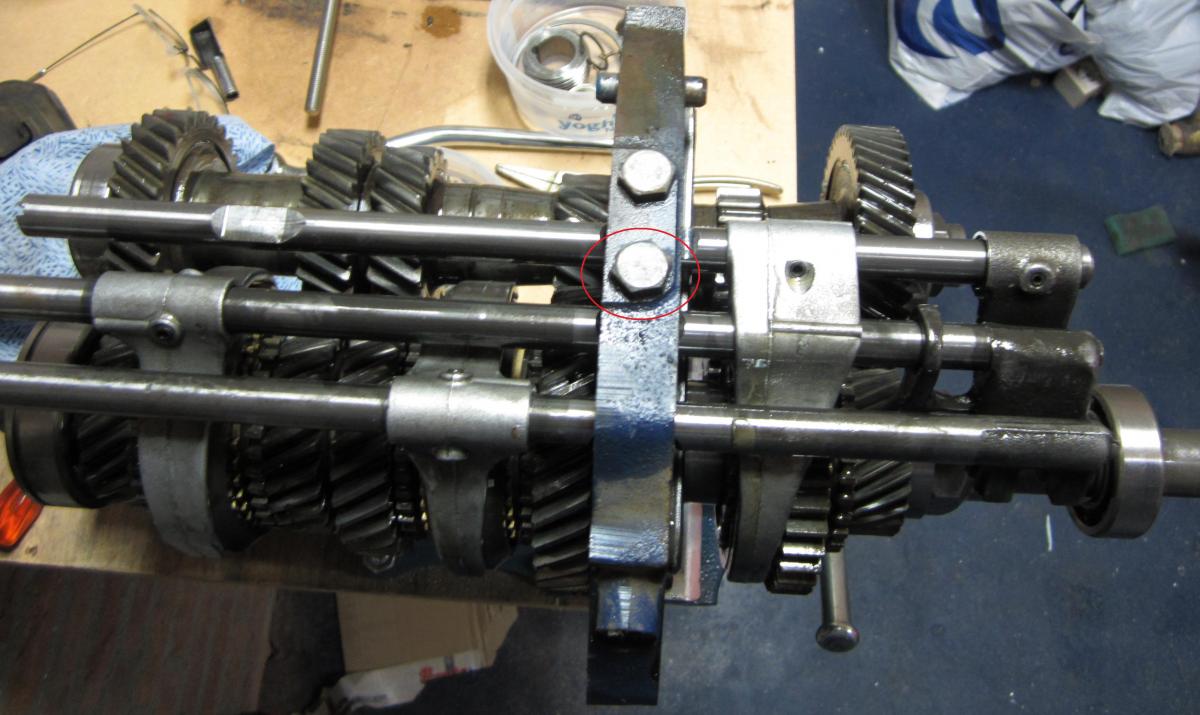
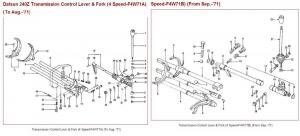
Chris' method would be the simplist and quickest way to fit the 71B, but if you don't want to cut the console you can consider this method. I found some photos on the web some time ago. You can see how he cut and rewelded the shifter rod. A friend did this to his, but we welded it on the back position to make sure it had enough room above the shifter rod. You can see what I mean in the photos and the sketch we made. A word of advice if you choose to do this: Cut the shifter rod off. Mount the bottom section back in the selector mechanism with the transmision in 2nd or 4th. Tack weld the shifter in place so it clears the striking rod guide. Then remove it and weld it fully.. We found out the hard way. Its was hitting guide and wouldn't let it go all the way into 2nd and 4th. After cutting it off and rewelding it again at a slightly higher position on the ball the problem was solved. This also makes the shifter shorter and the through is shorter. Chris: You made a slight error in the type transmission. "with a F4W71B 5spd" should be the FS5W71B. A little bit of trivia: The 71B stands for the distance between the main shaft centre line and the cluster shaft centre line 71mm. The B is the version; A, B & C. Chas


-
From what you are describing, you have a pre 09/71 240Z. The original transmission was a F4W71A. The transmissions you have are the F4W71B. The A would be more original, but they are getting harder to find in repairable condition. Which one is better?? Going on availability, I would say the B would be the better option and you already have 3. Maybe other people have ervaring on this and can make a better judgement. Those numbers on the casing are just casting numbers for warranty and quality control. An alternative is to use the B transmission and install a competition S type shifter or cut and weld the existing shifter. There are drawing floating around on how to do this, but the main idea is to get the shifter about 60mm back from anchor point so it clears the tunnel in 1st and 3rd. Chas Edit: Just read your VIN. That puts it at around 4/71 I think.
-
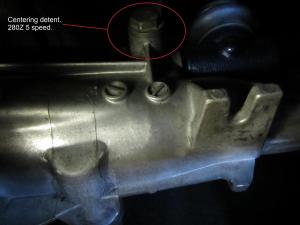
Your transmission, if still the original type, could be a F4W71A or the F4W71B 4 speed. The "early" 240Z (pre 09/1971) had the Type F4W71A and from 09/1971 they changed to the F4W71B. You can tell them apart by looking at the bell housing. The Type A has a seperate bellhousing (3-piece transmission housing) and the Type B has a two piece housing where the bell housing and front section are one piece. The Type A also has the clutch fork with the return spring and adjustable slave cylinder pushrod. The selector is also very different from the later versions. All this is nice to know, but the springs for the selector detents are all the same. You can access the springs from under the car. A 14mm spanner or socket set for the three detents in the adapter plate. The top one is hard to get at and you might need to drop the transmission mount a little to give you better access. The centering detent needs a 19mm spanner. The selector bushes are only for the F4W71B version. The A is different. To do the selector bushes you will need to remove the center console. Here are some links to the online parts manuals for the 240Z and Courtesy Nissan to check availability. http://www.carpartsmanual.com/datsuns30/DatsunZIndex/PowerTrain/tabid/1547/Default.aspx http://www.courtesyparts.com/ And some more photos that might help. Chas
-
It would help if you mention what model transmission you have and what you have done to it. Like Martzedcars mentioned its most probably your 3rd, 4th detent spring in the adapter plate. There are three of them, one from the top and two from the side. The one you need to look at is the top one of the two side detents. The springs are still available through Nissan (P/N: 32830-20100) and you can order all thre for less than $1.00. Most people don't replace them during a rebuild, but iss a very small price to pay to improve shifting. While you are at it you may want to consider changing the centering detent springs. There are two, one fits inside the other. Its the detent that returns the selector to the 3rd - 4th line when you push the gate other to 1st - 2nd or to 5th - Reverse. Inner P/N: 32852-24901 Outer P/N: 32856-24901 Gear selector bushing set 2x P/N: 32855-H1010 1x P/n: 32861-N4200 Chas
-
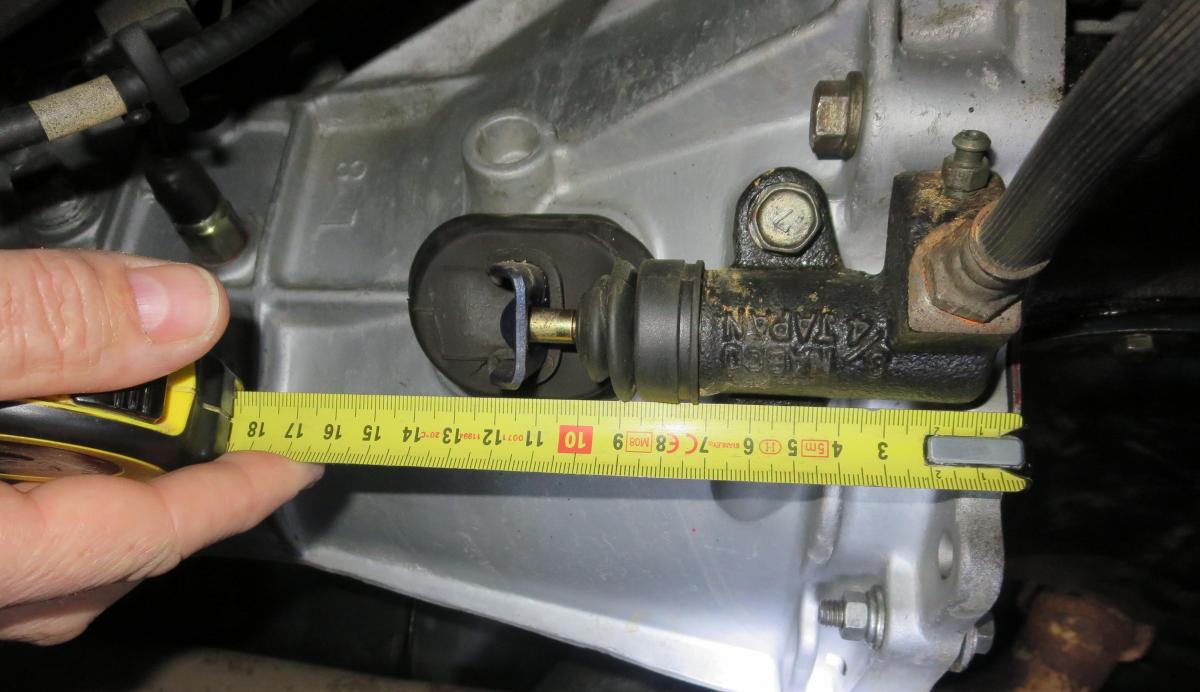
The information out there is sometimes very confusing when doesn't need to be. Even the MSA site quotes a useless 1-1/2" total distance and what you need is the clutch fork pivot point to the back of the bearing. http://www.thezstore...c22b02d/21-2122 Thanks for taking the measurements. I have the measurements for mine somewhere and will add them to the collection for the 280Z. PressureplateMeasurements.pdf Chas
-
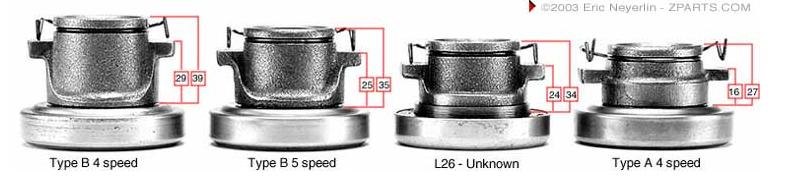
The original "size" pressure plates have not been made by aftermarket or nissan for years. They all refer to the later type. Only problem is they forget to mention you also need the bearing collar for the later version. If you can't find one in a yard, you can get one through MSA. http://www.thezstore.com/page/TZS/PROD/classic22b02d/21-2122 Chas
-
It will be interesting to see what you find. If you could take meaurements of pressure plate finger height with the prsssure plate still mounted, would be nice for future reference. Goodluck Chas
-
I couldn't find my sketch, but here is a photo of my clutch fork. The distance from the bellhousing to the front side of the fork (measured at the outer edge) should be around 110 to 115mm max. If its longer than that, you probably have (and Im now almost certain of it) a throwout bearing collar for the "early" 240Z (pre 07/1971) with the Type FS4W71A 4speed transmission and the new pressure plate for the later version Type FS4W71B transmission. If this is the case you should be measuring around 120mm or maybe a bit more than that. Note: Those measurements are taken with the clutch at rest, clutch pedal NOT depressed. An easy way to tell the transmissions apart is the Type A has a seperate bellhousing (3-piece transmission housing) and the Type B doesn't. The Type A also has the clutch fork with the return spring and adjustable slave cylinder pushrod. Im afraid your only option will be to remover the transmission and find a new throwout bearing collar for the later pressure plate. Chas


-
Your model should have the clutch fork with the adjustable slave cylinder push rod. Make sure that is adusted with the correct free travel. The push rod in the master cylinder could also be reducing your effective travel. What you mentioned about the different length is a common problem with the aftermarket units. This master cylinder was used on other models along with the S30, but some other models need a shorter push rod. The manufacturer simply makes the short one and subsitutes it for the S30 as well. You should be able to swap the push rods. I did that to mine and it work with no problems. I have a sketch somewhere with the figures for the distance between clutch fork and slave cylinder. That way you can confirm it has the right throw out bearing collar. Note: To insure long life its advisable to dismantle the two cylinders and clean them before using them. Mine had machining material and some cutting fluid for when they were made. The pieces of metal filings get in the ports and cut the rubber cups to pieces and the piston can pick it up and damage the bore. Chas
-
Or when you are going through the dipper at Mount Panorama
-
Charles, Looks like a foot support. Fuel and clutch pedals are the same LH drive vehicles. The fuel pedal is next to the door. You do get some car makers that mount the indicators on inside of the steering column towards the passenger. Probably to reduce different parts and manufacture one type of steering column. I have yet to see one the other way. It would be challenging to drive. Chas
-
The bouncing problem can be caused by several issues. One common issue is the outer cable. Its just as old as the inner cable and wears too although a lot less then the inner cable. If you fitted the new cable without extra lubrication it could be too dry. You don't want it packed full of grease, but to dry can make it stick and jump.I cleaned my outer cable by pulling lint free "nylon" string/rope through it. The string was soaked in brake cleaner. I repeated that until all the old dryed up grease was gone. After that I used a similar string covered in white lithium grease to relube the outer cable. Then lightly greased the inner cable and fitted it all back together. Another probable cause is wear in the speedo itself. Fast women mentioned it in her post. If thats the case, you might need a replacement. Don't try to lubricate it by spraying anything in the drive end. You could make the situation a lot worse. It works with a small air gap between discs and any kind of fluid in there will send it to maximum speed. Pay special attention when mounting it to the speedo and the pinion adapter at the gearbox end. Make sure its lined up correctly. Poor alignment can cause your problem. Try to avoid sharp bends. Back to the pinion. The pinion in mounted in the transmission, but it is not related to which transmission you are using. It depends on your diff. The transmission came out of a 280Z which uses a diff ratio of 3.54:1. If you haven't changed the diff it should still be a 3.364:1. The yellow pinion gear would be the correct pinion for that situation. It won't cure you bouncing speedo, but it will give you a more realistic speed. Chas