Everything posted by siteunseen
-
Debadging: Yes or no?
I'm going to delete the "5 Speed" off my '77 deck.
-
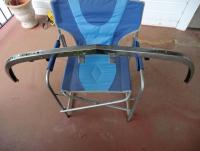
Would this be workable?
Would this bumper work with the right brackets on '77 280?[ATTACH=CONFIG]53129[/ATTACH It's off a 240.
-
Site fundraiser
I just read all about Glade Plug-Ins, and tried to see my car value but it wouldn't go beyond a '98. Evey little bit helps. Maybe one day I'll be in RED.
-
78 280z engine tear down and rebuild N42 block and head. flat top pistons
I've been trying to reply for 5 minutes! Download time is forever even though I have nothing to say but I bought an N42 reworked head, valves and sides ground and new stems etc., for $250.
-
75W-90 Syn-Blend Gear Oil
Yeah I guess I am being a cheapskate on this for some reason. I've done too much work and thrown money around like crazy. I'll go with Redline products. Thanks for your replies.
-
75W-90 Syn-Blend Gear Oil
Could I use this in my transmission as well as differential on a '77 5spd? I know everybody runs Redline but this has to be close in quality and is a 1/3rd of the price. http://www.walmart.com/ip/Super-Tech-75W-90-Syn-Blend-Gear-Oil-1-Quart/16795248
-
76 Rear Panel Color
This may help http://zhome.com/History/ZColorGallary/index.html
-
78 280z engine tear down and rebuild N42 block and head. flat top pistons
Like LeonV says, the "How to To Rebuild L Series" by Tom Monroe was the best money I've spent on my 280Z. And Blue's Tech Tips from Atlanticz.com was the best $0 money, he could charge for that info, it's priceless. If you plan on a paint job for the body you should pull what's left and start from there. $2000 to paint and you will not want to pull the motor out or I would not, the fenders a very thin, an elbow would make dent.
-
78 280z engine tear down and rebuild N42 block and head. flat top pistons
I had good results with laquer thinner and a very strong degreaser that came from a local chemical supply, not sold in retail stores, and small wire brushes from the welding section at Lowes. Brass bristles for the aluminium.
-
License and Registration Please
$28.19 in Alabama for 1 year. Antique plates get pulled over alot around here because your only supposed to drive to and in, then home, from car shows or parades. They're $50 1 time but I would rather pay per year for a current tag. A friend from high school that's a Police Officer say's "Not to draw too much attention by running antique plates. The crack dealers use old cars with antique plates". Cheap Bastards.
-
Mud guards? Yes or No?
Originally Posted by escanlon seeing as the op was asking where to buy the parts, the comments as to how you feel about them are not necessary. He wasn't asking for your opinion. To top it off with "go buy them at an accessory parts place" qualifies your answer as a dumb answer. Those mud guards (aka splash guards) are available from our sponsor - motorsports: http://www.thezstore.com/page/tzs/ctgy/sg the splash guards shown are custom molded for the year of the z and are the best fit i've seen in years. The style does differ for the front and rear as they fit to the fender outline very well. E. Reply: 72 OJ I See plenty of personal opinions given on this forum , and plenty have nothing to do with the original issue , I made a suggestion on where to find the item and placed my opinion on the item. In your profile I see that your Z has this guards, if this offends you.....not my intent......life is full of flavors Also if you make a call to a quote , use the entire line and not a part of it to justify an offense. Mud flaps are a touchy subject it seems. I'm glad I've made my decision.
-
Z-Tops?
I had a friend whose Dad gave him a '75 Z. Perfect car, goldish brown color, ran great. He cut the roof out for a targa top and the car bent in the middle. He had a welding shop weld 2"x2" angle iron down the underside rails and got stuck on a speed bump at our mall. That's one funny story for me. Thanks for the memories Greg.
-
240z MSA Stud Location
Here's something that may help. http://www.classiczcars.com/forums/showthread.php?42420-77-280z-head-removal-step-by-step-photos Lots of pictures. I'm sure the Factory Service Manual for '75 thru '78 would have a diagram. Here's the one for the '78. http://www.jdmgallery.com/information/s30-manuals/s30/
-
Gas tank rehab.
It will sun dry again today and then I'll put in the other half quart for a second layer Monday or Tuesday. Then it will be sitting for at least a month as my engine is in hundreds of pieces in my spare bedroom. The directions say when you can no longer smell the sealer it's alright to recoat. I noticed this morning it has some runs coming down from the top down the sides. Not very happy with that but I'm hoping it won't cause problems down the road. I want to put a glass filter before the fuel rail also and hopefully not see any pinkish fuel.
-
Who doesn't love 240Z photo's........Ole #797
Beautimous Z.
-
Gas tank rehab.
I used 1/2 gallon of muratic acid mixed with 1/2 gallon of water and swished around for about 10 minutes then drained and put 1 box baking soda mixed together with 2 gallons of hot water and swished around then drained. Used a leaf blower to dry up the inside then poured in a quart of acetone and swished and shook for a few minutes then hit it with the leaf blower and an air hose. Poured in a quart of Red Kote and rolled all around and still drained out almost a half of the quart. I'll definitely apply a second coat in a day or so. Worked great and was alot easier than I was expecting.
-
Energy Suspension question.
That's what I was worried about, BFD (if that means what I think). Thanks.
-
Which glass pack?
I saw an opened up exhaust here http://atlanticz.ca/zclub/techtips/suspension/rearend/index.html and the 2 1/2 pipe was reduced down to a hole not much bigger than quarter in that paticular resonator. I'm sure they're not all like that but I don't want to buy the wrong one and have that kind of reduction in my $500 exhaust. I do like the one Walter used.
-
Which glass pack?
I've got the MSA 6 to 1 header and the 2.5" premium exhaust. Everyone speaks of the horrible drone? at highway speed. I thought a drone killed terroists, so it I'd rather not have to deal with it. Whats the best glass pack to buy? I do not want a resonator. Thanks for any suggestions.
-
Energy Suspension question.
Finally I'm down to 3 bags of bushings. The best help tool was a small bottle jack, by the way. My question regards the front control arms and the rear control arms as well as the 4 bump stops, that's the 3 bags left. I will be replacing my stuts after I get all this other stuff done, probably next year. Won't I have to disassemble the control arms when replacing the struts? And don't these bump stops go at the top of my struts? I'm so sick of that silicone like grease I want to wait until the strut job to finish with the bushings. Thanks for any replies. Cliff
-
How Many Z Drivers Also Own BMWs?
I bought an '88 325is in '98 for $3500, sold it in '10 with 300k on the odometer for $1000. Put 2 slave cylinders and a new driveshaft plus routine stuff, tires and sparkplugs. So far the very best car I've owned. I beat the crap out of that 6 cylinder.
-
What's best for differential flush?
That's good enough for me. Blue you have saved my a** many times. Thank you.
-
What's best for differential flush?
I'm working in that area and thought I'd go on and change it out. I've read flush with diesel fuel. I've read synthetic is best, Redline, and also read not to put syn in something that has had "dinosaur dope for 30yrs". Blue's tech tip says to flush out but doesn't say what to use. Please share 280z tried and true expieriences. Thanks for any replies.
-
Windows 7 Classic ZCar Theme
Kurbycar32 that is such a distinguishing sound! Good ears.
-
Thermostat gasket
I had to make my own too. It didn't leak.


