
Captain Obvious
Community Member
-
Joined
-
Last visited
Everything posted by Captain Obvious
-
You were right.... It was still early. This ones better. .
-
Yeah, that .047 difference really changed the position of the tensioner. However, forgot to mention... The chain guides and tensioner shoe are worn in that pic. If they were new unworn, it wouldn't be quite so bad. I can also slot the slack side guide holes a little to bring it in closer to the chain. I'm thinking that my sweet spot of "low hanging fruit" could be about .040 off the head, get new chain guides and tensioner shoe and slot the bottom hole of the slack side guide a little bit.
-
I've run the compression ratio numbers through my spreadsheet and came up with the following... F54/P79 stock - 8.83:1 F54/P79 with .040 shave - 9.37:1 F54/P79 with .080 shave - 10.0:1 Is 9.37:1 still in the realm of regular grade gas?
-
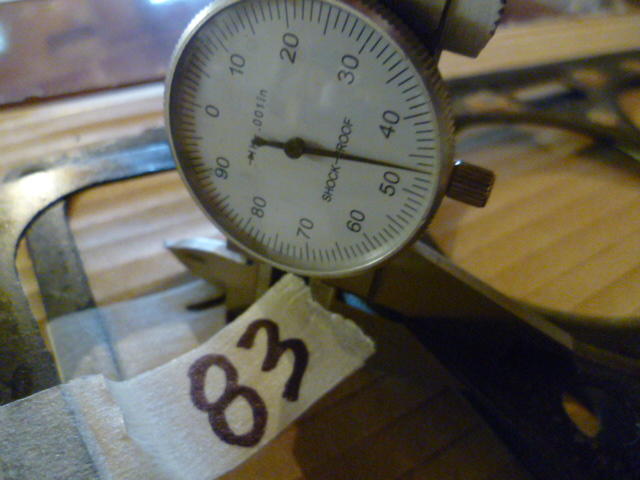
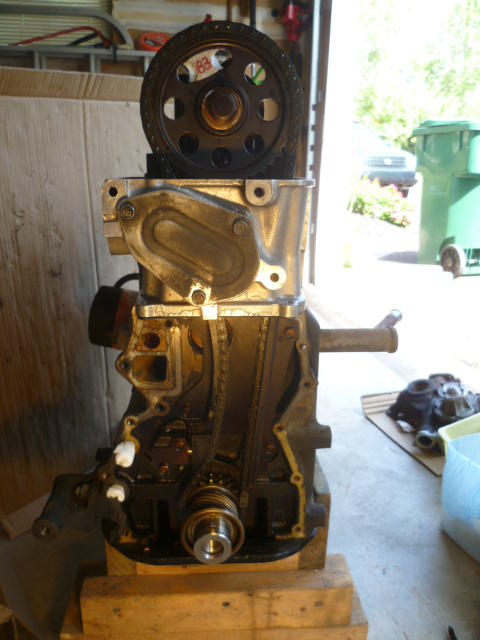
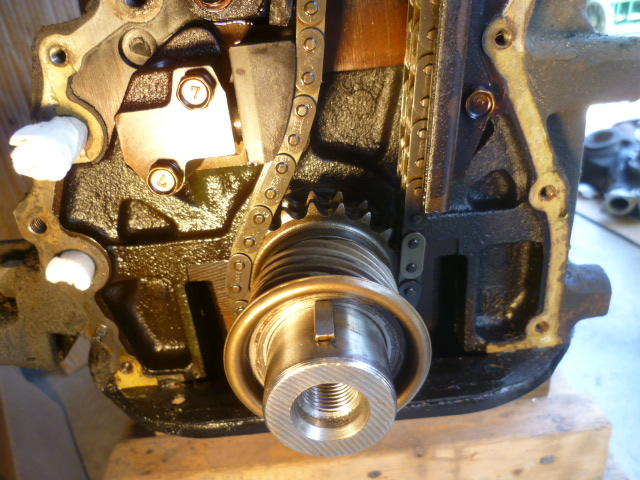
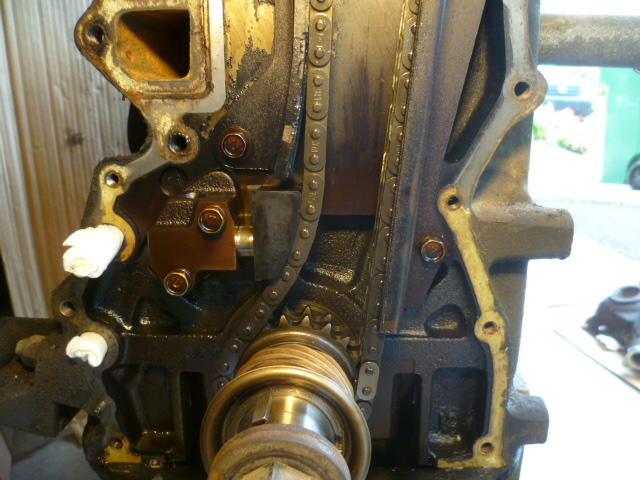
That's exactly what I'm trying to do with this P79. I'm trying to achieve the "best bang for the buck" and pick the low hanging fruit. I'm trying to get through this without having to use shims under everything or put in some fancy aftermarket chain tensioner. I would like the piece of mind that I could run a tank of regular gas through it if I needed to without detonating. I'm not sure that would be possible with the common .080 shave off the P79 since that sends the compression ratio up to over 10:1 What I would really like to do is shave the P79 as far as I can and still be able to use the stock tensioner, no shims, and regular gas. In other words, I want as much of a performance gain I can without the next level of modifications. With that in mind, I did this... I measured the thickness of the head gasket I took off the motor. It came out to be about .047: Then I put the head back on the motor WITH NO HEAD GASKET and tightened the bolts just a little. I put the timing chain in place so I could see what that would do to the tensioner. The theory is.... This is what the chain tensioner would look like if you were to shave .047 off the head. With the head gasket missing, the head is about .047 closer to the block, simulating a .047 shave off the head. So with the head gasket installed, the chain system looks like this: Here's a close-up of the tensioner with a normal head gasket installed: And here's what the chain system looks like when there is no head gasket installed: And here's a close-up of the tensioner with a .047 shave off the head (simulated by putting the head on with no head gasket): How does that tensioner look to the collective? I'm not thrilled. I think maybe a .040 cut would be safer. What say ye?

-
That's a stock Nissan cam. Not a regrind. You might check and adjust the valves while you have the cover off, but other than that, move on. Fix your fuel pressure and get your PCV routing correct.
-
Cool. And thanks for that too!
-
Thanks for that. I had the wrong one! He's probably wondering.... "Huh?"
-
Might that be one of our resident racers @Jeff G 78 ? Seems like the kind of thing he'd be all over. I also found another error source... If you look carefully at the piston design, you'll see that the tops of the pistons don't actually touch the cylinder walls. There's a small gap between the piston tops and the walls. You can see the effect of this by the carbon ring left at the tops of the cylinders where the rings don't scrape. Nothing scrapes there because there's no contact. I measured the volume of that area to be about 0.63 cc. Doesn't sound like a lot of volume, but since it's uncompressed, it changes the compression ratio by almost 0.1. So if you're at 8.9 and want to get to 8.8, you can account for that. I'm at 8.83 on my spreadsheet and am about to call it a day. Now I need to find someone who's measured the P79 volume AFTER they cut the head.
-
So while were talking about this stuff... Has anyone here actually measured the chamber volume of the P79 themselves? The online calculators use 53.6 cc, but can anyone here attest to the accuracy of that number? I've not measured it myself, and I don't currently have the equipment.
-
Well if you're going into the code... Here's the other things I came up with. First, I think the pin height used for the L28 flat top pistons is incorrect. When I put my pistons at TDC, they stick-up out of the block by .021 inches. I'm assuming Nissan's target was 0.5mm there. So whatever you need to do with the pin height to make that piston pop-out number work out to 0.5mm. Also, I measured the thickness of a used head gasket to be 0.047 inches (1.19 mm). I measured the thickness of a brand new one to be about .052 (1.3mm), so there's some crush there when the head is torqued down. Other thing I found is that the piston holes in the head gaskets are elliptical, not round. I measured the holes on a used gasket to be approx 3.440 by 3.505 inches (87.4 x 89mm) . Sure you can average those two numbers to something in between to make the end result close to correct, but I think it would be better to use real numbers. I also measured the holes on a brand new L28 head gasket and got approx. 3.447 x 3.516 (87.5 x 89.3mm), so the piston holes close down some as the gasket gets crushed. That makes sense too. Anyway, if you're going under the hood, there's some other things to think about.
-
Yes, I understand those subtle points, and that's where some of the problems are. For example... If you change the pin height spec in the calculator here>> http://www.atlanticz.ca/zclub/techtips//calcs/engine builder/index.html The compressed volume changes, but the un-compressed volume does not. It's a bug. It's not accounting for the fact that the piston height at the bottom of the stroke is raised as well. I'll clean up my spreadsheet some and maybe post my numbers.
-
No. Says who? I'd rather have the new one.
-
You should be able to very easily measure the base circle to at least determine if it's a stock grind or not. No calculations, no degree wheel. If it measures out to a stock base circle, you're done. If not, we can talk about that later? Don't pull that cam gear off now. Absolutely not. Way far down on the list of things that might get done. Or not.
-
I guarantee it!! Glad you found another starting point, and here's hoping it's a better start than the last one.
-
No.
-
I got the chamber volume "off the web". That 53.6 is the number that "everybody uses". Of course, because of that, I cannot attest to the accuracy. So I've been messing around with the calculators a little more, and I believe they messed the math up some. I've got an excel spreadsheet with my own measurements and calculations and I get pretty close to that 8.8 using data that I measured or derived myself. When I use my measurements in my spreadsheet, I get 8.86. I have not measured the chamber volume myself, so some small differences there could explain the remaining discrepancy. I do not think they are calculating the uncompressed volumes correctly. Also, my measurement of piston stick-up above the block deck back-calculates to a significantly different pin height than what they're using.
-
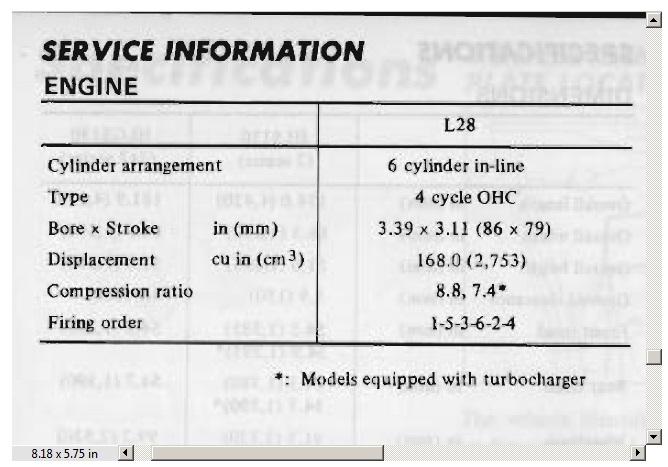
Now that the dust has settled with my broken camshaft project, I'm trying to get back to my F54/P79 motor. I was messing around with the handy-dandy Atlantic Z engine calculator app found here: http://www.atlanticz.ca/zclub/techtips//calcs/engine builder/index.html and I can't get it to give me the correct compression ratio. The FSM says the F54/P79 combo (used in the later ZX NA cars) yields a compression ratio of 8.8: But using the calculator app, I don't get that result. I get 8.43 instead: I get 8.43 instead of 8.8. What am I doing wrong? I know some of the numbers (like the head gasket thickness) is off a little, but not enough to explain my delta.

-
And @thetwood, You're doing a good job of becoming your own expert. Good work!
-
It's clearly a OEM Nissan cam, but it's not clear if it's been reground, right? If I'm understanding correctly, couldn't he just measure the cam base circle in-situ and determine if it's a regrind?
-
Hope you guys are all OK!! And when I heard Alabama was going to get hit, I was worried about you too. Thankfully, however, it was just the fake news and you guys were never in danger.
-
Well you aren't planning to put your sealed beams back in and run tests for me, are you? If so, that's certainly not necessary. I mean, if your incredibly bored and don't know what else to do with your time, I think the results would be interesting to discuss, but other than that, it's a lot of work for some academic discussions. I don't know what headlights I'm running. I know they're halogen somethings, but I don't remember the brand. Probably Sylvania. And with that said, all the real world effects of current drop and the like will diminish as the current draw goes down. So all that stuff like power being lost in switches, wires, and connectors will be much less with the LED's as compared to the old sealed beams.
-
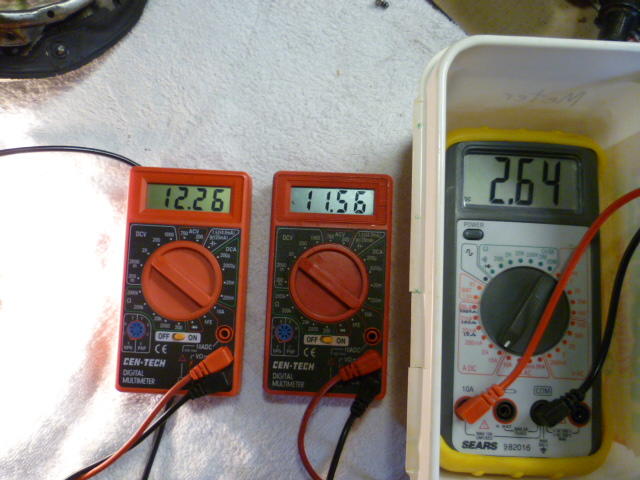
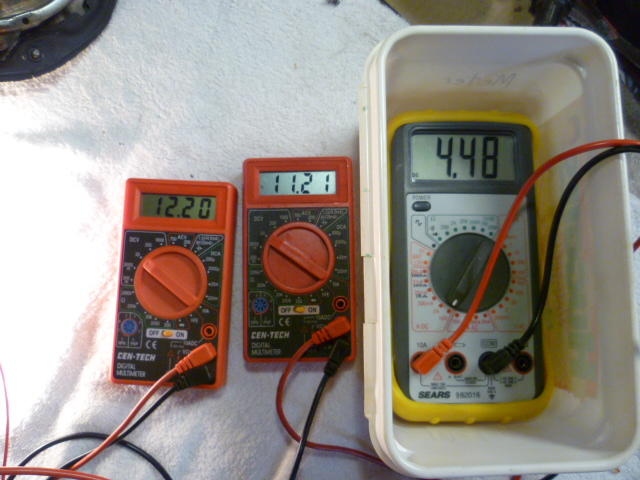
I found measuring the headlight parameters to be a lesson in "real world" effects. Stuff like... If the engine isn't running, the battery voltage changes (drops) while you are trying to take measurements (because you're pulling capacity out of it). The currents are high enough that any amperage measurement results in a noticeable drop across the Ohmmeter, thereby affecting the results. Voltage measurements need to be taken both at the battery and right at the bulb. That'll tell you how much you're losing in the wiring and switching. Here's the best I could come up with... Three meters at the same time. One measuring voltage on the battery terminals. Second measuring bulb voltage right at the back of the bulb. Third measuring current draw of one bulb. Here's an example from after I finished my headlight relay upgrade. Both bulbs are lit, but measuring one side. Voltage measured on the battery terminals while under testing load (two bulbs lit) = 12.26V Voltage measured right on the bulb prongs of one bulb = 11.56V Current draw of one low beam bulb = 2.64A This is low beam: And this is high beam: If you go through the math, I'm consuming about 30W per side on low beams and about 50W per side on high beams. One thing that seemed odd to me was your current draw numbers were higher than mine. My total current draw on low beams should be approx. 5.3A (doubling my 2.64). And that's with relays installed which should increase the current because the system drop is lower. Questions are... 1) Did you have relays in place when you took your reading? And 2) What was your system voltage? (Was the engine running at the time?)
-
That AFM has been messed with in the past. Don't know if it's been adjusted, but that cover was definitely removed and reinstalled in the past. The glue's wrong. That said... Other than trying to verify that it's the correct AFM for the system, don't spend any time worrying about adjusting it right now. That would be one of the last things to mess with. Get the fuel pressure correct and tracking intake manifold vacuum first, Fix the PCV routing so you aren't pulling huge amounts of unmetered air. Get the AFM mounted properly so gravity has the correct effect. Search out and fix any other vacuum leaks in the system. Do all that first and go from there. BTW - I recently stripped down an 82 motor and it has the same fuel rail and regulator system as the stock 78. If you just can't seem to get the aftermarket stuff working, we can work out some sort of trade for your aftermarket stuff. I know it's a "downgrade", but it comes with the advantage of being a known entity.
-
Yeah... Yours was way worse. I'm relieved that mine was as minor as it was. Not that I ever need to do that again. Ever. But your experience is evidence that all things considered, I got lucky.
-
Looks great. So about your measured current draw values... Your original sealed beams drew 6.8 Amps for the pair and the new ones draw 1.7 Amps for the pair? If so, your new bulbs are consuming about 11W each on low beam. Does that make sense compared to the LED bulb specs? I took a quick look and they say they are 25W, but I don't know if that's for a pair, or if that's high beam, or what.