


Zed Head
Community Member
-
Joined
-
Last visited
Everything posted by Zed Head
-
The critical fact is does it open and close consistently. It might have been stuck open, and you have adjusted your warm idle speed to compensate, giving a low cold idle speed. It is pretty easy to connect 12 volts to the two pins and see if it closes. Then disconnect the power and see if it reopens. Do that a few times and you'll be fairly sure it's working as well as it can.
-
No link? Is u-pull it a chain like Pick-n-Pull?
-
Uuuummmm....shiny.... http://www.summitracing.com/parts/AEI-13109/ This one has an extra port for a gauge..http://www.summitracing.com/parts/AEI-13101/ Many more options... http://www.summitracing.com/search/Department/Air-Fuel-Delivery/Section/Fuel-Pumps-Regulators/Part-Type/Fuel-Pressure-Regulators/?keyword=regulators
-
You probably found the throttle blade stop screw. That will change your idle speed, but that's not what it was designed for, and will probably cause other problems. You should really read the FSM. You'll be much happier in the long run.
-
It looks like your Auxiliary Air Regulator is missing. It would normally be mounted where the two screws are on top of the plate with the water lines running to it. It has battery power connected through that loose plug. Does the car take a while to warm up once it starts? Runs at low idle speed, gradually increasing as it gets warm? The diamond-shaped blocking plate is covering the port for the Air Regulator hose. There should be another hose, maybe connected to the hose to the valve cover, that might be blocked off, although some years used a T-fitting. Your CSV is in the picture on the left, with the fuel line connected to it and an electrical connection. The Air Regulator costs about $100 so maybe the PO decided to do without. It is convenient though to allow you to drive the car while the engine is cold, it keeps the idle up until the engine is warm. Edit - 78zcar beat me while I went to the garage...
-
I should have said "Flame-Thrower" coil, not Blaster. Pertronix recommends this coil with their Ignitor electronic ignition. It's shiny and silver... http://www.pertronix.com/prod/ig/flame/coils/40000_volt.aspx It's on the fenderwell on the distributor side. The aftermarket coils usually have brand markings, the stock ones are flat black and look factory. FW, I think that patjamejam was pointing out his(?, I assume) general unfamiliarity with the car and its parts.
-
I believe that the Pertronix electronic ignition unit can be wired with or without the ballast resistor, depending on the coil that is used. Do you have a shiny silver "Blaster" coil or a dull black stock one? Search Pertronix and you'll find a lot of discussion about the pros and cons of the Pertronix unit. I think that the issue with your ammeter is probably from a different wiring issue, but it might or might not be indicating a problem. The ammeter doesn't tell you a whole lot about what your charging system is doing. Someone who knows ammeters can probably tell you more. In the meantime, if you have a voltmeter, it wouldn't hurt to measure voltage at the battery at low and high rpm to see if your charging system is regulating correctly. Do you know if you have the "stock" alternator or has it been upgraded to internal regulation?
-
Shaking your wiring harness to get your fuel pump running today, building a twin-turbo 3.2 liter stroker motor tomorrow. Looks like quite a journey.
-
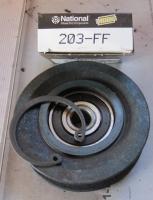
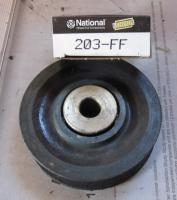
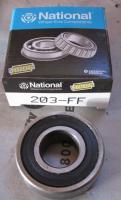
I just replaced the idler pulley bearing on my 1976 280Z. I got the bearing from Baxter Auto Parts ($9.29). Apparently it is a very commonly used bearing, the guy at the counter said he sells about 5 per week. The parts guys know it as the "203" bearing. My pulley used the circlip to retain the bearing. The usual mix of fixtures on the vise, large hammer and large sockets worked to remove the bearing from the pulley and the bushing from the bearing, and for reinstallation. I attached some pictures for anyone who has a similar setup, in case they break a cold sweat like I did, thinking that they might have the bushing on the wrong side after the bearing was already pressed halfway in (I didn't). The pictures are labeled, the bearing shown is the old NTN 6203LB original with the new bearing's box. They are identical. The bushing head goes on the opposite side that the circlip does,and the pulley mounts with the bushing toward the engine. There is a spacer washer that goes between the bearing and dustcover on the front of the pulley to keep the nut from crushing the cover (I already had it installed before I thought to take pictures). As someone has noted in another post (can't find it), the pulley can be removed from its mounting shaft without removing anything else, if you can squeeze your arm and hand down between the fan blades. Thanks to sblake01 for the link to this thread, from my other post - http://www.classiczcars.com/forums/showthread.php?t=40117&highlight=ac+idler
-
I would bet that there is something in the FSM about adjusting idle speed. Probably in the Maintenance section.
-
The flow rate of your injectors and the engine management system used to control injector open time will be much more important than the fuel rail that you use. Those two will work together with your fuel pressure to supply the necessary amount of fuel to the engine.
-
This line in the ad is meaningless, since the hose barbs inner diameter would be the constriction, plus the car's own supply lines - "Large .500" internal diameter for increased hp" The only reason to buy it would be to neaten things up around the intake manifold.
-
I remember a very similar thread a while back from one of the forums. The problem was a poor ground of the ECU to the body. Apparently the ECU housing itself needs a good ground. Try re-seating the screws that hold the ECU to the body. If you have an ohm-meter, make sure that you have good continuity to ground for the ECU case. p.s. if you decide to give it up, for $1000, please post it here first. That would be a decent deal for a running turbo Z.
-
It might be leaking from the base of the plastic reservoir itself and running down the MC to the booster. I had that happen when I replaced my MC, I had to readjust and retighten the clamp at the base of one of the reservoirs. Is it coming out of the bottom of the booster, the base of the MC where it bolts to the booster, or the bottom of the reservoirs and running down the bottom of the MC to the booster? If all of the fluid leaks out in two days, I would be surprised that your MC pistons and seals can still develop enough pressure to apply the brakes. You could have a cracked reservoir also. Do you have two, front and back, or just one?
-
This thread should be informative for you - http://forums.hybridz.org/index.php/topic/95316-braaps-l6-efi-induction-advice-and-tips/ The Air Flow Meter (AFM) only handles part throttle fuel enrichment (as you've discovered) until the vane is wide open from air flow, after that it's all rpm and temperature based. The cold start valve (CSV) only squirts gas when the key is turned to Start. After the engine starts, it does nothing.
-
Sorry, AFR was a typo, I meant FPR, Fuel Pressure Regulator. I ended up running rich months later after I had the Reman. AFM installed and the engine was running well. Recap - my original AFM had test values of 126 and 226. I tuned and adjusted everything I could, but it was not even reasonably drivable until I got the Reman AFM. Months later, after many miles, the engine started running richer and richer and I traced it down to an FPR that let the fuel pressure get quite a bit higher than spec. when it was hot. That was my experience with a "rich" mixture. Smelly exhaust, terrible gas mileage, black spark plugs but still very drivable. I installed a new FPR, immediately got better mileage, the exhaust stopped stinking, and the plugs cleaned up and look very good now. In summary - with the out-of-spec. AFM, the car stumbled, bucked and popped back through the intake. Installed the Reman AFM, all those problems went away, passed emissions testing, got registered, drove it around all spring and summer. Months later I had the rich mixture problem. The AFM I tested above is an extra one that I have. But I also tested the resistance (but not the voltage sweep) of my remanufactured AFM, that is on my car now, and it came in at 100 and 180. Those are all of my AFM tuning experiences. I have had issues with the fuel pump contact, but that was just a poor adjustment by the remanufacturing company.
-
This thread on the Hybridz site is a good start for researching - http://forums.hybridz.org/index.php/forum/63-ems/
-
If you try to measure voltage at the AFM connector be careful, there is very little room in there for alligator clips, and 6, 7, 8, and 9 are all right next to each other. You might short your battery and smoke your test wire. I measured my spare 78 AFM last night and got the numbers below. I have no idea if anyone can use this information to fix a funky AFM, just putting it out here to ponder. 1978 AFM Pin 8 to 6 - 182 ohms Pin 8 to 9 - 102 ohms 12.89 volts across pins 9 and 6 6.6 volts across 7 and 8 with vane closed 0.17 volts across 7 and 8 with vane open Smooth rise and drop Jenny, I can't give any details on whether my engine ran rich or lean with my bad 1976 AFM. All I know is that driving around the neighborhood, it would sputter along, occasionally smoothing out to give me hope, but then would buck, and pop back through the intake when I tried to give it throttle. I would guess that it was lean, since I've had rich-running conditions since then (AFR problem) and it ran okay, just stank like unburned gas through the exhaust. I adjusted and tuned everything to factory spec., from timing to valve lash, but it never got better. I did not do the voltage test on that AFM, I just went ahead and got the reman. It was my first Z and I did not know much about the engines.
-
Search "slave cylinder". It is a relatively easy fix. Most people recommend doing the master cylinder at the same time, since it could be either, and the master usually goes soon after. They tend to fail from corrosion, from moisture intrusion, causing debris and a rough surface, which wears out the rubber seals.
-
I had a few more thoughts on how the AFM does its thing. They're just broad "can this thing work like it's supposed to" kind of thoughts. 126 is 26% higher than than 100. 226 is 26% higher than 180. So in percentage terms, the AFM being discussed is pretty far off. (In retrospect, this is why I bit the bullet and bought a reman). 180 - 100 =- 80 ohms (the ohm range for the factory settings on the AFM) 226 - 126 = 100 ohms (the range for the AFM being discussed) The working range of the AFM is 25% wider, which would give a shallower enrichment curve (more vane movement required for the same relative change in resistance). So adjusting the vane spring would only get you back to "perfect" spec. if it also changed the slope of the enrichment curve. The test that might be the most telling is the last one on page EF-51. Connect 12 volts to 9 and 6 and measure output at 7 and 8. Unfortunately, they don't tell what the values of the output should be, they just ask for smooth operation. It would be interesting to know what the upper and lower limits are though using a 12.6 volt battery. I might try it on my spare 1978 AFM. IF you had the upper and lower output values expected for a certain voltage in, AFM closed vs. AFM wide open, then I think that you could be confident that your ECU is seeing what it's supposed to for a certain volume of air entering the engine. Otherwise, it's still a guessing game. Just throwing some stuff out there while it felt clear in my head, plus for the mental exercise. It would be great if we could come up with an inexpensive fix or tuning procedure for this expensive part. If I get time, I'll put the results from that final test out here, just for reference.
-
Yes, 68.7 ohms is continuity. That is about right for the heating element in the Air Regulator. I bought a new one for my car, because I accidentally pulled the heating element/bimetallic strip right out of the housing when trying to remove the connector, then I got a parts car, so now I have two extra. I found that all three had around 60+ ohms of resistance and that they all worked after I cleaned up the valve inside (glued the first one back together). It get's gummed up like everything else in the intake system from backflow from the PCV system. You can move the valve back and forth with a small screwdriver, and spray it down with carb cleaner or WD40 or similar. You can also connect 12 volts directly to the two small terminals to confirm that the heater works, and the valve opens and closes correctly. But be very careful that you don't touch your clips at the connector contacts, it's tight. As cozye said though, if it's closing when the engine warms up (there is actually a small heater block under it with engine water running through it) then it is a secondary problem.
-
Actually, motorman's picture is on the left/driver's side, you can see the base of the distributor and the vacuum advance canister. Plus the air pump is on the left of the crank shaft pulley. Motorman's timing tab is on the left side of the engine. It might be that the bracket serves dual purpose, AC compressor and air pump. I know that the AC compressor mounts in the same general area on my 1976 car. Either way, they would be mounting holes for parts that were not common on all cars, so yoshi is probably not missing anything.
-
The 280Z dist. uses a VR, or magnetic pickup, to trigger the spark. You would need either an electronic ignition module from a 280z, or a GM HEI module. The ZX swap is popular because the ignition module is mounted on the distributor, so there's only two wires to connect. But it works the same way as the externally mounted module. I think that you will need the distributor base also, the part with the set screw for adjusting timing. Here is one swap article, although it may not be perfectly clear. - http://zhome.com/ZCMnL/tech/gmhei.html
-
I think that the holes in the block are for the AC compressor bracket. I was just fighting with one the other day. The wire picture by the battery is too dark to see (for me). Where does the other wire go? What year Z, and what engine?
-
Your first post said "My car will start but the engine will die out once i turn on the headlamps. The car will run with the parking lights on but once I switch it one more level to turn on headlights, it turns off. " What you're saying at the top here is different. Has something changed or is one these statements not right? First the car would start then die if you turned the headlight switch to on. Now the car won't start unless the headlights are on? Almost opposite statements, so hard to figure out what's going on. Either way, one good way to problem solve is to isolate circuits. Unplug your headlight switch entirely and see if the car starts. See if it starts with the headlights on low beam and high beam. Take some fuses out and see if one fused circuit or another has an effect. Eventually you'll narrow it down to one area.


