Zed Head
Free Member
-
Joined
-
Last visited
Everything posted by Zed Head
-
 If you had the wrong TOB collar you could have problems, either getting the clutch to disengage or to engage fully. Your slave piston starting pont doesn't look bad. Bleeding the clutch is very easy and you can tell if it's working by turning the shaft by hand, with a helper on the pedal. I took a measurement of my fork distance from a reference point, just for people to check if they run in to a clutch problem. It tells you if the fork angle is right. About 58 mm to the head of the bolt. I also have extra room in the slave cylinder to push the piston back like you're doing.
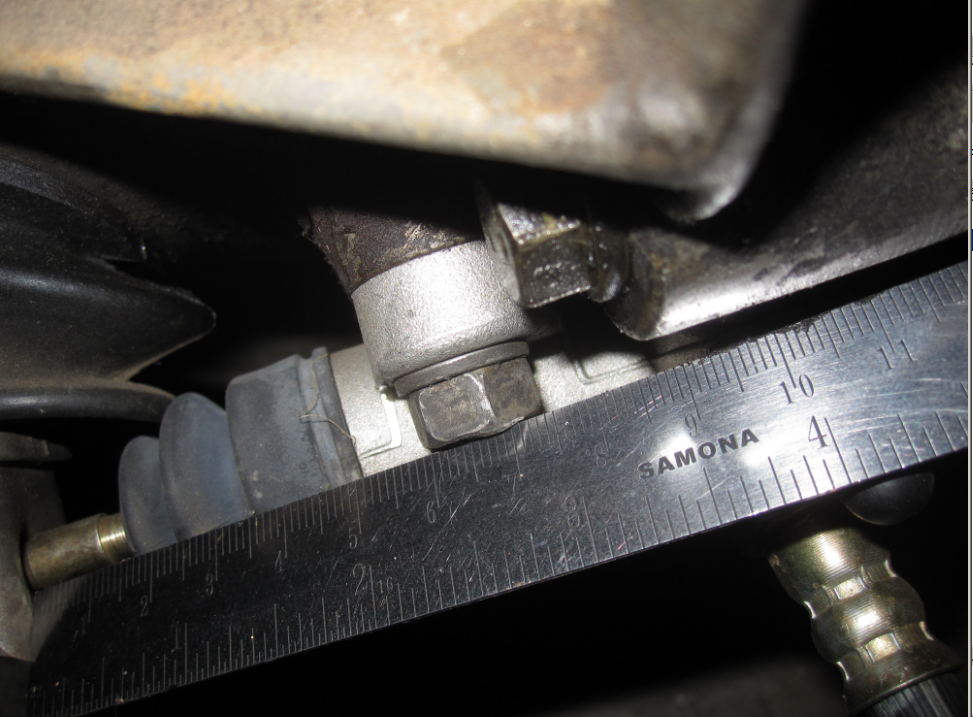
-
-
1.2 ohms is pretty good. So you have spark ,and you have connection to Pin 1. So we're in to the odd possibilities. Like cam timing or ignition timing is off, or the ECU isn't getting what it needs through Pin 1 even though it's corrected right. I've had two cars that wouldn't start with the tachometer disconnected. Is your tachometer installed and connected? Look at Post #45 here. Some good timing things to check. If it won't start with a good blast of starting fluid in the intake manifold it's not the ECU's fault.
-
What type of ignition system are you using? Distributor type, points, electronic, Crane, MSD, etc. The spark will just go to the closest electrode to the rotor when it's triggered. So your spark is getting triggered when the rotor is closest to #5. By moving plug #1 wire to the #5 spot, you've set everything to where it should be to time from #1 wire. You can study your triggering mechanism to see exactly when the spark should be happening and make decisions from that point. Could be that your triggering device in the distributor is moved.
-
With the key off, you can connect a jumper wire from the coil negative to ground, Then check Pin 1's continuity to ground. If Pin 1 shows continuity, then there's a complete circuit. Or, you can just check for voltage at Pin 1 with the key On. Power will pass from the battery through the coil to the negative terminal and down the circuit to Pin 1. Use the Fuel Injection Guide to make sure you're measuring Pin 1.

-
So you got it to start with starter fluid? Your life would be so much easier if you would take some measurements. I remember the old ways from the old days though, Filling my crankcase with gasoline as I cranked and cranked the engine with the "new" carb" that had no float valve, but I knew the carb was good, my friend gave it to me. Grinding the springs off of my new clutch disc because it was installed backward and I didn't want to take it off again, and I knew that wasn't the problem. Got a great workout though from removing and reinstalling the transmission about ten times. Good times man, good times.
-
If you're going to break it all down again to transmission on the floor, you might just take the pressure plate off again and slip the clutch disc over the splines. Make sure it will actually engage as far as it needs to. You might have the shaft jammed up against it so it won't turn but not getting insertion. Measure the diameter of the clutch tool and the main shaft nose and make sure that they're the same. Also, check that the disc wasn't installed backward. I think that the spline entrance of the disc is sloped to allow easy insertion the proper way but might be squared off on the back side, making it difficult. Before you break it down though, take actual measurements of the gap at various places. When you're in a hurry it's easy to make a guess, but an accurate number might tell something. For example, the nose of the main shaft is only so long, not even an inch, I believe. So if you're more than an inch out you haven't even made contact with the pilot bushing yet. The gap can only be less than the shaft insertion distance in to the bushing if that was the problem.
-
One of the simplest things that you can do is to check continuity between the coil's negative terminal and Pin 1 of the ECU connection. You'll have the connector sitting in front of you before you can even take the ECU out. But not starting with starting fluid is a significant sign that you're not getting proper spark. Starting fluid (the real stuff, not WD-40 or brake fluid) is very flammable. If the engine won't at least pop a few times then it's not getting to where the spark is, or there's no spark under cylinder pressure. I wouldn't do any fuel related stuff until I got a few pops with starting fluid. Remove one of the hose to the intake manifold and squirt fluid directly into the manifold. Ignition is a completely separate thing from fuel. Also, you're not really "showing your work" (like math class). You said "appears connected" which could mean that you just eyeballed a few things. That's not good enough. C-.
-
Yes, put it in gear, apply a spinning force while trying to get things in. Visualize the throwout bearing, the fork and pivot pin and you'll see that the fork should be centered in the hole. The bearing sits on the front cover nose and the pivot pin holds the center of the fork. You might not have the spring clips clipped over the pivot pin. Stole a picture from the beergarage. The installation procedure is "place over pin top and press until it clicks and locks in place". If it's on correctly it will be hard to remove. Another thought - the fork is on the pin correctly but the TOB has slipped off of the front cover nose and is jammed between the nose and the pressure plate. That should put the fork end up though, not down, although if you were twisting things, who knows.

-
Also just noticed that your clutch fork is hanging. If it's sitting on the pivot ball right with the clip holding it correctly, it will be in the center of that hole.
-
That looks like more than an inch. About like the splines aren't even engaging on the disc and shaft. Have you had the disc on the shaft? Do the alignment tool splines match the transmission shaft splines? When the transmission is sitting like it is in the picture can you turn the tail shaft with the transmission in gear (sorry, didn't tell you that trick either)? If the splines are engaged you won't be able to. So, could be that you're not getting the splines through the splines. The trick there is to put the transmission in gear and turn the tail shaft while maneuvering the transmission. Overall to get everything done, you have to get the shaft through the hole, then the splines through the splines, then the nose of the shaft in to the bushing, then the dowels in to the locating holes.
-
-
I've heard of that problem but not actually seen someone have a 5th gear issue as bad yours. Something to be aware of. Just went out and looked at one of my extra shift levers and it has much deeper gouges than yours, same spots, But I never had a problem. Weird.
-
And here's another trick - start a couple of the upper bolts in to their holes when you get within one inch. You can let it hang on those bolts becuase it will just be the weight of the transmission pressing in on the mainshaft, which you're doing anyway,but not really much weight. This will let you crawl around and make sure that the gap is really parallel. Sometimes you'll get the transmission cocked and can't tell. Then grab the tail of the transmission and wiggle and push and rotate and cuss until the nose finds its home in the pilot bushing. Sometimes it's just a tight fit. I've done mine that way but balanced on floor jack. I just leave it, get out from under the car, get everything aligned from above and below and the sides then give a it push and a wiggle. If you want to be more careful, you could also mark the pilot bushing and the nose of the shaft with some grease and look for witness marks after you try again. It will at least let you know where the mainshaft nose is and what it's doing.
-
Here's a thought - since the transmission might be a hybrid of two or more models and years maybe the mainshaft is an inch long. Did you change the pilot bushing and was the new one in the same position as the old one after it was inserted? Or, along the same lines, did you try the pilot bushing on the nose of the main shaft before inserting it. I always try the obvious stuff, becuase manufacturing quality isn't the highest for aftermarket parts. I had a pilot bushing get stuck half way in to the crank shaft, had to chip it out to get a replacement installed. If you have the transmission pulled back or out again, measure how far the main shaft sticks out from the bellhousing. I have some transmissions I can measure if you can get that number. Also, is it really exactly an inch or is it more or less? The exact number might be a clue. The other things that can hang up are the locating dowels in the back of the engine that fit in to the bellhousing. But they're only about 1/2 inch.
-
Was yours hitting at the base (where I marked)? People have reported that, and I've seen marks on levers, but don't have the problem. You'll see a little ding in the lever. I have a an old 4 speed lever on my 1980 ZX 5 speed and everything is fine. They say you can grind some clearance there and be okay using it. I was going to mention this earlier but you said 77 in Post 1. Edited.
-
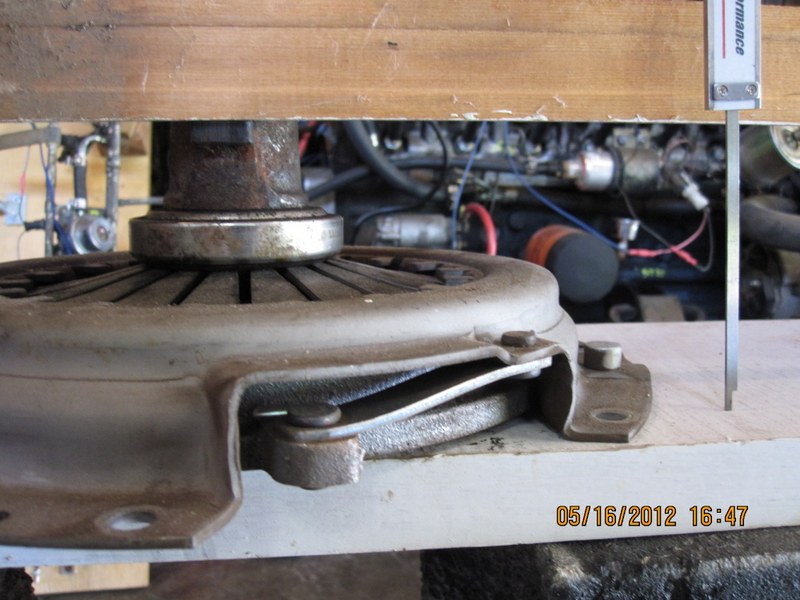
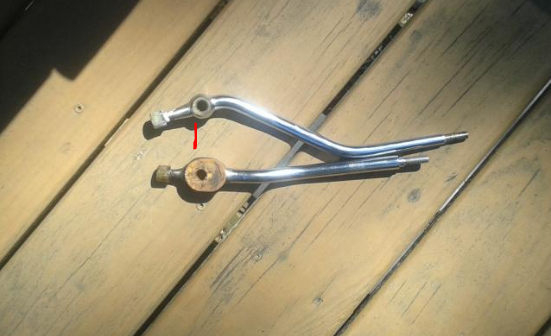
The reason it's important is because it sets the angle of the fork at first contact, which determines where the slave cylinder piston starts. Best to measure. You could measure across the tops of the lever arms with a straight edge, at the hole center, where the TOB sits, to the base of the plate and compare those dimensions. If they're the same and you're using the same collar you'll be fine.
-
Here's what I'm talking about. And a link showing the various possibilities. The pressure plates have various heights over the years and models. That measurement is to the top of the ears, where the fork sits, not the top of the collar. zparts lists the transmissions, but it's the pressure plate that matters. Wish they'd fix that. I think that the original page is from zhome. http://www.zparts.com/zptech/articles/trans_swap%20parts/4tobear_specs1.html
-
If you sell a lot of cars it can probably pay to have artificial asking prices. Makes the other over-priced cars look like bargains. Harmony01 from the past -
-
Not positive but I think that a loose/messed up shift fork can cause that also. The roll pins break or come loose some times. Still has to come out to fix it. Does it feel different than the other gears when you move it in to gear? I think that the loose nut and a loose fork might feel similar. The coupling sleeve is not moving far enough to lock in to place. Might be able to feel something by hand, engine off. 5th would feel mushy and incomplete. Not clicky.
-
The ECU opens the injectors based on what it sees on the blue wire from the coil negative to the ECU Pin #1. You can test that circuit by connecting a wire to coil negative and tapping it to ground with the key On. Every tap should cause a spark from the coil and every third tap will case the injectors to click. You can also test continuity to coil negative from Pin 1 before getting crazy with jumper wires.
-
You have so much going on that it's easy to overlook the simple stuff. Here's an important one - did you get a new collar, the part with the ears that the fork sit on, with your clutch kit. The collar is a match to the pressure plate and if your new pressure plate has a different height than the old one you might have clutch release problems. The ears on the collar should be about 92 mm from the surface of the flywheel when it's all stacked. If you are using the old collar you should check that or check that the surface the TOB sits on is the same height for old and new pressure plates. On the clutch disc alignment tool - the weight of the disc will make it tilt down a little bit, especially if it's a sloppy fit (some tools are better than others). You need to hold it up and tight in to the bushing while you finger tighten a few of the pressure plate bolts. It can be difficult.
-
Just curious. That's what shows at the bottom of my page, like on this thread right now. there's even a Next button which I'll click after posting this. What's at the bottom of your page? Maybe it's just me and my computer.
-
Adsense. They know what you're looking at. They think we all are. https://en.wikipedia.org/wiki/AdSense

-
Don't forget the good old coolant temperature sensor. The #1 cause of running rich (aka "over fueling"), I believe.