


Zed Head
Free Member
-
Joined
-
Last visited
Everything posted by Zed Head
-
 I second this also. The 044 is a high volume pump. Known for overpowering fuel lines. The ECU/PCM works on an assumed base fuel pressure. It can only adjust so much.
 -
I cobbled together your basic facts. It's not really clear what you're using for engine management, the ECU and harness. Also looks like you're just connecting things up then seeing what happens. Not a great idea, especially with a turbo engine. Most modern engine management systems have a fail-safe or limp mode to protect the engine when things aren't right. Timing is retarded, and/or cylinders are shut off. Also looks like you're not 100% on the O2 sensors and how they work, and the different types. You need to get the right ones, guessing and getting lucky is iffy. I'd get the pinout for your ECU and wiring harness and spend some time checking every circuit. Adding extra grounds is kind of pointless. There's no magic, just get the right parts connected the right way. Good luck. Looks like it will be a lot of fun when it's running. Be careful too, you'll have enough to be spinning in circles before you know what happened.
-
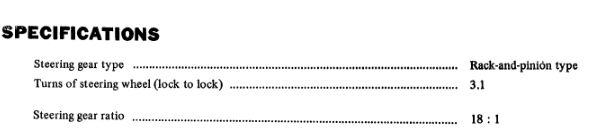
I posted a picture of the 77 18:1 below the 76 15.8:1, in my post #13. By "as you found", I meant what you found in the early FSM. I was trying to say that maybe you have an earlier rack, 1976, with the 15.8:1 ratio. 1977 was a change year. I wonder if the gear changes might show up on somebody's parts CD? It's not shown in carpartsmanual.com.
-
That's a good one. Looks like the last change was 7/73 though. http://www.carpartsmanual.com/datsuns30/Datsun-Z-Index/Axle/Front-Axle
-
I only looked at the years in question on the rack specs and they are the same by FSM year. But, maybe, as you found, you have a 15:1 (actually 15.8) instead of 18. Here's 1976, and 1977. Maybe you have a 76 rack. I don't feel so wimpy anymore. I assume the higher number is higher mechanical advantage? Not sure.

-
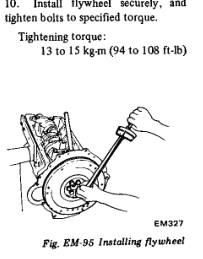
I made something like jonbill did from an old piece of trailer hitch hardware. Same concept, get a strong piece of metal that will jam in to a tooth. Be aware that Nissan used some pretty strong threadlocker from the factory install. Either that or somebody else did when they worked on mine. If it's never been off those bolts might take some real effort. The bolts should have been torqued to 100 ft-lbs so will need at least that to break free.
-
Wiggle, wiggle, pull usually works if all of the bolts are out. Grab the tail, work it back and forth and pull. Or push it back in and get some inertia going, it might pop free. They do get stuck, so that's normal. Make sure it's supported. They're heavy.
-
The pilot bushing and pilot shaft can wear and get stuck. Also the splines on the clutch disc can get crud buildup and/or rust. Did you get the two small bolts on the bottom removed? They attach the dust plate to the trans. Easy to miss they're small, on the bottom, and usually covered in greasy grime.
-
Tire air pressure? Probably have to swap wheels to be sure it's a car difference and not a tire/wheel difference.
-
Odds are you'll never find a "kit" for what you're trying to do. If you removed your 77 bumpers and took the car and the 260 bumpers to a shop they could probably get it done for not too much. You could mock it up at home with zip ties and assorted hack stuff to see what it might look like. Take a picture if you like what you get and take that picture to the shop.
-
Since you have a 73 it's probably a good bet that the carbs and parts are from 73. Doesn't matter that it's an L28. There's a chapter in the FSM called Emission Control Device. Download the FSM and start there. You won't find removal instructions but you can figure out how things work. That's the key. https://www.classiczcars.com/files/
-
Hey David F I think that you might not be understanding what we're telling you here, and maybe you're not clear on how the early tachometers work. They don't sense voltage, they sense current. A blast of current rushes through the circuit for every spark. The tachometer "senses" it and "counts" it. Current, generally, causes heat. Too much current can cause too much heat. Lower resistance allows more current to flow. That's why the coil's are fairly high resistance on the primary circuit, and why there is a ballast resistor to lower it even further. And that's why the primary circuit resistance is so important. So, the "help" is - measure the primary circuit resistance of both coils and post them up. If they're correct then maybe your tach just died. If they're incorrect, then making them right might get the tach working. Good luck. The part about super conductors was a joke. Your coils do have some resistance, I'm positive. You just need a decent meter and some time to get it.
-
Might be that the tach (edit - wrote coil before) was damaged by too much current. Good resistance measurements might tell something. Only superconductors have no resistance and they require liquid nitrogen and/or helium.
-
Shipping costs seem kind of high. That's gonna kill the sale right there...

-
Too much powder coating is a common problem for all powder coated parts. Scrape the inside of the hole clean, I'd say. It's almost, or maybe it is, an interference fit. Zero play.
-
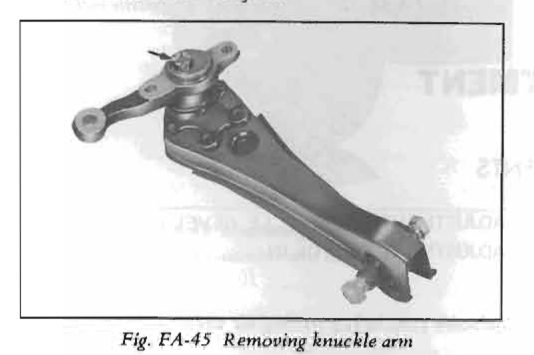
These are no good? Maybe you're looking at the arm (transverse link) upside down.
-
Just a follow-on to cgsheen's post - the ballast resistor is in play while the engine is running. So if you had the ballast wiring wrong, bypassing the ballast like the Start circuit does, you might get too much current through the tach. You can get the diagrams and/or you can see which post on the ballast has power with the key on, then measure resistance from it to the negative post. Resistance should be the ballast plus the coil. Or it might be that you used a "Blaster" or some other low resistance coil. 72 uses a pretty high resistance for the coil. Or you used a 3 ohm coil and don't have enough current through the tach circuit. Many possibilities.
-
I'm going to guess that your new coil is different than the old coil. Can you give specs on the two, take a picture, and/or measure resistance across the primary circuit? Might be a clue there.
-
15%?
-
Is the door jamb tag gone?
-
You don't really need the manifold just the "slingers". Here's the 280Z parts. Couldn't find 240. http://www.carpartsmanual.com/datsuns30/Datsun-Z-Index/Engine-280Z/Cylinder-Head

-
Well done! We should have some sort of Sherlock Holmes award. I tried the Google but it just took me to a motorcycle race shop.
-
I had this problem with an electronic ignition system. A condenser/capacitor added to the system fixed it. It wasn't the tach it was the signal on the line. My guess was based on logic based on accumulated random knowledge. Can't explain in detail why it works. Like 7 too says, it's hard to tell what you're working with. Why would you pull the distributor to change those parts?
-
Since your manifolds are off you've lost at least one slinger. Their general positions are shown in the FSM though. Make your own and bolt them tightly to the head. You could probably drop the cross member and just lift the remainder of the car shell off by hand. Like an old VW Beetle.

-
This is a good point, and it's after you drain the transmission fluid. In case you were thinking you could pull it with the fluid in. As things tilt, there will be residual fluid draining. You could leave all of the fluid in but you'll need a much tighter seal. You'll probably need to remove the console also to get to the shifter. The propeller shaft bolts will be hard to remove, but should be since you'll want the prop shaft off before pulling. You can leave the slave cylinder hanging. Remove the radiator, don't try to finesse the engine out with it in. Take pictures or mark your parts with tape. Use ink that won't rub off with greasy fingers, or put the label inside the bag. There's a lot of small stuff that could/should be done before even hooking up the hoist. A few thoughts in case it's your first time.

