Mikes Z car
Free Member
-
Joined
-
Last visited
Everything posted by Mikes Z car
-
 I have an old Toyota that had a front end shimmy for years when braking and there may be other solutions but I had the rotors replaced and the problem went away. Mike
 -
I had a noisy 4 spd in a 71 240 and was told it was a spun bearing. I replaced all 4 bearings and the noise quit. I didn't think it hurt reliability though. Oddly when I got the old bearings out and spun them by hand I could not tell which one had caused the noise.
-
FastWoman, Thanks for reminding me about the rocker panel drain holes. I will use them too. My frame rails have no rust as far as anything visible. I'd like not to have to worry about them though. The guys at work told me about a local corrosion expert gentleman and I asked them does he help with the rust or does he get you to stop worrying about the rust? I was teasing them because they tease me about worrying about rust on my car. Interesting that Wikipedia says the military is quitting the use of Cosmoline because it is too hard to get off. That is likely a nice endorsement if the anti corrosion qualities are still there after it has been on long enough to be difficult to remove. At least it doesn't flake off like undercoating can. Cosmoline comes in spray form and in quarts (other sizes too) which makes me think it must be diluted for the spray cans as it is described as having the consistency of vaseline. Maybe squirting oil into cavities might get anti corrosion material into places the thicker Cosmoline might not get into and therefore be a good substance to use in conjunction with Cosmoline. The ACF-50 looks good too, maybe a little to spendy for this guy though. Mike
-
I am going to put holes in strategic locations in my 240 that are not easily observed where possible to squirt oil from an oil can periodically with the hole just large enough to allow the oil can nozzle to be aimed in different directions. The holes down the length of the frame rails maybe a foot apart or less might be be rubber stoppered or threaded for bolts (or some other idea) to keep water out but on the interior I was thinking of using a black plastic rivet looking thing for holding on interior panels with ribs on the shank that I picked up at Shuck's auto supply. Existing holes might serve double duty for this maybe? I also plan on putting holes in the rocker panels possibly under the Datsun sill plate or whatever it is called however there is some access already on the inside under the interior rocker flap cover thing (it could have holes put in it too). Anything that makes this more convenient would make it done more often I would think. Being able to squirt oil onto any surface seems a good idea if possible in this line of thinking. Maybe use a bent nozzle to accomplish this to be able to squirt in an up direction? Any place that is prone to rust would be a candidate in my thinking on this such as the doglegs or over the rear tire well. Maybe put oil on the inside of the rear of the front fenders which would be possible with a small hole on the interior footwells behind the rust prone area of the fender above and rearwards from the Datsun badge. These holes probably would not be normally visible. With my previous 240 I used to squirt oil after a rain at the the top of the wheel well toward the fender lip where the fender meets the hood because the bolts had rusted off of that car and I had to weld new nuts on the engine compartment metal right at the hood line. I used bolts to hold the nuts in place temporarily for welding. These nuts hold the fender on. I hope to put rust bullet in the rust areas except for the frame rails if I can figure out how to get access to these areas before oiling . May have to cut holes that are rewelded in or make new access hatches designed to not have structural impact? Need a mechanical engineer here. What is the class taught on this, strength of materials? Anyone have other ideas? Mike
-
I just checked that wire with this new info because I was wondering what it was for. On my 240 that wire agrees with Zs-ondabrain and is hot in ACC and ignition but only when the fan is on. I am trying to label all the wires under the dash as I have left overs from a POs wiring though everything seems to be working.
-
I remember noticing on a wiring diagram for the early 240s that the only fusing for the ignition wire going to the coil is the fusible link. I wonder if that is a standard procedure?
-
Your excitement reminds me of how I felt when I first turned the key after replacing bearings/rings in the 240z I used to have. Mine barely ran when first started due to retarded timing.
-
Ron, Are the colors on the 3 way inline W, W/B and R? Mike
-
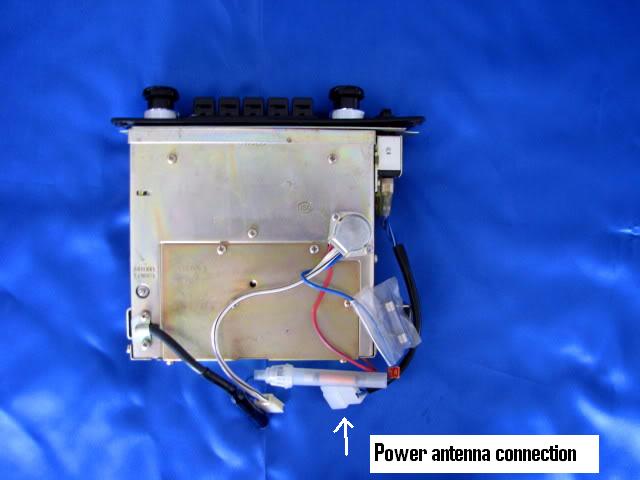
Ron, Aha, I have a 4 wire connector like the one in your picture behind the non original radio that is not being used and it has only 1 wire in it, a blue one and I wondered what it was for. In looking at your picture of the connector lying on top of the radio it looks like the blue wire goes to the lower left connector? I am trying to figure out if that blue wire matches the blue wire in the female connector I have though I understand that the wires sometimes change color across a connector. Thanks Ron, Mike
-
Ron, Am I interpreting your pictures right, the pictures numbered 2 and 3 show a 3 conductor connector with the connectors for that one in line with each other like this? XXX and the colors are White with black stripe Red with blue stripe White? Does the blue fuse wire go into the 3 conductor connector I am asking about that has the three conductors in a row or is it a separate single conductor that has a bullet on the end? Thanks, Mike
-
My early 70 240 uses a large three connector plug for the antenna power connection as far the dash connector. I don't have an original radio. In the attached picture you can just see the radio three connector plug. The wires in the connector for the radio power antenna are arranged _X_ X_X like that and are not in line with each other. I am chasing this too. It would greatly help me if you find and post a closeup picture of all the connectors on the back of the radio if you find one. Mike

-
Hi all, My 240 has twin sunroofs installed by a PO that are side by side and though I haven't driven in the rain to determine this I can see signs such as applied RTV that indicates the sunroofs leak. I may delete them and put in a new roof panel where they are. Has anyone been able to put in a replacement sunroof to stop leaks? I wonder if it might be possible to have a piece of glass drilled for the existing hardware such that the new glass would be larger all around to extend out beyond the rubber to prevent leaks. I might not be able to open it then though. These leak because keeping rain out depends on a seal between the glass and the rubber but the seal is slightly indented by the glass so that rain goes down in this joint instead of flowing off of it if that makes sense. Any ideas appreciated. Mike
-
I wonder if the bottom of the inside of the drums got rusted from mositure collecting at the bottom from being in one spot and the shoes are grabbing more there than the rest of the drum as the wheel turns?
-
I can't help think the voltage regulator for the alternator isn't working. This might not be the easiest idea and better logic might prevail but I would try putting in the old alternator as a check of the regulator. Mike
-
Glove box latch fix and door warp prevention (see part 2 of 2 of this blog post for bending the latch tang on the upper half of the door latch on the body of the car to make the latch click solidly every time) I wanted to make the glove box latch work right and to stop the door warp by weakening the overly strong light switch spring. Note that ZULAYTR posted in a thread: http://www.classiczcars.com/forums/interior-s30/19881-glove-box-door-light-switch.html as to how to straighten out your door if it is already warped by heating it up and bending it the other way. To stop the latch on the door from sliding if it is loose: 1. The door latch on my car was loose (a two piece assembly) and sliding even when tightened so I took it out and flattened with a hammer the back 3/8 inch part of one end of the U shaped piece closest to the hinge. 2. I drilled a tiny hole thru the U shaped piece and the lip on the flat piece it fits in and put a cotter pin through the hole to keep it from sliding back and forth. There is room for a tiny cotter pin. On my car this hole needed to position the parts so that the U shaped part is slid all the way into the flat part it mounts on to mate to the upper latch right: As information the upper half of the glove box latch on my early 240 is held in place by two 4 MM metric bolts with a .7 pitch. Preventing door warp by weakening the door light spring: 1. To avoid further warping of the glove box door I replaced the spring in the glove box switch with a weaker spring; what Ace Hardware here calls a no. 3 spring. Spring specification: 2. The switch assembly, called "nut spring" in the fiche can be pried out with a pocket knife. 3. Bend the legs of the chrome colored retainer out just enough to allow it to pop off of the rest of the assembly. The spring will pop out at this point. The "legs" of this item fatigue easily and will break if bent too much so limit bending as much as possible. 4. I cut off part of the no. 3 spring to make it even weaker however if you do this be sure the spring is still long enough to push the copper connection on the end of the plastic plunger rod into firm contact with the chrome colored retainer as that is where it gets its ground connection. I tried shortening the original spring but the spring still felt too strong. After replacing the chrome colored retainer on the rest of the assembly pull gently to test that the two parts are gripping each other. If not it is possible to gently squeeze the retainer with pliers just under the lip to force the legs to grip tighter. If the legs need to grip the sides of the hole better try putting a straightened out paper clip under a few of the legs in the middle and use pliers to squeeze the end of the leg to force it to bow out so it will grip the hole it fits in better.
-
I used to live in Sacramento with my orange 71 and the local Z club. Wish I could be there!
-
What did he say?
-
Do you have any borseight camera pictures? Where did you get the boresight camera? I made one for my frame rails and other areas but haven't used it yet. Mike
-
On my early 240 (MFR date 1/70) the motor wires go straight up out of the motor about 3 inches and plug into two similar wires that continue straight up another two inches that then go into a hole in the very top of the fan box nearest the edge toward the passenger seat. I assume the resistors for slowing down the fan speed are in that hole. A wire bundle comes out of this same hole and goes maybe 3 inches before having a molex connector pair on it (male and female connected together). This wire bundle continues maybe 9 inches on to another molex connector pair (male and female pair connected together) that is 5 inches from the fan control switch on the dash and continues on to connect to that switch. This molex conductor has a red wire coming out of it and if I connect 12 volts to that red wire the blower runs. This red wire plugs into one end of a blue wire that goes to an inline fuseholder in the passenger footwell that currently has a 15A fuse in it. The other wire from the fuseholder is also blue and goes into the wire harness. My fan will run if I connect 12 volts to the fuse but I am not getting 12 volts to the fuse for some reason. Hope this helps, my car is a 1/70. I can take pictures if needed since I have my radio out and I can see a little bit. Also a hand mirror with a small bright light helps. I use a 10 watt halogen bulb in a wire cage connected to a 12 V power supply. Mike
-
I smelled fuel in my car until one day working on something else I had the hood up and turned the key so the fuel pump kicked on and noticed fuel squirting out of a fuel rail to carb 1/4" hose. FWIW.
-
Don't know if this is worth mentioning but the local Z doctor determined that one of the rear stock springs I ordered for my 240 was for a 280 because the diameter of the spring wire (not the diameter of the whole coil) was wrong. He determined that with a caliper and I believe the FSM but don't quote me.
-
Been following this thread, just remembered that in solar battery systems there is a periodical equalization charge done so that the battery is briefly overcharged as sometimes one cell in the series doesn't charge as fast as the other ones. The charger I left on my Z all winter is a ProXone model 610004 dual rate which doesn't boil out the battery like the cheapie one I had. I guess the proXone works like the battery tender.
-
Took a picture of the crossmember under the radiator to get an idea of the curve at the end for a sketchup 3D drawing I am attempting to make of the early 240Z frame. Not sure how far I will get with this as it is more time consuming to get any accuracy than I thought and I am no cad expert. I will upload what little I have so far to my blog for anyone to make use of and for any comments. Drove my 240 to the hardware store where it got looked over. Several people have commented on how nice it looks this last week or so as I have had it outside to finish the wiper motor install and the headlight harness upgrade.
-
Hmm I wonder if the points opening and closing could make it appear the voltage dropped because with the points in action there wouldn't be a continuous DC on the coil as there might be when measuring with the engine not running? Mike
-
Yahoo!!!! That makes my car by comparison worth $100,000 !!!