zKars
 Subscriber
-
Joined
-
Last visited
Everything posted by zKars
-
 Hmmm. I got my Nissan hatch seal off in one piece recently, but it had been replaced 6-7 years ago, and the glue was not factory. Just took patience. I'm very concerned if you could remove original factory glued weatherstrip without riping it to shreds. Give it shot. I'de be using heat to soften for sure.
 -
There was a thread here just recently discussing the common left side hatch twist. It was mentioned to not be related to the hatch strut. While I can also apparently vouch for this, as I have a really nice twist on my 73 that is driving me nuts, and found that removing the strut does not make it go away. When down, the strut applies no force to hatch, at least not upward force. That said, it may be that years of having the hatch propped open on the left, allowing the right side to SAG, has eventually over time twisted the whole thing, resulting in a left side sitting up too high today. I don't remember if anyone mentioned that they have had this issue since the very early life of their cars, which might settle if this may be or contribute to the cause. Ah! Did they also discuss if dual strutted 280's have this issue? If so, then its definitely not strut related. time to find that thread and re-read All that really sticks in my mind is the one person who solved it by having his bodyshop beat the left side weatherstrip lip down with a block of wood and a mallet I believe until it did fit. Ouch!!! Jim
-
Can't remember the details of doing it posted here before, it has been discussed. I would bet your hatch has been replaced with a 260/280 hatch to have the two 6mm holes on the pass side. You will have to do two mods to the pass side body. One would be to weld on the L-bracket/tab with the 8mm hole that mounts the stud from the strut brackets you borrowed from the JY car. If you didn't already get it, should go back for it. You would have to drill some spot welds I'm sure, but its do-able. Might be able to do it with rivets, but that bracket takes a fair bit of torque, welding would be better. Then the interior plastic needs the notch cut out to clear that bracket. Sound like a nice afternoon project. Now to hope that the passenger side strut has some "ohmph" left in it. Jim
-
Well plainly it is fate that you were to have this beast. Congrats and welcome back. It looks pretty darn nice. And as luck should have it, I just picked up a early 74 front bumper in pretty good shape. Maybe its better than yours. It's been raining early 260's out here this spring. I know of a parts car that's in pretty good shape about a mile from me, there is one for sale in Edmonton right now, and then this bumper falls in my lap! Well out of a barn roof actually. Well, I knew there was a reason for me finding it. Drop me a line z240@shaw.ca and I'll send some pics if you're interested.
-
There is a rubber like putty commonly know as "dumm dumm" that is used as seal for windshields, tail lights, that sort of thing. Auto parts stores have it. It comes in a roll, is about 1/4 diameter bead of this super sticky rubber compound. Rip off a chunk, warm it up, knead it, stretch it, stuff it into the spaces you have. Stays soft. Tony is talking about various gasket making goo in a tube that is very similar to silicon caulking. Not bad to use for this I suppose, but surfaces have to be clean if you expect it to stick and seal. Just don't use old socks...
-
Crank pulley bolt torque is 116-130 ft-lbs Seal goes in without a driver. Just tap in around the circumference with a rubber mallet. No grease, other than engine oil on lip and pulley to ensure it slips on easy. Biggest trick is look at polished surface on crank pulley where seal lip rides. Must be as clean, smooth and perfect as possible. If you current seal leaks, there is a reason, and it may not be just the seal, but the beat up rusty dirty pitted surface it rides on. And no beer. Wait till it all runs again. Jim
-
That line around the front of the rad is someone's great idea to keep the gas line cool to prevent vapor lock I'm betting. Definitely not stock. The two hard lines down by the alt on the frame rail are where they end. Put a fuel filter on the supply (5/16 line, smaller is return) and go straight to the carbs by the shortest route. My preference is on using just a mechanical pump. Quiet, plenty of volume to feed my 3.1 stroker and 44 mikuni's, trivial and cheap to replace. Went through several electrics that burned out (in my opinion) due to lack of cooling from no return. Never could get proper return regulation due to insufficient return line size. Now if we could only get these things to start more easily....
-
Large exhaust leaks from exhaust manifold/pipe cracks or its related gaskets/connections near the engine are usually accompanied by a very distinct ticking sound as you can hear the combustion. It's loudest during engine revving, and absent during run-down, ie explosion specific. If your engine bay is "quiet" then I'm going go with exhaust gases coming in the back somewhere from the exhaust pipe outlet. There are many many threads here that describe the seemingly endless places where it can enter back there. Tail lights, hatch gaskets, and missing drain plugs seem to top the list, but as I said, I can list 30 spots off the top of my head that may be partly to blame. hunt like a CSI with a bright flashlight in a dim room....
-
4 of 10 x 1.25 for the bracket to rear panel. 30 mm are plenty long. The nuts that hold the studs on the bumper to the bracket are the same. The threads on the welded on nut on the tab at the bumper tips where they bolt to the side of the car are also 10x1.25 on my car (72 bumpers), but the same nuts on front bumper tips where 6x1.0 thread. Not sure if that's standard or not. Seemed a bit odd at the time.. Hope that helps!
-
The wiring colors on the tach itself do not correspond to the wiring colours on the harness and on the diagram. On your tach picture , the Red/Black wire is the L (blue) wire in the wiring diagram. The green is the +12 line , the black is ground, I mean the two that connect to the white plastic terminal block on the tach. Connect the tach back to the wiring harness. Check continuity from the Red/Black wire on the back of the tach to the - neg side of the coil. If they are not connected, then find that resistor that the wire passes through. It is on the passenger side foot well up in behind the glove box near where the fat bundle of wires goes through into the engine bay. It has blue tape around a black rubber rectangle cube about the size of the end of your thumb. It is a 2200 ohm resistor inside. Blue wire coming and going from it. Also check that you +12v at the green wire on the back of the tach with the key on. Also confirm you have continuity between the black wire and the metal chassis anywhere on the car (ground). Gets those checks done and get back to us. Jim
-
I'm thinking the FSM might be a good tool for you. Look at www.xenonS30.com under the Reference tab for the manual. The Engine Mechanical (EM) chapter has good rebuild information and of course all the related specs. Cleanliness means more than anything (right next to part fitment)! Pretend you're doing heart surgury and the slightess bit of crap in the wrong place means death. Things you can't see, like oil passages, are the places to pay attention. Soap, water, compressed air and a clean place to work are your best friends at this stage. Jim
-
Ah, Owen hit the nail on the head. If it costs more time or money than I have or want to spend to get the car on the road so I can drive it sooner than later ("I just wanna drive something already"), then its too much. Totally relative to the individual and situation. Jim
-
Chesley: My apologies. Just a keyboard slip. I've been correcting people with a "K" vs a "C" in my last name ever since I could talk. Its even worse when getting wrong makes it involves a gender swap. My bad. What I am concerned with is safety. The car is weak now, bending it again will make it weaker in my opinion, due to age induced rust and fatigue since the accident. I say leave it alone. The only cheap way to improve strength is weld steel over that frame rail. Take care Jim
-
Chelsey Sure it can be fixed. Just takes time and money. This is a job for a frame shop that has to bend the body back into shape and get the correct stock dimensions. Then the bent frame rail and other bent parts have to be replaced and/or re-enforced. I'de take it in for an estimate, then you can decide if its worth it. It will not be cheap. And you will likely find other surprises in the form of rust and decay that's being hiding and getting worse since the accident, not to mention all the other usual places Z's rust that will be uncovered. Better you know the facts now than later. Safety first. Jim
-
Dan: Metric supply sucks for sure. I've been tempted a couple of times to order things from McMasterCarr in the US after similiar fruitless searches in Canada. I'm sure I I have extras of the tension arm and knuckle bolts too. The only "specialized" Z bolt I've ever been able to buy at a Canadian bolt supplier is a spindle pin replacement bolt. They are 5/8 NF Gr9 x 10.5 or 11 inch long I think. Parts cars are heaven for sure, if you can find them. Jim
-
Well you haven't asked me yet! How many would you like? I'm sure I have at least two extra's. Drop me an email to z240@shaw.ca and we'll get them on the way to you. Suppose you need the nuts too? Shocking that can't find 14mm x 85mm x 1.5 Gr 10.9 bolts at decent hardware supplier anymore. Jim
-
PM sent with some details and options. Let me know what you want to do via PM or my e-mail that I sent. Glad to help. Jim
-
Does that mean you still need a fuel cap? Let us know!
-
Dang, didn't notice the Japan thing. Not the first thing I have noticed this week, eh guys? I'de throw you a spare ZX dizzy or HEI module in the mail if you'de like. How far is Japan from Western Canada anyway? Maybe 5-10 miles, right?
-
Sorry Blue 72, the fusible link cover is a white plastic thing that pops off. I don't even see it on his 260 in the picture, maybe its behind his hand. That is a relay he's pointing to, looks like a horn relay but the "Real" one is under the dash and wires aren't the right color.. Follow those wires both ways and see where they go. Looks like a custom job for something non-stock. Gotta love a mystery. Jim
-
Since only Walter wants to play, here's a hint. They are more of a nut than a bolt.....
-
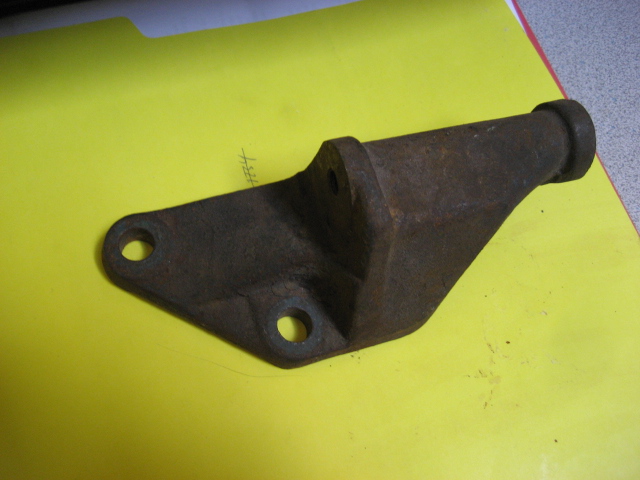
And I must learn to read more thoroughly and post with additional details. Here are pictures of the lower bracket that mounts with two 10mmx 1.25 bolts and one 10x1.25 stud (upper right). It has two 8x1.25 mm threaded holes for bolts that pass through the alternator body tabs and into this bracket. Jim


-
The reluctor gaps being way out of whack is your basic problem. If the dizzy shaft bearings are in good shape (no play you can feel), then you can use the guts for a pertronix conversion. But I'm feeling you're missing out on mechanical advance from your description of what's left of the guts. Surely there is much more performance you are missing out on! I'be be looking for a new ZX dizzy in good shape. Other options are to use any Z or ZX reluctor dizzy with a HEI module trigger. Pretty easy to put together and easy to replace a blown HEI module at any parts store. Not so with a E12-80 module. Hope this helps. Gotta spend a little money to get this fixed. Jim
-
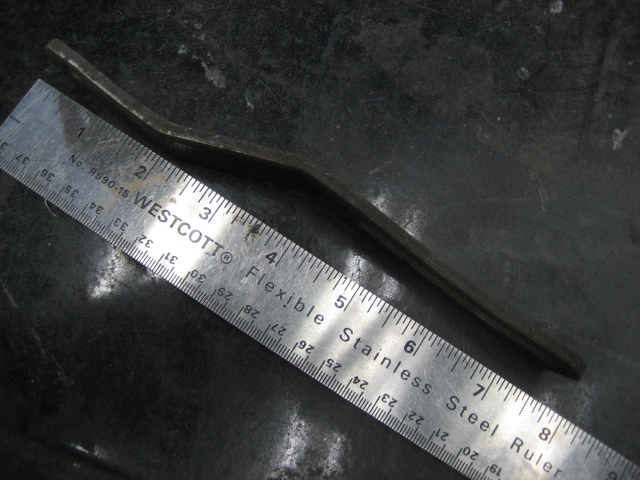
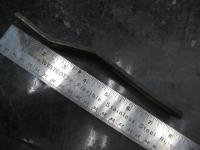
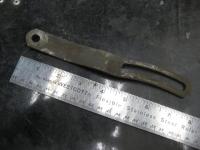
Here is a couple of pictures to help.
-
The bumper bracket bolts are 10 x 1.25. There are lots of 10 x 1.5 bolts on our S30's, head bolts for starters. And starter bolts! . Think of any others? Now can anyone name any items on Z's that have a 10mm thread, but have 1.0 mm pitch? There are over 20 that I can think of on every car. Yes, its Friday and I'm bored.... Jim