


Leaderboard
-

siteunseen
Free Member3Points15,115Posts -
Captain Obvious
Free Member3Points10,081Posts -

Zed Head
Free Member3Points19,228Posts -
chibluz
Free Member1Points7Posts


Popular Content
Showing content with the highest reputation on 02/23/2017 in Posts
-
A while ago, I was looking into an issue where my idle would hang a little because the throttle body butterfly would not always return to fully closed. The puzzling part is that it always closed just fine with the engine off and it only got sticky when manifold vacuum was present with the engine running. Reference old thread about it, but that old thread never really got to the bottom of it: http://www.classiczcars.com/topic/45152-sticky-throttle-body-hanging-idle/#comment-409180 My solution at the time was to simply add an extra turn to the throttle body return spring and that extra spring force overcame whatever was causing the stick. Worked, but not really the right way to fix it and I always wanted something better. So this off-season, I pulled the throttle body off again to do some more investigation. I believe I have traced the sticking issue to worn through chrome plating on the throttle shaft exposing the softer steel beneath, and that softer steel doesn't slide as well against the pressed in bushings pressed of the throttle body. Even though everything seems to move just fine with the engine off, I believe the friction between the worn shaft and the bushings is amplified when the two of them are forced together by manifold vacuum causing the hanging idle. After considering several different approaches to fixing the issye, I decided to try replacing the original steel throttle body bushings with Delrin. The thinking was that Delrin is a naturally slippery material and the hope is that it won't stick to the exposed steel of the shaft. Also, while I was in there, something else I wanted to improve is that with the original design - The only thing locating the throttle butterfly plate within the throttle body bore is the butterfly plate itself (just like the carbs). In other words, when the throttle is closed, the butterfly plate should self center within the throat because the walls of the throttle body bore will contact the brass butterfly and move it into the center. But when the butterfly is opened, the plate is free to move back and forth a little within the bore. This results in scraping against the internal walls and wear on the walls and butterfly. I was thinking that I might be able to come up with a way to incorporate shaft locating into a new bushing design. So with all that as background... I started with this: I ran a tap into the original bushings and pulled them out: Here's the original steel bushing and the new Delrin bushing for the side where the throttle linkage attaches. The larger diameter lip section keeps the throttle butterfly from moving too far in one direction: Here's the linkage side in place. You can see how the lip is sandwiched between the linkage and the body casting to take up the side-to-side slop and acting as a thrust washer in the inward direction. The other end will address the play from the TPS direction, but this is half the battle won: And here's the concept I came up with for the TPS side. I turned a groove on the throttle shaft to accept a spring clip, and made a stainless steel "D" holed thrust washer to run against the outside of the bushing. These features are what prevent the throttle shaft from moving in from this direction. With the combination of the two limiting features, the throttle plate is now locked centered in the middle of the throttle body throat bore. This side was more of a PITA because there is very little room to work with since everything has to be hidden behind the TPS: This is what the TPS side looks like when installed. Spring clip limits motion in the inward direction: Here's the two new bushings on the throttle shaft to show how they work: A little epoxy to keep the bushings from spinning in the throttle body casting (that's what the grooves are for). Not much sticks to Delrin (including epoxy), but it doesn't need to stick well. Just enough to make sure the shaft spins withing the bushing instead of the bushing spinning within the body: And a little blue thread lock on the butterfly screws: It's all put back together and back on the car and I'll post the final results after the salt is off the roads!3 points
-
2 pointsYou'd be better off using the choke lever mounts that Art Singer sales on ebay, $30-$40? They screw down on the transmission tunnel in front of the ashtray hole not the plastic console like the OE one in your 2nd picture. That's one of the best aftermarket Z parts out there in my opinion.2 points
-
Looking forward to seeing the finished product. I'd be interested in a set depending on fit, finish and price. ;-) I have an original set I can compare them to if that helps.1 point
-
1 pointIf you go to the link I posted above it goes to a post that has the complete US dealer list (for 1972?). The full list is spread over posts 8 & 9. I have no idea about finding old vin records but good luck on your search.1 point
-
1 pointNot from this small batch, but it is something I could do as a small group buy later on.1 point
-
Darn it. Just realized I was looking at your terminal block wrong. It's actually right for 78. Ignore all comments about two pickup coils, yours looks right, a block for a single pickup. But the resistance you measured isn't right, it's way too high, essentially open Triple check those wire ends, it looks like somebody put new ends on, and might not have got them right.1 point
-
1 point5/16? That's what I used. I was going to order cloth fuel line for a VW bug, they have metric lines in the sizes we need, but this student budget is really killing that plan... http://woodworkerb.com/home/datsun-240z-rebuild/240z-fuel-tank/1 point
-
Thanks Jerry for the kind words. I have other ideas and plans in the works, as well. My background is in auto body and metal fabrication, and I see what I think could be a big demand for real body panels, not just patch panels. For example, complete door skins. Like I said above my job is the biggest reason for all of these delays, hard to get a lot done when most weeks I'm working 60- 80 hours at my main job. But hopefully the day will come in the next couple of years where I can leave and start my own business. I'll continue plugging away and I will be very happy and proud the day I can start offering some products for sale. Chris1 point
-
1 pointchoke cable choke lever transmission crossmember bolts carb throttle rod mount - bolts onto firewall something to hold a hose ignition resistor by the coil brake booster check valve bracket - mounts to firewall pads that go under cowl at either end Chuck1 point
-
You could get the block and head codes and be certain of what you have.1 point
-
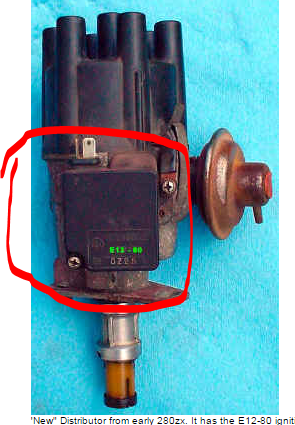
The intake manifold and parts look like an 80-83 280ZX engine. I was serious when I said to remove the distributor cap, take a picture, and post it. Half of the ignition system questions will answered.1 point
-
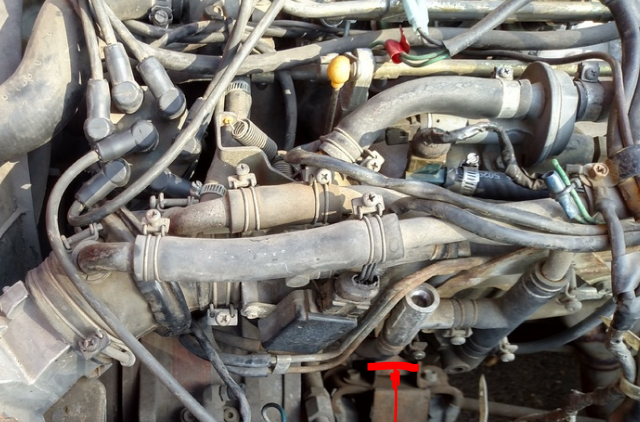
Is it sure that the distributor is the 280Z unit? I can't tell from just looking at the cap in the picture, but the idle speed screw is ZX style so it looks like somebody stuck a complete engine in. Could be a ZX distributor. And they have their own set of problems, with loose bushings, broken reluctor magnet rings, and modules that experience sudden death. Which it is changes the thought processes. Would be worthwhile to take a close look at it. Look for the "black box" on the side of the unit. Here's a picture from atl Z. And a link showing the problems and parts. http://atlanticz.ca/zclub/techtips/distributorrebuild/index.html
 1 point
 -
I believe that this is a mid 20's car on BAT. The history could bring that up a bit, but I still don't believe that is would break the 30K mark. I just went back and took a look at the history of these on that site. This is a #2 car and the 1973 is not bringing what the 1972 and earlier cars are bringing yet. I would consider this car a great refresh not restoration, a restoration was probably not warranted but it does make a difference. Just my 2 cents and I am at times surprised. JLP1 point
-
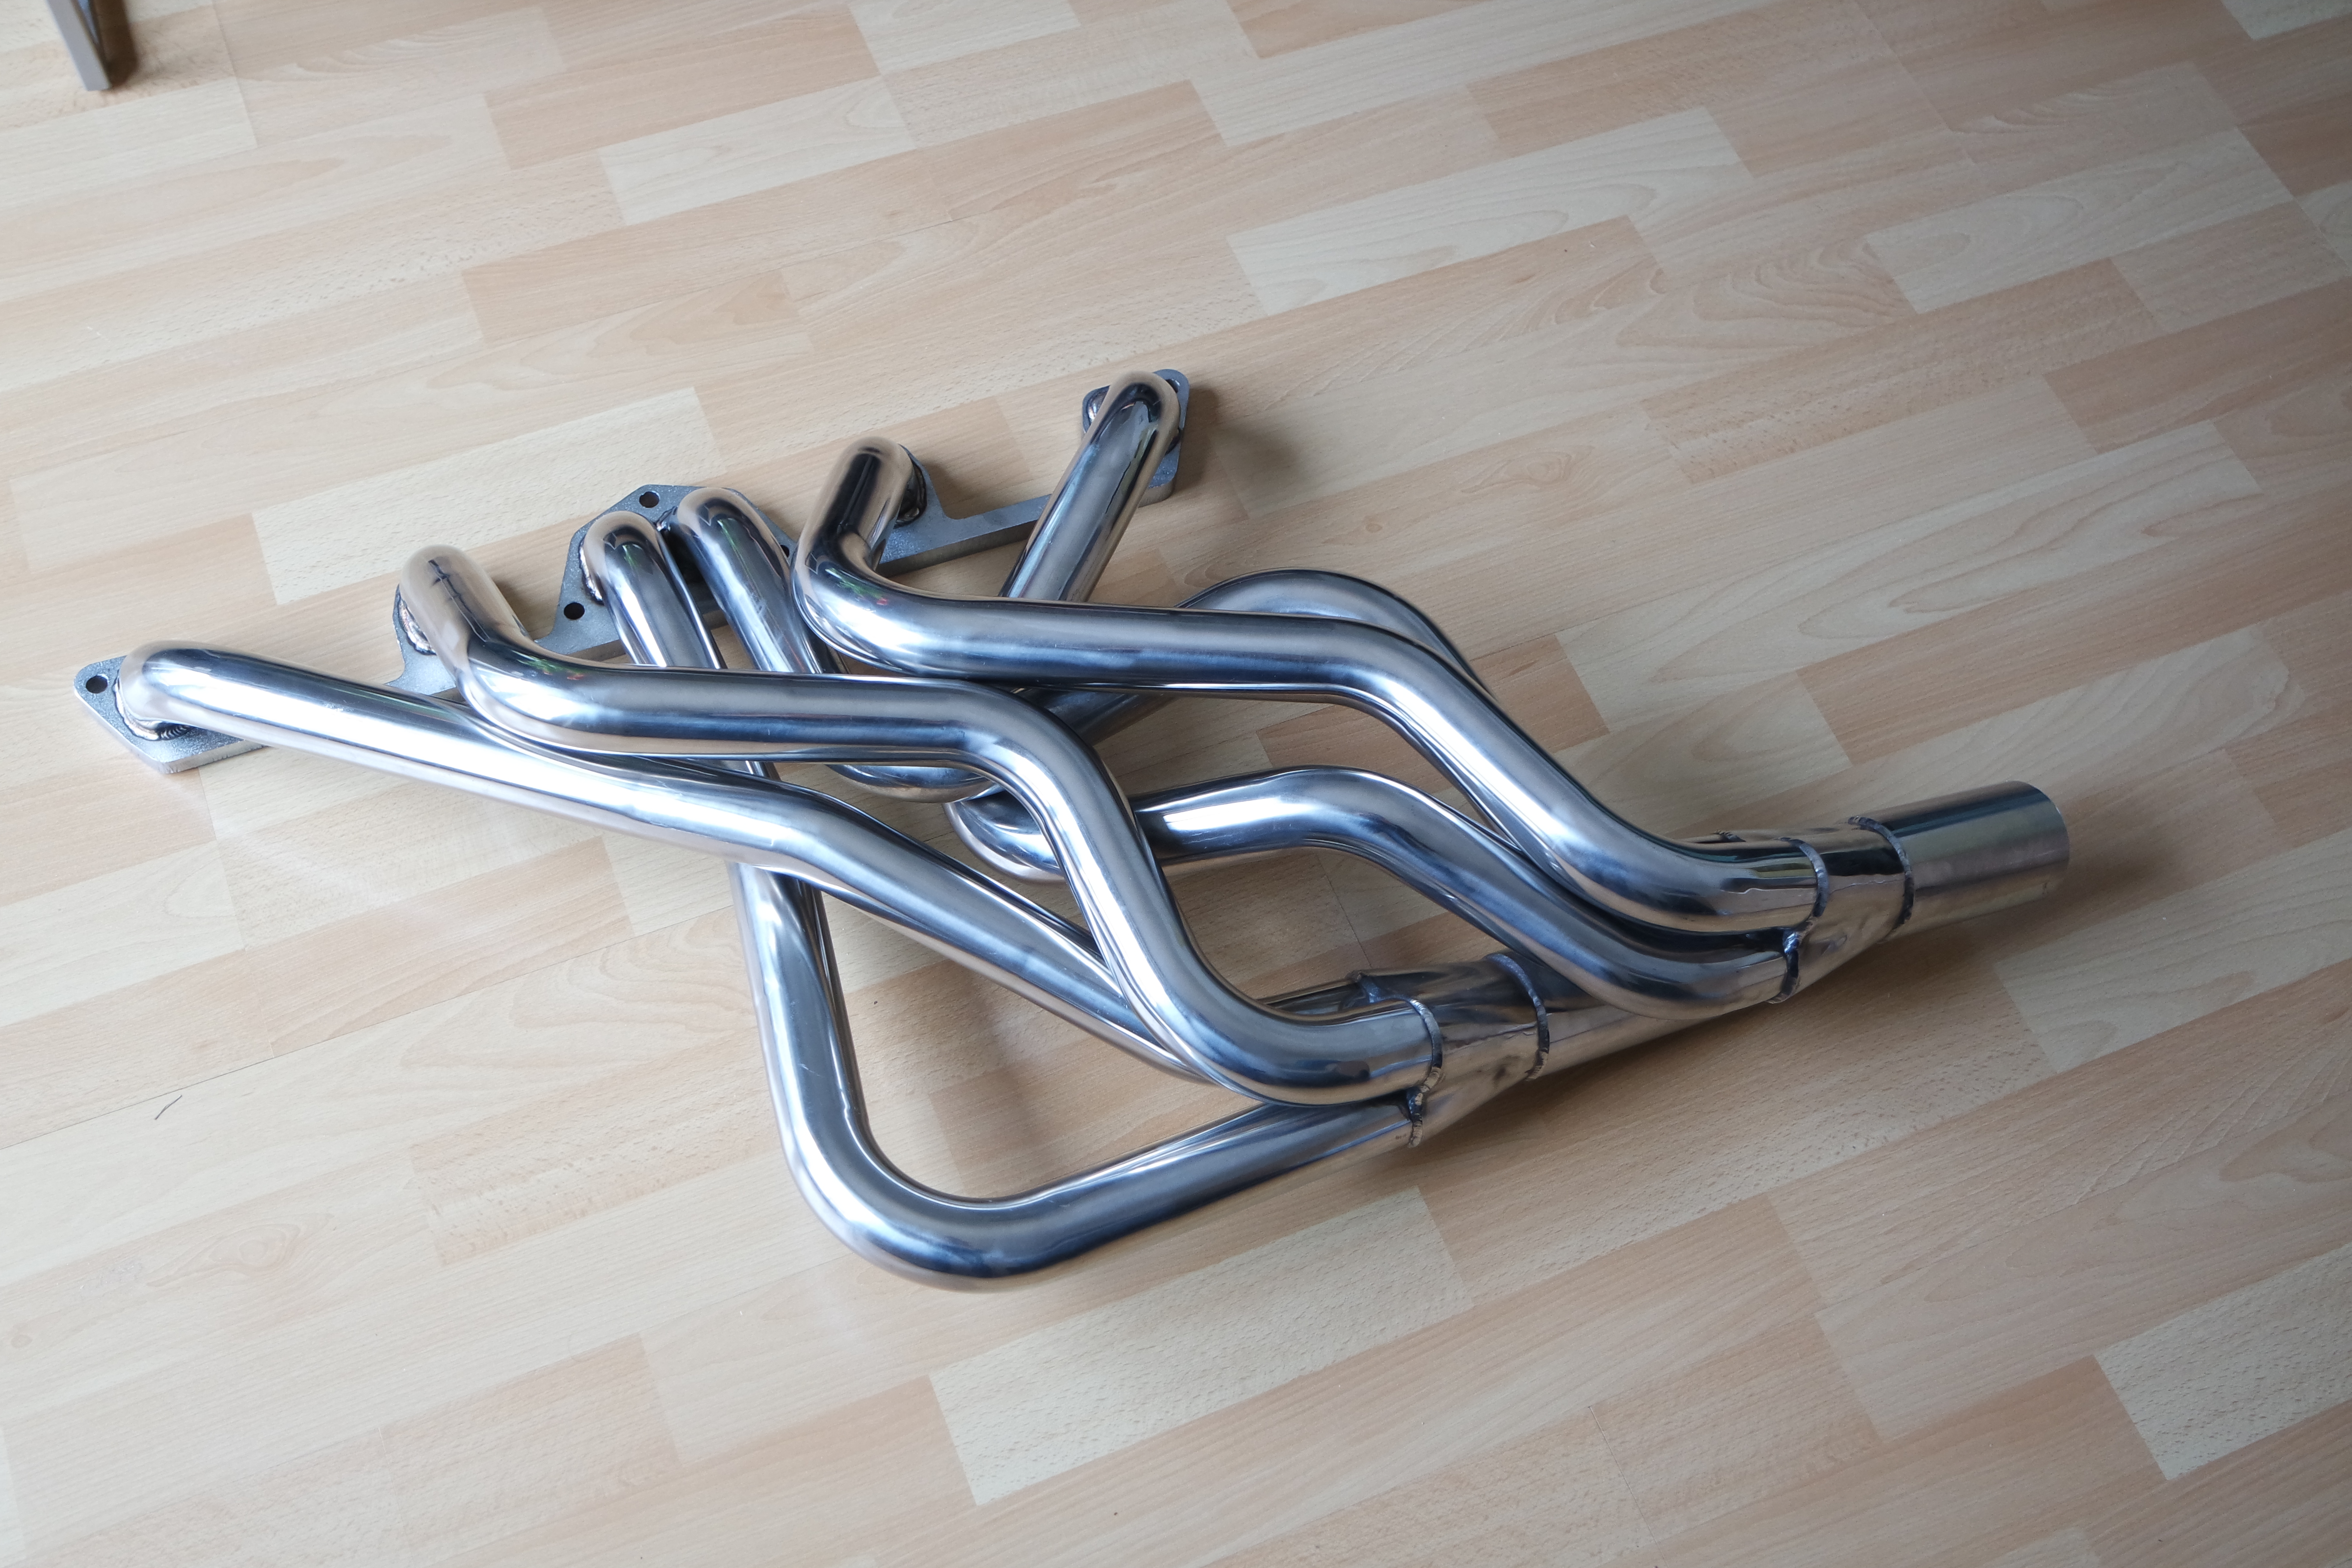
Update: I got the crank back from the specialist. Now it is back to specs!! Before: 0.17mm (0.0066") runout After: 0.01mm (0.000393") runout All the main and rod journals are exactly at the lower wear limit. I'll use standard bearing shells then. I'm actually quite impressed how everything turned out! I also received a big package with Sean's (Zstory) stainless steel exhaust systems with sport/race equal lenght headers. The "muffler" looks quite nice I'm not worried about my car being to quiet anymore.
.thumb.JPG.3fd6a93674c0d7712e19d1c4ef413f1b.JPG)

.thumb.JPG.9b08586fd15b2cb804d25cfc13509693.JPG)
.thumb.JPG.42bf95b2df1bff18daa3aa4c91b953e6.JPG) 1 point
1 point


.JPG.e466319f02c56bce4462547a72eb0af1.JPG)
.JPG.0d9c98fd61ff95278370588efb3bdbec.JPG)
.JPG.dff864bd0dcced9b23ec2bc64cbe1319.JPG)