All Activity
- Past hour
-
 First of all, thank you for all the amazing and detailed information. Apologies for the slow response. I had a bunch of trips. So here is where I am at. Half idiot and half mystery. Idiot part-I put my phone on the Hazard light and defroster switches and turned them on. Hazards on wasn't my first instinct, because only one side was blinking. So I started diagnosing it as a blinker problem. After I disconnected the Hazard Unit to prevent it from draining the battery, the defroster still managed to kill the battery becasue I hadn't figured out it was me hitting the switches yet. So next step, solve dead battery problem. Mystery part- Both blinkers don't work (lights and dash indicators) now when actuated by the turn signal stalk. But the left one is the only one that works when the hazards are on (still does that . Fuse is good, bulbs are good. I checked the stalk before like I said and it seemed good. I can take it out again and do a pin out with an ohm meter next. Open to suggestions. Thanks, Adam
 -
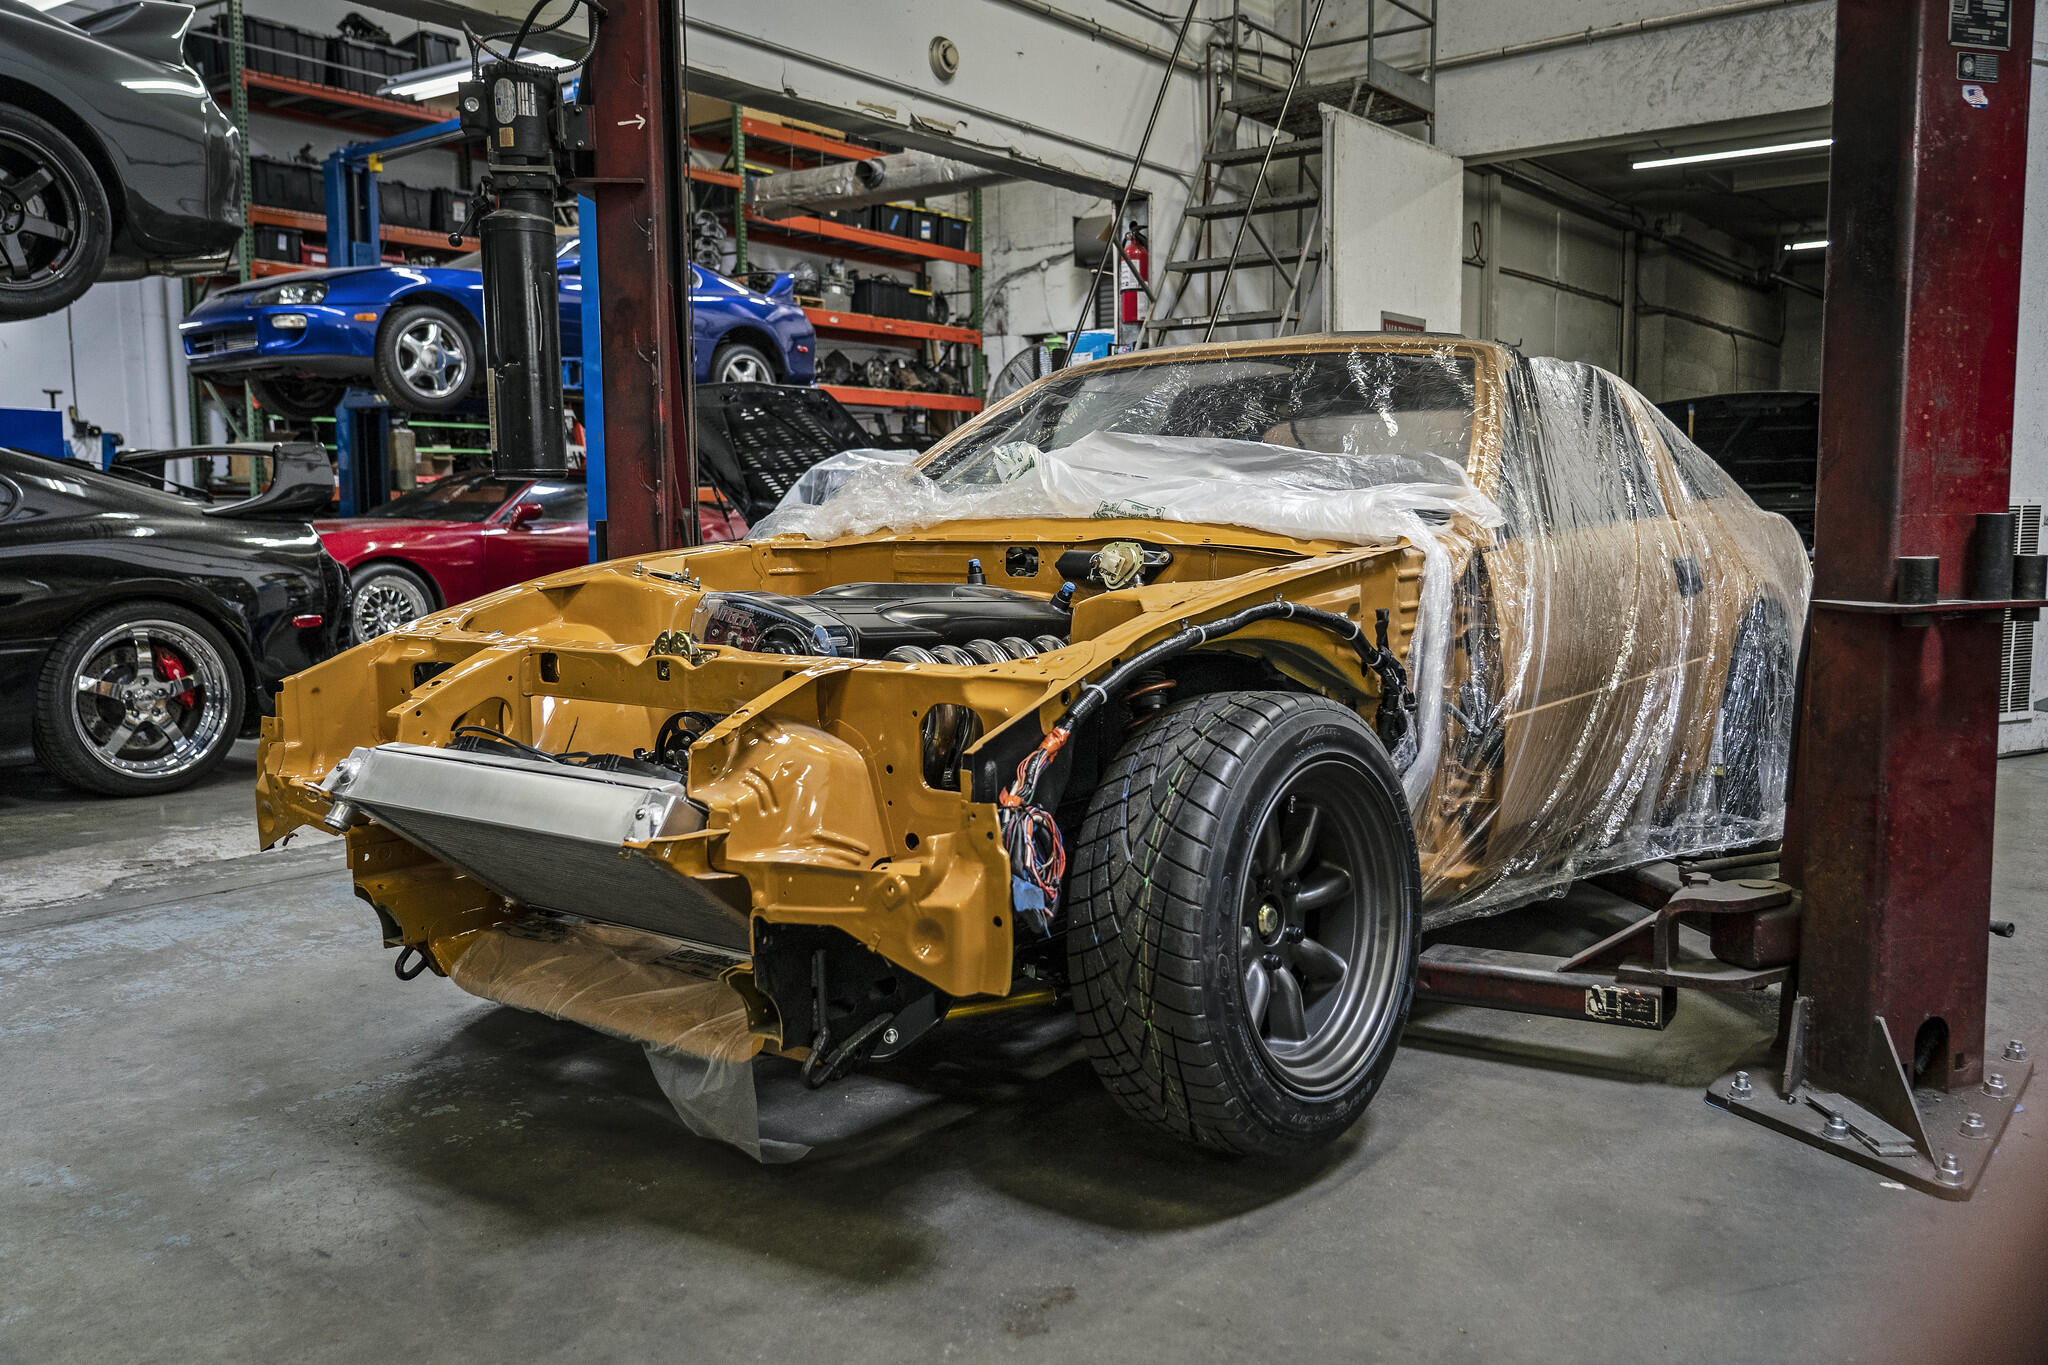
 A true beast, so very well thought out. Awesome work! Safari Gold rules!!!
 - Today
-
Thanks Guy, but I am disinclined to follow someone else's work in this case. In his ebay post I noted that he "modified" plastic connectors and the metal base. With all of the switches I have refurbed I have not yet found a need to modify the OE components - sometimes replaced with new or from the parts bin but never modified.
-

-
 zephyrtobias joined the community
 -

- Yesterday
-

-
 So, can we think up some simple tests to run, maybe at the flasher or the plug itself, that might show low resistance through the turn signal circuit? Or high resistance at the contacts. Any chance the flasher itself is pulling too much current? Or do we just assume that the cleaning and modification was not well done? Seems like the sliding contacts must have got gummed up. This is actually datsuniverse writing -
 -
 Jeded joined the community
 -

-
-
Electrical principles can be difficult. datsununiverse might be more of a mechanical person. If he cleaned up the switch and rerturned it that seems fair. Sounds like he's saying that he doesn't really know what went wrong. People often get voltage and current mixed up. I found his eBay store front but don't see a web site. Can't tell what "rebuilt" means. https://www.ebay.com/str/datsuniverse
-
There's some BS going on here. 13Ax14V=182W. I'm not sure whose backside produced a 13A figure. There are 2 (two/dos/zwei) 23W bulbs and a 3W bulb (on the gauge) in the circuit. Please invite the person who gave you that response to come here and show the testing. Until proved otherwise, I posit that someone is covering up for shoddy work. I am interested if someone can make me eat my words. I'll see if I can set up my scope with ammeter to look for transients that even come close to 13A
-
Per the recommendations from @Zed Head , here are two excellent upgrades you can make to improve your lighting situation: Headlight relay kit: https://www.thezstore.com/product/3861/headlight-relay-upgrade-harness-70-73-240z Parking light relay kit: https://www.thezstore.com/product/5031/parking-light-upgrade-harness-70-73-240z Take note of the fitment limitation regarding the Parking Light kit for the '73 240Z. Another improvement you can make is to switch out all of your small exterior bulbs to 3W LEDs. This would be front parking and turn signal, sidemarkers, rear tail light and brake, license. If you do so, rememebr to use LEDs that are the same color as the lens cover. If making this change for the turn signals, you will also need to swtich the OE flasher cans for the turn signals and hazard switch to aftermarket electro/mechanical units, a easy plug-and-play change. Your turn signal issues are possibly caused by the heat from high resistance in your wiring circuits: corroded bulb sockets, fouled terminals in the wiring, damage at the fuse block (check the underside), damaged wiring. Hope some of this helps.
-
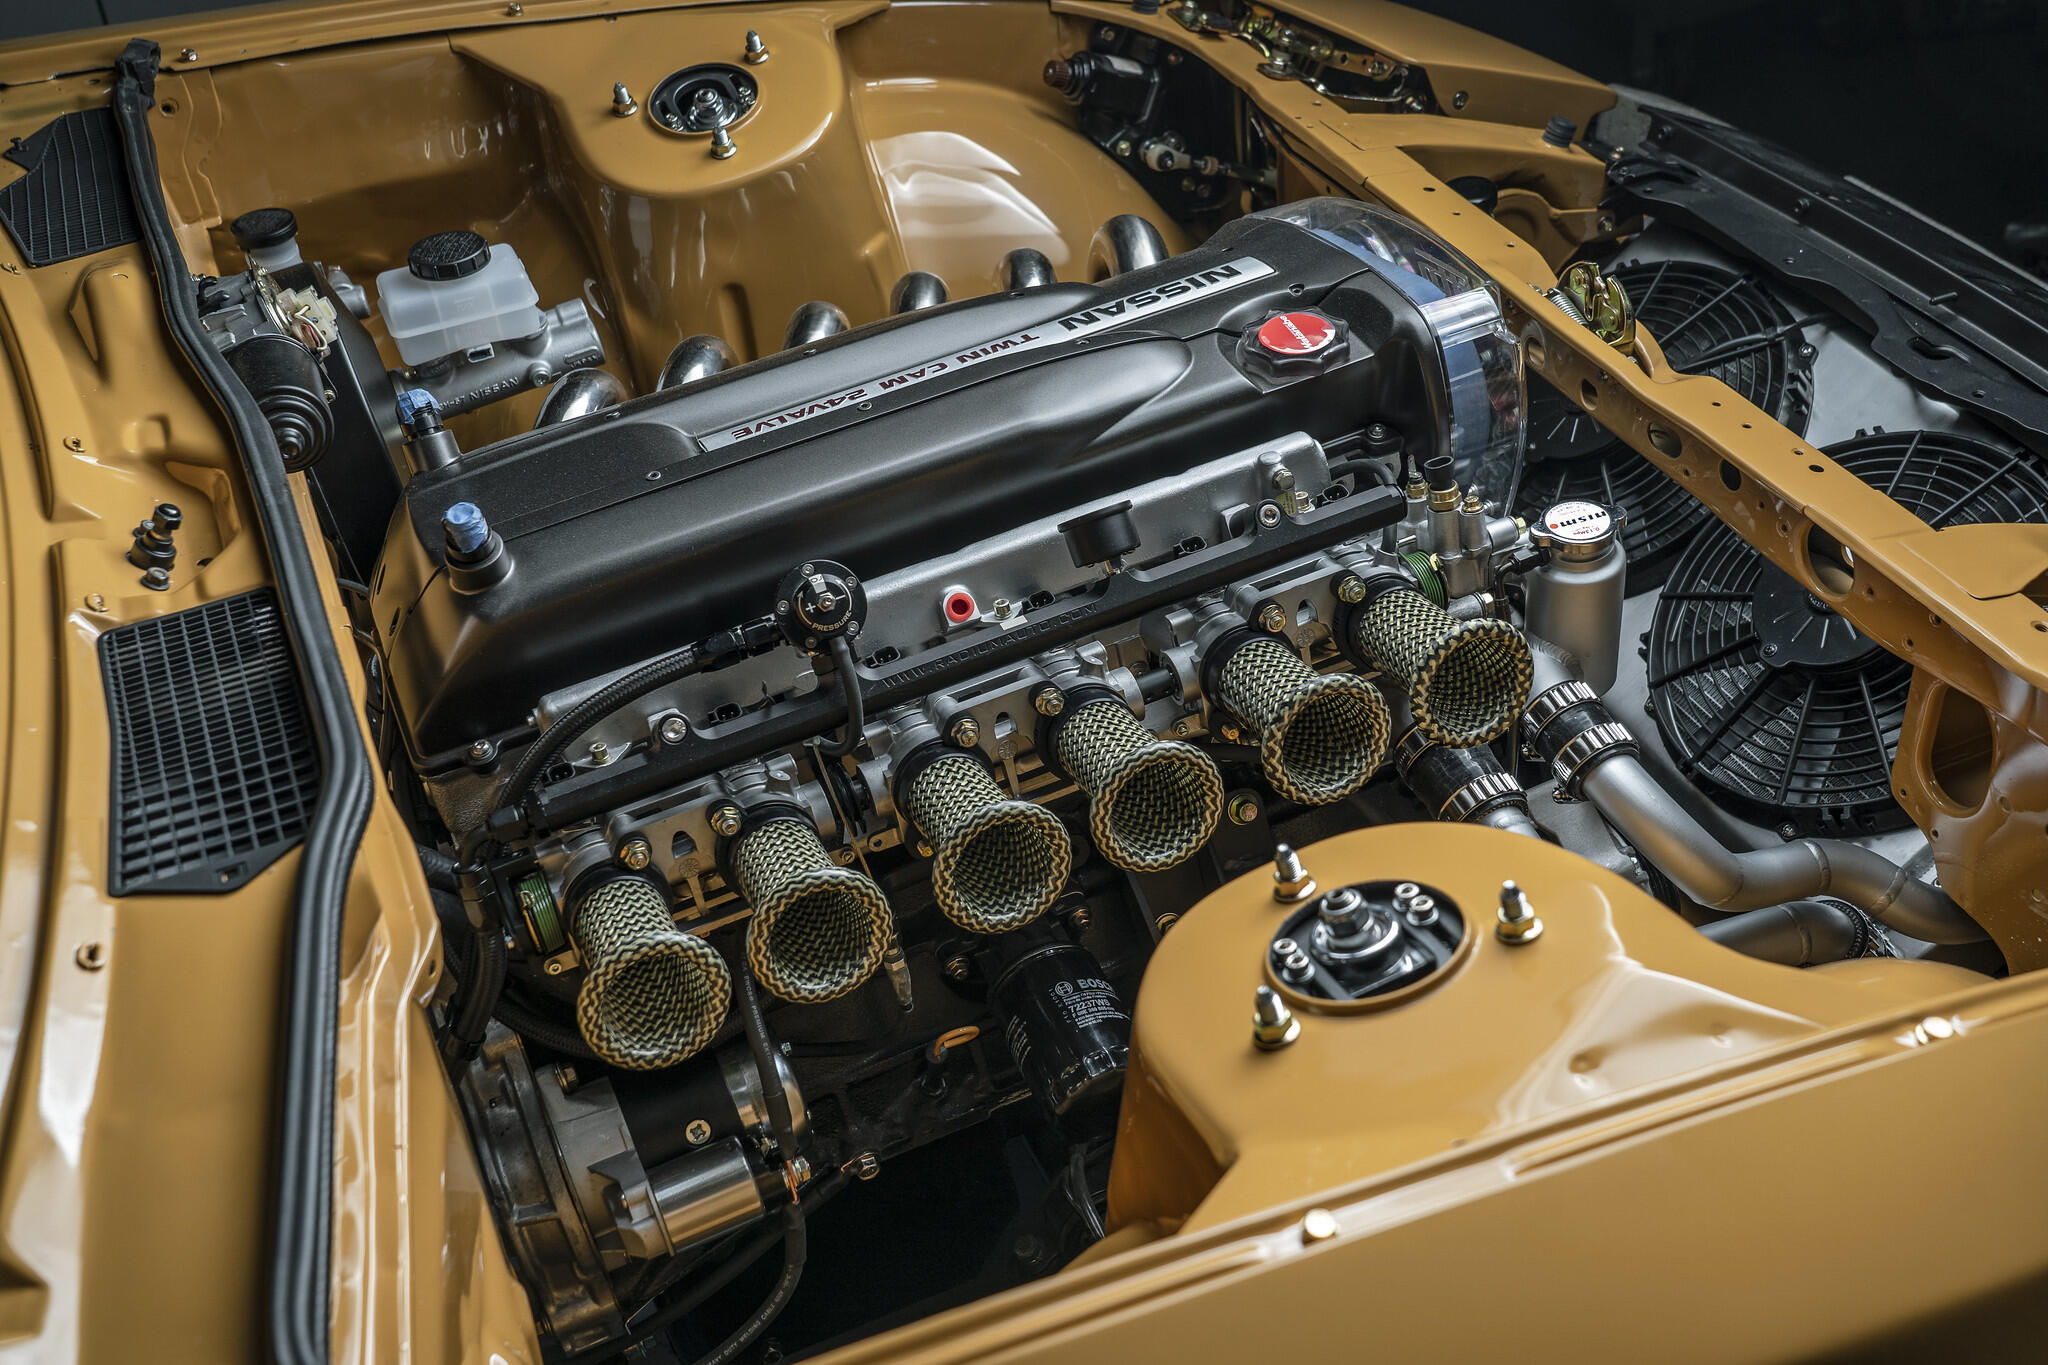
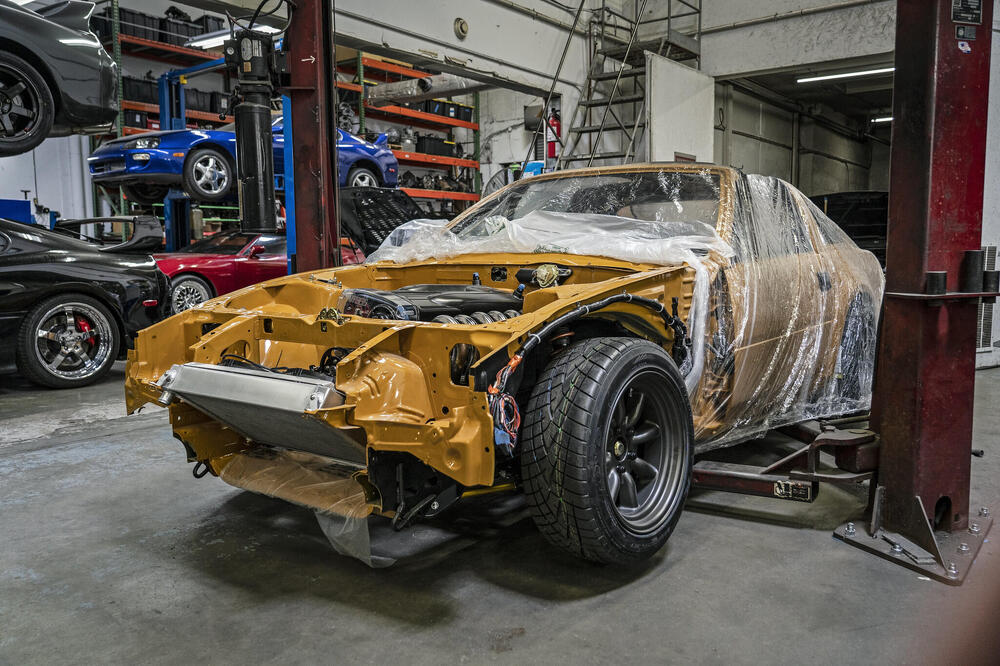
 Such a clean engine bay. Just stunning!
 -
 Hi @HusseinHolland! Any updates on this project? Curious, if you finished the 350z tranny adaptation in your 1st gen.
 -
 Happy to join conversations, exchange ideas, and gain fresh perspectives throughout the journey. I enjoy hearing diverse viewpoints and contributing whenever I can. Always open to different experiences and connecting with others. Here's my site-AutoMisto24 https://automisto24.com.ua/
 -
Thanks Marty…….The Z31 is amazing…..Brandon didn’t miss a beat! Pit and Paddock shot a poster of the 300.


-
 Lucy Lloyd joined the community
 -
I haven't seen much about turn signal contact pitting in my time browsing the Z car WWW. The headlight and running lights have a problem for sure, melting/breaking solder joints and burning contacts in the switch, but a turn signal switch problem I've not seen. But, the cure for the headlight and running lights problem is a relay so if your switch works and you want to avoid the problem in the future a relay would be a good idea. I haven't looked at a 73 wiring diagram closely but I'd think a relay in front of the flasher should get it done. I tried to take a look at the wiring diagram in the 73 FSM but, wow, it's hard to look at. Can't tell which side is the power supply side but a meter would solve that problem. On the other hand though, what datsun universe seems to be saying is that your turn signal lights were pulling too much current, causing the contacts to pit and overheat. Somebody handy with a meter might be able to test the possibility. If you did have a high voltage problem it would manifest in many other places also, so "high voltage" doesn't really make sense. In short, your problem is kind of unusual. Hope my thoughts help a little bit.
-
 Pace yourself guys!
-
 When i did my restoration project on my 73Z I purchased a rebuilt turn signal switch from datsun universe. It worked great for about a year. The other day I started having problems with the turn signal on the left side. It would not lock in or illuminate. Everything on the right side worked fine. After checking all the obvious potential culprits, I contacted datsun universe and he told me to send it in and he'd check it out. Below is his response as to what he found and a potential long-term fix. My question is: does anyone know who may sell this modification or how to fabricate one. By the way, the guy at datsun universe is a great guy, very helpful, and fast turn around. I also bought a reconditioned headlight switch from him as well. He does all the rebuilding himself. Datsun Universe reply to me..... "Hello Paul, the attached picture illustrates what your switch issue is; too much voltage coursing through the switch and fouling the contacts. This is a normal issue for a 240z. When I measured continuity on the left side turn signal switch it fluctuated between 35.xx ohms and 65.xx ohms. Anything over .19 ohms is going to start causing problems for switch operation. I knew I was going to find something like this when I opened the turn signal switch up. The long term solution for this issue is to invest in a 240z aftermarket plug and play turn signal relay harness. It only sends something like 2 amps through the switch as opposed to the 13 or so that comes from the stock direct battery hook up. I cleaned the contacts and changed the spring plate and turn signal switch housing and the freshly painted turn signal lever will dry overnight.. You have a good switch here; The turn signal geometry and parts thereof are good, the stroke of the turn signal lever is good. the lever locks in place like is supposed to, the switch return function still works etc. I would invest in that relay harness or learn to clean the contacts yourself ( s30 ZCAR switches are made to disassemble for maintenance) as my switch warranty is voided by vehicle electrical causing switch damage so that is the end of my commitment concerning repair of your switch". Any help would be greatly appreciated.
 - Last week
-

-
Check the vacuum hose to the FPR for fuel. If it's original it's very old and the diaphragm can crack and leak fuel internally. It shoots straight in to the manifold. Also, your ECU is not likely to be 79 since that would be a ZX and they are wired differently. Unless somebody swapped in a 79 EFI harness also. A 79 ECU will plug in to 75-78 but won't work. I found that all ECU's from 75 through 78 would run my 76 with no problems. It's also known that bad ECU's often cause rich running. Broken solder joints seem to be the problem. But I'd check that FPR first. Also, have you measured fuel pressure? Welcome to "getting the old 280Z running right" world.
-
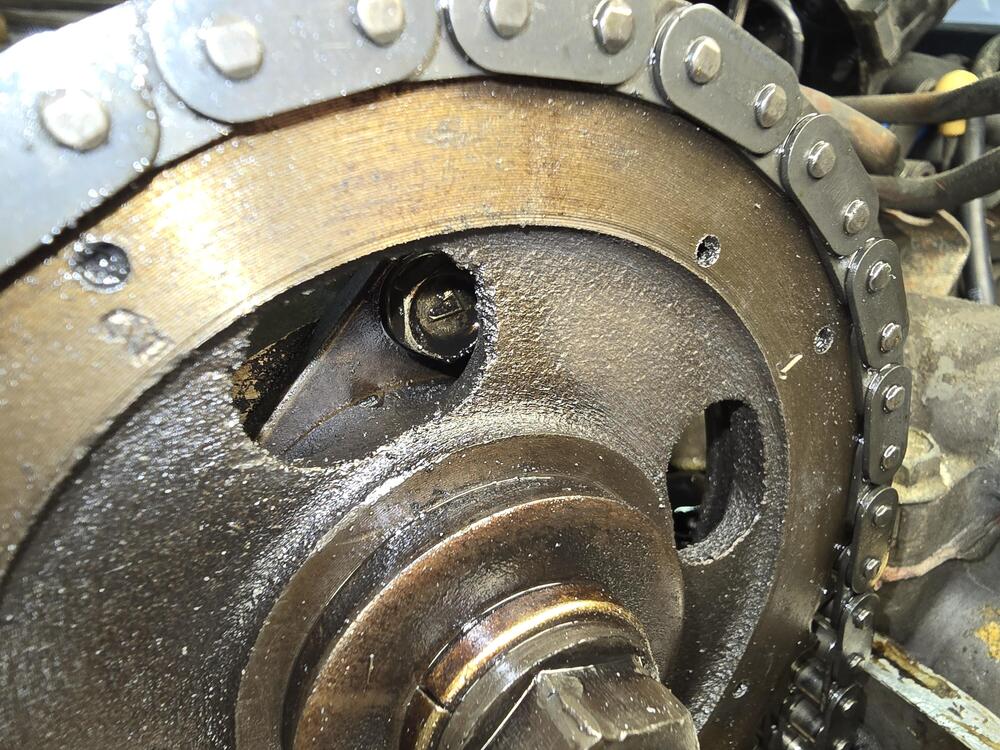
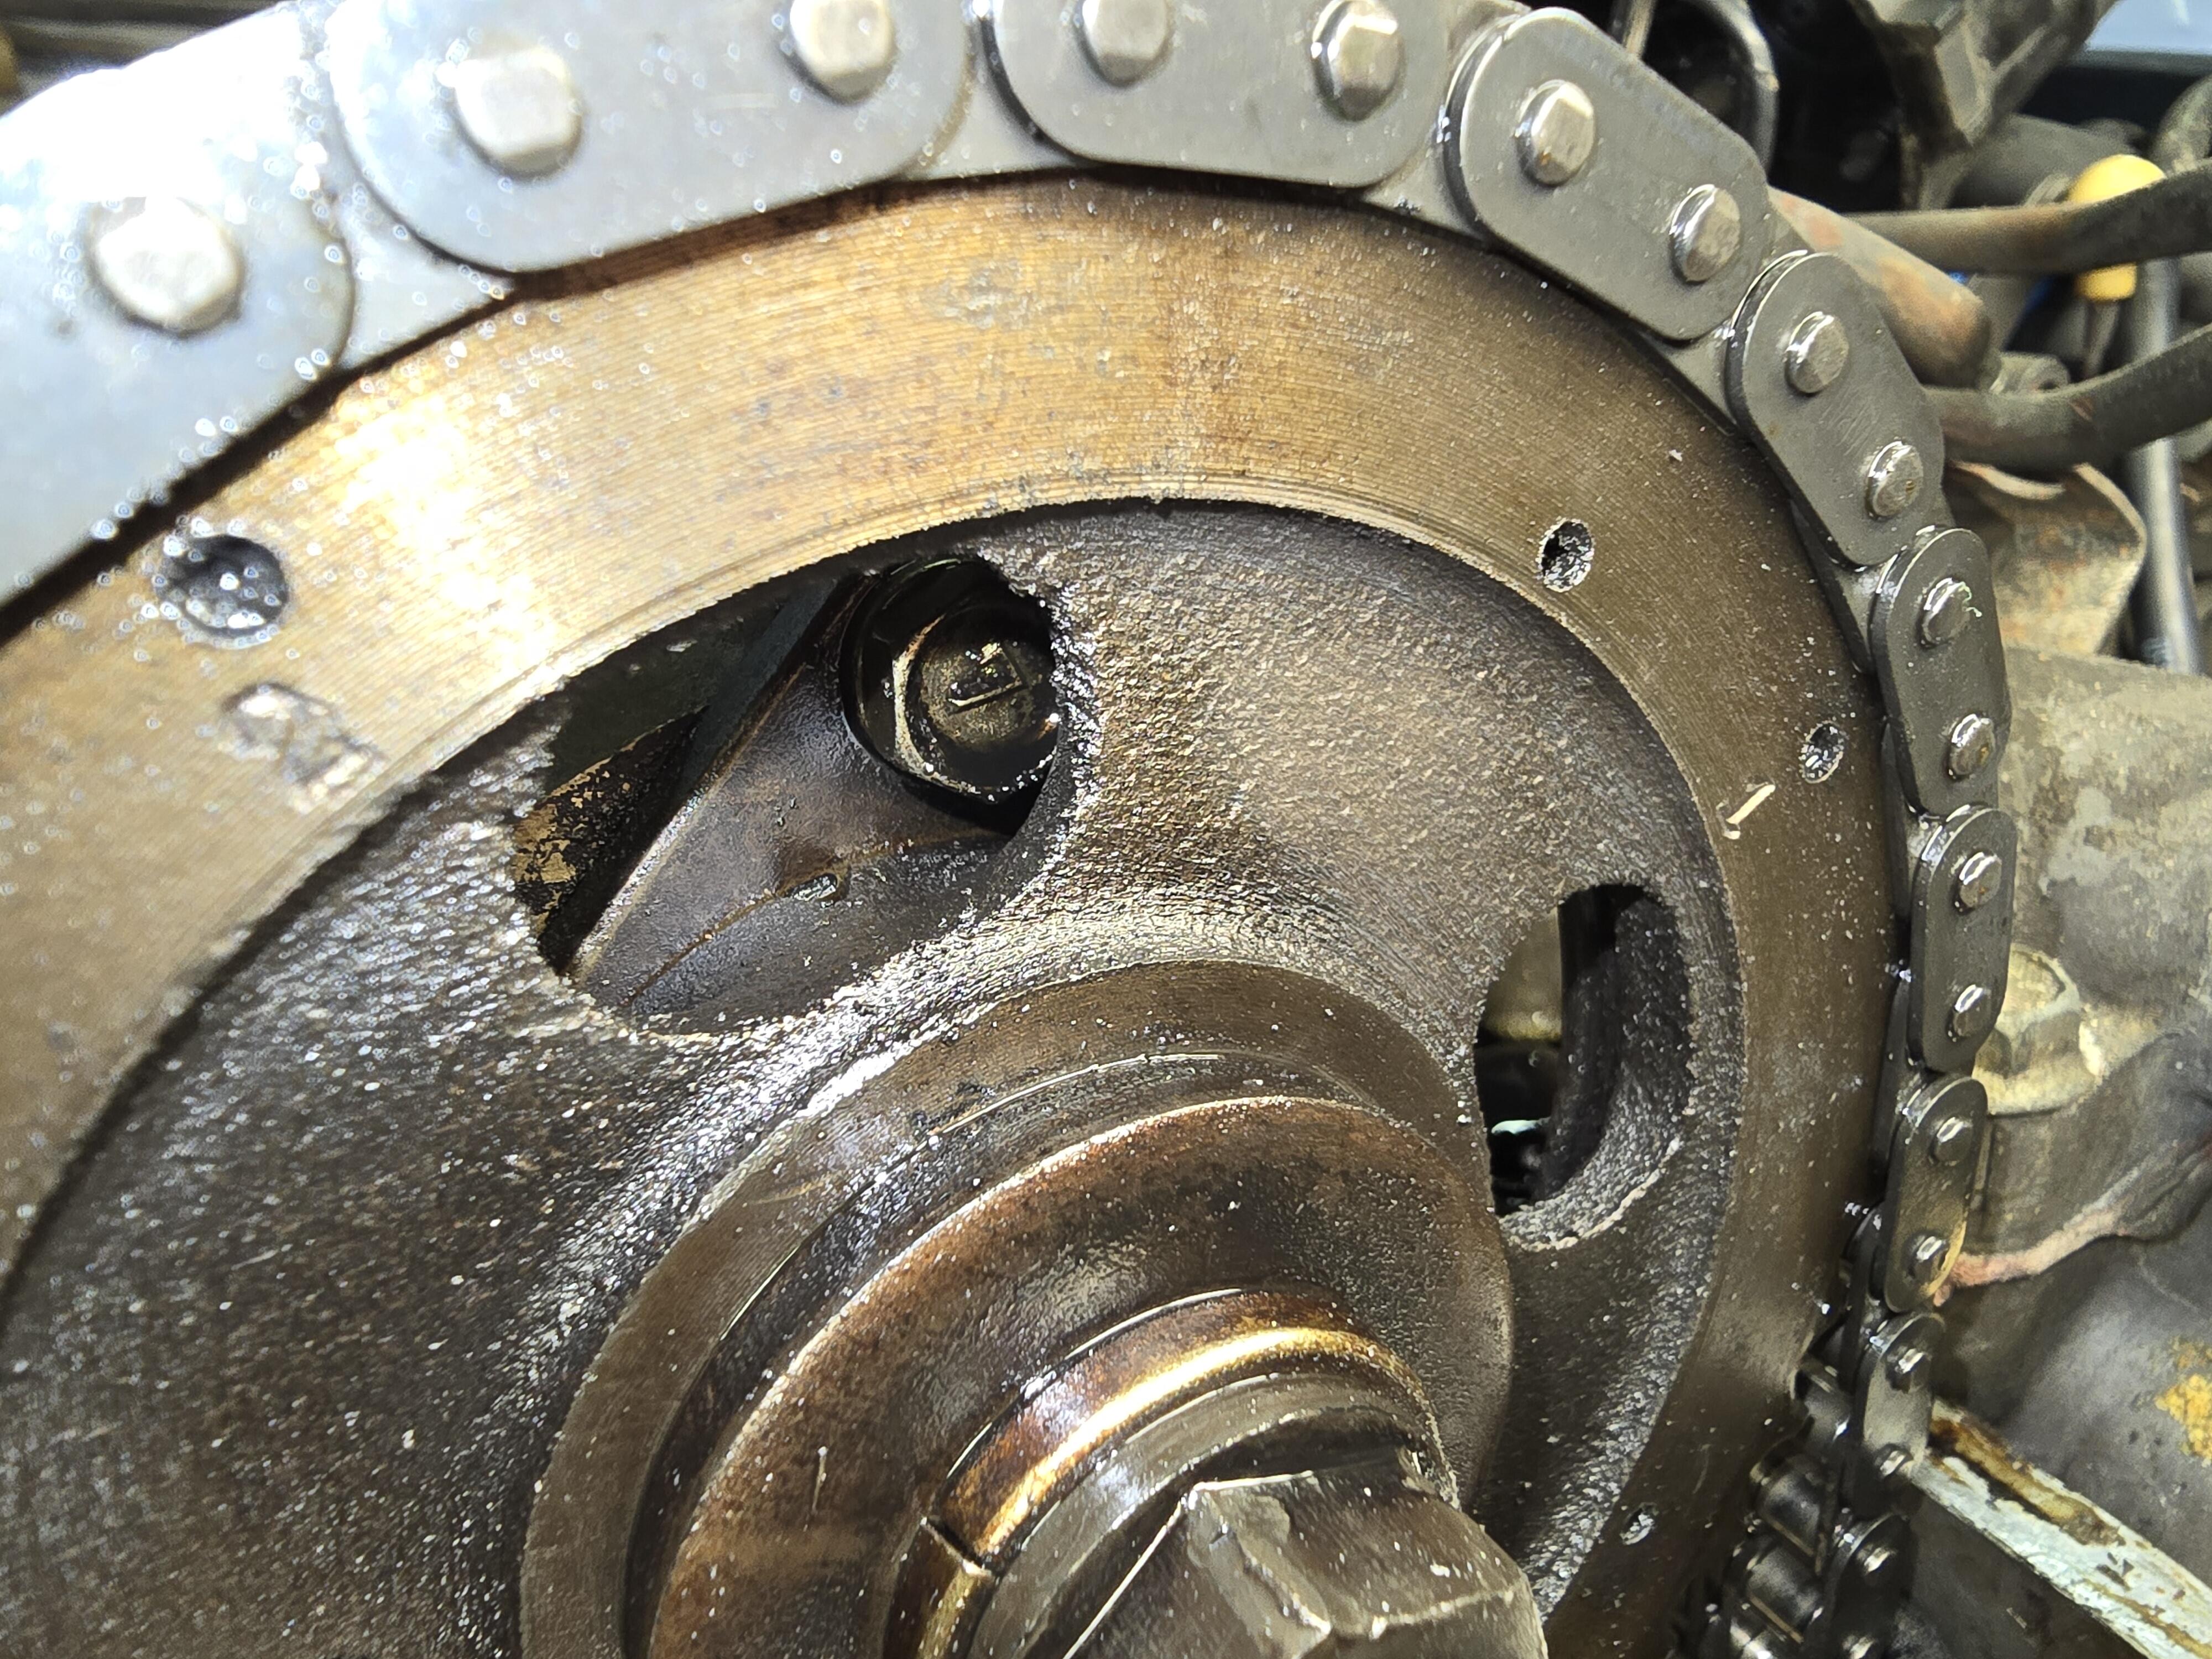
Found one! And just realized that I am obsessed with the notch and groove, I'm in all of the notch and groove threads. Looks like Nissan put the 1 on the right for position 1. So you're on position 1. https://www.classiczcars.com/forums/topic/49373-is-this-off-too-much/ Thread from which it came. https://www.classiczcars.com/forums/topic/56868-oe-camshaft-and-cam-gear-markings/
-
 Yes that made finding the groove difficult what led me to all this is the constant fowling of plugs, I have done all the continuity tests up to coolant temp switch and sensor ( which i have replaced) and the airflow meter ( which passed its on car continuity test by the fsm procedure. It would start and seemed so far out of time i could not get a reading with my timing light . Aswell the distributor needed to be maxed out at advance to get close to an 800 rpm idle . Any attempt at driving it results in instant heavy plug fowling, dry thick black soot , (massive extra fuel there ? ) the ecu has been replaced as seems to be for a 79 manual ( i am a 77 manual so who knows how that is doing well or not) any opinions are welcome and all the advice so far is greatly appreciated. I have a small towing company in sanford n.c so I would be happy to help any local members in that area if I can. Its a cool car and I hope to get to a reliable state so someone else can enjoy it as much as I have enjoyed these z 's. Thanks again everyone !
 -
I've been looking at that Nissan drawing for years and I keep realizing that they put a lot of information in it, but it is still unclear. In the "Before" picture they show the number 1 on the right side and number 2 on the above left, on the perimeter of the sprocket. In the after picture the 2 is where the 1 used to be and 3 is on the left. But they don't clearly say if the before picture is the 2 position or the 1 position. It would make sense to have the position hole at the top. But they don't say. Anyway, based on the notch and groove your cam timing is correct and you should be fine. You're about halfway to needing an adjustment. It is odd though that your groove is below the perimeter of the sprocket base in that picture. Also interesting that there is apparently 16 degrees of play in your chain, since the groove did not move at all, but the damper did. Not sure what to make of that. So, there you go, much discussion but still wondering. Good luck! I'm going to browse around and see if I can find an original notch and groove picture with numbers. Maybe somebody has one?
-
Ok I tried to get a better photo and took the advice to set my marker at the crank on zero .this on compression stroke as indicated by the distributor being at no1 cylinder postion . It looks like the window is lined up with cam plate near no. Cam postion , does this mean the Cam has been adjusted to the second postion for chain stretch .?