All Activity
- Past hour
-
 Good deal! Keep that hammer handy!!
 - Today
-
That scissor jack is a life saver. Used mine over and over for many applications?
-
 Haha ya, I considered it, but at nearly 800 bucks, and for the first time in more than 15 years decided to pay a local shop to do the work to save the time of doing it myself. They dipped, prepped the inside, and painted the outside and for 500 bucks I'd expect some quality work. I wasn't happy with the job they did and basically ended up redoing most of it myself anyway. In the end, would have save more money going with the S30.world tank Thanks @siteunseen ! Will take a read through that once I wrap up the tank
 -
 Steve thanks for the comments. Yes, I am sure that the tank is the right size. I have several photos comparing my old one with the new tank. Not sure that I want to go for the trans jack just yet but that may be an alternative. Yes I've lifted the tank until reaches the top. However I've been working mainly with the end opposite the fuel filler end. Getting the fuel filler end in place first may help since that was the hardest to get apart. If there are additional thoughts I'm all ears. Thanks Rodger
 -
 When you click on Zed Head's link to atlanticz find TPS Adjustment and see if any of that sounds familiar. There easy to fix once you where the vanes are supposed to be. Oh yeah. Those AFM black covers get popped off and on all the time. I can't remember the times I've read on here of people screwing with the wheel and wishing they hadn't. Look for those factory silicone blobs.
 - Yesterday
-
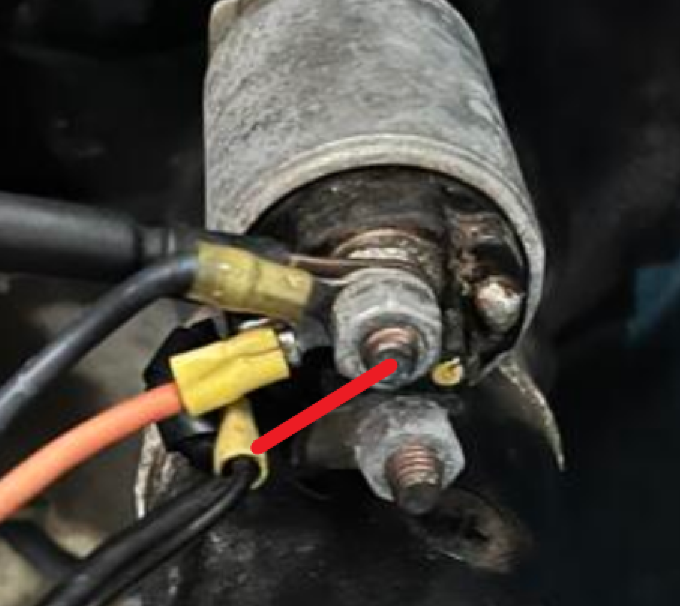
 Big thanks for the info! I hit the solenoid with a hammer then used the screwdriver method and the starter turned.
 -

-
-
What i mean by " rough" the car starts easily, ( with an unplugged cold start injector ) , the car ildes fairly consistently, it does not stumble when settling back to idle it just sounds like a lumpy cam in an old Chevy or how the engine sounds when you retard the timing too much at the distributor . As for the afm I have not opened it up but by the look of the copious amounts of silicone holdingthe cover on i beleive someone has.
-
-
-
 Eats, shoots, and leaves? Eats shoots and leaves. Runs, but rough. Runs butt rough. Just kidding. Are there any glue blob marks on the AFM adjustment screws? Match them up if you can find them. Nissan placed a blob of silicone on the wheel after it was set at the factory. What do you mean by "rough"? At idle, during cruising, during acceleration? It's fairly common for the 280Z's to run lean. There's a modification that can be done, described by Blue on his atlanticz pages. He also has an AFM "reset" procedure for AFM's that have been messed with. https://www.atlanticz.ca/zclub/techtips/EFI&fuel.htm
 -
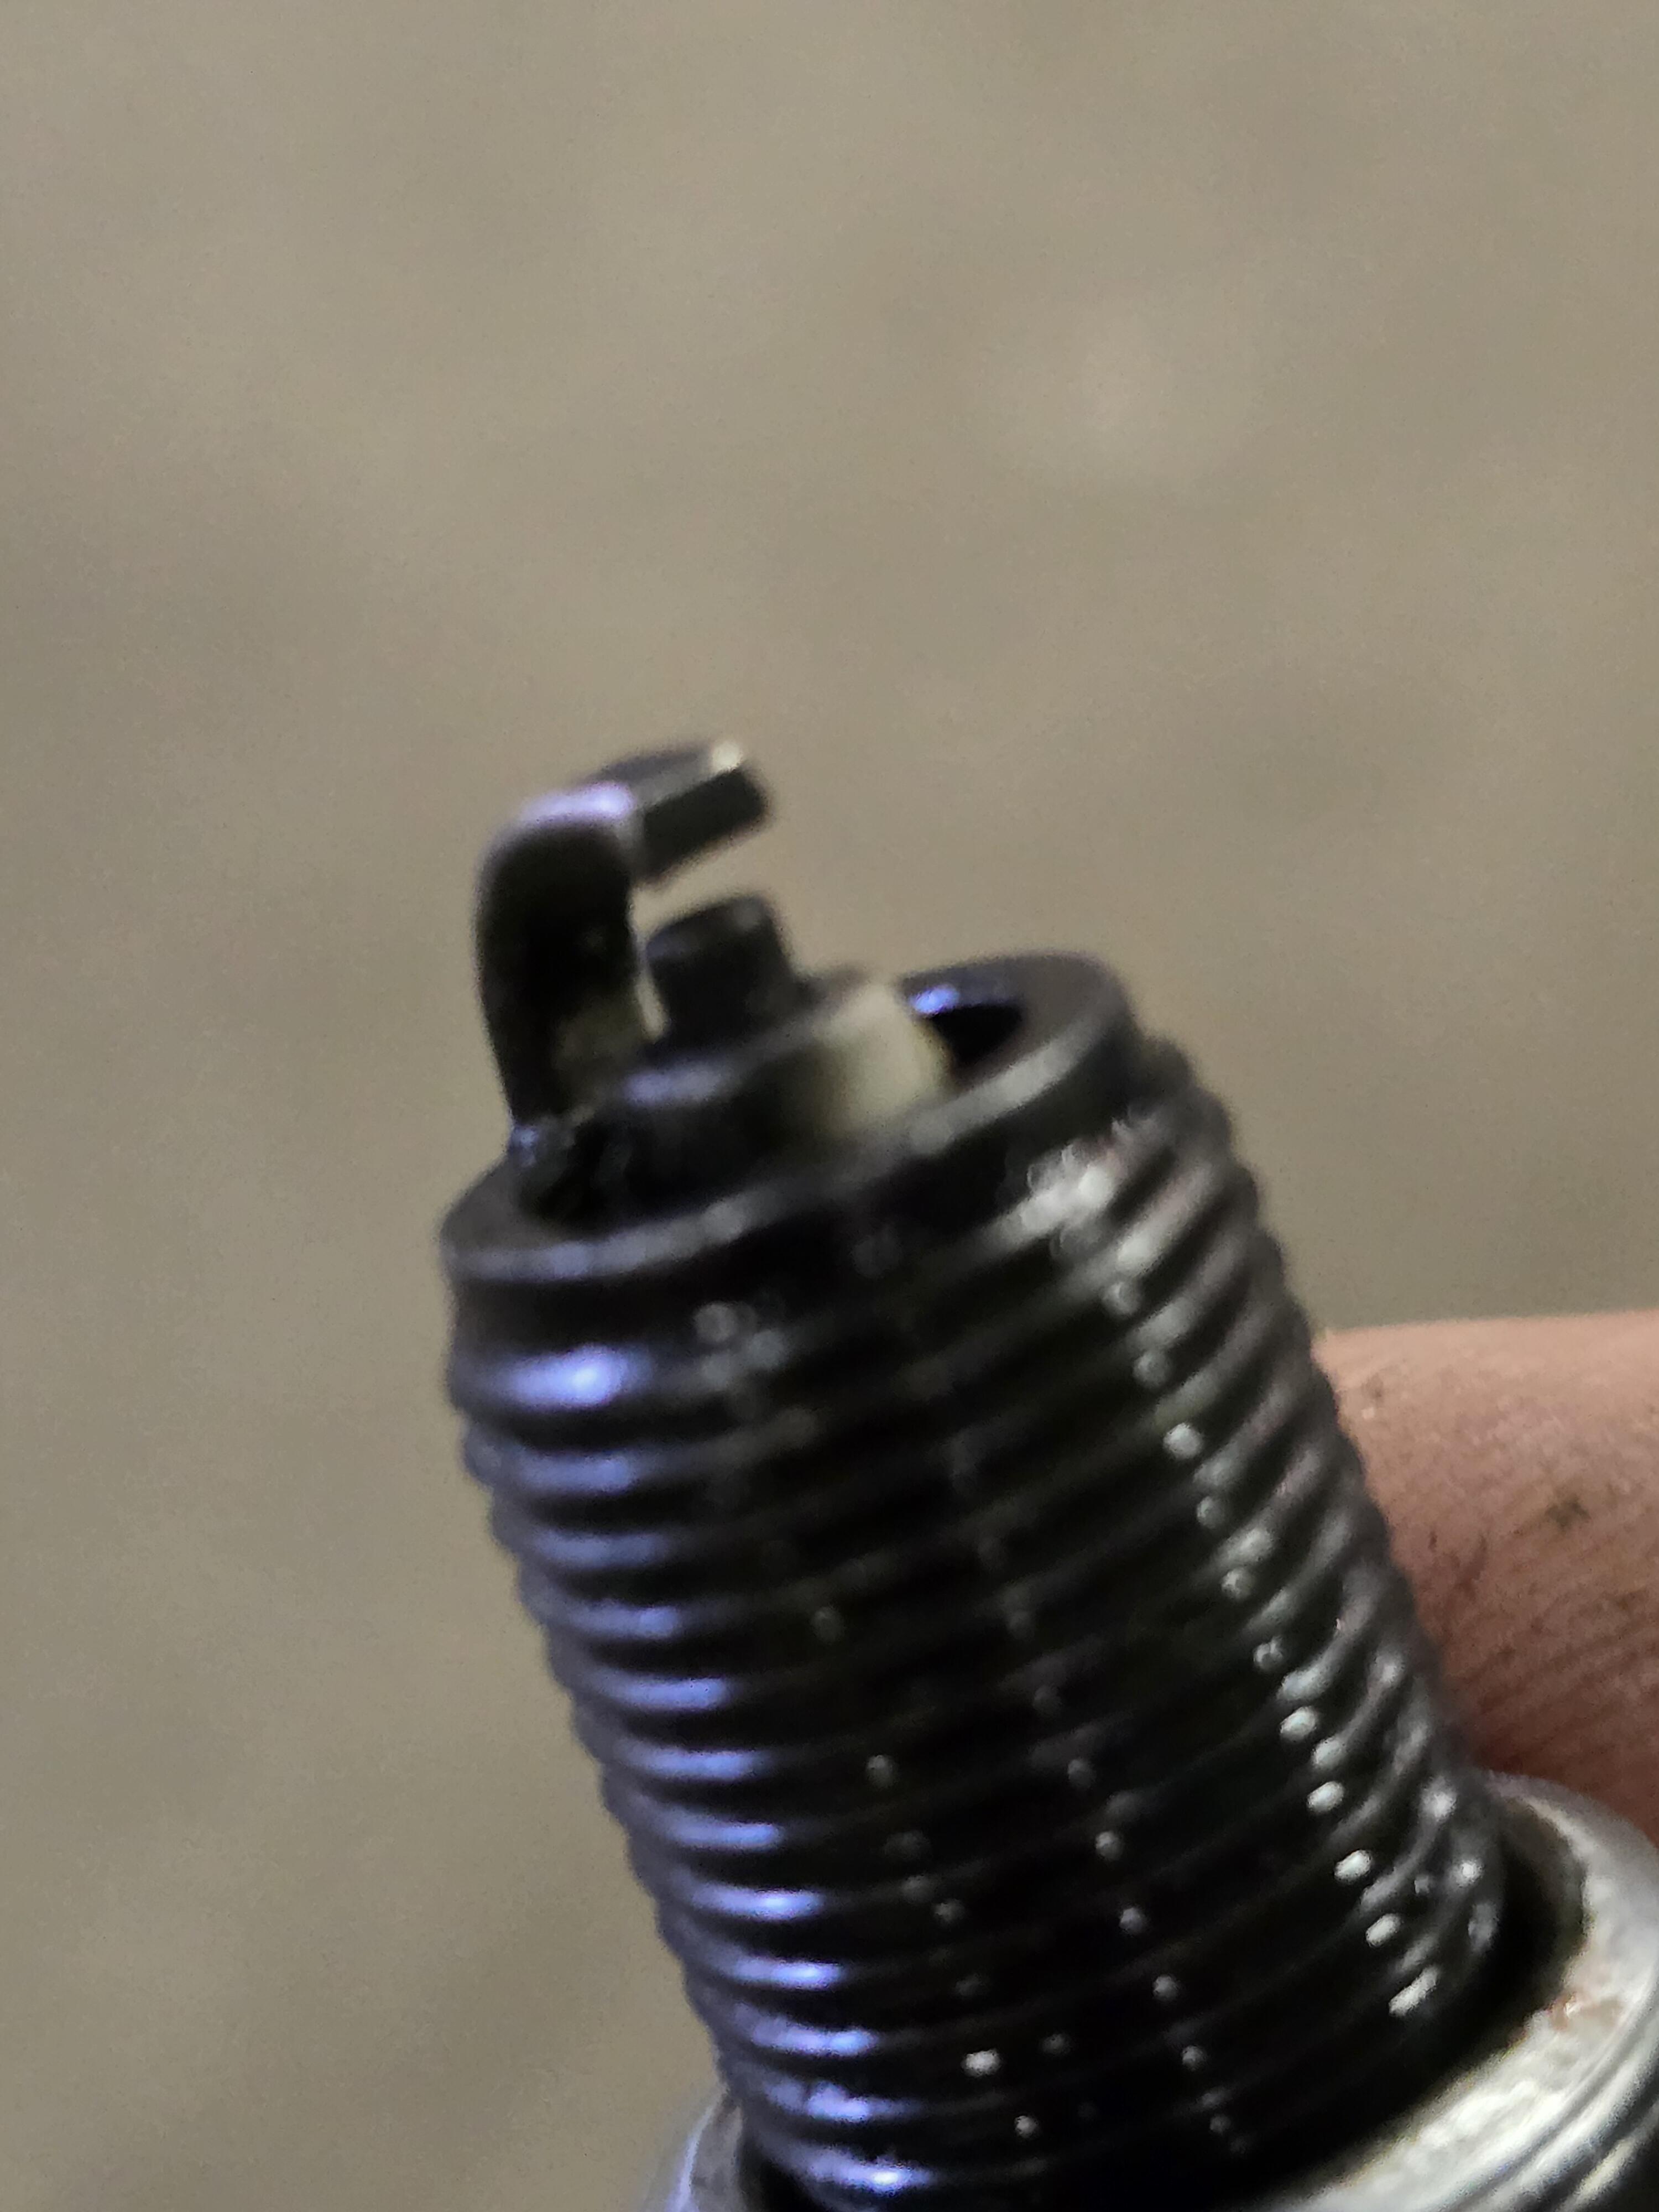
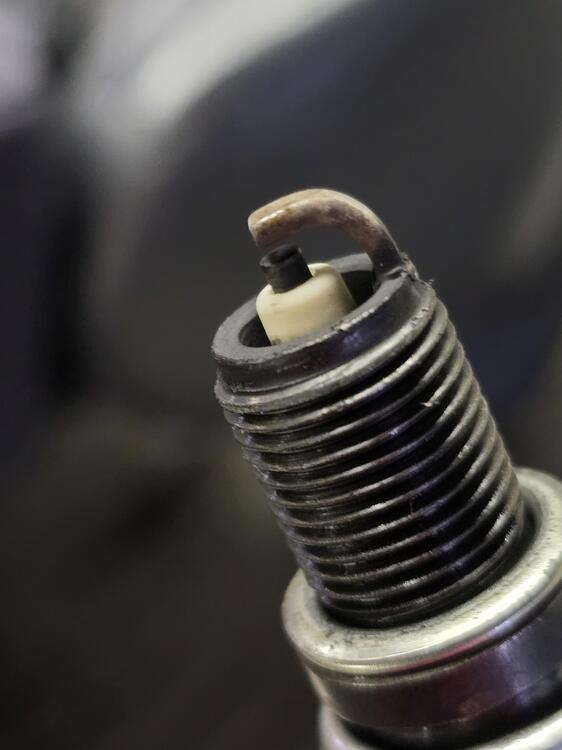
Hey everyone! I'm happy to say my datsun runs well enough to drive, however I beleive it has two problems . So I have a new regulator, new plugs, new injectors and checked the plugs and looked perfect, milky white insulator and electrodes looked polished ( too lean?) Literally the electrodes and ground of plug look like shiny bare metal . This is interesting because I began this journey with plugs that looked like dry dusty soot . (( Hella rich) so, also have new temp sensor ) i beleive someone has changed the afm settings in the past I welcome any opinions . So my question is should I consider the preload or the postion of the door. It is clear someone has been in afm . Thanks also it seems plug three is splash fowling but that's another problem I guess

-
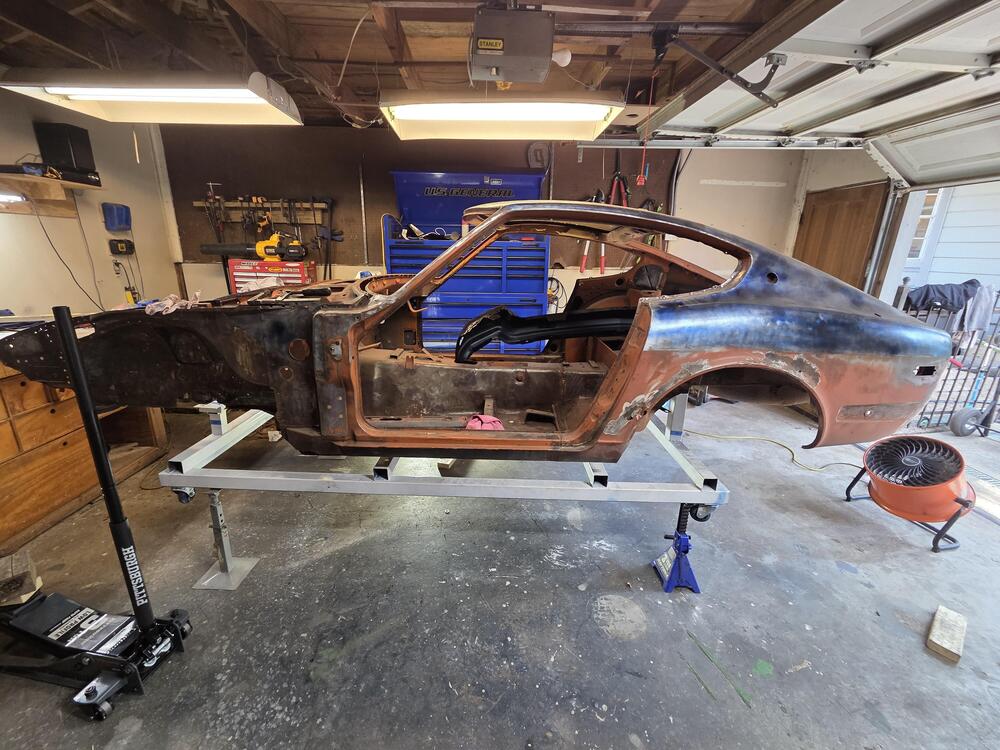
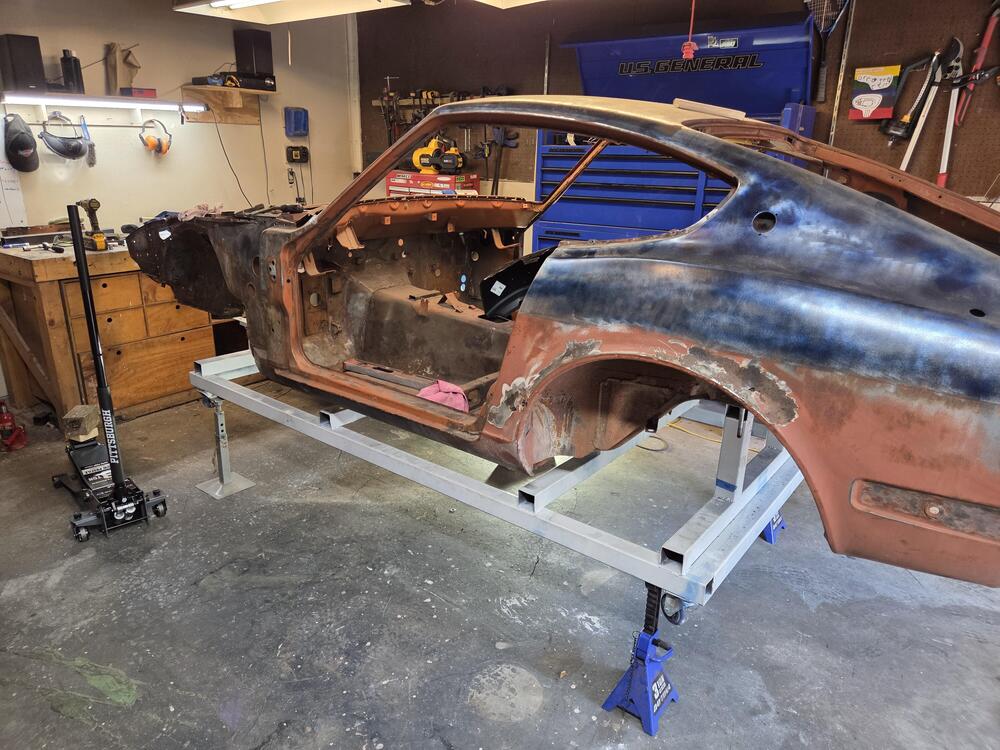
 Ok. Replying to myself in order to hopefully help someone else out in the future. This was SUPER painful to work out but the correct measurements were. From back to front: Rear of rear diff/lower control arm mount to front of rear diff/lower control arm mount: 456.5mm. This is 465-15+6.5mm. Next is front of rear diff/lower control arm mount to gearbox mount: 1434mm. This is 456.5+15+962.5mm The last one is from the gearbox to the strut towers. Mathematically its 2387.8mm..... This is the number that doesn't work. It comes from 456.5+15+1585+331.3. With my car however this number is closer to 2401mm. For the above 4 points the vertical reference is from rear to front. 285mm, 69mm 86mm, and 130mm. (To underside of front frame rails). I've mounted the car, its very stiff and ready to be deconstructed ....
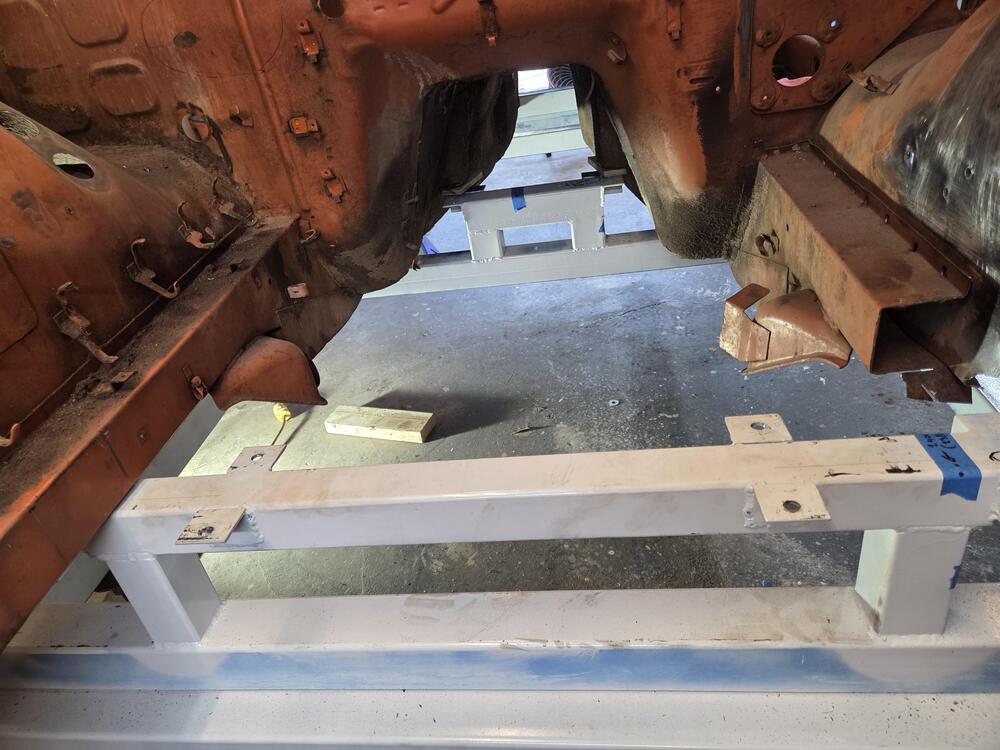
-
as @Zed Head said, pull the spayed ign. Off the terminal and measure the voltage. Black to Gand and red on the spade turn the key to start. I think that he's just answering Yarb's question directly. Seems like you're getting voltage/current to the starter solenoid. Leave the wire off of the spade terminal on the starter and use a jumper wire or a tool like a screwdriver to connect the main battery connection to the spade on the solenoid. You can also run a longer wire directly from the battery positive for convenience. The starter should actuate. If it doesn't then the solenoid contact has probably crapped out. There will be some small sparks and the starter will work correctly otherwise. Make sure the car is in neutral and nobody has their fingers or other things by the fan belt. If you hear a solid click from the solenoid but the starter motor does not spin that's a sign that the starter motor has failed. Yout starter looks pretty crusty. If you try this jumper wire method and everything works then you have a problem with the wire from the ignition switch.
-
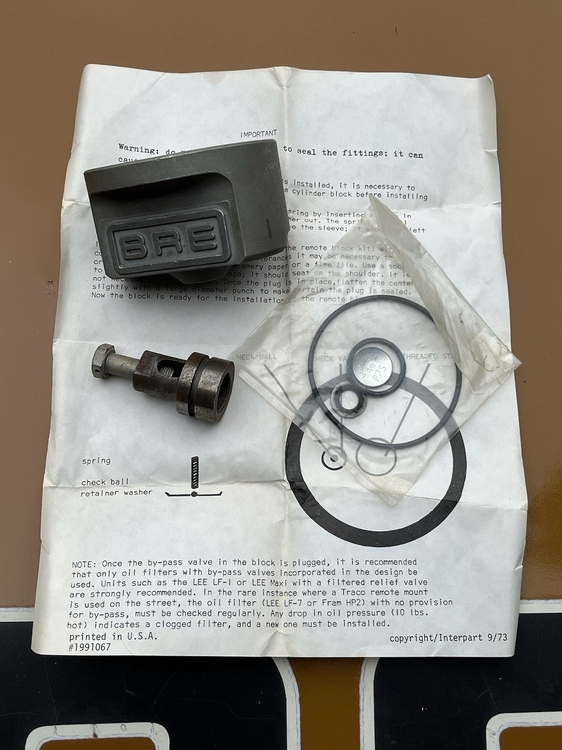
 Managed to find a couple of the BRE cast aluminum adapters recently. https://www.ebay.com/itm/317146279997?_skw=Datsun&itmmeta=01K22V8ZHVKDFD1YZ2R67FYVVG&hash=item49d764303d:g:5ZgAAeSwYvNokRsm&itmprp=enc%3AAQAKAAAA4MHg7L1Zz0LA5DYYmRTS30kCoKfIwvB5xxhwqLfQsN2nCxk2lPQjX3YKVMYwrxYpvqUj44P448Su9W0IOyv9xeIAWjVrCeP8Fr2QU1TY9e7pNLlaT0BG9tj5zLexgY7byGGuH2yDK0OiyU3vR5fkXWKKN3IQdcSYmXNnnPXjRhXS2So%2FSPgQZXBaYiIZLQCVX3X7Vna%2FqJOosiRjsA69htfeltceq2Cf7k2gmZCY6J8H8hKNyQdK0sBnsetXbfjln%2FMlmTzAAStHKN2erVuANzBT9%2FZ1nAhivjZ33R04f%2B9W%7Ctkp%3ABk9SR4z5o9uQZg
-
 The recommended prices on the website range from $1235 to $2665 to $3380 in US dollars. I have always owned Seikos and really like them but I don't wear a watch like I used to. As much as I would like to get one, they're too pricey for me. I can't see spending more than $500 for a watch / chronograph (old school) like that. Hell, I could get a Heuer for $3400.
 -

-
-
 Imtgw3-630 joined the community
 -
 Have you started to identify which contacts they used inside the shell? There are lots of different members within the family, and I'm not sure which ones they used. They are the split finger version and are not gold plated... Those two things you can tell from just looking into the connector. But beyond that, I haven't looked into it. And also within the family... There is JT (Junior Timer), and JPT (Junior POWER Timer), I believe the major difference is the inclusion of a spring (on the power version) to clamp the female contacts closed tighter. So if you're concerned with contact force, maybe you could "upgrade" a couple contacts to a JPT version instead of the original JT? Not sure it's even possible, but just a thought.
 -
The tanks fit. What you don't say is whether or not you have lifted the tank all of the way in place so that it is hitting something. IIRC the last time I installed a tank (about 4 years ago), the key is to get the tank up high enough so that you can get the filler neck through the opening in the body. Also make sure you have the top vent hoses connected before you try to get it in place fully. After you get the filler neck in place, that will help hold the tank up. As for lifting the tank, if the car is on jack stands, this will do a great job of lifting the tank: https://www.harborfreight.com/450-lb-low-lift-transmission-jack-70262.html That way you can use your 2x6s to help get the tank to the right height.
-
 hayaief joined the community
 -
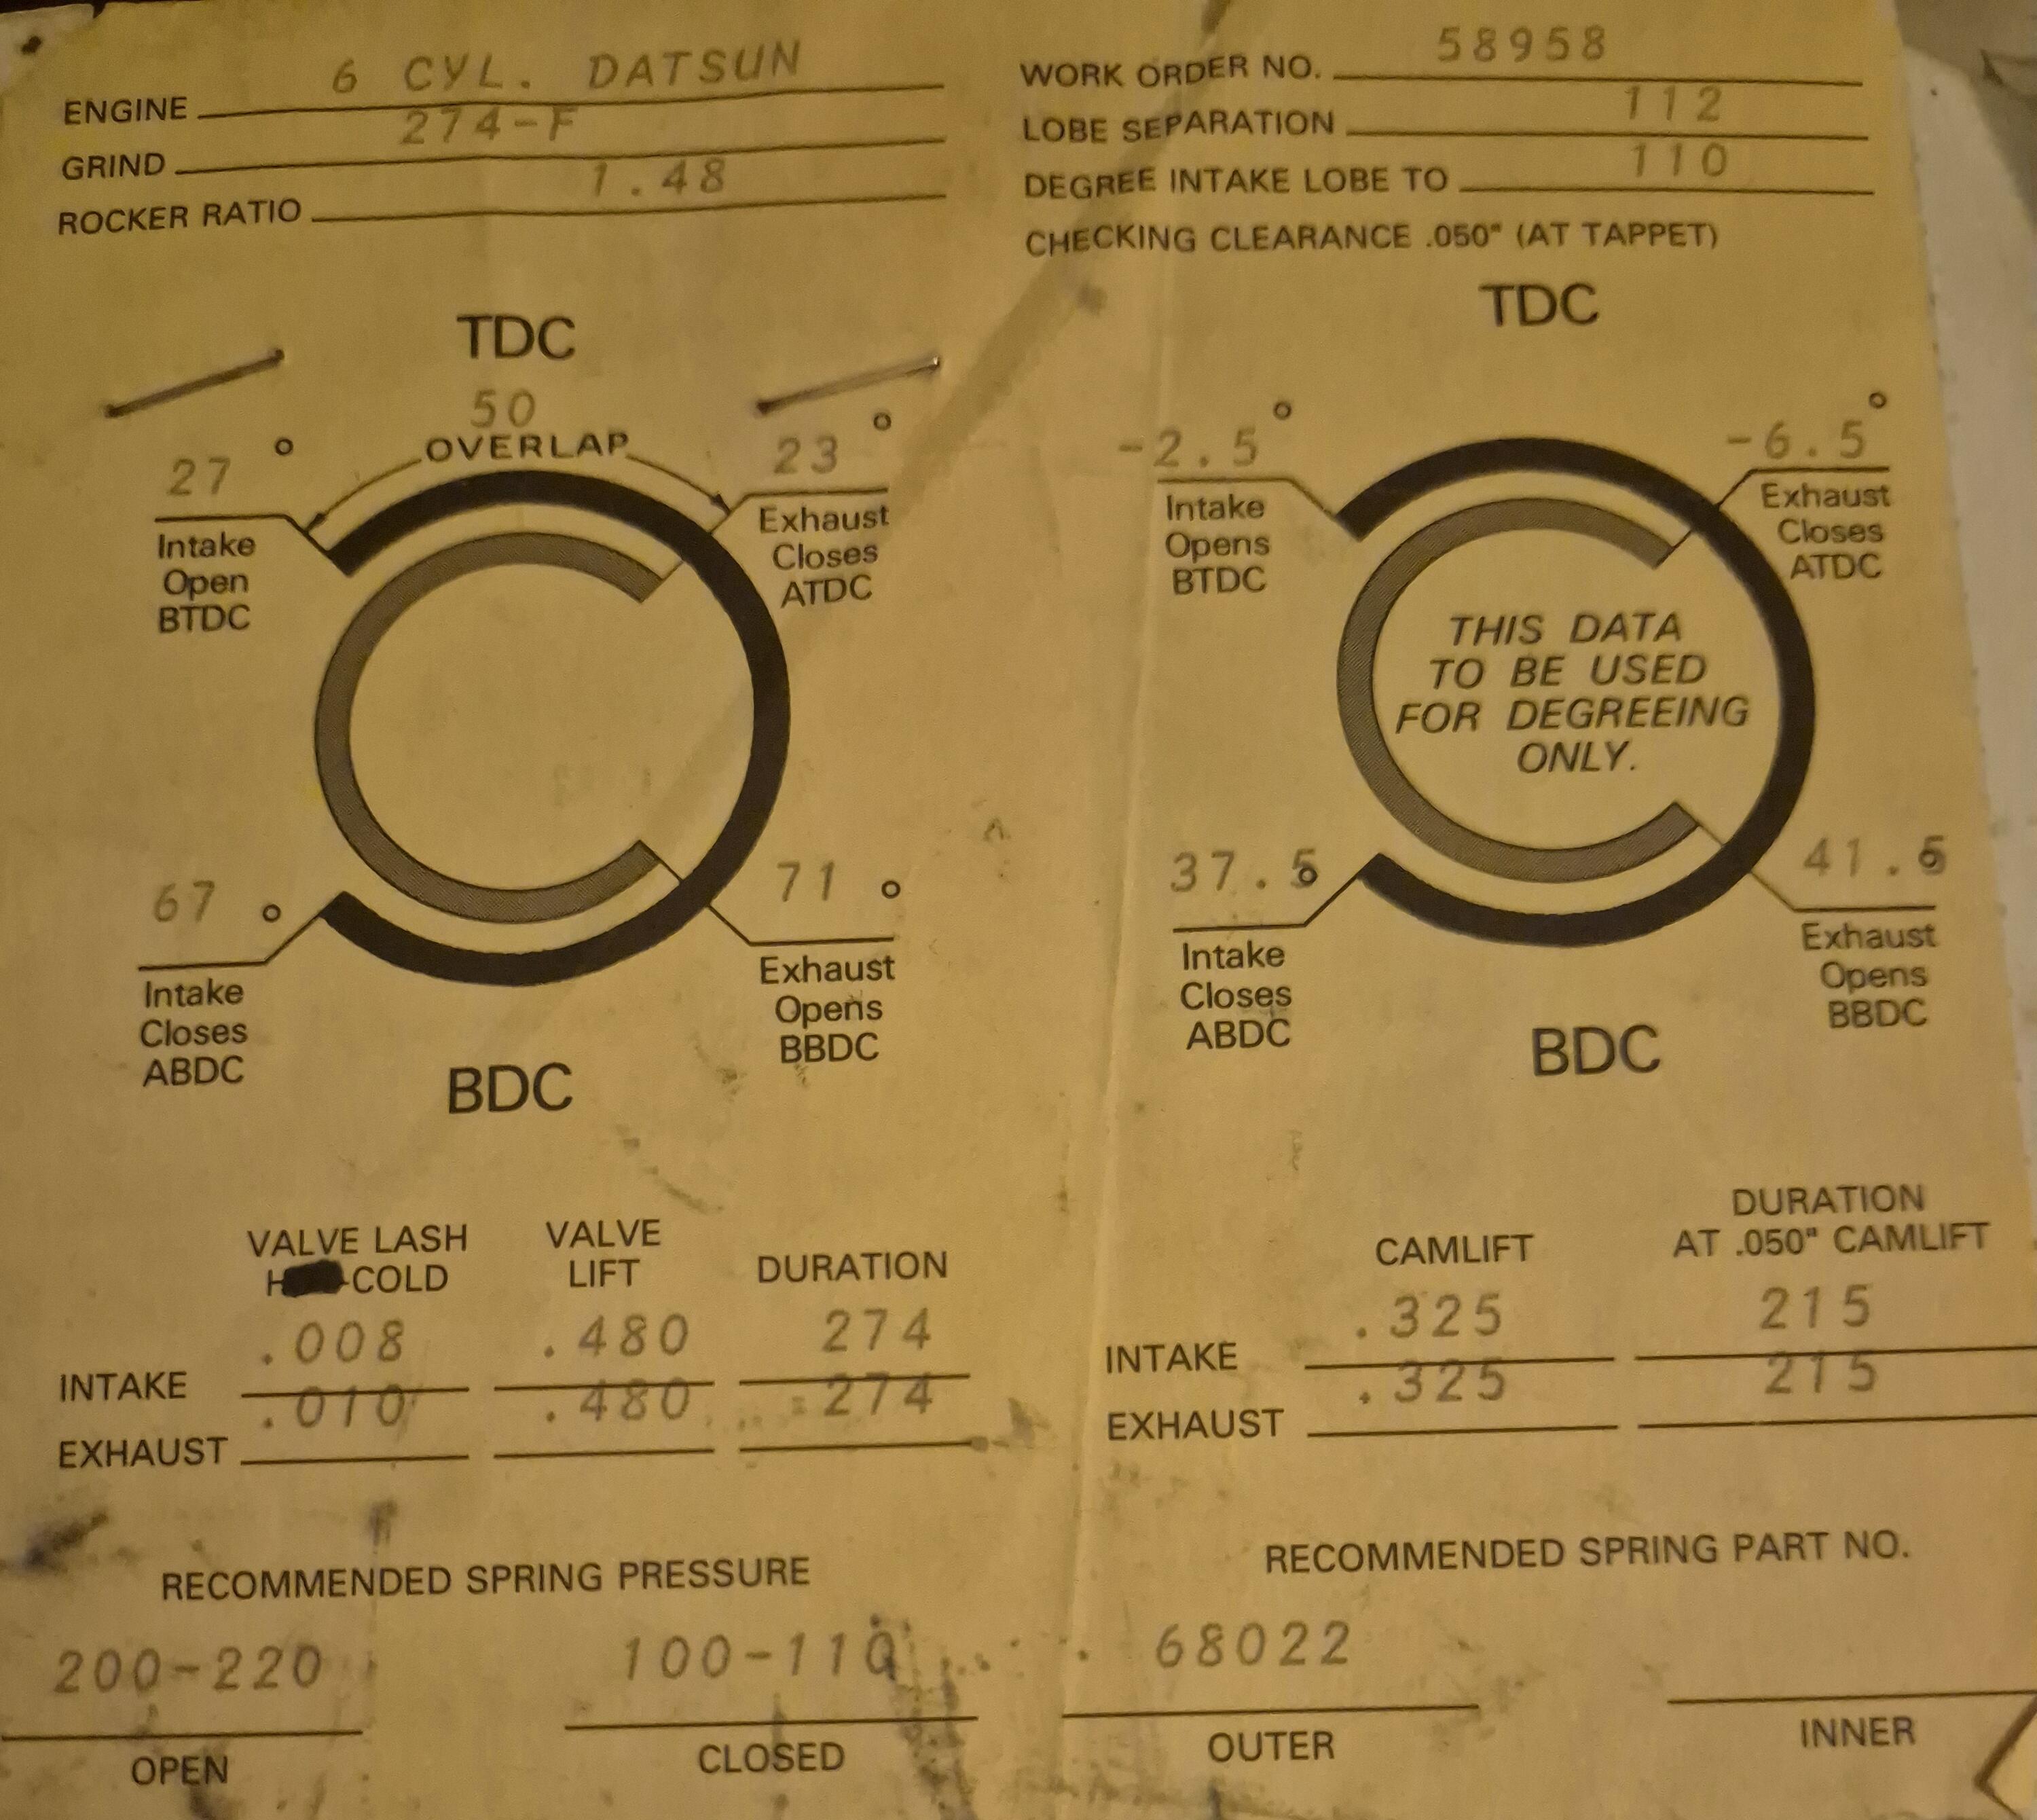
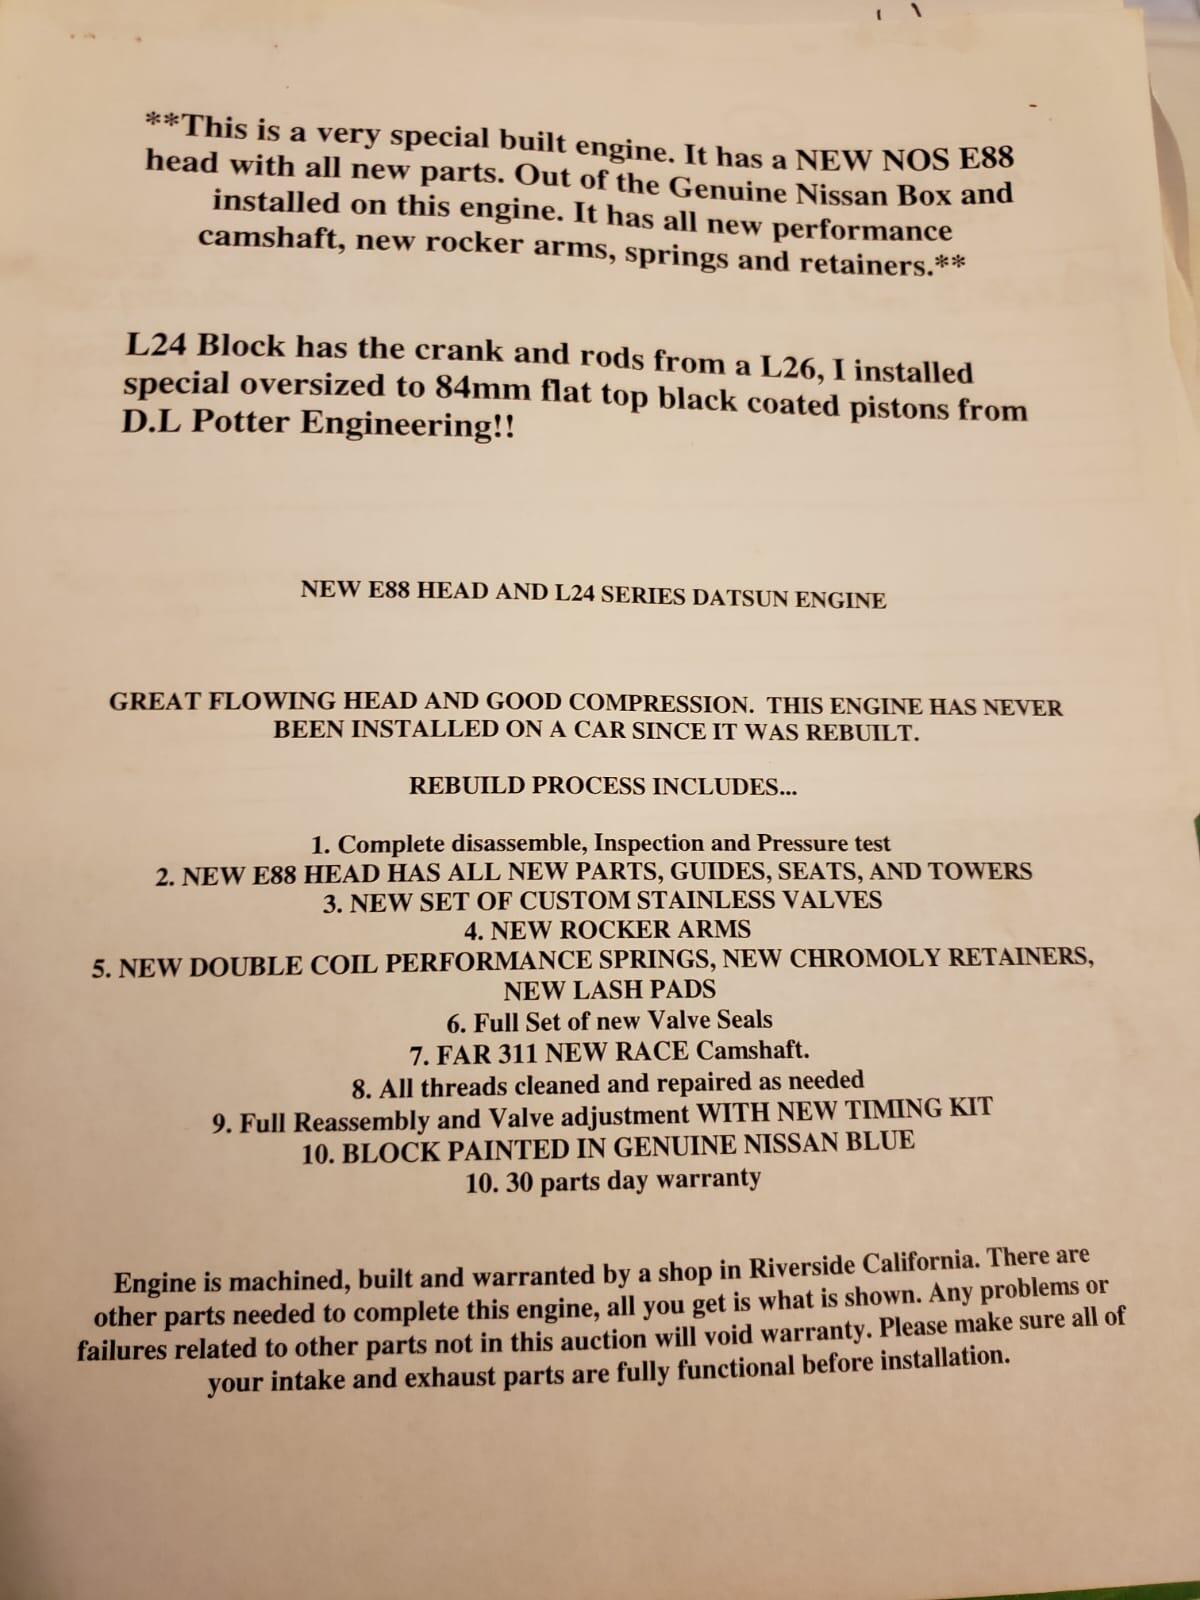
 Ahould i retard the timimg from 20 to 17 degrees and then adjust the fuel mixture in both su carbs? This are my engine specs.
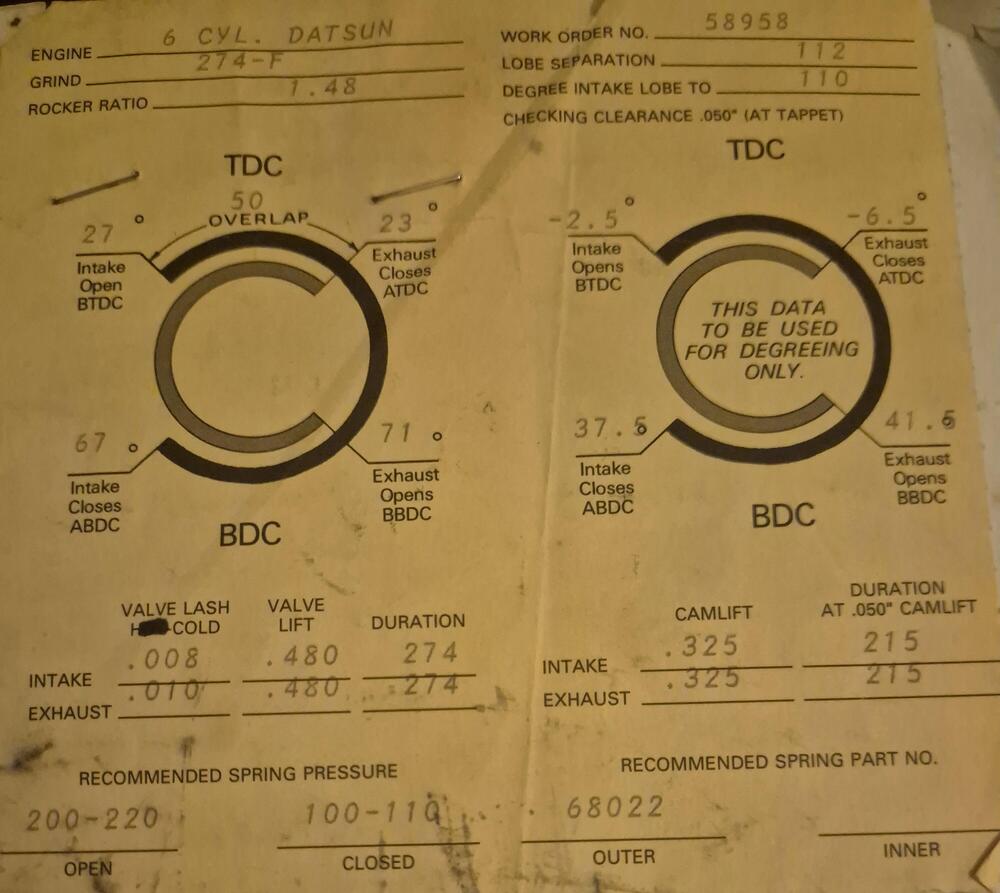
-
To clarify above, the combination of the two metal bands and the mounting bolts are still leaving me 3 o 4 inches shy of being able to connect properly. Hope that helps.
-
OK after some down time I tried to install the new gas tank from S30. i have spent a couple of days wrestling with this thing. My problem is that I cant get the tank high enough to connect the two tank mounting bolts. It's almost as if they are too short. Obviously they cant be because they were holding up the old tank. Since I'm doing this by myself the scenario is that I'm laying on my back under the car trying to hold the tank up with one hand while trying to attach the mounting bolt with the other. It's not working. I've got a small wheeled dolly under the tank with some 2x6s stacked on it so I'm not having to lift the tank all the way off the ground every attempt. Any ideas from some of you smart folks will be appreciated. Rodger
- Last week
-
@Mike Think we could fenagle a group buy? You are in charge of negotiations of course!!!