EScanlon
Community Member
-
Joined
-
Last visited
Everything posted by EScanlon
-
I'm vague on the 280's, but as a rule of thumb on most cars, you need to make sure that the window crank, courtesy lights, and any type of "fixed mount" item as well as the door lock pin (the one at the top of the door to lock the door by). Then you usually start at the lower edge of the panel and start pulling the panel clips out of the door body (not the panel). These are typically wire or spring metal clips in the shape of the letter Omega (for lack of a better term), that is, the clip must be compressed in order to be removed from the hole it fits into. Lastly, you LIFT the bottom edge of the panel and disengage the part of the panel inserted INTO the door by the window. This can be a real bear to do with the window rolled up. As a final note, if you can roll the window down, you might be able to reach inside the door with a long straight rod and push on the door lock mechanism and get the door to open. HTH Enrique
-
I'd forgotten that you have a 280. On the 240's there are 3 levers. If the topmost one is set to VENT then the other two are rendered null. The other two only apply in the HEAT position. E
-
You don't mention what position you put the TOP lever in. It MUST be in the HEAT position for the DEFROST Lever to actually send air to the defrost vents. If the top lever is on VENT, then that's all you have...a vent and the air comes out the center and side "eyeballs". HTH Enrique
-
Candy is dandy.... but it's a real b!tch to make sure it's even everywhere. And forget about touchups. Lance: Custom paint jobs, IMO, are normally done on vehicles to highlight or emphasize specific body lines, features, or ..... Flames are usually done to emphasize a car's "speed" or the look of speed. Again as you pointed out they're common and almost mundane unless you go for that "real fire" look that one painter has devised. If you're really looking for something UNIQUE, you need to step away from all the "typical" looks. This is where the true artist can emphasize...well, that's where the artist steps in and describes his idea. Remember this though, a CUSTOM paint job will have as an inherent fault, the problem of "repairability". As you know, it's almost impossible to repair a candy paint job. Special colors are also bad, especially if they've aged or been damaged by UV. Any kind of air brush art....again, you normally can't "fix" it. As a suggestion, look at the colors that are available TODAY over the colors that the cars was originally and choose one that you feel will really set the Z off. Personally, I like that Metallic Sunset Orange (Name?) on the new 350Z, and have seen pictures of that on a 240....that does look extremely nice. 2¢ E
-
Helldog: Are you sure the cracks in the paint are due to flexing and not CRAZING due to incompatible paint base? Post a picture of the cracks, a lot of times a poor base will result in the final paint job showing "cracks" when in reality it's crazing. Sounds similar, but the causes are completely different. Usually when you repaint a known crazed surface you sand down as much as possible and then paint with a primer sealer to prevent future crazing. Doesn't sound as if your painter applied sealer before repainting. If you had your paint job done at a Custom Body Shop, they might guarantee their work. Worth checking into. Tomohawk: As Lance mentioned those cracks are on the join line between the roof and the fenders. That you are cracking the paint there points to a couple possible items. You might be flexing the body very hard. Whether by hard cornering, Auto-X, riding hard over bumps AND there's another part of your uni-body that has also been tweaked allowing that part of the car to twist more than usual. The other is that when the car was last painted, or on one of the prior paint jobs, they uncovered the lead filler. Lead is used due to it's malleability (as Lance mentioned), what's not commonly known is that it doesn't like the standard primers used on cars. The primers will stick, but eventually they'll start to "dry" and cause the paint covering it to become brittle. That's when you get your cracks. Lastly, it could be a combination of the two. Enrique
-
G U L P!!!! Would someone please pass the salt? Maybe that way I can stand the taste of my nasty feet!! Lance, I apologize. For some reason or another my Alzheimers or whatever must have kicked in extra hard! :stupid: :stupid: :stupid: Enrique
-
A common problem with the 240's is the actual IGNITION switch. That part that connects to the back of the Ignition Key Cylinder. Sometimes the contacts inside this switch get worn and corroded to where you have to push in hard. To verify if this is the problem, remove the Steering Column Shroud, remove the Ignition Switch from the back of the Ignition Lock, then turn the switch with a flat blade screwdriver WITHOUT pushing in. If you're able to repeat your problem, you've found the culprit. Enrique
-
Here's a place to begin learning: http://www.lambolounge.com/Body/Paint/paint.asp We've had this very same question posted numerous times, do a search and sift through them to get a mini-education. If you truly want a unique and excellent job, I'd go back and patch things up with your painter. Remember this though, the FINAL look of ANY paint job begins with the prep work. You're already talking of stripping off ALL of the prior paint without knowing whether you need to or not. That is one of the most common misunderstandings about painting a car. Don't just go by the "everyone knows" myths, almost all of them aren't true in every instance, and so many are so plain old wrong that they serve as instructions to avoid. Enrique
-
I question how it is you know how to paint yet don't know the first thing about prepping for paint (from your other post). Sorry, but your question of "How would you paint your car if?" sounds like another version of "Does this dress make me look fat?". Go to an old book and magazine store, or the library, find books on custom cars, hot rods, how to paint books. Read them! There's tons of pictures, instructions on how to do it, even step by step pictures. How you paint your car is subjective and highly personal. What one person would drool over, another would find vomit worthy. Besides if someone has a really good or exceptionately unique concept, what makes you think they're just going to give it up to you? If you are a painter, then you know that people that go for custom paint jobs DO NOT want what others have. You'd sooner get two women to wear the same dress to the office party (I saw that happen in an office once, and it was a regular work day...talk about tense feelings!) than have the owner of a custom paint job allow you to copy his. It happens, but I'll be willing to bet that it isn't by consent of the original. Other than that, I like Will's suggestions! Enrique
-
It's going to be difficult to diagnose over the internet. You'd be better off contacting Phred (member here) he's on the other side of Portland from JustaZcarguy, and he might be able to offer help. Otherwise ask Brian where he used to take it to get tuned up or invite him over for a beer and pizza to help you tune it. 2¢ Enrique
-
Off the top of my head, it sounds as though your timing advance is not working. On the earlier 240's this was a common problem, the advance mechanism INSIDE the distributor was supported on a thin plastic piece with some ball bearings in it. After time the plastic would dry out and break, and freeze (or almost freeze) the advance mechanism so that it would cause the motor to act as you've mentioned. Hope that helps. Enrique
-
You best re-check your electric motor manual. Not until recently (last decade or so) have there been motors that do not have magnets around the armature. As I remember, without a magnet you can't get an electric motor to run. E
-
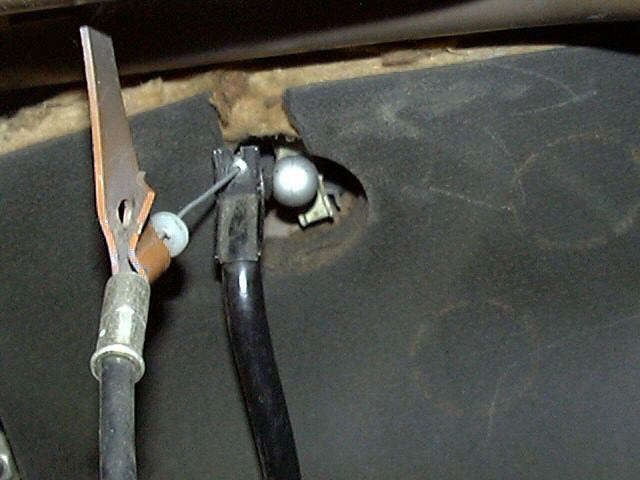
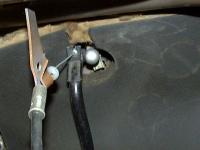
Something very important to note on the third picture in your collection. The picture that's labeled: throttlecableattachment3.jpg ; is showing the throttle cable mounted incorrectly. The Bracket shown in the first picture should be clamping the metal end of the cable sleeve. The 3rd picture shows it BEHIND it. The Nylon washer that's in front of the clamping bracket should be clipped ONTO the accelerator pedal "wishbone". The ball on the end of the throttle cable, does not attach to anything, it pulls on the nylon sleeve when you pull on the hand throttle lever. The design is such that it will allow you to accelerate MORE than the setting on the throtle lever with the foot pedal, while allowing it to return to the hand throttle position afterwards. I've attached the picture for those that might have a problem seeing your site. Enrique
-
Did you make sure they're Metric? :devious: E
-
If I recall correctly, the rivets used on the tail-light finishers are just slightly different than the interior rivets. The ones on the finishers are just a dash smaller, almost imperceptible until you put them side by side. If you were at a concours points show, you'd get a small deduct IF the judge / evaluator is aware of the difference. E
-
Air Horns and / or the regular horn. E
-
Do a search for Carl Stahlnecker's (Bambikiller240) article on re-assembly of the pivots. It is probably the ONLY article you'll need. Enrique
-
I believe this is what you're asking about: http://www.classiczcars.com/photopost/showphoto.php?photo=8950&cat=500&page=1 2nd view: http://www.classiczcars.com/photopost/showphoto.php?photo=2600&cat=500&page=1 And no, I don't know how it "double exposed" as it was with a digital camera. I bought those off e-bay and they are quite similar to the first ad you posted. One note, check with your state DMV as BLUE lights in front of the windshield pillar are considered NO-NO's in some states. E
-
There CAN be a slow drain that wouldn't necessarily register through the fuse box. I had it happen when the Accessory Relay went bad on me. The easiest way is as Ken pointed out. Except I use a small continuity checker in line on the negative side of the battery. (By the way, to check for a drain, either the negative or positive will do.) As long as the bulb is glowing (and the rate of glow indicates the size of the drain) there is a drain. Disconnect items and if no change then reconnect them. This ensures that you don't introduce other problems. Check the relays on the kick panel, these have been known to go bad and cause your symptoms. Enrique
-
Emphasis Mine. This is EXACTLY what happens. Great words Stephen. I recall this one dude in Basic Training when I was entering the Air Force. Even though I was Dorm Chief (i.e. the fool who gets blamed for everybody in the flight's mistakes), he'd continually give me sh!t every morning as we walked into the shower (Communal shower). He'd shout with a small glee of laughter while pointing at my ~clam digger~ and ask "What a tiny little thing....who the hell are you going to please with that?". As IF I would discuss this with him, let alone take it back to the store for a larger size. Last time I checked, you're stuck with what you get. Well after a few days of this, I finally got fed up, and in front of just about the whole flight, when he once again did his shpiel, I shouted back: "ME you idiot! But I just want to know why you keep looking at MY d!ck? Is it because you like them? Or something else? Speak up!!!" And that ended that. This guys sounds a bit like my Flight Mate years ago. Needs to make noise denigrating you and your choices in order to make his appear to be better or more desireable. Next time he starts spouting the "negative" points about the Z.....look him straight in the eye....smile like if you were saying "You poor misinformed fool"....and say: "You're right!". Vary the method, but always agree with him. Eventually, he might ask why you agree yet do nothing....smile - as before- and say "You're right!"
-
Your friend says "...in review, there is no performance aspect, finical reasons, or even a great memory lane trip." And he's right......for him! You may not need the punch of a nitro dragster, or the re-saleability of a Rolls, or the memories of prior ownership. It may be that you've fallen in love with the car, it's styling and for it's age, the ride. The only way to get that ride is to "re-fresh" it. There are other ways of getting that thrill, but if it isn't your cup of tea, it isn't. Just that simple. So, instead of trying to get him to see your point in restoring it, ask yourself if he's an integral part of your restoration, (i.e. without him, no mechanic) or if he's just another friend with his opinion to voice. If it's just another opinion, then shouldn't that tell you something? E
-
Chasing Thread means, as MikeW and Larry said, to run your tap through the hole to ensure that the thread has no deformity in it (such as POR), or a bent thread. By running your tap carefully into the hole that's already threaded you remove anything that would interfere with a proper load on the bolt. Cutting new thread is where you MAKE the thread on the rod. The position where you begin cutting new thread isn't normally important (meaning in radian degrees of the rod), but chasing thread on an old bolt or nut you need to be careful that you are in fact chasing the old thread and not beginning to cut new. Sorry for the confusion. E
-
Will, Would you have him contact me? Or send me his info and I'll find out where he is. Don't forget that Washington is a BIG state. It might not be as big as California or Texas, but it still takes more than 3 hours to go from southern border to northern border, and West to East is probably closer to 8+. So hopefully he's not on the East side. If he's close, I'll see if I can't get that hatch to you. Enrique
-
This bears repeating, and emphasizing. Even if you re-use your original hardware after you cleaned it up, the never-seize is an excellent idea. Granted, you need to be careful with the silver paste stuff as that stuff will get on your hands and every single panel you touch thereafter. One important note, make sure that you do use lock washers and or nylon lock nuts when necessary. Otherwise you're asking for something that needs to be fimrly bolted eventually working itself loose. On areas where you've used POR, this can't be emphasized enough. CHASE THE THREADS!!! If you try to cut through the POR, even with stainless screws, you are almost ensuring that you will strip or cross-thread into the carbon steel nut you're threading into. POR is tough and extremely strong. Even when you cut the thread through it you'll be surprised at how tough it is, it just doesn't cut like paint does. And don't forget that some screws and bolts should be locked tight WITHOUT never-seize. These should be locked in place with Loc-Tite or some similar product. Enrique
-
I'd be willing to bet that each and every one of you went back and re-ran the video...... E P.S.: I did.