


kmack
Community Member
-
Joined
-
Last visited
Everything posted by kmack
-
For the amount of grip the Azenis provide, yes they are the best tire for the money. Only down side is there is only one size offered for a 14" rim (195/60R14). That was my reasoning for getting the Zeix. I wanted at least a 205 series tire for my car. But i have driven a 914 (6 cyl.) with the Azenis; they stuck like glue. I have also seen the 195's on another car and they don't look as skinny as I thought they would. Since you will be using a 2nd set of street tires, I would definitely go for the Azenis. Keep in mind, the Azenis absolutely suck in the rain or wet! They are not meant to be driven in the rain. But in the dry, they are freakin awesome!
-
We don't use english here in Texas, it's called "Texican"!!! And actually the sun hasn't been too hot this summer. Pretty mild really. We only got above 100* F 3 or 4 times! Lots of rain, though. Sorry I don't hang around in the chat room anymore. This new job has me running so much that I'd just be an unresponsive name on the chat anyway. Today is an exception for some reason....
-
Just to throw in my Texan vote, Fred, "logistics" sounds better to me. I vote for the 2nd one.
-
http://www.vulcantire.com/ze502_6_t.htm Although, at this time I'm running the Ziex on my 240. They are an excellant tire for street driving. And they offer a few better sizes for this model. I've also been using them in autox, although they aren't as sticky as the Azenis are. But I will say this about the Ziex: they are VERY predictableall the way to their traction limit and beyond. I have run these tires on a long track where speeds are above 100 mph. I have also gone through turns at over 70 mph with the back end kicked out and have yet to lose control of the car with these tires. They are that predictable and controlled. And for the $45 per tire price, I couldn't be happier! www.victoriatire.com I have also driven these tires during the rain on a course and they performed great. Although I like the Ziex, when these wear out I will get a set of Azenis for my car.
-
For quick reference: 85 - is for your ground 86 - is from the switched source (ie: your ignition) 30 - is your power input (from alternator, battery, etc.) 87 - is your power output (in this case to your fuel pump) 87a - would not be used in this case The 87a is the alternate power output. Relays are commonly used as a switching device. So the 87a output will power some other accessory when the main power is not switched to the 87 output. Did I make sense? Either way, it's not used in this case.
-
Only the sound came through for me. No picture. But yesterday I just saw the version from Ford for their new Sport KA. Freakin awesome. I assume this is the same thing?
-
http://www.eastwoodcompany.com/itemdy01.asp?T1=31021&Dep_Key1=BodFen Actually this is what I was talking about. It creates a flange that can be overlapped with the existing metal. Mox-nix
-
:tapemouth :tapemouth :tapemouth :tapemouth :tapemouth :tapemouth So there!
-
THE BEST DRINKING STORY EVER From the state where drinking and driving is considered a sport, comes a story from Texas. Recently a routine police patrol parked outside a local neighborhood bar. Late in the evening the officer noticed a man leaving the bar so intoxicated that he could barely walk. The man stumbled around the parking lot for a few minutes with the officer quietly observing. After what seemed an eternity and trying his keys on five different vehicles, the man managed to find his own car which he fell into. He was there for a few minutes as a number of other patrons left the bar and drove off. Finally he started the car, switched the wipers on and off (it was a dry night), flicked the hazard flasher on and off, tooted the horn and then switched on the lights. He moved the vehicle forward a few inches, reversed a little and then remained stationary for a few more minutes as more patrons left in their vehicles. At last he pulled out of the parking lot and started to drive slowly down the street. The police officer, having patiently waited all this time, now started up his patrol car, put on the flashing lights, promptly pulled the man over and carried out a breathalyzer test. To his amazement the breathalyzer indicated no evidence of the man having consumed alcohol at all! Dumbfounded, the officer said "I'll have to ask you to accompany me to the Police station. This breathalyzer equipment must be broken." "I doubt it," said the man, "tonight I'm the designated decoy."
-
Q: Why do Rednecks wear button-fly jeans? A: Because the sheep can hear a zipper a mile away!
-
If you have any scrap pieces of metal laying around. Try a few samples off the car to see how hard it is to do or how good it turns out. Always best to practice off the car first.
-
The absolute best way is to cut the replacement section a little longer than the original, while putting a "kink" along the overlap section. So that when you lay the repair panel under the orig. panel, the two pieces lay flat creating a nice level seam. Stitch weld it then use filler to smooth and you'll have a nice blended repair patch. Eastwood's has a tool for making that "kink", some sort of crimping tool. My Dad used to use your 2nd method when replacing rear qtr panels on cars. Use the thinnest cutting disc you can find to minimize the gap that is left after the cut. And make sure you do small stitch welds to keep from warping the metal. I would slowly weld the entire cut, then grind down smooth and fill where necessary.
-
Here's another picture that shows good reflections. I have gotten wonderful comments about the paint job. And I get even greater responses when people find out that was my first paint job, ever! Read up on painting. There is lots of info out there. Use it to your advantage to learn something new and save some cash at the same time. http://www.scottgrundfor.com/pages/collector.html This website has pretty good info on painting, prepwork, and repairing paint chips.
-
I had no painting experience before I painted my car other than shooting primer, which is hard to mess up. I bought a $39 Wal-Mart spray gun, 4 in-line moisture filters from Harbor Freight ($6 ea), an air regulator for the spray gun ($6), and all my primer, sealer, and acrylic urethane paint (about $600, the paint alone was just under $200), and rented a spray booth ($35 for 24 hours). I did all the primer and sealer work, and first coat of paint myself in my garage. Along with the final prep work. The final coat was put on at the spray booth some 30 miles away. Of course I did a final prep at the booth before spraying. If you have the inclination and want to try something new, do it yourself. You'll do at least as good a job as Maaco if not better for less money. Plus you'll be more critical than Maaco will be of the work, especially the prep. And by all means, use the moisture filters. There is no quicker or easier way to ruin a paint job than to let water get into the air lines.
-
Q1: If you can "just feel" a bit of play, then think about how much air can get into the carb through that little bit of play? You should not be able to feel any otherwise, you'll run into a lean condition and you won't be able to ever egt the carbs set right. If there is any play at all, then the shafts need to be re-bushed. Q2: Expect to pay anywhere from $150-250 for a used L28 from a pick-n-pull yard or junkyard. A lot depends on the yard and the current state of the engine. If you're looking for one that's been rebuilt, expect to pay at least $600 and up depending on where the engine was rebuilt and by whom.
-
I wouldn't say that mine is high-tech. Sturdy maybe, but not really high-tech. I have seen some made out of wood 2x4's!
-
I asked because on the early 240's the inside panel beside the headlight scoops is where the front bumper mounts. I tried to use that when designing my rotisserie plans. It flexed too much side to side and I feared it would not hold the car while rotated over in a 90* position. The better way (I think) is to use the existing tow hook mounting holes on the bottom of the radiator support. They are already drilled and tapped so all you have to do is locate the holes in your mount system. My front mounts pivot from the actual bumper location, but they drop down 7" to cradle the bottom of the radiator support. See my thread on rotisserie plans for downloadable drawings that you can use to build a set of stands. I build and sell stands but the shipping to Australia would be too much. Although, I will build and ship a set to you in exchange for one of the Dashboard Restoration's new dash covers! :cheeky:
-
I know I found this kind of late, but did you get your question answered about the front mounting point for the rotisserie?
-
Hey, Did I hear someone call my name? 240Zdragon72, If you want some info on the roitsseries I build, give me a shout. I build and ship the stands straight to your door (or business if prefered). Or you can visit my new site. Vintage Rice Racing - Rotisseries Best bet is to email me with any questions. Listed on that site are a few of the people who have purchased from me. By all means, feel free to chat with them about the stands. mperdue is a member here on this site as are a few of the others. I'll be happy to answer any and all questions you may have.
-
I saw a good piece still left on the car! Don't send it to the crusher yet! The rubber foot rest is still there and in good shape! Save it before it disappears! ROFL
-
The crossmember from the '76 280Z I had looked like the one from my 240Z. I didn't specifically compare the two so I can't be certain. But I do know for a fact, that the front control arms are identical. I checked on that part. So mounting issues (w/ regard to the controls) should not be a problem.
-
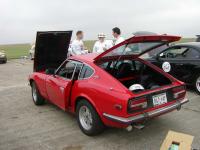
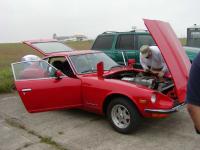
 Notice the big, gaping hole in the engine bay? The rebuilt orig. engine is color matched to the body of the car. I think it turned out rather nice.
 -
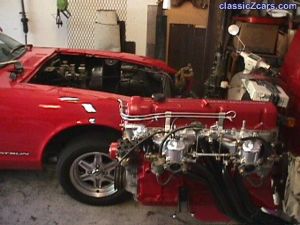
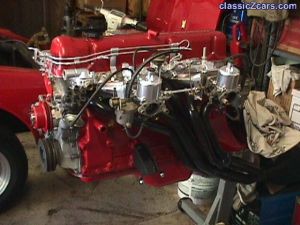
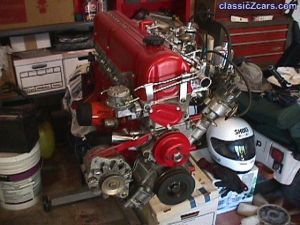 Going back with the original engine. Rebuilt and detailed for showing. (just another view)
 -
 Going back with the original engine. Rebuilt and detailed for showing.
 -
I'm 31, going on 20. I have a '71 Series I. 1 wife, 1 kid, 1 dog, 2 cats. I live in San Antonio, Tx and that's the farthest north I have ever lived.


