Jarvo2
Community Member
-
Joined
-
Last visited
Everything posted by Jarvo2
-
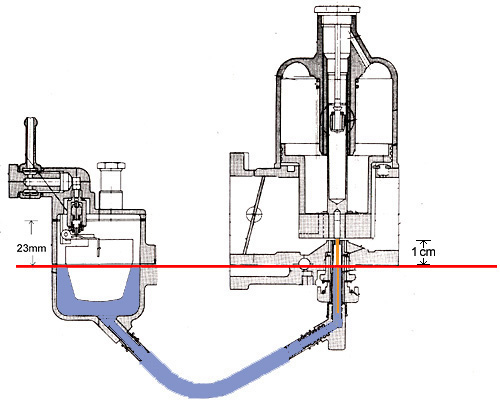
I created this tool out of necessity since now that gross jets are no longer available, its a pain to accurately set the float level on the bench while rebuilding the carb's. The approach I took is for the tool to used temporarily while checking float levels; once set, the sightglass is removed. I pull the fuel hose from the float bowl & connect my sightglass to the nipple. Its preformed and graduated to allow the user to easily see how high the fuel level should be. Then a couple cranks of the engine (coil wire unplugged & trans in neutral), the sightglass fills up. Then it becomes a game of opening up the float bowl lid, bending the tang and re-filling the bowls. Once set the floats should be good for quite a long duration, thus the reason I didn't invest in drain plug bungles. I actually prefer running this test without the engine running.
-
Great point, Jim. I actually just grabbed this pic to illustrate what we were trying to accomplish. I'm still formalizing my instruction manual based on my learnings throughout the years. The funny thing is I was running at about 15mm of fuel and having tons of issues, raising it back up improved the drivability and performance once tuned properly.
-
After continually fiddling with my SU's I've created a fairly inexpensive Sightglass for my carburetor float bowls. My device will allow me to see what the floats are set at and ensure that the carb gross fuel mixture setting is correct. Then I'm able to dial in the fine mixture setting with the adjustment knobs on the nozzle to get back to factory specs. Would there be interest from any members in a set (allows you to see levels in both carbs at the same time)? I'd be willing to provide 2 sightglasses with instructions for $15 including shipping anywhere in the US. PM me if you're interested and I can provide more detail.
-
I think I'm going to try to pop my SM needles out and reinstall the N58's which came with the car when I purchased it.
-
Thanks for the info, Stanley. I have two distributors, both with the same # on the first line, but different second lines. Can anyone tell me the specs on either of these? They both perform well, I'm guessing they just have different advance curves. D612-53 112b D612-53 205
-
Thanks for the insight, Walter. I agree completely with you regarding the total amount of advance. So based on this, is it safe to assume that the non-emission L24's had a different distributor with a less aggressive centrifugal advance? This then leads me to the ultimate question of carb-tuning. Should I be happy with the performance I have even though the pin-lift test doesn't work? Based on lifting the piston 1/16" the engine boggs down which leads me to think its running lean, although everything else is pointing to its tuned correctly. I recently picked up a colourtune which I hope can help me see what's going on in the combustion chamber.
-
You might be able to steal some ideas from my Electric Fuel Pump conversion and schematic. I've never had any issues with my Pertronix yet, but I will admit that I carry a set of points in the trunk in case I ever get stuck. Dave's 1972 Datsun 240z: Electric Fuel Pump Installation
-
Last year I rebuilt my carbs with a ZTherepy kit and couldn't be happier with the results, very high quality product and informative video. My vacuum gauge is reading a steady 19 at idle and the car performs well and my plugs look good (not rich nor lean). The main issue I've had is that when I adjust the SU's to allow for the pin lift test to work (slight RPM increase then return to normal), I need to richen the mixture so much I get a big cloud of black smoke out the exhaust and the vacuum gauge lowers to approximately 12-13 and the engine runs rough. I recently removed my emissions gear (smog pump, dashpots, etc.) and closed off all of the vacuum ports to ensure I don't have any unmetered air going into the system. My ignition timing is still set at 7 degrees BTDC as per the FSM. Now that I don't have the emissions equipment, should I increase the timing upto 15-17 degrees BTDC to account for the change in the engine as per the FSM? Will this improve the performance of the engine at all and allow me to properly set the lean/rich mixture?? I have recently adjusted my valves and have checked for vacuum leaks and I'm also running a Pertronix ignition. Any thoughts you may have would be appreciated!! Thanks. - Dave
-
No need for a lift...just jackstands & a floorjack will work for you...

-
-
As mentioned, below are two pictures of the NOS parcel bar that I have. Please let me know if you're interested and we can discuss price/shipping. I've had great success with shipping parts to the UK in the past, so this shouldn't be any issue. I can be reached at david_jarvas@yahoo.com Dave


-
Yes! I've got a NOS one from my '72 240z which has never been installed and is sitting in storage. Chrome looks 'new'. I can snap some pictures later this morning & I'll post them shortly. Below are some stock pictures of what it looks like installed (not my unit).


-
Taz you should look into EA plates in Illinois...much less expensive than passenger plates and you become exempt from smog testing. Able to drive 'normally' March through October, and then limited to car shows and service stations over the winter months.

-
Have you replaced your bushings? Sounds like it might be the 40 year old rubber bushings that might be failing & causing the clunks.
-
Any type is fine. I used some leftover ATF that I had. You'll know there is enough when it starts to leak out. Check out Blue's write-up on it: http://atlanticz.ca/zclub/techtips/suspension/tokicoupgrade/tokicoinstallfront.htm
-
-
For a reference point, I was able to get $450 for the full A/C kit...probably could have gotten more if I waited for a higher bidder.

-
Here are the instructions that came with my ARA kit. It doesn't really speak to the type of hose clamps used.

-
I decided not to install an inertia switch as I'm going to rely on the oil pressure gauge to cut the fuel pump off if the engine stops. From what I've heard, you can easily find a used one at a wrecking yard, or purchase one from RockAuto. It needs to be in a place that it can be reset, although I don't think speedbumps/railroad tracks would trigger it to flip unless you pull a Dukes of Hazzard jump.
-
I just adjusted my toe-in this past weekend via the 'string' method. I ended up using the 2mm-5mm toe-in setting.


-
I ended up bringing my oil pressure sensor to Menards (hardware store, similar to Home Depot) and then did some trial and error in the brass plumbing section. I believe it was 1/4". Don't forget you'll also need a male-male straight pipe to get the "T" into the block. Looking back, the oil pressure switch was a little bit of overkill, but I am aiming for safety and drive-ability. I've heard of some people pulling power from the yellow alternator wire to power a relay (avoid the need for the multi-function oil pressure switch).
-
Check out 1975 Datsun 280Z for more pictures.
-
I saw this car on Chicago Craiglist and I'd be fearful of the rust!!
-
Thanks for the advice, Chas....I'm in agreement not to touch the pinion seal until it starts to leak. The driver's side seal was really deteriorated, hence the reason I started to replace the rear 3.
-
My next quest on my '72 240z was to eliminate the leaks out of the differential (rear end). So while the rear suspension was out, I dropped the entire differential, cross members, and drive shaft. The transmission must be drained before trying to pull out the drive-shaft! I'd also suggest using a floor jack under the differential as it weighs quite a bit. Next I removed all of the pieces from the differential, including the half-shafts so that I'd have a manageable piece to work on. I then began to work on the side seals, as that was new territory for me. After removing the half-shafts, its as simple as removing the the center bolt and pulling out the axle stub. I'd recommend working on one side at a time, rather than pulling the entire thing apart. Also, its easier if you drain the differential before you start pulling the seals out. Keep in mind these are keyed (one side does have a flat-face) Below is the old side-seal installed, followed by the new Beck Arnley seal which I'm replacing it with. You need to be careful when removing the old seal to not damage the mating surface. Like with replacing an oil-filter, I did smear some differential fluid on the new side seals before I inserted them. After buttoning up both side seals, I pulled off the rear differential cover to clean the surface and replace the gasket. I did use a very very very thin layer of high-temp RTV on both sides of the new gasket.