


Captain Obvious
Free Member
-
Joined
-
Last visited
Everything posted by Captain Obvious
-
 Late to the party, but that's what I've seen as well. Water bypass pipe closest to the engine, then engine sling next outboard from that.
 -
I don't have any input into identification of what would be the correct advance canister, but I'm a little puzzled by the reaction you had with the one you tried. At idle, the vacuum advance should be doing nothing. In fact, you should be able to connect or disconnect the vacuum line from the canister with no noticeable effect. The vacuum source is a ported source, and there should be no vacuum in the hose when the engine is at idle. I'm not sure why your engine wanted to rev and then die.
-
That'll do it. That's the same issue that inline6 had with his master. Stuck open. Cars really don't like to just sit. You need to get in and push the pedals a couple times a week just to keep stuff moving. Make "vroom-vroom" noises if it seems appropriate.
-
Paid attention while driving my 77 yesterday. I think it's just the rubber boots that pushes my shifter away from 1-2. I don't think there are any intentional springs on that side.
-
@zKars, Were the bushings correct for the 240 or the 260/280? I'm guessing they are focusing on the earlier cars since that's where the money is.
-
The 1972 FSM says the ET is 15mm for the 5 inch wide wheels. I did not find documentation of what the earlier 4 1/2 inch wheels had for ET (offset), but I took some quick crude measurements comparing the 4 1/2 inch to the 5 inch wheels and it appears they added 1/4 inch to each side. If that is the case, then the ET would be the same for the 4 1/2 inch wheels.
-
My 77 5-speed shifter does rest in center 3-4 position if you aren't pushing it to one side or the other. There is something pushing it away from 1-2. The spring pushing away from 5-R is much stronger than the force pushing away from 1-2. Might just be the rubber boots and linkage stuff, but there is something.
-
I haven't used them, but I'm not sure about the validity of the fitment claim... The later cars used a different (wider) bushing than the earlier cars. I think the 240 used narrow and 260-on used wider.
-
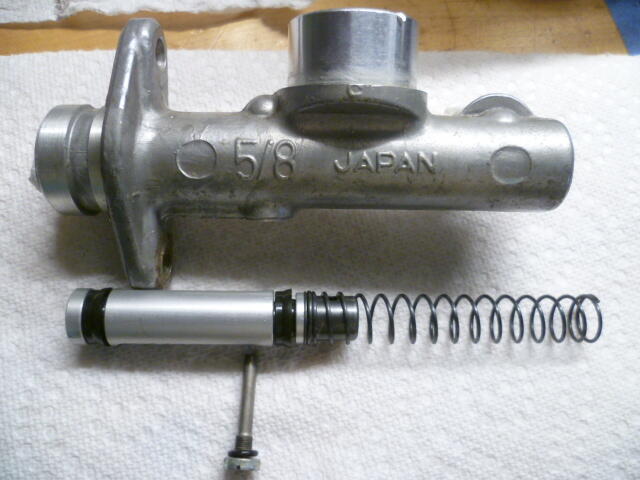
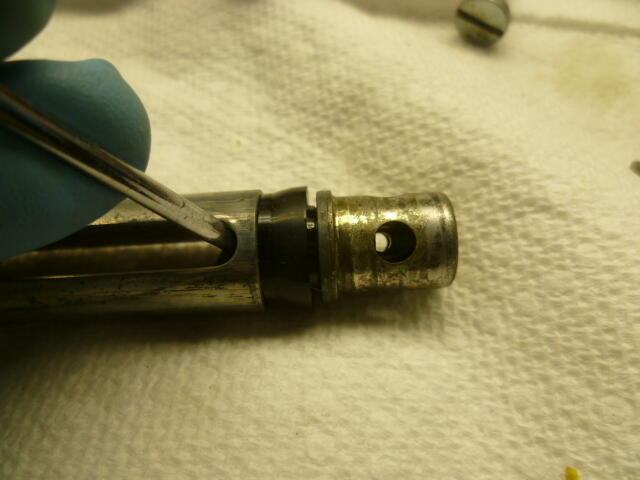
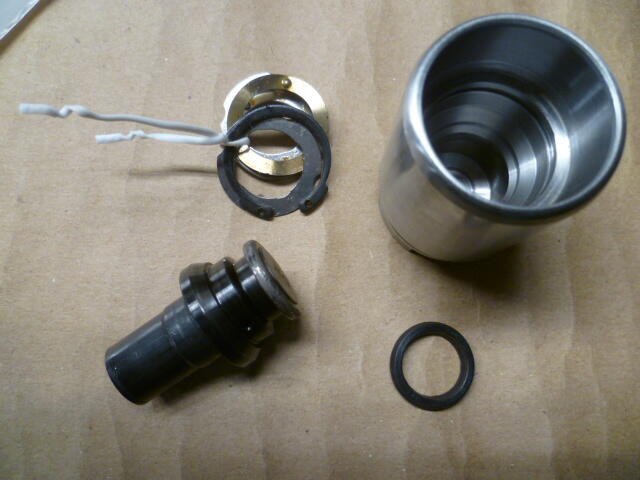
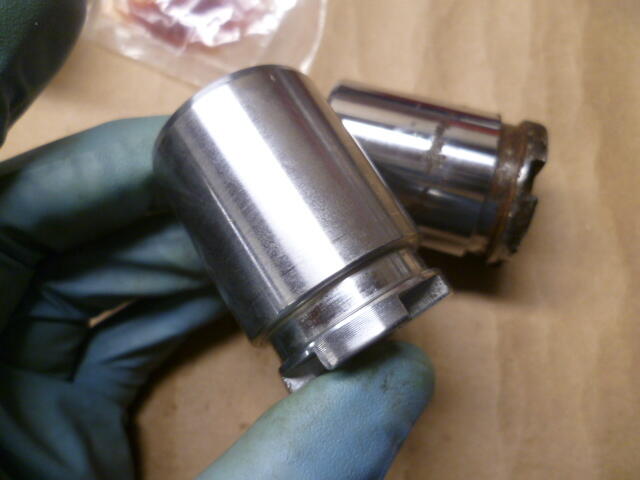
I posted some pics in that other thread detailing the valve in the brake master cylinder. The later clutch master cylinder is the same concept. Here's a couple pics. Looks like this: This screw cuts across the master inside and opens the valve when the clutch master is at rest: Opening the valve with the tip of a screwdriver: You can see daylight through the valve when it is pushed open:

-
Did you try loosening up the flare nut on the back of the caliper and seeing if that would relax the caliper grab? Rebuilding that style of caliper is usually a pita. Different car, but probably similar in concept. Complex internal guts in the rear pistons:
-
And that clutch M/C is the later type. You can do a kinda-sorta bench bleed of the clutch master by loosening the flare nut on the outlet and just let it gravity bleed into a rag. If fluid doesn't flow, I suspect it's a problem with the linkage. If you loosen the nuts that hold the clutch master onto the firewall, does it a) push away from the firewall, b) remain pulled tight against the firewall, or c) it's kinda neutral? It should be neutral with a tiny bit of slop in the linkage. If it pushes away, you need more play in the linkage and may not be opening the internal valve.
-
Well if you are simply looking for a test, I would do something like this: Hit the brakes and confirm that the rears are locked up. Let off the brakes and confirm that the rears are still tight. Reach behind a rear caliper and loosen the flare nut. Let some fluid bleed out. If the rears relax when the fluid bleeds out, then you were holding pressure. If they don't relax, then it's probably something in the caliper itself that's sticking. And if the rears DO relax, I would repeat the test, but this time let some fluid bleed out from the flare nut on the underside of the master cylinder. That will help identify where along the path the issue is. If it's holding pressure, I would expect it to be right there at the master cyl. And if that is the case, I might be able to help walk you through removing the check valve.
-
And as for your clutch... Which style clutch master are you using (early or late*)? Have you got a pic? And same thing goes for the clutch as goes for the brakes... When you're foot is not on the pedal, it is important for the master to return to un-actuated "at rest" position. If it does not return to "at rest" it will not bleed or work properly. * Early has the reservoir in front of the output hard line connection, while the late style has the reservoir behind the hard line output connection. Both have a valve inside, but they operate differently.
-
Just because you are using a later master cylinder, I wouldn't assume it doesn't have check valves. In fact, I would stand by my original belief that there is one. Let me put it a different way... Every master cylinder (70-83) I've messed with has some sort of check valve built into it. Some of them do more "checking" than others, but all of them had some sort of device inside that either stopped, or at least slowed down, the fluid back into the master. Some of them had a "residual pressure" valve built into them that would hold some small amount of pressure (couple psi) in the lines, and some of them had a device that did not HOLD any pressure, but would allow much faster flow OUT of the master than back INTO the master. Does that make sense?
-
The check valve (if there is one) is built into the master cylinder. Not all master cylinders I've messed with have a check valve. Some of them have a "slows down the return valve", but it's not a full stop. Others do have a full stop below a certain pressure. On the earlier 240Z, there are two "brass devices" under the right rear*. The first is a proportioning valve, and the second one is just a dumb "T" junction point. The feed comes from the master to the proportioning valve, and the output of the prop valve goes to the splitter "T". The part that zcardepot sells is the dumb "T" splitter junction. However, neither of those brass devices contain a check valve. *Closer to the right than the left.
-
The belief is that the mixture will be affected because the lower the bowl level, the higher the fuel would need to be lifted (by the venturi vacuum) in order to be pulled up past the needle. Physics dictates that the theory has merit, but I'm not sure about the magnitude of the effect. In other words... I agree that it would take more energy to lift the fuel higher, but I'm not sure I agree on whether that increased amount of energy is negligible or not. I do know that I have run cars* until the bowls get sucked down so far that they are nearly dry. And the engine seems to run just fine right up until the very end when the engine stalls due to lack of fuel. * and generators and lawn mowers, etc
-
I think the float bouncing around is part of it. I also think that you can get on the downhill slope of the float tang, and once that happens, you're doomed. Wideband testing would be cool. I know there are people here that think the mixture ratio is highly affected by the float level. I'm not one of them. I believe float level has an effect, but I don't think it's that stark. Of course, however, without testing data, neither camp is anything but speculation. Wideband data would be very interesting.
-
I suspect you'll find the fuel level lower than spec. I also suspect that it'll run ok even with the lower level. You might starve for fuel at WOT going up a big hill, but for around the neighborhood testing, I would wager that you'll be OK. As for final positioning of your nozzles, I've found that 2 1/2 turns down is pretty good for stock. With the changes you made to the engine, maybe you need a little more than that? I wouldn't start to be concerned until you're finding it won't run well below say three turns down. At that point, I'd be looking for a vacuum leak.
-
Yes, I believe a commercial setscrew type of device would work just fine. But as for the material composition... I believe that brass has a higher density than steel. So if your steel on is heavier, that would only because it's longer: https://www.engineeringtoolbox.com/metal-alloys-densities-d_50.html https://www.engineersedge.com/materials/density_of_common_engineering_materials__15896.htm As for screwing it up into the bottom of the float, that would also satisfy the failsafe of closing the valve instead of holding it open. Only reason I didn't do that is I wanted gravity to have as little effect as possible on pulling the insert out of the float. I figured that gravity would have less of a tendency to pull it out if it were stuck into the side. Not that I really expect that gravity could possibly pull it out, but put it on the side just to be sure.
-
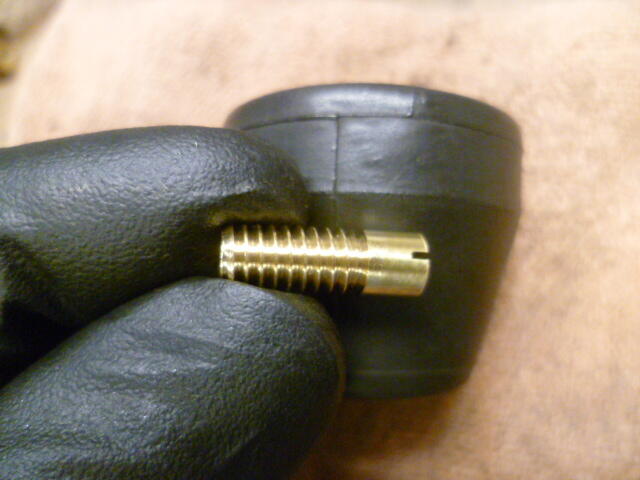
My last incarnation was a 4 gram brass piece threaded into the side of the float. This seemed to work well: And as for position, I put it into the side of the float over by the hinge pin. That way, it it ever started to unthread, it would tend to hold the float up, not hold the float down. My thinking is it's safer for the float to be held up (thereby cutting off the flow of fuel), than it is for the float to be held down (allowing fuel to flow even when it shouldn't). "Fail-safe". You could probably find something generic to use instead of making a custom piece. Maybe a brass wood screw of similar mass? And as for your hinge integrity, I think maybe yours looks fine. Maybe bent down a couple thousandths, but not enough to worry about.
-
Yes, that is the correct spec for 1971. Not sure your issue is the same thing I've dealt with, but I've had issues with the floats in the past. I'm sure you've seen some of this? I started getting involved at around page 8: https://www.classiczcars.com/forums/topic/55190-float-level-advice-please/?page=8
-
In addition to running the nozzles down a little more, maybe try some thicker oil in the dampers. What do you have in there now?
-
Yeah, I should have mentioned that possibility as well. Stuck in the open position will do pretty much the same thing as far as not being able to bleed the rears properly. Glad you got yours working!!! Now I just need to figure out why I can't get mine to work right.
-
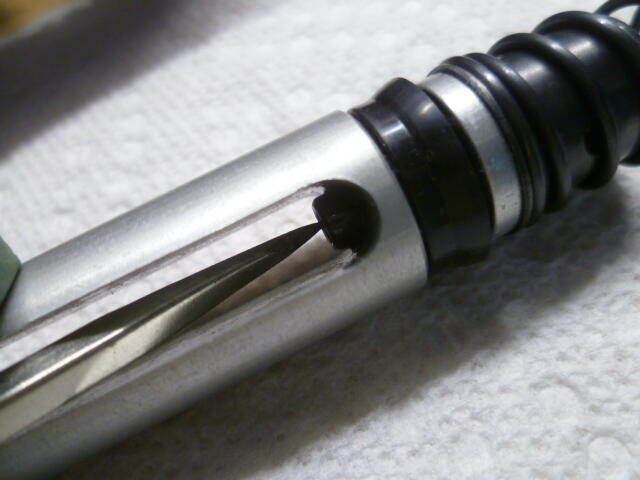
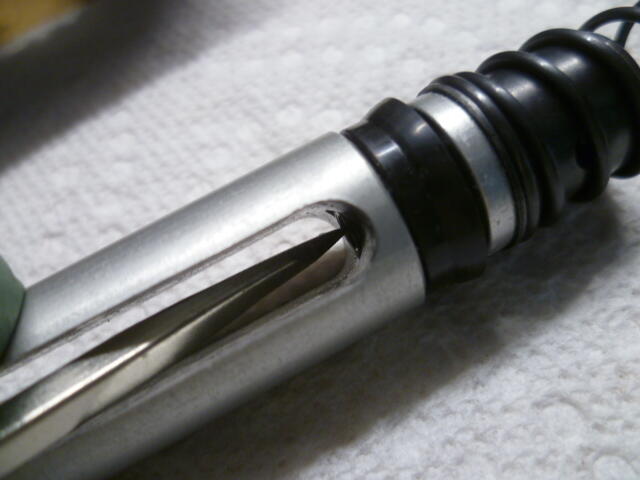
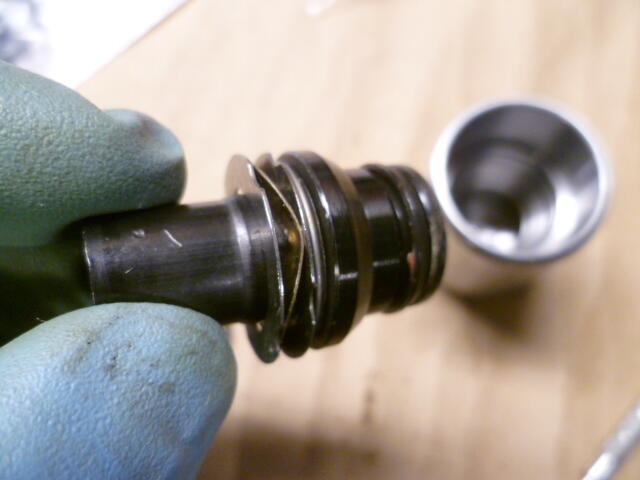
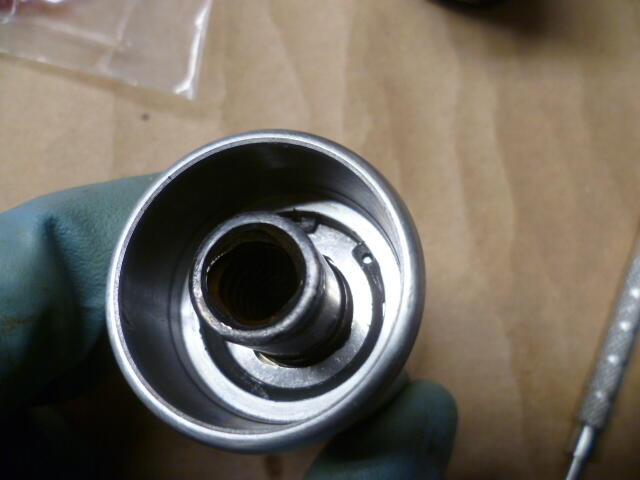
That is because of the way the valve works. When the piston is sitting static on the bench, the valve is closed. That's why spraying stuff into the holes didn't go anywhere. It's not supposed to. Goes like this... Valve is held closed by the spring: When you push on the other end of the little rod (it's actually a hollow tube) it compresses the spring and opens the valve. Fluid flows through the center of this tube and out the two small cross holes that you found all rusty like. Here's a pic of the other end of the tube: When the master cylinder is assembled, this little screw runs across the bore of the M/C and opens the valve when the cylinder is at rest. It pushes against this tube to open the valve: So when the cylinder is at rest (and it is important that it IS at rest), that valve will open and allow fluid from the reservoir into the chamber. So.... All that said. Are you SURE your brake linkage and rod sticking out the front of the brake booster are all adjusted properly such that your M/C was actually at rest when your foot was off the pedal? Because if it's not, that valve will never open and you won't get proper operation of the rear circuit.


-
Sigh. You are correct. I accidentally referenced someone else's pic. That's two strikes for me on just this page alone. I think maybe I'll just sit here quietly and watch for a while instead of unnecessarily muddying the waters.


