jfa.series1
 Subscriber
-
Joined
-
Last visited
Everything posted by jfa.series1
-
 Hi Chris, FWIW, I can offer you my real world experience with Tokico HP shocks and urethane bushings. I don't have the knowledge to speak of spring rates and other technical details, just seat-of-the-pants and steering wheel feedback to pass along. I finished my resto last fall, full suspension rebuilds included. I have 70's vintage Mulholland springs all round. Unlike OE-style hydraulic shocks, the HP gas shocks provide some amount of suspension lift and seem to keep the car from fully settling onto the springs. The springs are in full contact, not loose on the strut - they just don't seem to be significantly compressed at rest. On the front, I have eccentric bushings on the LCA's for camber adjustment so no rubber or poly bushings there. I have poly on the T/C rods, steering rack, and steering rod. The front end ride is firm-to-harsh, road feedback thru the steering wheel is harsh and unpleasant - a lot of snap in the wheel from small bumps. On the rear I have full poly except for the moustach bar mounts - I did not want to fool with cutting out the original bushings with the pressed steel inserts. The OE bushings were in good shape, so I left them alone. The ride on the rear is equally as harsh as the front - every small bump is transmitted into the body as impact and noise. This summer I plan to begin replacing poly bushings with rubber to get the harshness out of the ride. My car is not a daily driver, just primarily a fun car for club events, shows, ...etc. Hope this helps in some way. Jim
 -
That is a very nice looking car! Congratulations on a good find. Jim
-
BD also has them at $50 each for the left and right side. The stainless is nice; they come straight and have to be "warped" into the slight curve of the door edge. Jim
-
Here is the link to the spreadsheet. http://www.editgrid.com/user/mlwilliams/Z_Car_Registry And... Mr. Humble, please accept my thanks and appreciation for your wonderful book. I've spent many hours reading it while first planning my resto project, then again many lookups during the project. Jim
-
Ardmore is not that far from Dallas and we have a lot of active Z enthusiasts in this area. Perhaps you can bring your new treasure down to Cars & Coffee in Plano some weekend - it is always the 1st Saturday of the month at the BMW dealership. We would enjoy a bit of socializing with you. Jim http://www.zcluboftexas.org/
-
You can get a new one at Banzai for $7. Jim http://www.zzxdatsun.com/catRubber.php
-
Like you, I went with poly bushings throughout when I restored my car - and now wishing that I had not! Waaayyy too harsh a ride for a street car. I have eccentric bushings on the front LCA's for alignment with my lowered springs, so no chance of going back to rubber there. With poly bushings now on the steering rack, all absorbancy in the steering is now gone and twitchy / high feedback steering is a result. That leaves the T/C rods as a candidate for going back to rubber which I will do when the weather warms a bit. After that, I may go back to rubber for the steering rack. Jim
-
Consider contacting member Thorsten Link in Germany. He located and imported a car from the US in 2009 and may be able to give you some ideas on the search process and potential help on importing. Here is the link to his profile. Jim http://www.classiczcars.com/forums/member.php?22294-thorz
-
That looks like good old 920 Safari Gold - check out my garage. Jim
-
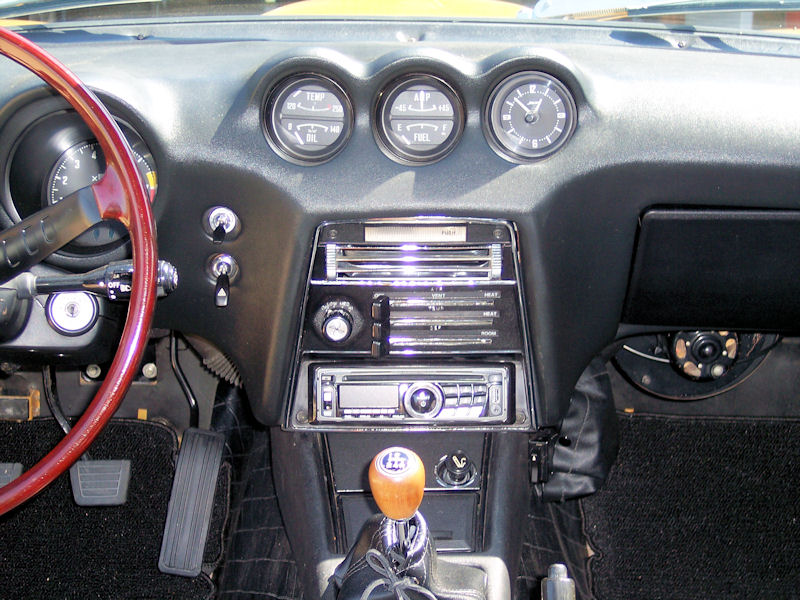
Here is the dash of my recently restored car. I installed a modest-priced Dual single CD unit with removable faceplate to get the USB and AUX ports. This is a standard single-DIN unit and it required a very slight relieving of the opening with a Dremel tool to allow the mounting insert to be installed. In addition to the standard switched power wiring, this unit requires a constant-on connection to maintain its memory settings. The nearby clock wire is constant-on and that is what I used. Hope this helps. Jim

-
There are relatively few S30's out there today that are still original and, I suspect, even far fewer that are in the beautiful condition as your car. On the other hand, S30's that are great candidates for mods are far more plentiful - and that is not attempting to include those rusting away to oblivion. With all that said, my counsel is to keep this great car in the original condition it is in now. Once you change it, the originality and uniqueness will be gone forever - it will become just another modded Z. Have a hankering to build one to your own specs (and I see you are a real car guy)? Then go rescue one that has fallen on harder times and bring it back to life just as you want it to be. Just my $0.02 worth. Good luck with your decision. Jim
-
Check the site classifieds.
-
Your original wheels were a steel rim - 14 X 4.5 with 0 offset, tires were probably 175/75 or possibly 185/70. New wheels and tires are what you like and can afford. Try to avoid extremes that result in clearance and handling problems - stick with 0 offset or as close as possible. Lots of photos and discussions on this site. The original cast iron exhaust manifold is very efficient, a header will have no real performance gains unless you are planning for significant engine mods. A suggestion: build a plan for the car, area by area: body exterior including all weatherseals, interior, suspension, drivetrain, ...etc. Then establish your budget for the areas and the total car. You say you have a great running car. Enjoy it for a while and figure out where the most serious needs are and go to work there. Scattershooting all over the car can result in a mess, cost a lot of money, and result in little or no real satisfaction. Just my humble opinion. Good luck and welcome to the group! Jim
-
I was in the same situation with refinished floorboards and foil-backed insulating material on the floors - my carpets were sliding like they were on glass. I picked up a couple of self-stick, non-skid mats with a granular finish similar to what you find on stairs, got them at Home Depot. Stuck them to the insulation on the floorboards. Problem solved!!! Jim
-
This appears to be one of the vent hoses for the fuel tank - the one that attaches at the middle-rear of the tank and enters the interior compartment behind the tail light cover on the right side. It is possible this hose spans multiple years of S30's. I replaced all 3 of mine during the resto, the P/N's were: 17239-E4601, $31.41; 17235-E4601, $61.53; 17236-E4601, $88.84. If the i.d. is about 1/2" then I think yours is the 3rd one in my list. Hope this helps. Jim
-
I agree with Arne on the satin black original finish. A matte or flat black will attract and hold dust, will show marks any time it is wiped down. Jim
-
Check out this current thread on a similar question to get a feel for what is involved with a swap. The override bars provide almost no additional protection for the rear, a slight protection for the hood on the front. Jim http://www.classiczcars.com/forums/showthread.php?44056-Z-Store-Fiberglass-Bumpers
-
The FSM is specific about installation of the oil pump to avoid this potential problem - the #1 cylinder must be at TDC prior to installing the pump. This will get the driveshaft for the distributor into the correct position. As recommended above, pull the pump and dizzy to check for damage, then start over with pump install. Don't forget to get your plug wires back into the correct positions. Jim
-
When I found my car in the dealer's showroom, the front and rear override bars were already installed - along with every other option the dealer could think of at that time. They had cut off the rubber on the front bumper guards, then drilled them for the override mounting screws. I suspect other dealers may have just drilled thru the rubber to mount the override bar. Probably a coin toss for you. Either way, you are going to damage the rubber to attach this piece. Jim
-
Don't overlook your local salvage yards as possible sources for pick-and pull. Also, consider contacting Roger Schmidt at Z Barn - with as many Z's as he has dismantled, he may have a large supply of used clamps. Getting used clamps replated is a fairly lost cost approach. Jim
-
Hey Chase - you may have already figured out the P/N does not get a hit on the Courtesy site. It certainly does not resemble a Datsun/Nissan P/N. The reference to "BFE" is possibly intended to be "BRE". The original BRE 240Z "Spook" used only in 1970 is visible in my garage. The second version is the one more commonly seen, typically available from MSA and others - and also directly from BRE. Note that BRE does not call the new model a Spook, they refer to their "Original Air Dam". http://www.bre2.net/mm5/merchant.mvc?Screen=PROD&Store_Code=B&Product_Code=bre_bodyparts_240zairdam&Category_Code=bre_datsun_body_parts Hope this helps. Jim
-
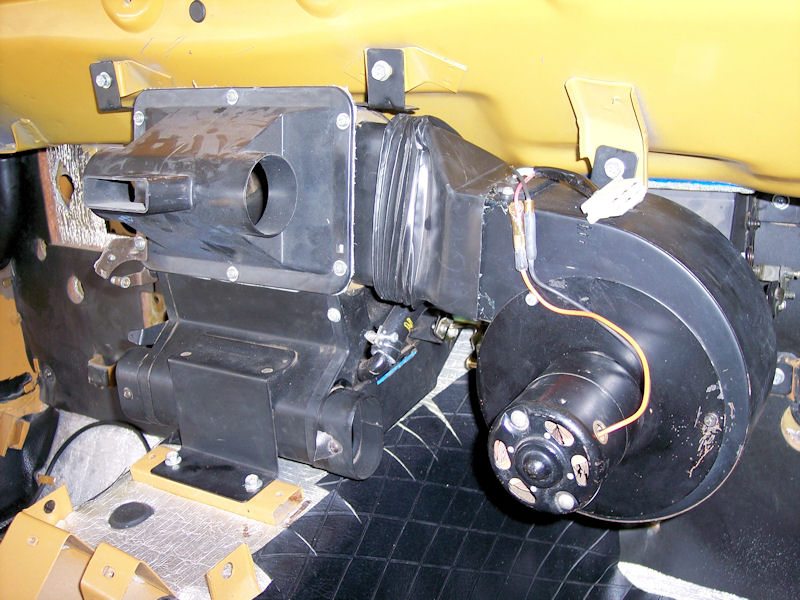
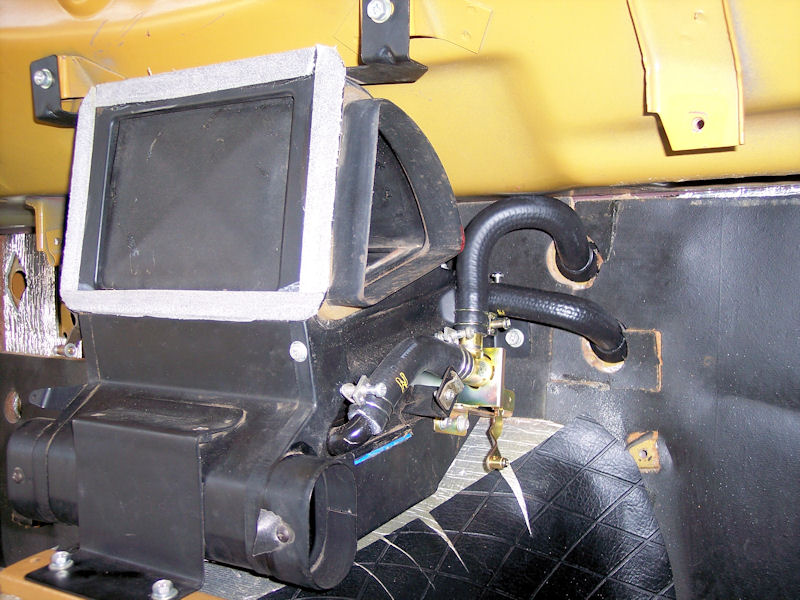
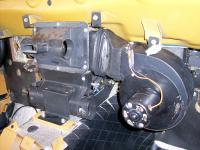
Nope, you do not have pull the dash but you will probably wish you had (just kidding). This is a PITA job because everything is tough to reach. Here are a couple of pics to let you know what everything looks like under the dash. The heater core comes out of the enclosure on the right side. Therefore, the blower must come out first: one hard control wire for the air inlet flap, electrical connections, 3 bolts on the firewall. After the blower is out, disconnect the flex hose (oval shape), hard control wire on the watercock, heater hoses from the firewall. Unbolt the watercock from the housing, then remove the elbow hose and watercock. Open the heater air flap using the dash control. There is a linkage wire inside to disconnect because the right side flap comes off with the right side cap panel. I think only one screw (visible on front) holds the right side cap panel in place. With the cap panel off, the heater core will slide out. Be sure to replace the short elbow hose (recommend the pre-bent one) and the watercock while you have everything down and consider replacing the heater hoses as well for the same reason. Hope this helps and good luck. Jim

-
You can buy a plastic plug that will fit into the rear of the transmission if you decide to drop the driveshaft. The shop that did my work had it on hand, I suspect it is a standard size item - not specific to Z's. Transmission/gear lube is especially smelly - it will PERMANTLY stain and smell any fabric it comes in contact with. Ask me how I know! Jim
-
Most of these clutches will bleed by gravity. Mine took about 15 sec. to flow with all new parts. Jim
-
Are you limiting your search to Canadian cars? Are there significant issues with bringing in a car from the states? If the import regs are not too difficult for an antique vehicle, look at some California cars that have a strong chance to rust free and not heavily modded. Jim