Zed Head
Community Member
-
Joined
-
Last visited
Everything posted by Zed Head
-
Take a good look at the ring gear on the flywheel. It might be worn or have moved. A small mirror through the starter hole might be needed to get a good look.
-
Did you put the five speed in or did you buy it that way? If it was previously an automatic, it might still have the spacer behind the flywheel. That would hold the flywheel away from the starter.
-
One more angle to think about that might help - the pistons are pulling against the throttle blade. If the throttle was completely closed, no air would flow through the AFM, each stroke would produce a vacuum, except for any remaining exhaust gases. The more closed the throttle, the less "charge" (oxygen/fuel blend ready to burn) there is for each combustion event, because the air that entered is at lower pressure (fewer gas molecules). Opening the throttle increases intake manifold pressure, more molecules flowing through the AFM. I've always thought of the EGR as a way to produce an effectively smaller engine also. The gas that's added to the intake system is essentially inert, it's oxygen has been burned. So the more EGR gas that's pulled in, the smaller the "charge" is, just like in a smaller engine, or like at low intake pressures (high vacuum/closed throttle). The fuel/oxygen ratio is still correct though, so proper combustion can still occur. Beer.
-
Some devil's advocate stuff, and channeling your own intuition. Oil pressure results from lack of flow, the pump pushing against obstruction. You noted very good oil pressure in the first post, but are seeing 51 camshaft turns (102 crankshaft) before oil flows, plus your observation that flow seemed low, just by eye. Seems like you might have some obstruction in the channel to the head. It's small already and wouldn't take much to block it. Some people open it up to get more flow, especially if they're running a spray bar and an internally oiled cam. That another thing that's common to both camshafts, besides the springs.
-
You know those are for Z's not ZX's right? Pretty sure they're different. Maybe you picked up a Z recently, thought you had a ZX. Aside - checked Courtesy Parts and they show the original non-adjustable compression rods as available. Only $156.37.
-
Maybe your subconscious added emphasis when you wrote, but the thing that jumps out is the spring pressure. My understanding is that the spring rate, spring height and the distance between seat and retainer (giving preload) will determine initial (base circle) pressure. Maybe one of those three things is off.
-
Open the link labeled Blaster 2 Coil w/Ballast..., then click on the tab that says Instructions, to see the drawing of wire connections. It's a PDF file. Of course, you're probably on a phone with a tiny screen so won't be able to open or see the file. If so, you'll have to borrow a computer with a big screen.
-
This topic has come up before. I replied in the thread below, but I think that my understanding was off. With the Blaster 2 and points you're supposed to install an extra 0.8 resistor. Which would drop the primary resistance to 1.5 ohms, the original value. That might be your solution. Might also be what Nigel was referring to in your Hybridz thread. And, it's in the MSD instructions. http://www.classiczcars.com/forums/electrical-s30/44994-msd-blaster-2-installed-onto-72-240z-idling-become-unstable.html Instructions: Blaster 2 Coil w/Ballast & Hardware - 8203
-
The Blaster 2 coil has 0.7 ohms primary resistance and the stock 73 240Z has 1.5 to 1.7. It's not the right coil for the 240Z ignition system, despite what MSD's sales literature implies. Could be why the tach doesn't work, you're passing too much current through the tach. Good luck with the problem and the attitude.
-
You never answered the question about what you're trying to do over on Hybridz. And the last reply on that thread was three days ago, not weeks or months. Put the stock coil back on if you want the tach to work.
-
Here's a guy selling a couple of ECU's - Ecu - Nissan : Datsun ZCar forum :Nissan Z Forum: 240Z to 370Z The fuel pump relay and EFI relay are combined in to one, up to some time in 78, when I think that they might have split them up. It's a 1x1x2" silver box mounted above the hood latch handle. I had a 78 with the same relay as my 76.
-
As Wade says, and you suspected. Not enough cranking amperage left to keep the voltage up. Batteries wear out eventually after so many charge-discharge cycles. Any good auto parts store can test it for you to be sure. And there are no factory issue starter relays. The power to the starter solenoid comes directly through the ignition switch. There are other relays but they aren't for the starter. There are other things on the solenoid power wire that could be causing a drawdown. If your battery tests okay, you might get the wiring diagram out and find those other things, like the seat belt buzzer timer, for example.
-
It's the mount, not the bar, if I read it right. If it was my car, I might just take the mount (off of the bar) and the car to a "muffler" shop and ask if they can weld it back on. The old marks are still on the car and exhaust-building pros are used to welding thin metal. Might be less than $50, I would guess. Clean up the mount and the spot on the car first and it will be even cheaper. Worst case, they'll just give some advice on why it won't work, and the right way to do it.
-
I've read that the 260Z's tend to have a problem passing enough current through to the solenoid to get it to do its job. The fix is to install a relay to drive the starter solenoid. If your remote starter does the job, but the regular starting circuit doesn't, you might have that problem. Search around the internet for "260Z starter relay" and you'll find more information.
-
Could be the AC belt idler pulley bearing. Remove the AC belt and run the engine and see if the noise goes away. The water pump and alternator belt will still put tension on the damper. You can run without that belt for while also to see if the noise comes from one of those two. Then run with just the AC belt on. Don't know why someone would suggest a damper problem first. That would be the last place I'd look.
-
You would get a stronger spark over the full RPM range with the right coil for the system. The ignition circuit is a set of parts designed to work together to give proper current flow. Each component has resistance. The lower resistance coil will charge faster and give stronger spark at high RPM, and you could also set your spark plug gaps at the 1979 spec. of 1.0 - 1.1 mm. Your C6R coil is limiting potential.
-
Double. Got re-directed to the full editor for some reason.
-
A tiny change in orientation at the fittings will affect how the pipes fit when you reinstall. A couple of degrees off, longitudinally or rotationally, at a flange can equal an inch or two at the other end of the pipe. You might consider drilling holes and using strap steel and screws while it's on the car to get a rigid assembly. It would be like a mechanical tack weld. You can fill the screw holes during welding. I had a factory down pipe that looked perfect, even during assembly, but was off just enough so that I couldn't tuck it up to hang it without getting a leak.
-
Many of the hoses came from the factory labeled with a letter on a small piece of tape. If you're lucky the piece of tape is still there. If you change a hose, move the label or put a new one on. The letters correspond to the diagram.
-
The three-way connector is just a typical Tee fitting. One line connected to the throttle body (ported vacuum, only active when the throttle is off-idle), the other line ran to your vacuum advance canister on the distributor and the last one ran to one of the nipples on the cap on the carbon canister. The one to the carbon canister was used to open the main vacuum line to the manifold that would clear the canister of adsorbed gasoline vapors on the carbon. The last line on the canister cap was connected the vapor tank (reservoir tank in the FSM) back above the gas tank. If it's not connected to the canister it might be hanging around spewing the occasional gas fume in to the engine bay.
-
beerman makes a good point. Everything is there to create a spark but the ignitor is not making and breaking the circuit. Re-read thread and it seems like your coil negative post is grounded all the time. You either have too many wires connected to the negative post or you have a short to ground on the wire to the negative post or the module is damaged. That would explain all of the symptoms, except maybe the spark when the key is turned on. I would focus on the wire to the negative post and any place that it goes. This link might help too - PerTronix Instruction Manuals
-
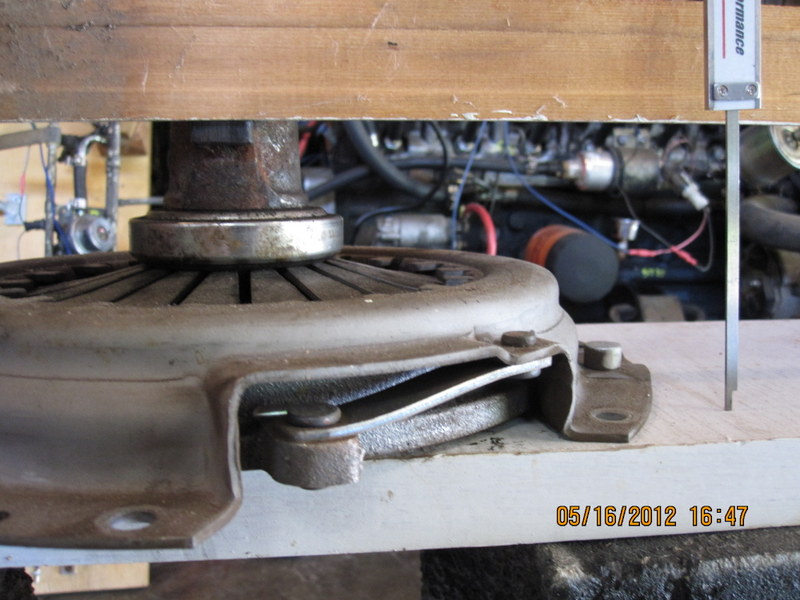
Several people over the years (me and, I think, Eurodat, from this forum) have determined that a stack height of ~92 mm from the flywheel surface to the surface the clutch forks ride on, will pretty much guarantee that the parts will work together. I've attached a picture to demonstrate. Measure to the tips of the diaphragm fingers and subtract to get the collar height you need. There are three or four different collars out there. Edit - I see that you've already taken the measurement in your first post. Do the math and hope you can find the right collar. Edit 2 - I re-read your post and realized that you didn't really ask a question. But, 92 mm is still good information. Anyway, good luck.
-
Good detective work. The power transistors are the two silver disc-shaped objects on the top though, your burned object might be a capacitor. Just a guess, someone that knows electronics would recognize the shape. The sealed can look fits capacitor. Someone else on this forum found a similar burned object. They were going to try a fix also, never heard what happened. I replaced the transistors on an ECU so fixing the ECU is possible, but my parts weren't over-heated, they just went bad internally.
-
More resistance will give more fuel. Most of the potentiometers available will give way more resistance than needed, enough to flood the engine out. The engine probably wouldn't even run if you had the knob turned to full rich. So whichever end of the rotation it's at now is going to be the lean end.
-
I might be wrong here, with the electrical terminology, but I think that it depends on which side of the potentiometer you are using as a rheostat. If you wire up one side, it will be clockwise, the other it will be counterclockwise. Only two of the three pins are used. So yours could be either way, if you didn't measure resistance before you installed, you'll just have to turn it and use your nose, or the seat of your pants. Actually, I see that it's referred to in the atlanticz.ca page that you linked, about 1/3 down. I don't think it's necessary to short two pins together as shown, but apparently it won't hurt anything.