


Zed Head
Free Member
-
Joined
-
Last visited
Everything posted by Zed Head
-

-
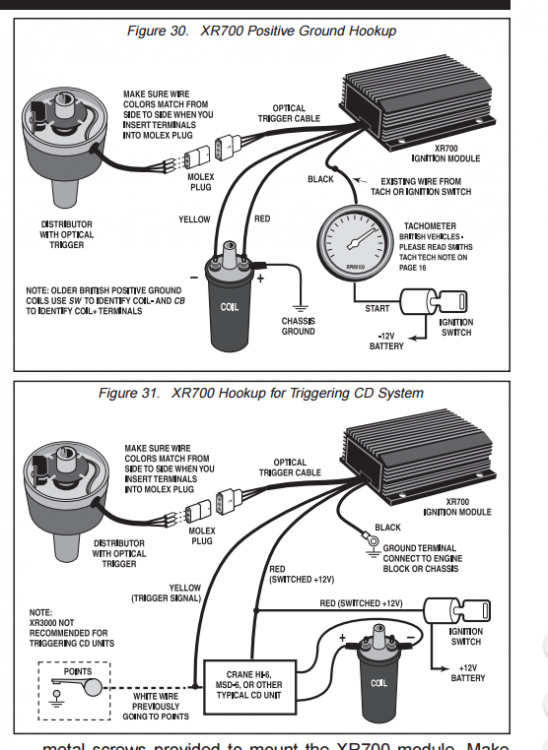
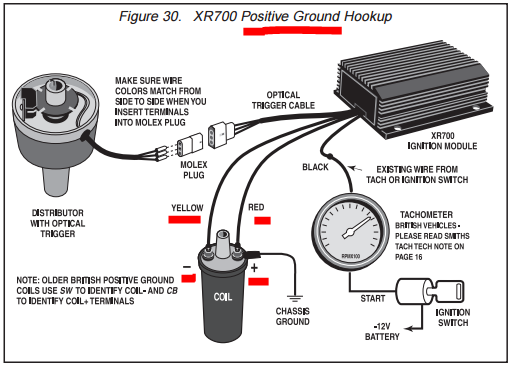
I should apologize, I didn't understand what Crane was showing in their instructions. Added a another picture from their manual. Apparently yellow negative, red positive is how negative ground systems are connected also. I had an electronic GM HEI module go bad and it produced a spark, but it was a weak orange spark. Not strong enough to ignite the fuel-air mixture. Could be that your Crane box has gone bad. You can see the Run/On, and Start wires in their diagram. At least get a meter and confirm that you have those wires connected to coil positive.
-
I've learned of the u-shaped device as a micrometer, and the device with the depth probe as a caliper. Although, in literal terms they both can measure on a small scale. Could be the point of the misunderstanding. I like the split-the-difference method. Mark the point on the damper pulley where the piston is 1 inch deep (or 2, pick your number) in the bore, go past TDC and mark 1 inch deep again. The mid-point between those two marks is TDC. The problem with trying to hit the top is that the piston barely moves at all at the top, for quite a few degrees of crankshaft movement.
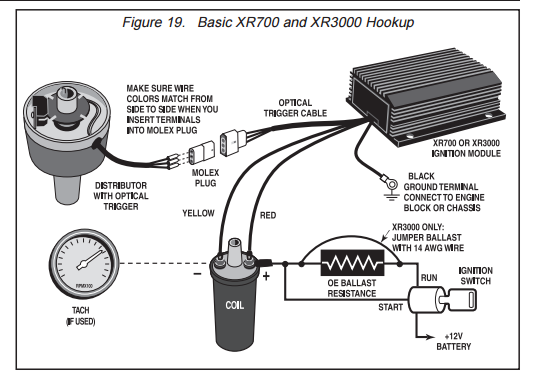
Willy-nilly wire connecting will damage parts. Hope you didn't damage the XR700 box. Red positive, yellow negative is a positive ground application according to the instructions. You're hooked up backward. Our cars are negative ground. I would get a meter and read the instructions (attached). Use the meter to confirm which wires have power when the key is On and which have power when the key is at Start. http://www.cranecams.com/uploads/instructions/9000-0700_.pdf
 I get lost sometimes when looking at floor pans and frame rails, but it looks to me like somebody replaced your floor pan, but didn't finish the job with a new frame (chassis) rail. Found a couple of internet links that show what I'm talking about. You floor pan is very flat and featureless, probably custom-made. http://forums.hybridz.org/topic/107012-i-know-its-another-dumb-floor-question/ www.youtube.com/watch?v=gjUJmDtKxyk Zedd Findings and Bad Dog parts both sell rails, and Zeed sells floor pans. This thread has some comments from gnosez, who is Bad Dog. http://www.datsunzparts.com/ http://baddogparts.com/
The bright links help you get started. But when you're done, the check is to look at the notch and the groove on the chain sprocket and the cam shaft retaining plate. How do you find TDC with a micrometer? I haven't seen that method. Added the picture from the FSM of the notch and groove. Still doesn't tell you if the crank is at TDC, but it's something. Overall though, the problem here is that you're trying to figure out which indicator is wrong - your micrometer method, or the damper marks and tab. If you know that your micrometer method is right, there's no need to look at the chain, sprocket, or cam at all. The damper just indicates TDC. The damper mark should be correct even with the head completely off of the engine. No cam, sprocket, chain. Actually, that would be the very best time to check your damper and tab since you can easily measure TDC then. The damper mark and tab mark's only purpose is to show you where piston #1 is.
I get lost sometimes when looking at floor pans and frame rails, but it looks to me like somebody replaced your floor pan, but didn't finish the job with a new frame (chassis) rail. Found a couple of internet links that show what I'm talking about. You floor pan is very flat and featureless, probably custom-made. http://forums.hybridz.org/topic/107012-i-know-its-another-dumb-floor-question/ www.youtube.com/watch?v=gjUJmDtKxyk Zedd Findings and Bad Dog parts both sell rails, and Zeed sells floor pans. This thread has some comments from gnosez, who is Bad Dog. http://www.datsunzparts.com/ http://baddogparts.com/
The bright links help you get started. But when you're done, the check is to look at the notch and the groove on the chain sprocket and the cam shaft retaining plate. How do you find TDC with a micrometer? I haven't seen that method. Added the picture from the FSM of the notch and groove. Still doesn't tell you if the crank is at TDC, but it's something. Overall though, the problem here is that you're trying to figure out which indicator is wrong - your micrometer method, or the damper marks and tab. If you know that your micrometer method is right, there's no need to look at the chain, sprocket, or cam at all. The damper just indicates TDC. The damper mark should be correct even with the head completely off of the engine. No cam, sprocket, chain. Actually, that would be the very best time to check your damper and tab since you can easily measure TDC then. The damper mark and tab mark's only purpose is to show you where piston #1 is.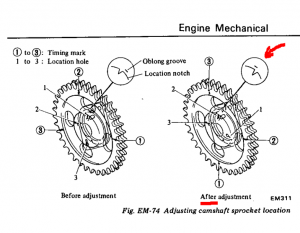 You're on the right forum. I wonder if the PO is/was a member here. Is that a CB antenna? Not stock! I can see the big spring at the base. Easily fixed. Very nice car.
If you consider what PCV offers, you might want to keep it. It purges the crankcase of fuel, and exhaust, and moisture. Keeps things clean. The only real downside is if you're racing and you need every fraction of a horsepower. It does allow some small amount of oxygen-deficient air (blow-by) in to the intake manifold. It won't fix a blowby problem but will cover for it. You have an L28, but it must have carbs. Right? Here's a link to MSA where they talk about the early PCV. Later Nissan FSM's put the description in the Emissions chapter. http://www.thezstore.com/page/TZS/PROD/18-9050
One picture? 1970? No VIN? C'mmmoonnnnn..!!
I wish that I still had all of the cars that I've had. I'd be sitting on some good money. The Dart Sport had the twin snorkel hood scoops, the later rounded fender body style (not the early squared off version), and a 340 with an 800 cfm ThermoQuad carburetor. I bought it for $600, rebuilt the carburetor (it had a sunk float), and made noise around the neighborhood for a few months. Can't remember why I sold it. Maybe I had a moment of sensibility.
Yes you can. They overheat and boil fluid out with unregulated voltage (that's a good sign of a bad regulator). Then, if you have a 1974 Dodge Dart Sport, the electronic ignition module will die like somebody shot it, after you replace the external regulator, as you're heading in to town. If you're lucky a local mechanic will be standing in his yard and come over to tell you what happened after you describe the recent problems.
If I had a nice-looking engine I'd only put the engine puller on when I was pulling an engine. I don't even know why Nissan leaves those on unless it just makes factory assembly easier, they don't want to add a step, and they're inexpensive. They're certainly not very attractive. I'd install the engine then remove it and put it in a drawer.
Don't mean to get all pedantic and I hope I'm not irritating - but the chain's only purpose is to spin the camshaft and keep it oriented properly to the crankshaft. That's why I focus on the crankshaft and the camshaft and ignore the bright links. You have the cam and crank properly oriented, now you just have to put the chain and sprocket on so that that orientation is maintained with the straight side of the chain tight, like it will be when the engine is turning. If the damper and tab marks are off when you're done then change the damper and/or tab. Not the chain or sprocket or anything else. The damper marks and tab are just external indicators. If the parts aren't indicating what you just confirmed as correct, the problem is with them. Only reiterating to be sure. One place you can get screwed up on when confirming cam orientation is to not have the straight side of the chain tight. It has to be tight. Still wondering about the "straight up and down" part though. You're in the eyeballing it regime, there are no marks to go by. "With the crank key slot is straight up and down." Here's a thought - if you have an old damper try it and see if the marks are still off. Two identically bad parts would be unusual.
What will you see under the timing chain cover that will tell you more than what you can see now? There's nothing under there. All of the marks you need are visible under the valve cover and on the damper and timing tab. There's no need to pull the cover. If you want to be exact, better to get a dial indicator down the #1 bore and verify TDC that way. That's the basis of your questions. Everything revolves around piston position.
There was a bot? Does that come from botfly? Lays eggs that hatch inside? Ewww... Definitely more pleasant. Even the ads that slip through. Coffee...uuummm
You never know. If the damper mark doesn't match the timing tab and you're sure that the mechanical are correct and solid, just change the tab or the damper. The notch and the tab are just indicators of what's inside. You're blending together many things, the shiny links (which don't matter at all really, they're just a convenience), the ignition timing marks (the tab and damper notch or notches), and the cam timing. They're really separate things, that can be addressed independently. I would ficus on the crankshaft and the cam timing as an assembly, and the crankshaft and the ignition timing. Use the notch and groove for cam timing, not the shiny links, and the marks on the damper for ignition timing. All with the crank key groove straight up. I would forget about the shiny links entirely. They're just a distraction.
Do you mean straight up relative to gravity or straight up relative the front of the engine. Did you adjust for the tilt of the engine in the chassis?
Seems like a good guess.
You're on the right forum. I wonder if the PO is/was a member here. Is that a CB antenna? Not stock! I can see the big spring at the base. Easily fixed. Very nice car.
If you consider what PCV offers, you might want to keep it. It purges the crankcase of fuel, and exhaust, and moisture. Keeps things clean. The only real downside is if you're racing and you need every fraction of a horsepower. It does allow some small amount of oxygen-deficient air (blow-by) in to the intake manifold. It won't fix a blowby problem but will cover for it. You have an L28, but it must have carbs. Right? Here's a link to MSA where they talk about the early PCV. Later Nissan FSM's put the description in the Emissions chapter. http://www.thezstore.com/page/TZS/PROD/18-9050
One picture? 1970? No VIN? C'mmmoonnnnn..!!
I wish that I still had all of the cars that I've had. I'd be sitting on some good money. The Dart Sport had the twin snorkel hood scoops, the later rounded fender body style (not the early squared off version), and a 340 with an 800 cfm ThermoQuad carburetor. I bought it for $600, rebuilt the carburetor (it had a sunk float), and made noise around the neighborhood for a few months. Can't remember why I sold it. Maybe I had a moment of sensibility.
Yes you can. They overheat and boil fluid out with unregulated voltage (that's a good sign of a bad regulator). Then, if you have a 1974 Dodge Dart Sport, the electronic ignition module will die like somebody shot it, after you replace the external regulator, as you're heading in to town. If you're lucky a local mechanic will be standing in his yard and come over to tell you what happened after you describe the recent problems.
If I had a nice-looking engine I'd only put the engine puller on when I was pulling an engine. I don't even know why Nissan leaves those on unless it just makes factory assembly easier, they don't want to add a step, and they're inexpensive. They're certainly not very attractive. I'd install the engine then remove it and put it in a drawer.
Don't mean to get all pedantic and I hope I'm not irritating - but the chain's only purpose is to spin the camshaft and keep it oriented properly to the crankshaft. That's why I focus on the crankshaft and the camshaft and ignore the bright links. You have the cam and crank properly oriented, now you just have to put the chain and sprocket on so that that orientation is maintained with the straight side of the chain tight, like it will be when the engine is turning. If the damper and tab marks are off when you're done then change the damper and/or tab. Not the chain or sprocket or anything else. The damper marks and tab are just external indicators. If the parts aren't indicating what you just confirmed as correct, the problem is with them. Only reiterating to be sure. One place you can get screwed up on when confirming cam orientation is to not have the straight side of the chain tight. It has to be tight. Still wondering about the "straight up and down" part though. You're in the eyeballing it regime, there are no marks to go by. "With the crank key slot is straight up and down." Here's a thought - if you have an old damper try it and see if the marks are still off. Two identically bad parts would be unusual.
What will you see under the timing chain cover that will tell you more than what you can see now? There's nothing under there. All of the marks you need are visible under the valve cover and on the damper and timing tab. There's no need to pull the cover. If you want to be exact, better to get a dial indicator down the #1 bore and verify TDC that way. That's the basis of your questions. Everything revolves around piston position.
There was a bot? Does that come from botfly? Lays eggs that hatch inside? Ewww... Definitely more pleasant. Even the ads that slip through. Coffee...uuummm
You never know. If the damper mark doesn't match the timing tab and you're sure that the mechanical are correct and solid, just change the tab or the damper. The notch and the tab are just indicators of what's inside. You're blending together many things, the shiny links (which don't matter at all really, they're just a convenience), the ignition timing marks (the tab and damper notch or notches), and the cam timing. They're really separate things, that can be addressed independently. I would ficus on the crankshaft and the cam timing as an assembly, and the crankshaft and the ignition timing. Use the notch and groove for cam timing, not the shiny links, and the marks on the damper for ignition timing. All with the crank key groove straight up. I would forget about the shiny links entirely. They're just a distraction.
Do you mean straight up relative to gravity or straight up relative the front of the engine. Did you adjust for the tilt of the engine in the chassis?
Seems like a good guess. I would measure voltage at the alternator plug with the key On. Both should show battery voltage. You don't even need to know which is which. Unless one has no voltage. Could be that your alternator has had the L circuit shorted at the B post, to eliminate the need for one wire. That would explain why it still charges. Could also be that your three-wire is actually a one-wire. I think that ammeter only shows charge and discharge from the electrical system. No indication of voltage at all. Probably why everyone switched to voltmeters and a charge light.
Also. 12.2 volts is a partially charged battery. ~50% by the chart shown here - http://modernsurvivalblog.com/alternative-energy/battery-state-of-charge-chart/ Could be a part of the problem. p.s. I'm not a survivalist. That site just had the best-looking and informative chart.
Remembered, halfway, also, that the power that was getting interrupted with the early switches was probably coil power. Little to do with this problem. So the early/late switch comment is probably not relevant. Most of my posts in this thread have been rambly and off-topic. If the yellow wire has constant power as the instructions direct, the radio should work as expected. You might try disconnecting the solenoid wire from the starter just to see if it's the big starter current draw causing problems or a switching problem. You won't get the drop to 10.5 volts without the starter motor kicking in. Here's the Retro site for those interested. https://www.retromanufacturing.com/collections/all/1971+datsun https://www.retromanufacturing.com/pages/wiring-your-radio
I just did a Google on "power interrupt radio capacitor" and the first hit was some guy annoyed that his CD player was losing its spot when he started his car. So he devised a fix. Unfortunately, there's a diode involved. He didn't say what type or year of car. Hail, hail, the brain full of trivia. http://blog.iharder.net/2010/07/29/radio-how-to-keep-your-radio-on-when-you-start-your-car/
Google - http://forums.hybridz.org/topic/73862-tilton-light-flywheel-for-l-series/ Probably need to clean yours to see any engraving or markings. https://www.google.com/search?q=tilton+flywheel+nissan&biw=1280&bih=895&site=webhp&source=lnms&tbm=isch&sa=X&ved=0ahUKEwjg86PF6uTLAhVB8mMKHR_VBpoQ_AUICCgD John Coffey may have seen one of these before - http://zhome.com/Racing/Auto/Coffey.htm
A thought - maybe a branch from the Start power wire to the radio would maintain its memory. It can't draw much. If it does, you could use a relay. You could have have Acc, On and Start all wired to the radio power. Use diodes to prevent backfeed. Still think a good unit has better power supply control. Which I think is what you're originally suggesting anyway.
I would measure voltage at the alternator plug with the key On. Both should show battery voltage. You don't even need to know which is which. Unless one has no voltage. Could be that your alternator has had the L circuit shorted at the B post, to eliminate the need for one wire. That would explain why it still charges. Could also be that your three-wire is actually a one-wire. I think that ammeter only shows charge and discharge from the electrical system. No indication of voltage at all. Probably why everyone switched to voltmeters and a charge light.
Also. 12.2 volts is a partially charged battery. ~50% by the chart shown here - http://modernsurvivalblog.com/alternative-energy/battery-state-of-charge-chart/ Could be a part of the problem. p.s. I'm not a survivalist. That site just had the best-looking and informative chart.
Remembered, halfway, also, that the power that was getting interrupted with the early switches was probably coil power. Little to do with this problem. So the early/late switch comment is probably not relevant. Most of my posts in this thread have been rambly and off-topic. If the yellow wire has constant power as the instructions direct, the radio should work as expected. You might try disconnecting the solenoid wire from the starter just to see if it's the big starter current draw causing problems or a switching problem. You won't get the drop to 10.5 volts without the starter motor kicking in. Here's the Retro site for those interested. https://www.retromanufacturing.com/collections/all/1971+datsun https://www.retromanufacturing.com/pages/wiring-your-radio
I just did a Google on "power interrupt radio capacitor" and the first hit was some guy annoyed that his CD player was losing its spot when he started his car. So he devised a fix. Unfortunately, there's a diode involved. He didn't say what type or year of car. Hail, hail, the brain full of trivia. http://blog.iharder.net/2010/07/29/radio-how-to-keep-your-radio-on-when-you-start-your-car/
Google - http://forums.hybridz.org/topic/73862-tilton-light-flywheel-for-l-series/ Probably need to clean yours to see any engraving or markings. https://www.google.com/search?q=tilton+flywheel+nissan&biw=1280&bih=895&site=webhp&source=lnms&tbm=isch&sa=X&ved=0ahUKEwjg86PF6uTLAhVB8mMKHR_VBpoQ_AUICCgD John Coffey may have seen one of these before - http://zhome.com/Racing/Auto/Coffey.htm
A thought - maybe a branch from the Start power wire to the radio would maintain its memory. It can't draw much. If it does, you could use a relay. You could have have Acc, On and Start all wired to the radio power. Use diodes to prevent backfeed. Still think a good unit has better power supply control. Which I think is what you're originally suggesting anyway.


Important Information
By using this site, you agree to our Privacy Policy and Guidelines. We have placed cookies on your device to help make this website better. You can adjust your cookie settings, otherwise we'll assume you're okay to continue.