


Everything posted by Zed Head
-

-
Sounds like you're living the good life. Good luck. Don't forget to reset timing with the new distributor.
-
Clogged air filter? When you open the throttle like that all that you're doing is allowing the engine to pull in more air. There's no accelerator pump like a carb'ed car. The fact that the engine doesn't "grab" more air could be because it can't or something's out of time. Has it had a good tuneup in the last three years?
-
Rockauto is dependable and the ZX distributor should work fine. Stick with that. We need to know more about this wedding that has a 1970 240Z as the honeymoon car though...
-
Yes, solid valve trains are noisy. If it's not ticking that means lash might be too tight and you're about to burn a valve. On top of the valve lash noise is the injector ticking which can be surprisingly loud. All you can do is take the measurements and trust the engineers and others who've been there. I've had a noisy #1 lifter for thousands of miles but it's been fine. So, the assumption is that you got all of the seals replaced, all back together, and the engine's running now?
-
I logged in just to say what site already said. If you haven't already bought the Cardone unit, you might just step back and reconsider everything. What are you looking for in your ignition system, how much do you want to pay, etc.? Easy to see how you got on the ZX path but there are other options. The ZX distributor and E12-80 module are a good system though.
-
Pretty sure the E12-80 has the modern current-limiting (dwell control) so the Blaster 2 coil should work fine. He has all of the parts, I'm betting that the distributor needs a little work. Whenever I find a ZX or Maxima distributor in the wrecking yard they're always mis-adjusted and have broken magnets. I don't think that they're very durable. Rockauto sells a replacement bushing for the shaft. " The distributor came off a 280zx "
-
Or disconnect the E12-80 module and do the same test you just did over again. If the module is shorted internally you'll get a stronger spark.
-
Remove the distributor from the engine and do the same thing with the coil main wire, but spin the distributor instead, with the key on. If the distributor and module are working you should get the same weak spark.
-
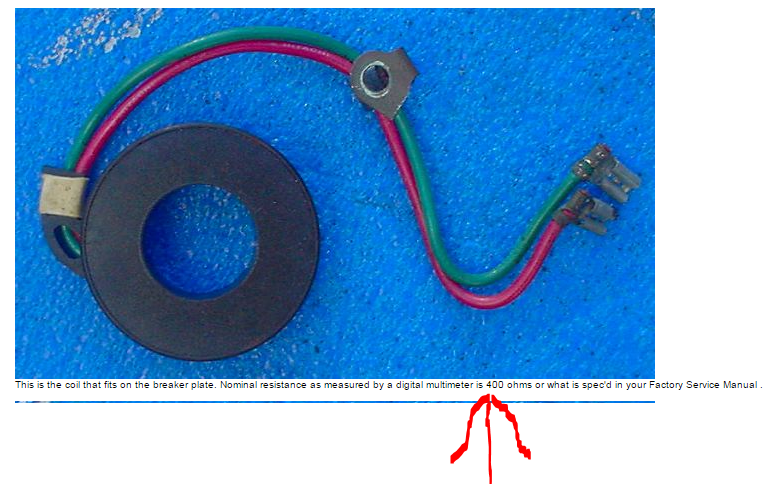
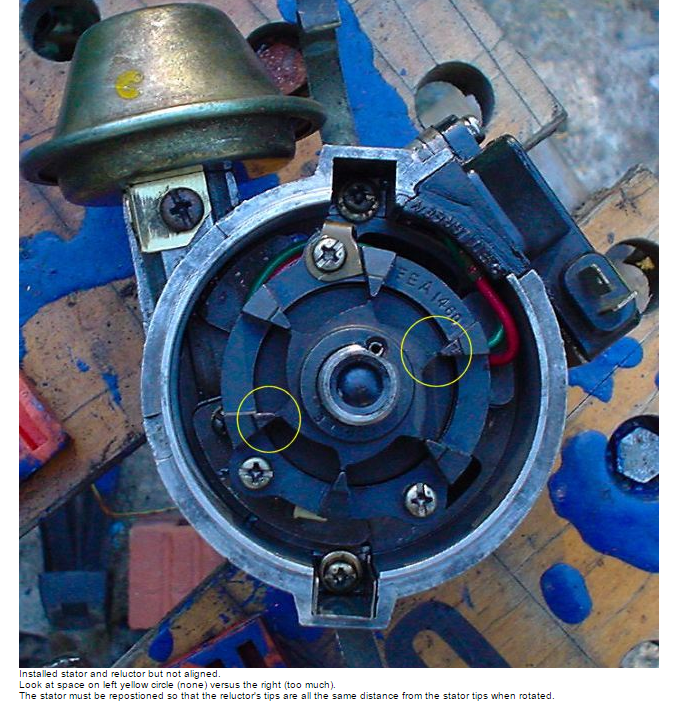
The part that many people seem to have the most difficulty with on these cars is the need to do lots of measuring and adjusting or fixing if the measurements are wrong. At least you have a meter and are using it. You just need to go deeper. You didn't mention pickup coil resistance or the air gap setting. The electronic module won't work right if it doesn't get the correct signal from the pickup coil. Your coil and wires seem fine, it's the triggering system that's not working.
-
Your wiring seems right. " 12v at the + and 12v at the - " is correct, the voltage is the same because the ignition module is not grounding the coil circuit. You didn't give any information about the distributor. You might have a bad module or a broken stator magnet. Pretty common with the old ZX distributors. Read the swap and rebuild ZX distributor links here - http://atlanticz.ca/zclub/techtips/electrical.htm
-
Forgot to say, those carbs are probably full of old fuel. Take a sniff. Your next move kind of depends on if you like to do things in small steps or one large one. I like to mess around so I'd start it to see how bad things are. But you can waste a lot of time messing around that way.
-
You have one of those PO puzzles. Each finding raises more questions. Why did the core plugs have holes in them? Was he planning to remove them? Why? Maybe it had an overheating problem? If it overheated, is the head warped? Is a warped head the real reason he decided to swap to a V8? Etc.... RossiZ highly recommends purgng the coolant channels. He did his and was shocked at how much crud came out. The water pump is probably fine since it's in a moving fluid zone. The crud drops out in the dead spots. If it was mine, and things aligned, I'd start it and run it for a few seconds to see how it sounds. I don't think enough heat will be generated to damage things. But that's me, others might recommend against. You're on the edge of just tearing things way down to check them out. Water pump, valve cover (timing chain and cam shaft), cylinder head (gasket and warpage), oil pan...
-
This one works well, with an extra board lengthwise for reinforcement - http://www.harborfreight.com/material-handling/dollies/movers-dolly-39757.html Not positive on plug size. Your local Nissan dealer might have them also. http://www.oreillyauto.com/site/c/search/Freeze+Plug/02267/C0367.oap?year=1974&make=Nissan&model=260Z&vi=5142642 Here's the head plug. Nissan uses the very proper term of "welch plug" - http://www.carpartsmanual.com/datsun/Z-1969-1978/engine-240z-260z/cylinder-head http://www.courtesyparts.com/?p=catalog&mode=search&search_in=all&search_str=11021-E3000 #9 here is the block plugs - http://www.carpartsmanual.com/datsun/Z-1969-1978/engine-240z-260z/cylinder-block-fitting http://www.courtesyparts.com/?year=&make=&model=&search_str=01648-00084&p=catalog&mode=search&scat=&search_in=all
-
You can run down and get core plugs at the OReilly or Autozone. Sorry ZStore. Get a cart from Harbor Freight, bolt up a transmission and starter, and you can get an idea of what shape the engine is in. Looks like it was in running shape when removed. People often remove perfectly good engines when they get V8 fever.
-
If it's still assembled you could clean it up and start it. Put it on a cart, crank it up and see what happens. Are the core plugs rusted or removed? Is there a head? If there's no head, is the timing chain held in place with a wedge? The short blocks are known to be very durable and last hundreds of thousands of miles. The heads tend to wear or get warped from overheating before the short block has problems.
-
That part is a capacitor, AKA condenser. The one wire units ground through the case and mount, the two wire units have a separate ground wire, as yours does. But they both do the same thing. If the engine starts that's not likely to be your problem. If it was shorted, you'd know it because it would short whatever it's connected to. I wouldn't worry about unless you've measured continuity and know that it's shorted. If the car sat for ten years, you'll need to give many many more details on what's been done to it before you tried to start it. The gas tanks on these cars aren't well sealed and tend to get rusty after just a few years, let alone ten. The fuel pumps get rusty, the injectors get clogged, the filter could be full of water. Who knows. But since it does start and run for a short while, describe what happens as it dies. Does it just shut off quickly, or does it slowly lose idle speed and die? Will it restart immediately or do you have to wait? If ti won't restart, does it not have spark or not have fuel? The more detail the better. You can't just replace parts one at a time on these cars, you need to do lots of testing. Check the forum's Download section and get the 1978 Service Manual and the 1980 Fuel Injection Guide.
-
Hope you haven't left yet. Forgot to say that the guy at the counter could't find it, but I think that he might have been faking computer literacy. He couldn't find any cars earlier than 1978 either, but there were about 10 out there. It's on Row 30. White.
-
Good luck, They seemed to be having a 50% off sale. I saw a bunch of flyers but didn't read the dates. Just collecting or looking for particular parts?
-
I mentioned this in the novel I wrote in Post 24: the coating has what's called a crosslinking agent in it. The solvents (MEK, acetone, etc.) that carried it in to the tank will be gone pretty quickly but the chemistry might take a little bit longer. I'd keep it somewhere warm so that the crosslinking chemistry (curing) can complete and make the coating durable. Put it outside in the sun and let it bake. If it's well covered inside I wouldn't put another coat in, the strong solvents in the second coat might cause the first coat to swell and come loose from the tank metal. Then you'll have a big floppy balloon of Red-Kote in your tank.
-
Are you sure it's the pump? Your picture shows what looks like an electric pump on the fenderwell, feeding the mechanical pump. It's too high to get a proper prime. Electric pumps generally should be at or lower than the fuel level in the tank so that they don't have to pull the fuel. They're designed to push. You could probably just remount that pump lower if you find that it actually works. Your mechanical pump should also be enough to get you going. You have a lot of wrong there.
-
Went out to see if it had its gas cap. It did, doesn't now (figured out why my tank doesn't "whoosh"). Has some parts left, no engine or transmission (automatic), TC rods, steering gear, front and rear suspension (one drum left), glass, doors (no handles), R180, halfshafts. Bumpers and rear lights are bent up or gone.
-
A plating shop would probably just do a degrease then a plating dip. Electroplating is all about filling cracks and crevices for corrosion resistance, usually. You'd have to see the service description to know what they were offering.
-
I would take a look inside before buying a rebuild kit. Sounds more like a broken part, than something a rebuild kit will fix. Along the same thought direction as EuroD, 2nd and 3rd usually show the signs of wear. Not 4th, for sure. If it has high miles it probably needs a new clutch anyway, before you grind the rivets in to the flywheel.
-
The pump parts can get stuck after stopping. It's essentially a set of roller bearings in a cage. Some rust, wear, or debris can jam it, then a tap can break it free. A mechanical problem, not electrical.
