Zed Head
Free Member
-
Joined
-
Last visited
Everything posted by Zed Head
-
 Everybody's just recommending that you check that the carbs aren't gunked up. Even a dry carb will get some slight corrosion of the aluminum that can cause friction, if it's in a moist environment. They're sensitive creatures. Sometimes it's worse when they're off because they might sit tilted. Then the varnish sticks on unusual parts.
 -
-
-
Looks like two problems, the seal area and the fit of the propeller shaft yoke. I think that steel outer shield is a press fit. You might be able to get it off by twisting and pulling. Nissan got rid of it in later years anyway since the propeller shaft yoke has its own shield. Once that's off you can work on the aluminum if needed. Once it's close though I'd take Euro's suggestion and just seal up the outer edge of a rubber seal and drive it in. You'll break the edge off if you do too much to it. Not an uncommon problem.
-
-
There is no "they" it's just one guy named Al. And he will spin you a story. His member name on this site is URGELUS or something like that. He's saying that the ZX starter is stronger and lighter than the Z starter. Which it is. But you can buy the same starter for less money elsewhere. Al sells inexpensive stuff for a high premium. The real question is how he stays in business. The answer is people who fall for his stuff.
-
It's a shame that Wheeler Dealers bought in to his hype and have added life to what he does. https://www.californiadatsun.com/california-datsun-parts-blog/wheeler-dealers-240z-restoration.html?highlight=WyJzdGFydGVyIl0=
-
Here's the two starters you're looking at. $75 for a polish. https://www.californiadatsun.com/starters/datsun-z-240z-280zx-510-heavy-duty-reduction-starter.html?highlight=WyJzdGFydGVyIl0= https://www.californiadatsun.com/starters/datsun-z-240z-280zx-510-polished-hd-reduction-starter.html?highlight=WyJzdGFydGVyIl0=
-
Like site says, other companies use the Nissan gear reduction starter as a high-performance unit, by installing a different nose on it to fit other engines. That's just a shined up and painted gear reduction starter from CD. Probably from Rockauto. Browse his other products and you'll see that most of them are just inexpensive parts with slight modifications, and a huge price increase. Distributors with a mounting block added - 3 times Rockauto cost. https://www.californiadatsun.com/distributors-and-parts/datsun-240z-280z-e12-80-rebuilt-electronic-distributor.html?highlight=WyJkaXN0cmlidXRvciJd The factory gear reduction starters work well.
-
Should also note that people get bad alternators straight from the shelf. That's why they have a lifetime warranty. But if you're not getting power at the T plug, the alternator can't work. That's probably where your mechanic is stuck. Since the engine runs on the battery, focus on that.
-
Dave WM's has the P terminal also, in his video, I see. The reman companies have consolidated their parts lists down so that just a few will cover a lot of cars. Looks like they're putting the P terminal everywhere now. Sorry about the misdirection. If you post some part numbers.... Can't emphasize enough how untrained the typical parts store employee is. All they know to do is key letters and numbers in to their computer and do what it tells them to do. Occasionally somebody will actually know some car stuff, but the majority don't. It's just the way things are. In the meantime, the Factory Service Manual has all of the testing procedures for the stock system. Your mechanic really needs to go there. It's free! http://www.classiczcars.com/files/file/22-1975-280z-factory-service-manual/
-
-
Here's the thing though - they have to set their test machine up as either internal or external regulation, I think. I'd take it back and make sure you get a guy who knows what he's doing and make sure he tells you if it's internal or external. If you have a part number from the box it came in we could do some detective work also. Could be that the reman guys are packing different things in to the same cases.
-
-
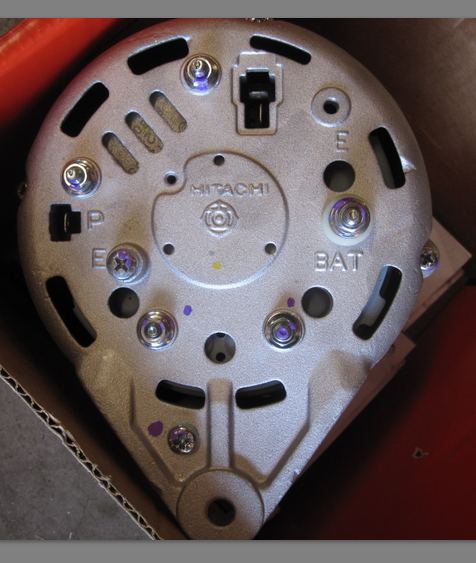
Can you find an S and an L over by the T plug? The yellow wire and the white/black wire. That would be the lock. But the "P" terminal is a pretty good clue also. I think that it only comes on the ZX alternators. Just took a picture of an OReilly Ultima alternator I had on the shelf. Looks just like yours. It's a ZX unit. I'll post a picture in a second.
-
Is it possible that you're too far down the line? Looking at outputs, but not inputs. Maybe go back to the start of the sequence of events. Is the CAS signal getting to the ECU? That would be the "engine is rotating" signal, wouldn't it? Isn't that what the diagram means by "engine speed" sensor? I know many Bimmers use the variable reluctor wheel on the damper. You'll need to know that signal is getting through anyway, even with Megasquirt.
-
Just pulling out some more clues. Could be that the gauges have been out and didn't get reconnected. Also adding something for your mechanic. Even though there may not be an actual charge light, the L(amp) wire is still the power supply for the alternator windings, I believe. I assume that power comes in to the VR through L then goes out to F at the alternator. Looks like Y gets its power from GR which comes from an ignition interlock unit. Not familiar with that. Made my head hurt just following the L wire out and I still don't know how it works. Here's a full diagram - http://atlanticz.ca/zclub/techtips/wiringdiagrams/75_280z_wiring.pdf


-
I hate to parrot your posts back to you but there's some stuff that's not clear. Might help you solve your problems though. Easy to get lost, best to get systematic when problem-solving. It sounds like the engine does actually run. You said the tach doesn't work and the only way to see that is if the engine is running. Plus you can't really ID vacuum leaks unless the engine is running. So you have an engine that will start and run on battery power, but you think that the alternator isn't charging. How did you determine that? Did you measure voltage at the battery terminals or are you using the dash gauge? You also had the alternator bench-tested then apparently replaced it. Most people would have the new alternator bench-tested right away just to save another trip. Then you replaced the VR, so you must have assumed the alt was good. So you should have a good alternator and a good VR but you're not getting voltage from the battery. That might point to the power supply to the VR. Which points to other areas, not necessarily the Signal wire. So, if you went back to the beginning, what would you say the problems are, and how did you identify them? I get the impression that assumptions are being made, and they may be incorrect. We have a bunch of people here who have seen every odd problem, but we work best with the raw clues, not the decisions that have been made. Your mechanic might be working on the wrong stuff.
-
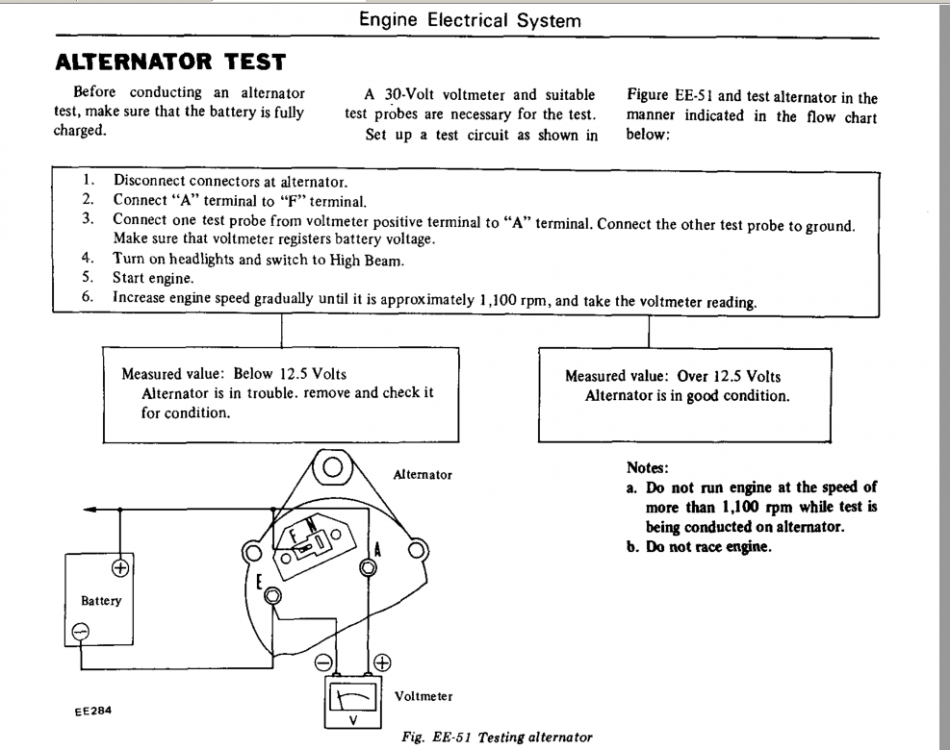
Guess I was way off on the plastic doohickey. F, N, S, and L will tell the story though. Still some concerns about what your guy was looking for . He must have been measuring at the alternator, not the regulator. Here's a test to bypass the regulator. At least he can see that it works and move on to other causes. There is a whole series of tests in the Service Manual. Also, I'm pretty sure that the external regulator suppliers out there are iffy. The solid state ones are sensitive, and the wiring changed over the years. If you find that the alternator works but you can't get a good regulator you might go for the ZX internally regulated system.
-
That's a great video Dave. I had my BAT wire and Condenser backward. So the original picture is not far off. And the later alternators, or the remans, apparently don't have the plastic assemblies on the back. My factory 1976 alt does. So the OP might have the right alternator. Does your alternator have F and N molded in to the case? Can he tell by looking if he has the right one?
-
-
A picture of the engine from the driver's side might show something. Is the distributor not a stock 1975 distributor? The tach is run from the blue wire from the negative post of the coil. But there are many many ways to install a new ignition system so the tach may not even connected. The engines are very durable so the fact that yours runs means that with some work you'll probably get what you expected when you bought it. If you know how to use a multimeter you might be better off in the long run fixing things yourself. The cars are a complicated collection of simple parts. With time most people make great progress.
-
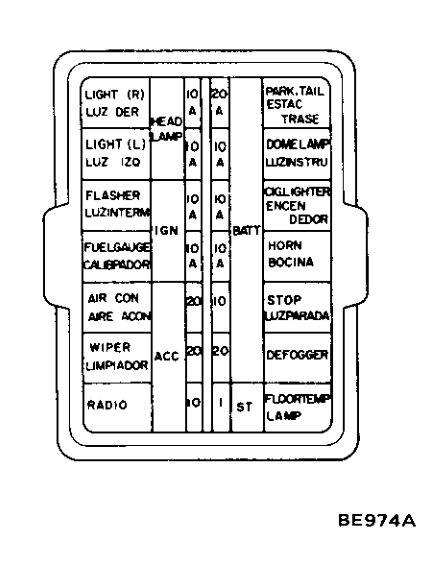
The tachs do go bad sometimes. Since you're here you might as well give the whole story of when the alternator went bad, when the tach went bad, what you were doing when it (they) died, any early signs that you saw, etc. The problems could be related or not. Does the car drive now, after you charge the battery? Or has it been sitting? As siteunseen said, fuses can go bad, along with fusible links and relays. These cars are old, and they leak. The electricals tend to corrode and rust. With more details something might show.
-
The tachs do go bad sometimes. Since you're here you might as well give the whole story of when the alternator went bad, when the tach went bad, what you were doing when it(they), any early signs that you saw, etc. The problems could be related or not. Does the car drive now, after you charge the battery? Or has it been sitting? As siteunseen said, fuses can go bad, along with fusible links and relays. These cars are old, and they tend to leak. The electrical tend to corrode and rust. With more details something might show.
-