Zed Head
Free Member
-
Joined
-
Last visited
Everything posted by Zed Head
-
 Beware - http://www.classiczcars.com/forums/topic/55976-slicks-garage-interested-in-z-cars/#comment-501094 Your project is beyond my ken (I have no idea why I know how to use that word. Too many books as a child). Considering all, risks, the joy of seeing progress, a reason to take a drive...maybe a local shop is the way to go. Arizona was just one suggestion. Really hard to keep track, especially if you get a non-communicative shop.
 -
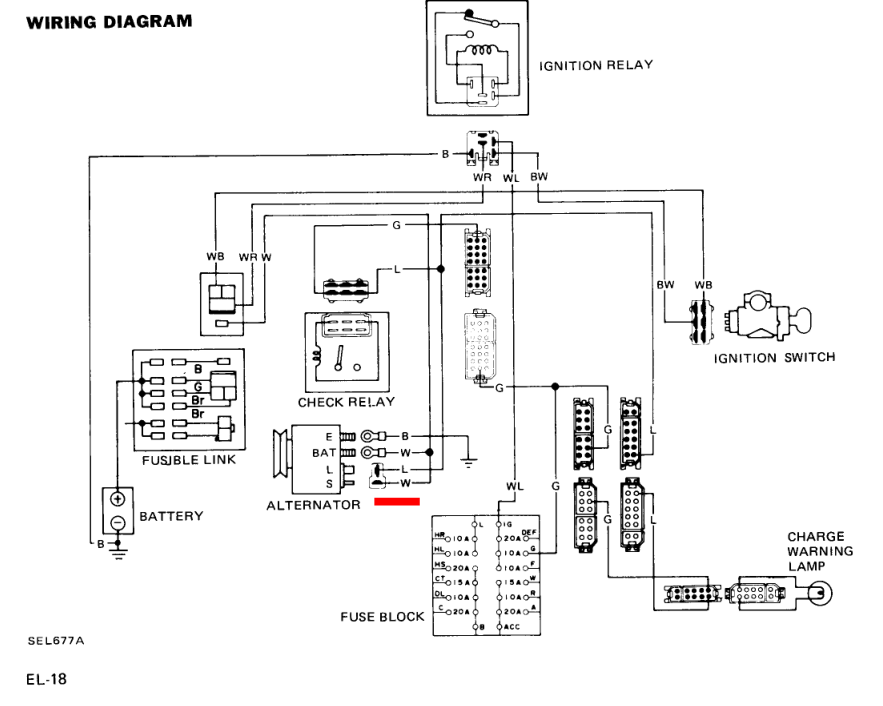
I wasn't warring just trying to get back to common forum courtesy. Read other people's posts, consider, then reply. CM has a tendency to repeat what's already been said like no one else is there. When I used the zcarcreations method (see below) I noticed that either the Brake light did not light up anymore or it stayed on all the time. So, to my mind, it did not work because I wanted a functioning Brake light. It indicates when the engine is running in addition to brake system function And the atlanticz method did not work either since the relay drained my battery after a couple of days. A common problem with problem threads is figuring out what people mean when they say work or not work. Too general. One person's good enough is another's doesn't work. CM's link to zcarcreations's site is the generic "how an alternator works" page, not the specific instructions that most people refer to. With the general knowledge of what S and L mean all you need is the L wire, which is where I ended up. Here's the specific zcarcreations page that can give poor results. http://www.zcarcreations.com/howto/voltreg.htm
-
-
Thanks Tomcat. Maybe Ryan from zcardepot can work up his own variant. I'm surprised he doesn't have something like the RT style mount, considering how fast his development work is going on other areas. His new Ford diff mount shows some imagination.
-
No idea how much is left, it looks thrashed, but there might be an odd part or two left. For example, I know the ignition relay is easy to get to, and dry, and it's a direct swap for the 280Z's, maybe the early ones also. It has a dedicated ground wire but you can still ground it through the case like the Z's. http://row52.com//Vehicle/Index/RNDK7fLV7NKQ1OQqa0rztNUJM
-
Weren't you working on getting a Haltech system going pretty recently? Have you installed and tuned a Megasquirt system? Seems like there's a lot of internet sleuthing and agglomerating going on. Nothing wrong with that, it's just good to qualify advice given with a caveat or two.
-
So much for the seven words...
-
****ing NBC $^!#-head mother****ing douchebags. I wanted to watch the womens 400 m and I accidentally opened a site that reported the winner already. Those money-grubbing bastards should have their dicks cut off if they haven't shriveled up to nothing already.
-
-
If I was stuck where you're at, I'd put a potentiometer in the circuit and throttle the current until the tach started working or a misfire started. A cheap test. If it works then you'll know it's a current problem and you can devise a way to get the tach what it needs. If it doesn't you haven't lost much.
-
****in' A, kind of pisses you off, doesn't it?
-
Crap.
-
Can't write wizz, but I can write damn.
-
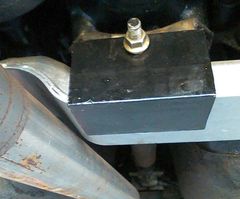 You might ponder the leverage applied to the base of that stud when the mount lifts.
 -
-
It's called F and N on externally regulated alternators. L and S on internally regulated. Diagrammed out with good illustration in the 1982 280ZX Electrical chapter. You're repeating already stated facts. Might read through previous posts first, it will keep things clearer. The zcarcreations wiring scheme screws up the proper operation of the Brake light in the dash. It's different from the atlanticz scheme.
-
Just trying to figure out how it gets in there, I imagine a drilled and tapped hole and a stud would work.
-
What is the bolt attached to? Did you just drill a hole in the mount and run it through? Most people weld the L bracket on to the old mount.
-
To be sure - did you connect L to the positive side of the battery? Is it a new or rebuilt alternator or used? Are you sure that it's in good shape? Have you confirmed that the alternator case has a good gorund circuit to the negative post of the battery? Power to L should have caused charging, even higher than 14+ volts because you didn't have "S" connected. I would get the meter out and check grounds and power sources. Make sure that everything that is supposed to be there is actually there, power and ground-wise.
-
That would be "L". There might even be an L molded in to the case. The atlanticz method should work fine, but it will leave that relay powered with the key off. 12.5-13.0 volts isn't enough info and engine RPM is important. All of the Z and ZX alternators are low on output at low engine RPM. You need to raise RPM and see if voltage increases to ~13.8 - 14.4 (around there) volts. If your battery is weak it will suck up the current at low RPM also. So if you did the wiring yesterday and the relay was activated overnight your battery is depleted. You can unplug the brake check relay with no problems. The charge light won't work when you remove the jumpers because that's where the power source for the charge light is. Edit - actually it might not be the source, just the ground circuit. Either way, you need the jumpers. Anyway, you might rejumper it and measure voltage at higher RPM.
-
I found a whole bunch of stuff on the internet devoted to bashing NBC for this, after I posted. It really is the old old TV model. Bob Costas looked like a tiny old man sitting next to some of those young blond swimmers, interviewing them. They couldn't even get a camera angle right.
-
Kind of looks like Mr. Isky doesn't really give a squat about the old Datsuns. His money is probably in all of those thousands of Chevys out there.
-
"F" terminal on the alternator? Internally regulated alternators don't have an F. They have an L. Maybe you got the wrong alternator. 76 also has the brake warning lamp check relay wired in to the regulator circuit. It's not addressed in the atlanticz writeup,which he wrote for a 77. It's on here somewhere, I wrote about it years ago.
-
Already linked in Post 14. Not competing, just saying...let's not wear any ruts.
-
Did you download from here? And are you looking in the Body Electrical chapter? FSM stands for Factory Service Manual, is that what you mean by Field Service? Just trying to figure out what you're looking at. With a meter and the diagrams it shouldn't be too difficult to figure things out. http://www.classiczcars.com/files/category/9-factory-service-manuals/ There's this one also - http://www.classiczcars.com/files/category/1-wiring-diagrams/