Zed Head
Free Member
-
Joined
-
Last visited
Everything posted by Zed Head
-
 I vaguely remember conversations about the CSV pins in the ECU. I think that we decided that Nissan had made some undocumented changes. Many of the ECUs are missing quite a few pins that the wiring diagram shows they should have. The EFI and Fuel Pump relays were split but I'm not sure the ECU actually doesn't anything with them. Here's an old thread. Found it on Google and it's one of those vague memories. Looks like CO had some firm thoughts on it. Nissan developed an analyzer that plugged in to the ECU connector. In 78 they did identify AFM pins that had no function though, so don't know why they couldn't add a comment about those pins if they were for the analyzer. I could see, maybe, a BCDD difference between automatic and manual. Or the fuel cut function, which is controlled by the ECU. But, worst case, I think that something just works slightly differently, probably an emissions function. EFI, generally, was developed for emissions purposes anyway, to start. It's primary purpose.
 -
-
I think that they call those test lights "noid" lights. Not sure why. I've seen them with two prongs that you can just plug right in to a two wire plug. Any auto parts store would have them. The ECU swap would be a quick easy test. When my 1978 ECU died, it just died completely. I popped in at my house, started the engine, and took off down the rode to give it a run, and the engine coughed once and died about a half mile away. It restarted and I turned around to get back home. It died 2 or 3 more times then wouldn't restart. I was close enough to jog home and get the original to put back in. I'm not suggesting the the switch from 76 to 78 caused it to die. I replaced a part in the 78 ECU and it worked fine after that. Might be why the car sat for 10 years then was sold for parts. I bought it for $300 from a guy who couldn't keep it running. I've had several different numbers in my 76 since then. Maybe I'll pull the box down and list them. Here's an example of the light. But, you can make them from Christmas tree bulbs also, the small ones with two wires. Haven't done it but I've heard about it. FastWoman wrote about them. https://www.oreillyauto.com/search/1977/chevrolet/camaro?q=noid
-
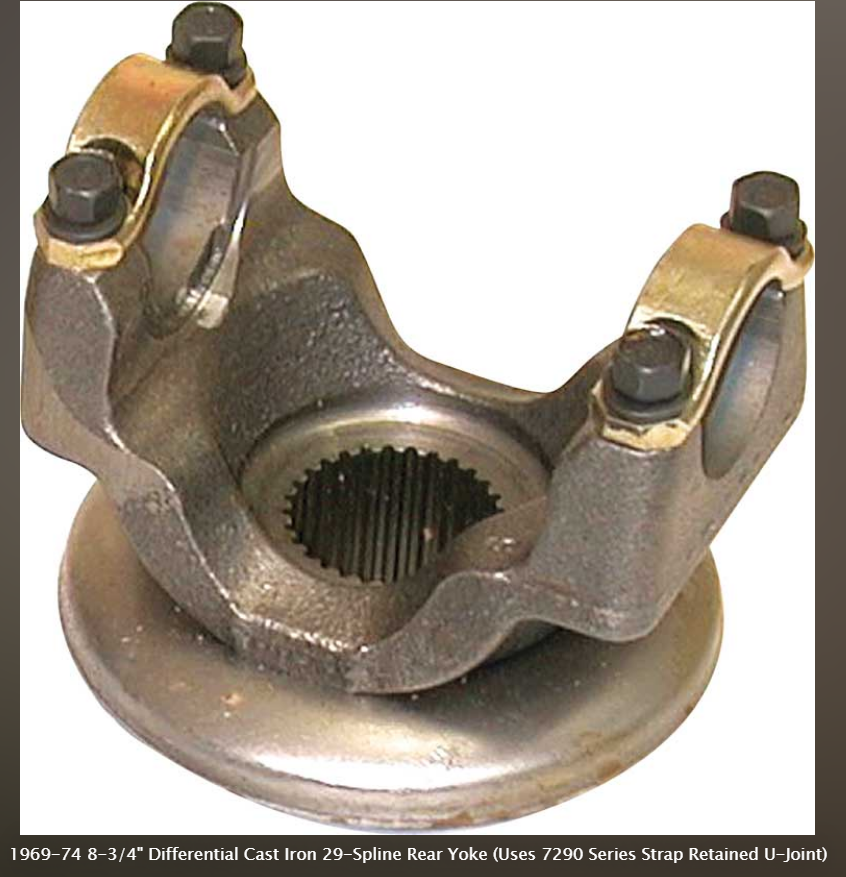
If the clip is pushed around the slot, like it typically does over and over again when you're trying to remove one, does it hang anywhere? Doesn't seem like there's much driving force to pry it off otherwise. If you mentally/calculate the loads on the caps, they are in to the parts of the yoke that aren't cut away, rotational loads under acceleration. The clips just need to be as strong as the six weak stakes, to keep the caps from pushing out under centrifugal force. Looks sketchy at first glance but big-picture seems okay. A good thought experiment. I mentioned my early experiences with u-joints. They use a strap with a small nut and washer on the ends. All it does is pull the caps in to the seat on the flange. When you look at it it looks very weak. But somehow it holds up. Found a couple of examples.


-
Pretty sure I've used both of those ECU numbers on my car with no problems. 1976 4 speed coupe. I've collected several over the years and run them for a while to be sure that they work. I have a spare behind the driver's seat, ever since one failed on a test drive. But the ECU is at the end of the line for injector power. So until you confirm power to the injectors, you won't know what the ECU is doing. The relay controls power to the injectors, and the ECU lets it pass through.
-
Make sure that this ground has low resistance to the battery's negative terminal.
-
Those power readings are all correct. Your wiring to the EFI relay looks right. Should have power to the injector plugs with the key On. Like Dave said the dropping resistors are in a pocket underneath the windshield washer bottle, by the brake system. You'll have to remove the bottle to get in there. They don't really go bad though. Eyeball them and make sure they're plugged in. OR unplug them and check for power. Also, make sure that you had a good ground point when you were measuring power at the injector plug. And also, somebody (maybe it was you, I can't keep up) just had a problem with the ground on top of the intake manifold. It wasn't good. It's in one of your intake manifold pictures.
-
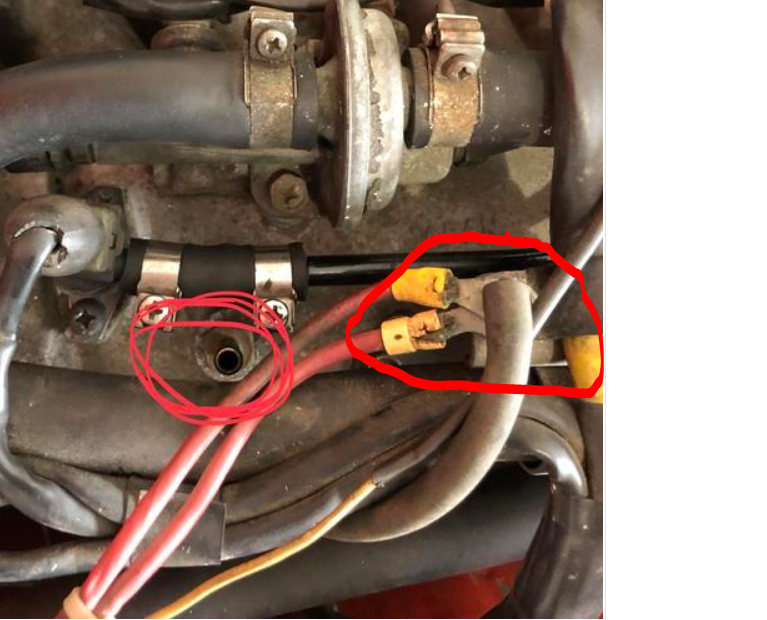
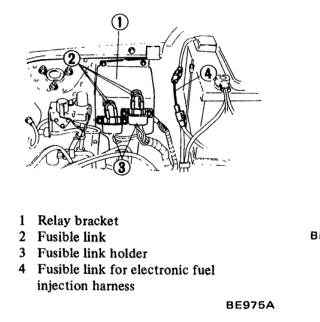
Is that with the key On? That's a good test of your EFI fusible link. You should have had power at 73 also. I think that fusible link is the Ign fusible link. It powers your ignition switch. Looks like you either have no power to the switch or the to 73 is broken. Here's a link to a bigger diagram. This progress, although it probably doesn't feel like it. The diagram might be hard to follow. But it shows that 73 gets its power through a path that goes through a couple of connectors, and also branches off to the ignition relay. But it starts at the fusible link. Might be that your Ign fusible link is blown and the source of many of your problems. Recheck the fusible links. ( p.s. Even with carbs you need the Ign link ). http://www.classiczcars.com/files/category/1-wiring-diagrams/
-
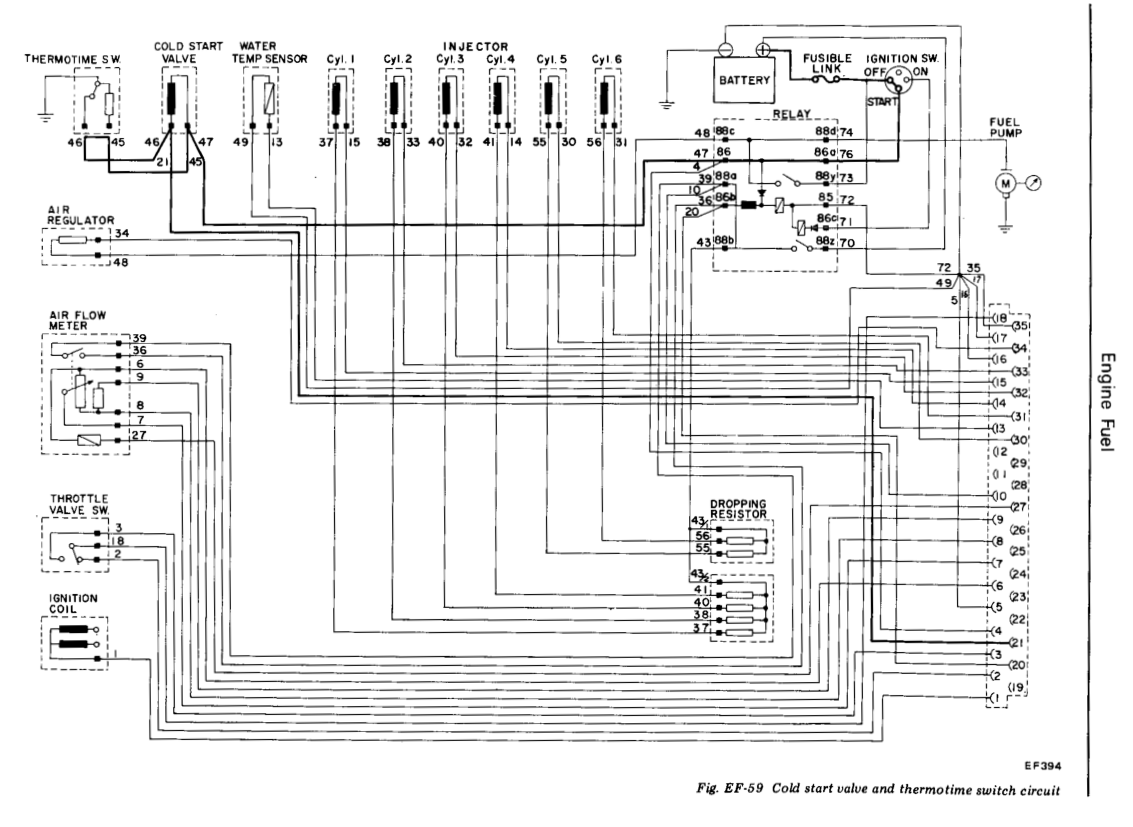
Here's a wiring diagram. Check your dropping resistors also. That's where the power goes right after it leaves the relays. You never what someone might have unplugged in the past.

-
Power to the injector plugs runs through the relay. So if the relay is good and there's power to the relay plug you should have power at the injector plugs. Only on one side though, if all of them are disconnected. If they are connected then you might see power on both pins, through backfeeding from the other injectors. You should see power when the key is at On. You're testing the right way with one probe on ground and the other on the pin. I'd probe all of the pins at the relay plug and see if there's power there with the key On.
-
Actually, on testing at the EFI relay plug you could just probe all of the pins in the plug with the key On. A couple or more should have power. If none do then the relay would never work anyway.
-
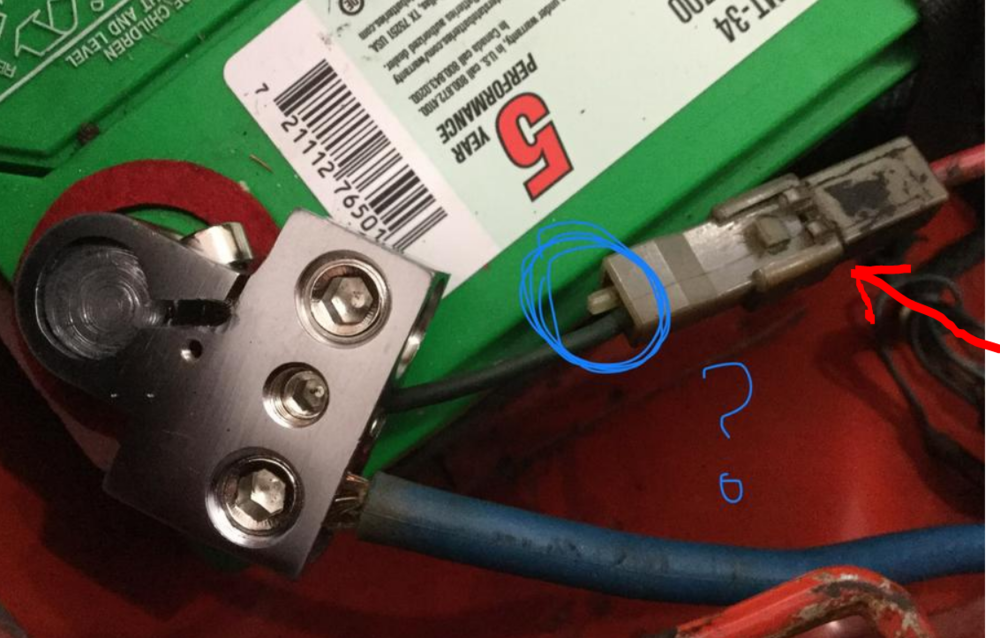
I went back through the thread and it seems like, with the fuel pressure fixed, and the new connectors, and the big vacuum leak fixed, that you might be able to get a start if you can get power to and/or through your EFI relay, the one in your hand. The relay you showed is actually the pump relay and the EFI relay combined. Before getting too crazy with the testing you might identify which pin is a power wire from the diagram, then go to the plug under the dash and confirm that it has continuity to the battery positive. Or, since you've already turned the key On, just turn the key On again and check for power there. If you do have power, maybe plug the relay back in and check for power at the injectors. Might be that the fusible link is burned and that's why you don't have fuel pump or injection. You can check at the end of the fusible link also just to confirm, since it's attached to the battery. Should have power at the red arrow if you disconnect there. Although, sometimes the links don't burn completely through. But attach a probe and bend the link around to see.
-
You might have got lucky on your EFI power and ground. But you should really check unknown wires with a meter before connecting them. I like to check continuity directly at the thing that is supposed to be getting power. Do this before you apply power and you'll know that you're not shorting directly to ground. Didn't you already check power to the injectors though? That's where that power goes, among other areas.
-
There is. Copied a snap from the 76 FSM, EF chapter. There's another page of tests after that. Looks pretty brown. They run hot and can burn up after a while.

-
That's a vacuum port for the charcoal canister. It should be sealed if it's not connected to the canister. The blue flame is from a backfire in to the intake manifold. That would be from either running lean (big vacuum leak) or a timing problem. Find or make a plug for it, squirt some fluid in there, seal it up, and try to start it. It's a pretty big vacuum leak if it's open. It might start and run.
-
Not so sure about the monogamy. He just grabs what he wants. Probably how he got his current wife. Probably bought her. Mail-order was big, before the internet.
-
Funny, we used to worry about "cookies" being used to track which web sites we visited. "Invasion of privacy!!!" But they're actually tracking every word we write. NSA, CIA, Google, Russia...pretty incredible stuff.
-
-
If the distributor works now then the pickup coils are good, so it should work with the proper MSD connections. If it doesn't work, it's not going to work with a manual distributor either. Seriously, it's not complicated. Two wires. The hardest part will be figuring out which wire is positive and which is negative. But I think the MSD instructions cover that, it's a common VR system problem. Which yours is, a variable reluctor trigger.
-
http://www.torcousa.com/index.html
-
Funny, I was sitting here staring at your message and mine and simply be underlined itself. I think it's on the server. Hybridz had the problem a while ago, bit other sites didn't. This site loads a lot of stuff, it takes much longer than other pages to finally finish and allow interaction.
-
Seems like they should work if they're tight. Nissan used a wide range of clip thicknesses, but they always paired them by size, so there was no centering process to worry about. There's a marking compound that you can buy for an easy visual check of movement. Basically just stiff paint that cracks if the parts move. Just curious and don't want to plant a seed of worry, but did you check the internals of the cross piece for machining grit, aka swarf? That's one of the common problems with offshore stuff, the reman parts anyway.
-
That sounds like the typical old malware that scans text and ID's words or phrases to link to external sites. Not sure if it's only on the first person's computer or the web site server. Let's see. It must simply be simple.
-
Yes, assuming that you're going to use the pickup coil to trigger the MSD box. You'll be using the two wires from just one of the coils. Typically the wires are tied together though so it might be difficult to remove the other. No need to remove one though, just use only one and leave the other as a spare.
-