Zed Head
Free Member
-
Joined
-
Last visited
Everything posted by Zed Head
-
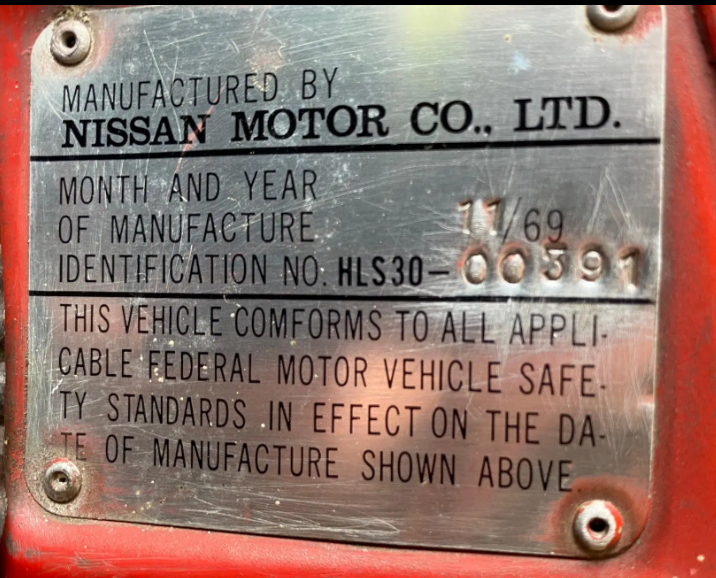
 So it's not really for sale. You put 1978 in your ad, but the title says 1975.
 -
Kind of vague. "Etc." and "nothing" implies that you did not find a single 280Z part on rockauto. Rockauto is full of 280Z parts. Even one of the ones you asked about specifically. https://www.rockauto.com/en/catalog/nissan,1978,280z,2.8l+l6,1209260,suspension,control+arm+bushing,7532
-
Could also be the throttle valve switch. A meter and some time spent at the ECU connection will give a good idea of what's working right. This book has all years through 1980. Page 59 is where the meter tests start.
-
Couple more red ones coming up. One has 300,000 miles. https://bringatrailer.com/listing/1972-datsun-240z-195/ https://bringatrailer.com/listing/1972-datsun-240z-192/
-
I wonder if the collecting/investing community was nervous about crossing "TheGuild". Does his opinion influence the value of a Z? He put his bid in early then implied that car might have flaws. I didn't read all of the comments. Maybe he overbid. Or maybe the seller lost out because TheGuild scared away bidders. Most buyers wait until the last day to make their bids. The auction flow was not normal.
-
Weird. The ZGuild guy bumped the bid by $5000 to $40,000 at the very beginning of the auction and nobody bid after that. No 2 minute extensions, just faded away to that first day bid. A ton of comments on the auction page though. An odd one.


-
Dave Irwin, aka Zs-ondabrain, designed those and made them for MSA. He has moved to the boonies and might be hard to contact but worth a shot. @Zs-ondabrain https://www.facebook.com/DatsunLEDS https://www.datsun-240z-upgrades.net/ https://www.datsun-240z-upgrades.net/home/products/ https://www.datsun-240z-upgrades.net/product-info/
-
Koni put a lot of effort in to getting those gland nuts made. Wonder what went wrong. The gland nut is meant to center the shock body in the tube in addition to clamping it in to the bore of the strut tube. @KONI Lee @Joseph@TheZStore
-
76 had a 60A and an external VR. There's a procedure in the FSM for checking the VR.
-
Obviously the solution is to build a plastic enclosure around the engine, or paint it with a durable non-conductive coating. I didn't say either way was better. I just pointed out that his battery post orientation is not the way the factory sent it out. Many alternatives possible. How about in the storage box behind the seat? Uuuummm...sulfur.
-
As I was thinking about this a bunch of memories passed through my head in voice over type thoughts. "Is this one exhaust or this one?" Do they just alternate from here? Exhaust - intake - exhaust - intake... No? Crap. The engine's tilted. Up is not Up". Is this still hot? Should I start over? It was perfect before I tightened the lock nut, now it's too tight. Does it matter if it's hard to get the feeler gauge in? Am I scratching the cam lobe with the feeler gauge? Where's my small sledge, I don't want to bleed anymore. #1 is a B___h! I should have wiped that oil off the edge before it dripped down the side of the engine. Wow, I really wacked something when the nut came loose. Hope nothing got bent. I could have just taken my time setting them cold, then rechecked them when they're hot. And that's just in the first hour.
-
RacerX, this is how these valve lash adjustment threads always end up. The guys that have done many and have practiced (that's the real key to speed - practice), and have calloused burnt finger tips, say it's easy and everyone should do them hot. "It's easy, don't be a weeny!". They have forgotten that their first time probably took a couple of hours. Logically, setting cold and checking hot has no flaws, except time spent. In the big scheme of things, for a guy with an engine that's new to him, the time spent looking at the engine parts with no reason to hurry might be more valuable than actually adjusting the lash. Plus, mistakes in lash settings can cost a lot of money. One hanging valve and the head might have to come off.
-
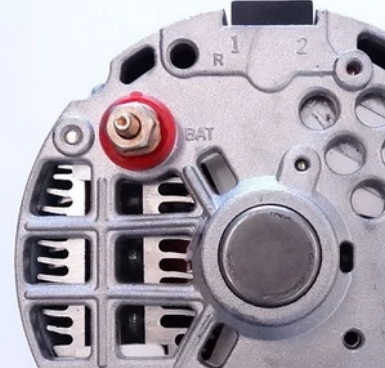
The battery you have has a common change that people make. You have swapped polarity on your terminals. Negative close to the chassis is not an electrical issue just a convenience issue. The factory setup has positive right next to the chassis for the occasional spark adventure. Some people even switch to side-posts screw type terminals. So you're off-spec. already anyway. But if you're worried about sparks from that close terminal it's not a concern. That's the negative terminal, it's already grounded.
-
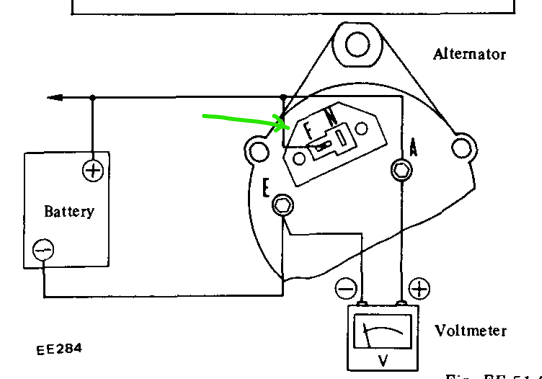
If you have a test light, use it between the negative post and the end of the battery cable before you connect it, with the positive cable connected. The only draw you should have is the clock. You could remove the fuse for the clock, whichever one it is, if you want to remove all potential draws. You can also look for sparks, and/or measure amps drawn, depending on what tools you have. This is what people have to do when their Field wire is not connected. That comes through the VR. Might be that your old alternator was fine and the VR is the problem. Measure voltage at the bottom of the "T" in the plug at the back of the alternator with the key on.
-
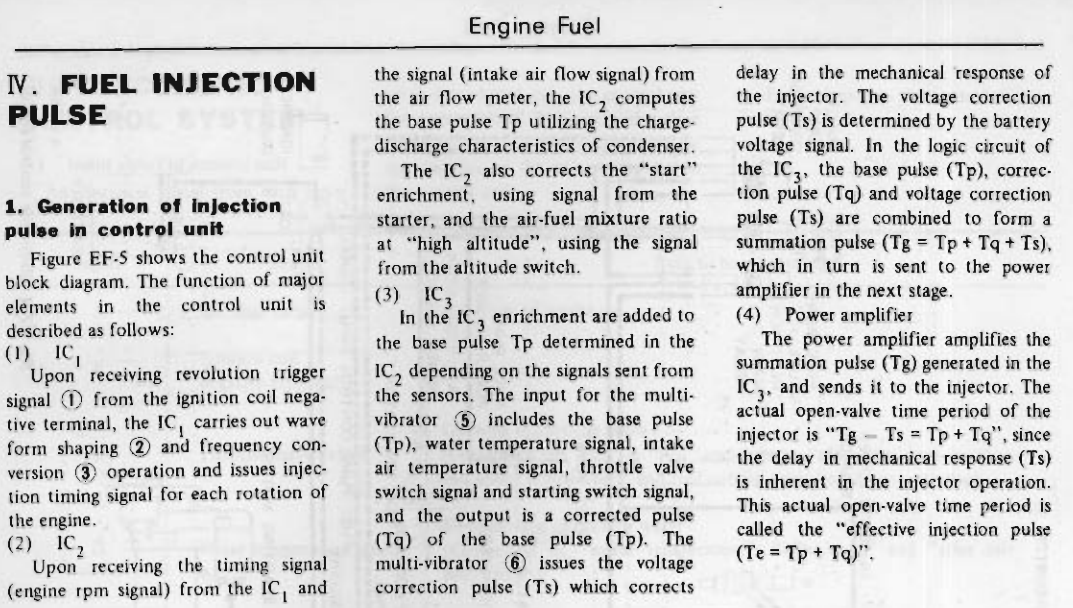
My post was basically a regurgitation of things I picked up from various other posts on the forum. Odds are almost certain that you're correct. My main point was that you can't really "tune" or adjust anything between the inputs and the outputs. It's all hardwired/soldered in. I did take the opportunity to dig up a neat article about the history of A/D conversion. I think I've mentioned in the past that most of my electronics experience is just dendrites of knowledge taking me just far enough to solve a problem. Many gaps. Like a piece of Swiss cheese, it will support some weight but it's definitely not solid. Kind of squishy. https://www.analog.com/media/en/training-seminars/design-handbooks/Data-Conversion-Handbook/Chapter1.pdf
-
Why did you replace the alternator? The VR has current path errors possible also. If you were getting zero charge, probably the alternator. Overcharge, probably the VR. And don't assume that Autozone gave you the correct product. Could be they gave you an internally regulated alternator. Here's a nice diagram. Note that what people are calling Red now actually started as Brown. Had it Copied, didn't Paste it.
-
As SteveJ said, it's for the external regulator plug. MSA should have them in stock. 😁 "It is small, weather-resistant, and simply plugs into the wiring harness in place of the original voltage regulator."
-
I went to the top of the page and couldn't find what "lean boot" means. The ECU's are analog computers and use capacitors to control injector open duration. No ones or zeros. The algorithms are hard-wired in, no programming possible. You can only change the characteristics of the inputs to manipulate the outputs.

-
https://www.thezstore.com/page/TZS/PROD/12-4067
-
You might check your engine mounts. Maybe the engine is low and/or shifted.
-
Here's another way they show the battery connection.
-
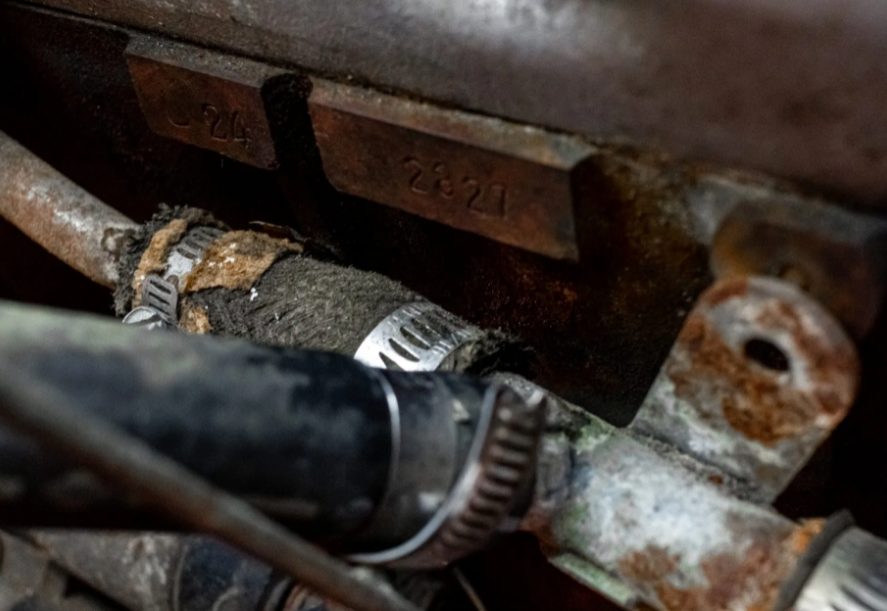
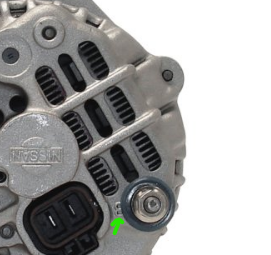
Looks like a late model alternator that he swapped pulleys on. That extra bolt could be a mounting lug that fits a slotted bracket on a different model of car. Here's an example of a "B" molded in to the case showing where the battery charging cable connects. Look for those. "E" is Earth, meaning ground. You can also use a meter and see if the lug is grounded to the case or not. The lug looks insulated though, more like it is the battery connection. Better get that right before you go too far. ZCD generates a lot of new parts and not all of them are the greatest (see brake kits). Also known for not supplying instructions with his new products (see brake kits). Good luck and be careful. p.s. I'm not saying that he sells bad products. Just that extra work can be required to get them to work correctly.
-
Where did you get the alternator? Post a link. There should be letters molded in to the case. A "B" and an "E", maybe a"P".
-
Grammatically, that would be a friend of the alternative. Just trolling... I wonder if ennisdavis has a tray under the battery lifting it up. The stock battery location is generally bad. Puts the positive post close to metal and has a leak point directly above the battery that continually washes corrosive salts down over the fender well if the car gets wet. Yet, they stuck with it all the way to the ZX. A shorter battery with a complete cover on top would be a big improvement. Points deducted though.
-
I had forgotten about that list. I got locked out from editing it so quit updating. Here's the one. https://bringatrailer.com/listing/1972-datsun-240z-161/ I figured Hershey was the Pennsylvania Hershey. Didn't know they had a big car show. I did go to an old tractor show out by Reading when I lived out there. I coulda went to Hershey! That was before I had a Z. There is certainly a lot more old stuff out there than out here. Which event? One of these or different? https://www.aacamuseum.org/events/ https://www.aacamuseum.org/