Zed Head
Free Member
-
Joined
-
Last visited
Everything posted by Zed Head
-
 The fact that the engine started means you guessed right. Check the ground junction on the manifold, by the throttle body. There's an eyelet with a bunch of wires attached.
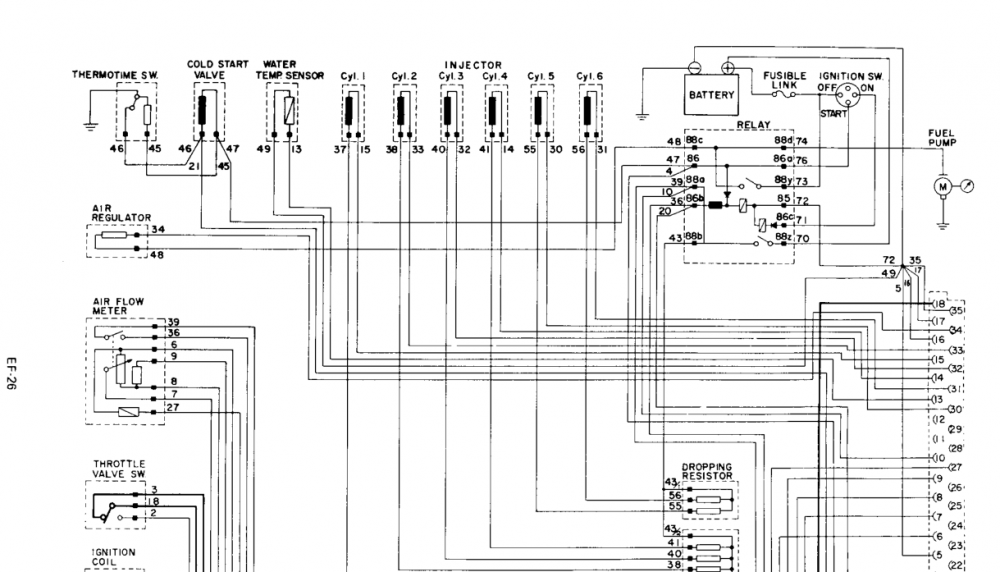
-
That usually works. These old cars lose their grounds though, just through rusting connection points. You can add wires to create better grounds, to battery and engine block. Looks like you should spend some time fixing your grounds. They are as important as power supply. Your running rich problem would be the water temp sensor. Next step is to check the sensor itself at the thermostat block.
-
Could be a pressure plate issue. The levers/fingers that the TOB sits on might be unbalanced, or stuck. The TOB should be centered on the pressure plate fingers by the nose of the front cover. Although if the TOB wasn't seated on the fork correctly it might be pressing sideways on the fingers, kocked. Interesting puzzle. Bummer though. The trans must come out.
-
Not sure TOB fits a knock. Does it knock once or continue knocking as the engine rotates? And does it disengage?
-
It's all about Youtube channels.
-
Many people install the high amp alternators to fix low current at idle RPM. It's overkill, in a way, but it seems to work. If that's the reason, the loads are the same. Normally, somebody would have asked "why?" at the start. What's the "upgrade"? Although, the parts store 60 amp remans are not known for their quality. I wonder if the ZCD 80 amp is really new.
-
That's a Wonderful story.
-
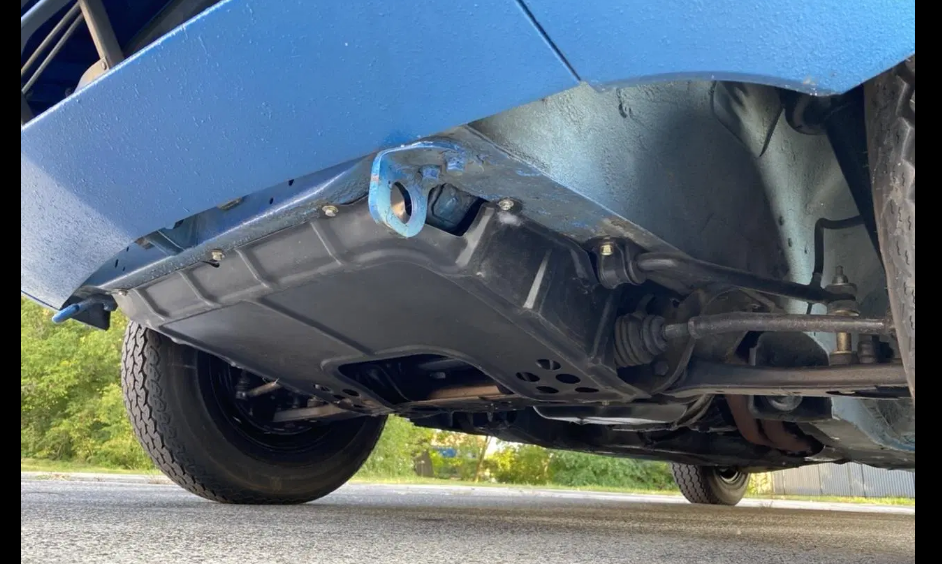
Here's a picture from a real car listing. https://bringatrailer.com/listing/1970-datsun-240z-65/
-
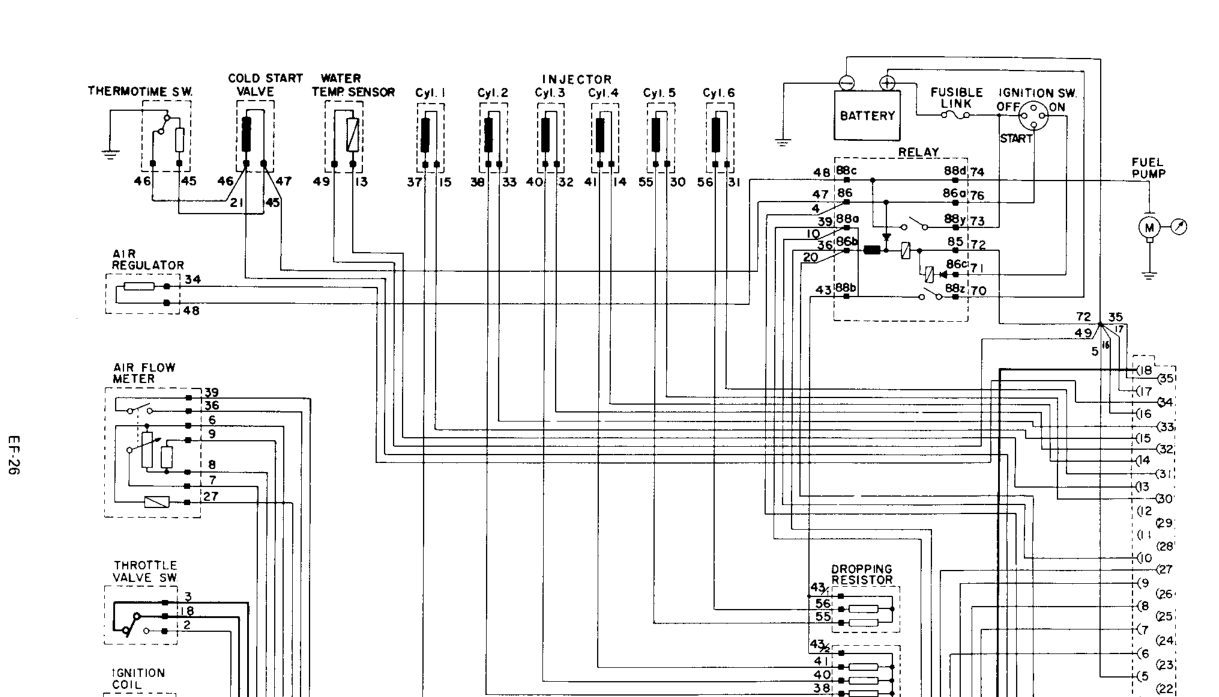
Here's a picture from a page from the 1970 FSM.

-
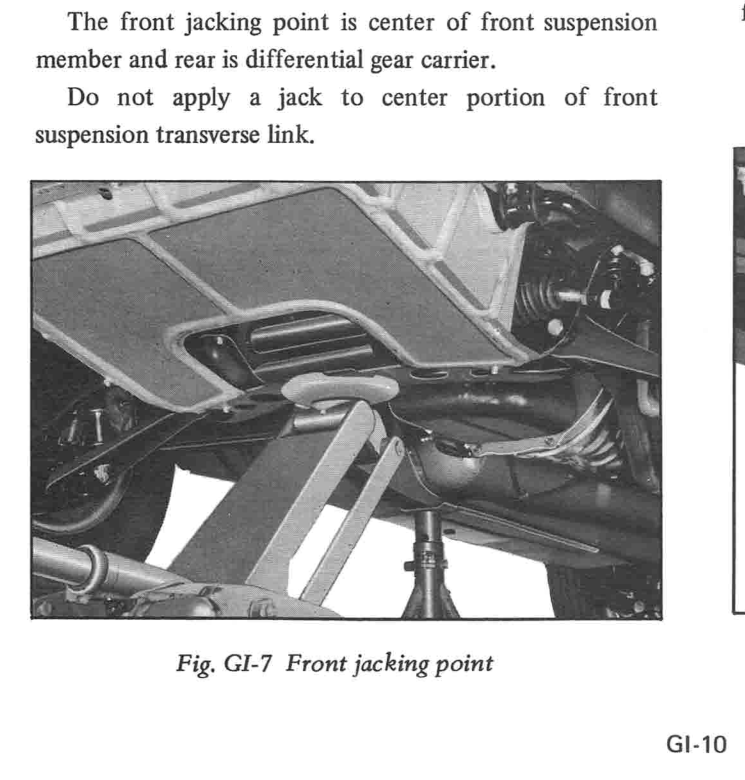
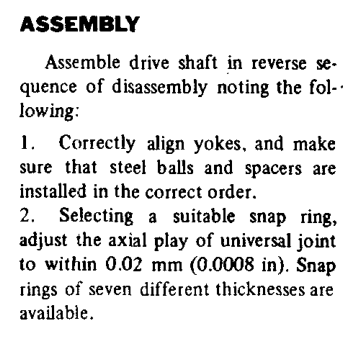
Quoting a couple of things that are "not good". I had a halfshaft was binding along the axis. I think it was one of the replacements that I mentioned earlier. It came from a 1978 parts car that had right rear damage, like it had been rear-ended. I took it apart, cleaned it up, looked for visible damage, and put it back together but it still was binding. Must have "brinelled" the ball path. I spent a lot of time cleaning up the mating surfaces for the flanges (the factory paint was peeling, leaving an uneven surface), shaving the burrs off the lock washers (Nissan lock washers are very well-made they dig a substantial burr when you loosen them. They hold tight.), and then making sure the centering rings were clean and free of dings before installation. There are a lot of small things that can add up. Nissan does recommend marking the propeller shaft before disassembly. Seems like a good shop would have variable thickness circlips to get a u-joint centered before balancing. Maybe a shop that builds drive shafts. Check the fit of the slip yoke in the transmission. Might be part of your problem.
-
The variety of thicknesses for the Nissan u-joints are probably for variation in the yokes, not the u-joint spiders. So, an aftermarket joint that only comes in one thickness doesn't have any way to address that variation. Might be interesting to measure that end play after a u-joint replacement. I spent $90 at OReilly for a full set of Precision u-joints then took them out and returned them when I realized that they were looser than the factory joints I had replaced. I really only needed one but I thought that doing all would be better. Luckily I had another pair of old Nissan half-shafts that could be greased up and were good to go. After that I started collecting them at the wrecking yards. There are six separate u-joints in the drivetrain so any looseness adds up. I assume that Nissan is talking about measuring spider movement in the bearing cups. Look at that tiny number.
-
You should measure the head thickness and check flatness. If it's too warped you might not be able to get it straight with more cutting. I seem to recall that the heads all started at 108 mm. Add up your cam tower work, valve work, skimming if necessary, etc., and see what the math looks like. The oil on your pistons could be bad valve seals.

-
Check your weep hole.
-
My coolant bottle level never changed over years. If the engine is consuming coolant, the level should drop each time the engine cools down. Coolant from the overflow bottle only enters the radiator when the coolant system pulls it back in as cooling creates a vacuum in the system. Often when you have an external HG leak the coolant doesn't get sucked in because the vacuum is broken by the leak. Mark the bottle with a Sharpie and see how fast and when it disappears.
-
Your audios didn't load. Have you seen the posts about the shifter interfering with the transmission in 5th gear? https://www.classiczcars.com/forums/topic/57424-280z-5th-gear-synchros-gone-bad/ https://www.google.com/search?q=5th+gear+siteunseen+shifter+site%3Aclassiczcars.com&rlz=1C1SQJL_enUS862US862&sxsrf=ALeKk02iQ-qp-Kb_POtLeZmJ-1z6Vac4pQ%3A1619467480443&ei=2ByHYP-yGqWT0PEPut-kEA&oq=5th+gear+siteunseen+shifter+site%3Aclassiczcars.com&gs_lcp=Cgdnd3Mtd2l6EAM6BwgAEEcQsAM6BwghEAoQoAFQ9BtYwGFg1GVoBHACeACAAaEBiAGwEJIBBDIwLjaYAQCgAQGqAQdnd3Mtd2l6yAEIwAEB&sclient=gws-wiz&ved=0ahUKEwj__pW_2pzwAhWlCTQIHbovCQIQ4dUDCA4&uact=5
-
How much driving are you doing in a couple of weeks? And how much is disappearing? A whole tank's worth? Does the exhaust smell like coolant? OR do you smell coolant in the engine bay? Check your spark plugs. HG leaks tend to clean the cylinder that is getting the coolant. Also, check the back of the cylinder head over the starter. Mine had an external HG leak there. The coolant ran down the back of the engine while it was warming up. Once the engine got hot the leak sealed up. But you could see the stain it left.
-
Set your wrench up on the nut, using the tunnel to brace against, and use a big screwdriver through the u-joint yoke to turn the propeller shaft instead of the nut. Hopefully you have the D-head screws, that lock against the yoke by themselves. You only need a wrench for the nuts.
-
The internally regulated alternators are all the same, two wires, one Sense, one Lamp. I don't think that the guy who wrote those instructions or made the diagram knows what he's talking about. It's wrong, if you want the Charge light to work. One prong is the L wire, the other goes to any positive point on the power supply circuit. Better to have it close to the loads. What he's describing the "one-wire" setup, which can lead to lower output since it's measuring voltage right at the alternator, not out where the loads are. Basically he's dumbed the system down to no Charge light and poor voltage regulation. He threw away about 20 years of development. New direct replacement high amp alternator for Datsun 240Z, 260Z, 280Z and 280ZX, 1970-83. This alternator is rated at 80 amps and bolts up in the same location as the original. Internally regulated. Datsun Z cars 1970-77 have an external regulator so the external regulator will no longer be used. Alternator uses standard flat male/female connectors or you can purchase the optional connector. *Optional connector plugs right into alternator. Yellow wire connects to switched 12V and green wire connects to the positive post on the alternator
-
I tapped in to the fuel pump power at the plug next to the passenger seat. It's under the carpet.
-
Earlier I mentioned the goal of the news programs as being to get people amped up so they'd buy more stuff. Saw something along those lines this morning.
-
This seems reasonable. See if it makes more or less noise if you use the gears to decelerate. More clues. My 78 5 speed used to make whining/whistling noise when I got on it at high RPM. Sounded kind of neat.
-
Those guys from 2003 seem pretty cool. The rear countershaft bearing would be the one in the adapter plate. Just looking at the picture of the gears you can see so many spots where that high frequency buzz could happen. Gear teeth touching slightly maybe. Gears slightly out of alignment. It doesn't sound like a tooth count problem, that would be a major problem. The fact that it happens when the countershaft is loaded suggests that the helical cuts of the gears are pushing two parts together, or one of the shafts is loose and being pushed away from the other. So something is slightly misaligned, or loose. When the countershaft isn't loaded the gears are just along for the ride. No noise then suggests they are moving just fine, it's the load that makes the difference. It's a bummer. I'd drop the oil and see if metal flakes show damage happening. It will give you a clue at least.
-
On my 76 I found that the brake lamp check warning relay was powered all the time after using Blue's Tech tips wiring. It drained the battery over a day or two. I ended up using the fuel pump power line to power the relay and disconnected it from the constant power wire. Might not be the same on 77. Seems like Nissan changed things around every year. Something to be aware of. I think that Blue's tech tips are specific to 77 so should work. Here's the link from SteveJ's sig link. (The AtlanticZ page is so tiny now...). https://www.atlanticz.ca/zclub/techtips/alternatorswap/index.html
-
I think it's a countershaft issue. 4th gear is direct through the main shaft. Not sure what exactly it might be or what to do about it.
-
Check the rock arm wipe pattern before installing. If he didn't dress the valve stem tips you might need new lash pads. Those three odd valves might cause an imbalance between cylinders. Combustion chamber volume, as mentioned. They look more massive also, and might hold heat, or not handle high RPM as well. Might be fine, but for $60 it might be worth swapping to stock valves. I don't have any experience building engines, I just absorb a lot. They look like lawnmower engine valves to me. No offense. Can't find anything similar on the old internet either.