Mike W
Community Member
-
Joined
-
Last visited
Everything posted by Mike W
-
I had a similar issue when rebuilding my calipers recently. One of the bolts holding the calipers together had a stripped head and once I managed to get it out, it needed to be replaced. I did not check with Nissan directly so it could still be available from them, and as many have already said the selection at McMaster is a little limited for these kinds of special nuts and bolts. This particualr one was unique in that the head conformed to the Japanese bolt standard (called JIS) and is smaller than the equivalent hex grade bolt head. So I finally ran across an on line company called BelMetric and they specialize in metric fasteners. It turns out that they actually stocked the JIS bolts I needed for my caliper rebuild and so I ordered them from this company. Got them in about 4 days and they were exactly what I needed. You may want to check them out as well. Website is: https://www.belmetric.com/ Hope that helps. Mike.
-
Chris, I faced the same dilemma a few weeks ago when I was trying to remove my rack and was planning to purchase a lift but could not find one in my area at the time. It turns out that I am also sourcing some parts for this rebulid from Z Specialities and was discussing this issue with him. He recommendedd just jacking the engine from the oil pan, which I must admit did not feel really good to me. I had visions of collapsing my oil pan and getting myself into a real mess. In any case I decided to try it and used a 20 ton bottle jack with a board on top that is about 12" x 12" x 1.5" and set it all under the pan. I then proceeded to loosen my mounting bolts most if not all of the way and slowly began jacking the engine up, ever so little at a time so I could see if anything detrimental was happening and stop it before it got too late. It ended up working like a champ. I raised the engine about an inch and that was all I needed to clear the rack so I could get it out. After that I lowered the engine back down on the loosened mounts so as to take the weight off of the pan, and that is how it is sitting right now. I am sourcing a powder coated engine cross member from Z Specialities so I can swap out a refurbished one with my old one as I start to put things back together, but for now it is just sitting in there with loose bolts and everything seems fine. If you do decide to try this just keep an eye out on your upper radiator hose to ensure that you do not stretch or twist it too tightly. It was not an issue on my car. Hope that helps. This method worked great for me. Mike.
-
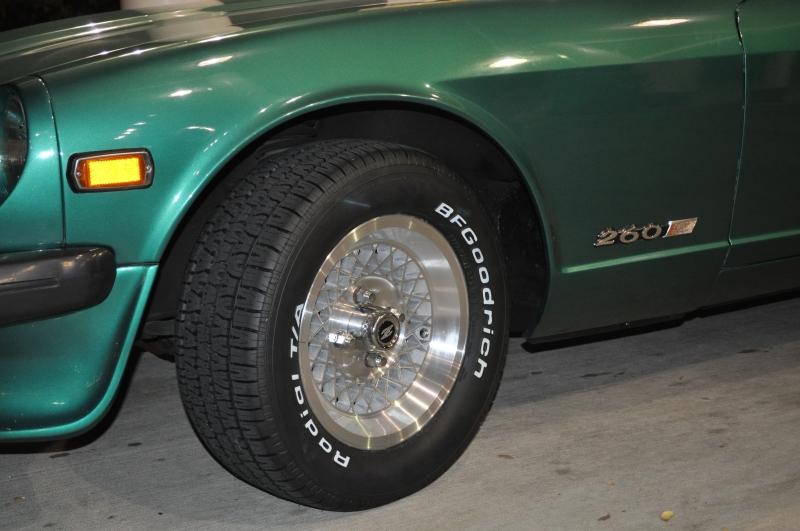
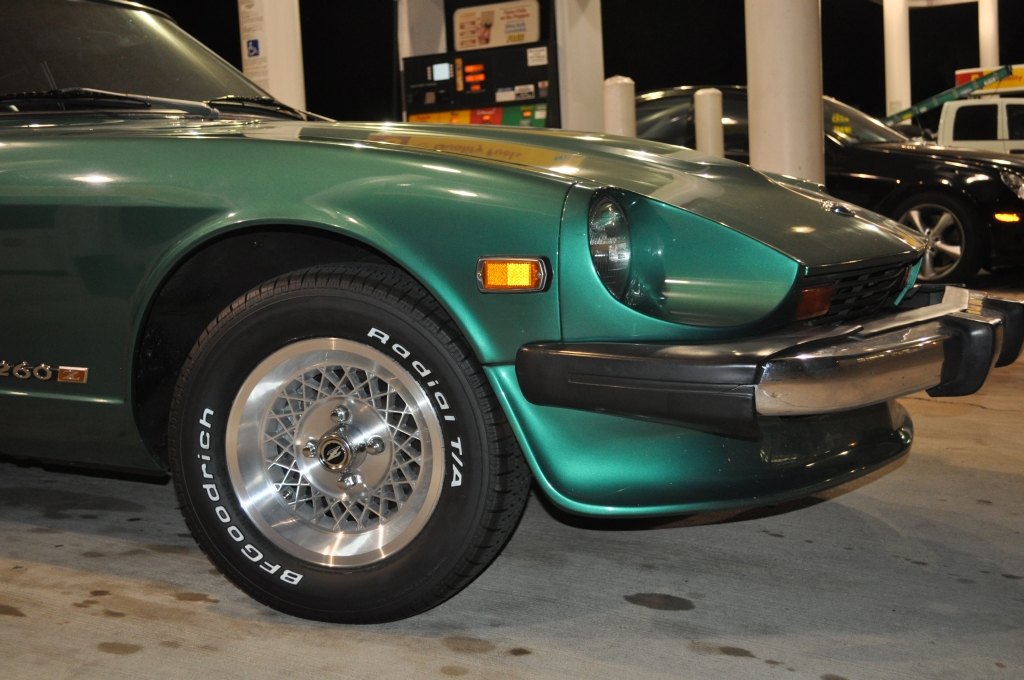
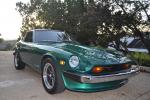
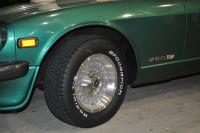
Peter, One last input before you make your final decision. I run old 14 x 6.5 Appliance rims and just recently got new tires. Went through some of the same gyrations on tire sizes and ended up settling on 225 60 R14. Went with the same BF Goodrich tires you are considering and it all worked out really well. My suspension is lowered by maybe one inch but otherwise is stock. As you can see from the attached pictures, there is plenty of clearance and I have no rubbing issues so far. Hope this helps. Mike.


-
Peter, I just went through this myself as I have started a compete refresh of my front end. As a part of that I was planning to also go with the 4 piston Toyota upgrade, but learned later on that 14 inch wheels are very questionable. I can tell you for sure that the upgrade which Arizona Z sells (they use Wilwood calipers) will absolutely not fit on 14 inch rims and in fact they recommend 16 if possible. When I spoke with the vendors of the Toyota solution, none of them would guarantee a fit although I was told that this works for some wheels and not for others. Unfortunately none of them had any specifics on which wheels worked and which didn't and so this seemed to be very risky to me, especially given that there were no return priveleges on the brake upgrade parts. It was also suggested that this could possibly be accomplished with spacers, but there is a reasonable liklihood that you would have to go with longer studs depending on the size of the spacer that you would need for your specific application. In the end I decided not to go this route. Incidentally I have 14 inch Appliance "mesh" mag wheels which are period correct for the car, and much like you decided that I did not want to change them out especially given that I had just had them restored and purchased new tires about 5 months ago. In the end I decided to completely rebuild my existing calipers and went with upgraded pads and rotors. I ended up with pads from Porterfield and upgraded rotors from Powerslot which I think will be a good bolt on alternative to the 4 piston upgrade I was considering. I still do not have this installed yet and so I cannot speak to the performance improvement over the stock system, but given everything I have read about the robustness of the original OEM design coupled with the fact that I only use the car for the street, I think this will end up being a good choice. Let me know if I can help you out any further on this. Mike.
-
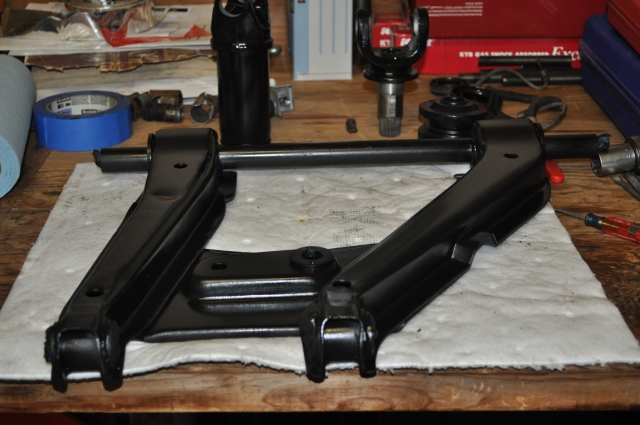
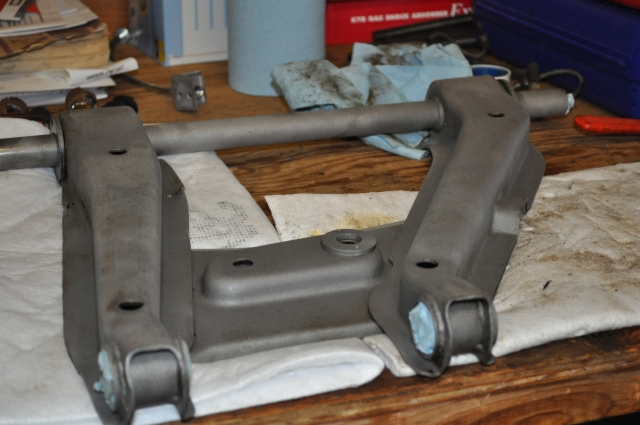
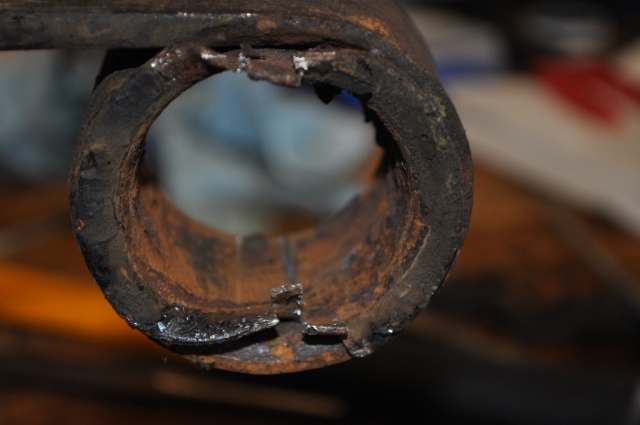
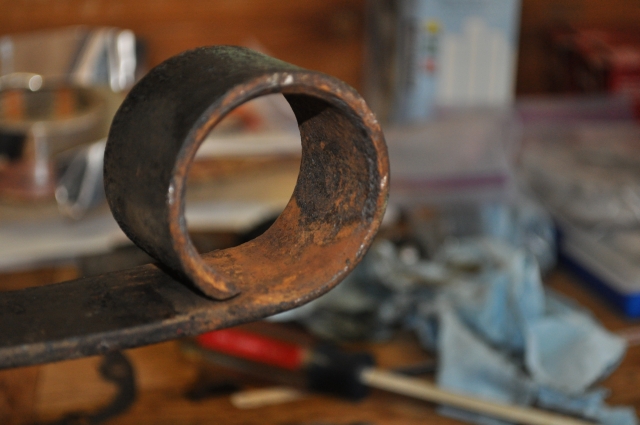
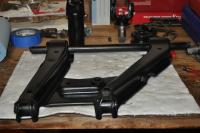
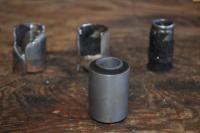
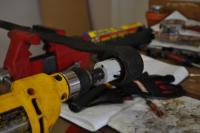
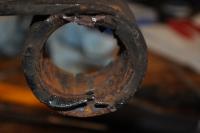
Chris, A few comments and hopefully a few answers to your questions. First, on the control arm, you do not need to buy the whole assembly but you will need to remove the old rubber / metal bushing from the end that attaches to the frame. It is the same for the rear control arms as well. There is a lot of info on the site with regard to techniques that other members have used to do this, up to and including buring out the old rubber part, but needless to say whatever method you end up using it is still a PITA. Personally, I use a hole drill that is slightly smaller than the ID of the bushing and drill out the rubber part. That will give you pretty good direct access to the metal sleeve. I end up using a hack saw and very carefully cut through the sleeve in a couple of places so that I can then use a punch to literally "peel" out the old bushing. I did this just this past week to my fron control arms. One of them turned out to be a breeze while the other was a real PITA to get out. Here's some pictures from the work that I did on my rear moustache bar that I think will give you a good idea. It is a different component, but the process for removing the bushing is the same. In addition, the rubber bushing is still available from Nissan and the part number is: 54535-E4100 I bought these about a year ago and they were still available and so I would expect the same now. Either Courtesy Nissan in Dallas or Gastonian Nissan should have them. I also invested in a fairly inexpensive blast cabinet from Harbor Freight when I started all of this and it has been worth its weight in gold. I have sand blasted all of my components down to bare metal and then painted them. Essentially the same thing you are doing except I dod this with a blaster while you are using some sort of chemical to remove rust, etc. It sounds to me like the blasting is easier (and perhaps cheaper) but you do need to have the room for one as well as a compressor. For paint I ended up using Rust Encapsulator from Eastwood as my primer and then Satin Black Chassis Paint for the finish (also from Eastwood) and am very happy with the result. See the pictures above of my rear control arm for reference. Let me know if you have any other questions. I would be happy to help where I can. Mike.


-
I just ran across this thread and the eBay'ers name rang a bell, so I did some research into my past emails and it turns out that I had a transaction with this seller in the past. In reading through the email exchanges that I had with him, I have been able to get some additional info on this company / person that will hopefully help kats to at least get his money back. The information that I have is as follows: Sellers name is Wayne Sava. The address that I have for him is 1172 Old Salem Road NE Suite 6 Albany, Oregon, 97321 The email that I have for him is ssherman1@live.com Based on how our transaction went I also have a phone number for his as well. The number that I have is 503 428 2615. Our transaction was a little convoluted, but in the end it worked out. It started when I purchased a set of half shafts from him on eBay but realized after they had been shipped to me that they were the wrong ones for my car (R180 vs R200). In the effort to resolve this, he sent me a phone number so we could discuss the situation first hand and find a resolution. I received his mailing address so I could send the original shafts back to him. This all took place between May and August of 2010. I remember talking to him on the phone and he indicated that he had quite a stock of all Z parts. I ended up ordering a set of springs from him as well based on that conversation. It took quite a while to get the springs but I ultimaely did receive them. However right after that he literally vanished and before I ever received the replacement half shafts and so eventually I just wrote it off. However around mid February of 2011 I saw some new ads from the same seller on eBay and so I contacted the person. He remembered the original transaction and I reminded him of the fact the the half shafts were never shipped. I received them about 2 weeks later so in the end he made good. I really hope this helps kats get his money back. Mike.
-
Chris, I went through the same mental exercise about a year ago when trying to decide on a strategy for my suspension refresh. In the end, I went rubber every place that I could and I also opt'ed for the KYB's. My expectation was a close to stock ride with as little noise as possible, but with more responsive handling based on the newness of the bushings and shocks. I also run an aftermarket spring that I purchased many years ago and it does lower the car by about an inch. I completed the rear end refresh back in the spring and was very satisfied with the results. It performed as expected and now gives me a ride that is as close to what it was when the car was new (I am the original owner) . Going with rubber did complicate the process as I had to remove the rubber and metal parts of the bushings on the control arms and this was tedious. I also had to find a way to flare the OEM bushings on the moustache bar and ended up having a tool made to do this (I have also loaned this tool to other CZCC members and will make the same offer to you if you go this route). The only bushings that I was not able to source in rubber from Nissan were the rod end bushings for the sway bars and the rack and coupling bushing for the steering system. I managed to source everything else directly from Nissan. In fact I ended up developing a spread sheet with all of the Nissan parts numbers that I needed for this and would be happy to share that with you as well. Just PM me and I will send it along. This was for a late build 260Z not an earlier 240 like yours, but many of them will be the same and I believe that I even created a column for the 240 part numbers as well. I am now in the middle of finishing the front end refresh and am really looking forward to having this done and getting my handling to an improved state as well. Hope this helps. Mike.
-
A quick question on your brake upgrades on the 240 as I am looking into these now as well. For the upgrade that you did on the front of your 240, what size wheels are you running? I looked into the Toyota upgrades from MSA as well as the Wilwood one from Arizona Z and both of them require at least a 15 inch rim. Unfortunately I am running 14 inch wheels and so neither of these will work for me. I need to find an upgrade that will work with my existing 14 inch rims. Thanks. Mike.
-
Bryce, I re-plumbed my entire fuel system during this past summer and did a complete write up on it. This included the removal of the mechanical pump as well as the installation of a new electric pump to replace the OEM one that came with the car originally. You can find the write up here: I have triple Weber 40 DCOEs which require regulated fuel pressure between 3-4 PSI. Your Webers likely require the same. Ping me if you have any questions on this and I can probably help you out. Mike.
-
I'm the original owner of a 1974 1/2 260Z that I had Ziebart'd right after I bought it. Nothing came from the factory back then and this was one of the few choices available. It spent the better part of it's early life in Connecticut so was subjected to the ugly New England winters with snow, sleet, and salt. Blue is correct that it is messy, and I am finding that our first hand as I try to remove it from the engine comnpartment and other areas that I want to clean, but 36 years later I barely have any rust to speak of. I would do it again in a heartbeat if I had the choice. Mike.
-
I cannot speak for the Mikunis but I have a fair amout of experience with triple Weber installations. I actually completed a total overhaul of the fuel distribution system from the engine compartment to the carbs and did a write up on this that you can find here: http://www.classiczcars.com/forums/showthread.php?43489-Braided-SS-fuel-lines&highlight=braided+fuel+lines I decided to keep my OEM hard lines from the tank to the engine compartment as they were in pretty good shape, but replaced everything after that with stainless steel braided lines. I was nervous about adapting the OEM hard line to a suitable AN fitting that would accept the braided lines, but in the end the OEM lines were close enough to 5/16" to make it all work. You can see a lot more detail about this install if you follow the link above. If you have any other questions, just let me know. Mike.
-
Well despite the threat of bad weather, my wife and I did make it to Fredericksburg for the weekend and had a blast. We did encounter rain both on the drive there as well as the drive back to Austin, but as Burl reported earlier, Saturday turned out to be a great day. It was a mix of sun and clouds but not a drop of rain until late in the evening. We ended up doing about an 80 mile drive around the Willow City Loop, up to Enchanted Rock park and finally back to Fredericksburg where we grabbed a few late PM cocktails and did some Xmas shopping. The drive was awesome. Great roads for the Z and I don't think we saw more than 6 cars the entire time, so we basically had the roads to ourselves. On top of that, my Z ran awesome. I had just finished installing a new set of Webers and was a little worried about the status of the tune, but as it turned out I had them dialed in perfectly. I can't remember when the car ran this well. Also, the hotel was fantastic, especially if you are into WWII planes. It is actually very convenient that the hotel is located about 3-4 miles from downtown as it avoids all of the traffic on Main Street, which I suspect was even busier than normal given the holiday shopping. The hotel staff was very friendly and helpful and the atmosphere is very ecclectic. The Diner next door is the same way and in fact you feel like you are walking back into the 50's when you enter. Great service, very friendly people, and good food on top of it all. In the end we both felt this was a great venue for a future event and are already looking forward to a return trip in the not too distant future. I'm also very sorry to hear about your father Stephen, but I want to thank you for taking the initiative to pull this together. I was really looking forward to meeting all of you but I guess that will just have to wait for the next event. I will be very happy to help pull something together for the next time and would definitely vote for the Hangar Hotel and Fredericksburg again. There are still a lot of roads waiting for us and our Z's in this area. Mike.
-
Zedy, No problem on helping out on the spring reschedule. Would be very happy to pitch in. I agree that a drive from Austin is going to be a lot easier than one from Houston and if we need to get back quickly we don't have that far to go. A little rain on the Z won't hurt it, although I prefer sunny weather if I have the choice. Will keep you all posted on our travels. Is there anything that I need to do with shirts at this point? I have not ordered ours as of yet. Mike.
-
WOW. This is depressing and disappointing. I had been focused on this date for the last 2-3 months as it was a milestone I needed to hit on a couple of projects I wanted to finish in time for the rally. I actually completed 2 of them over the Thanksgiving weekend and only had one more (cosmetic) project to complete in order to be ready. Interestingly, my wife had also been looking forward to this especially after I showed her a couple of nice day drives (ranging from 60 - 100 miles) that went through the Texas wine country. They looked like they would be fun roads for a Z drive. I also checked the expected weather on the NOAA site and the chance for rain ranges from 20% to 40% so I really don't know what it will be like this weekend. You can see it here: http://forecast.weather.gov/MapClick.php?CityName=Fredericksburg&state=TX&site=EWX&textField1=30.2705&textField2=-98.8722&e=0 I just spoke with my wife about this and we are still planning to go even if we end up being the only ones that attend. It will be great to get the Z out on an extended drive and we are both looking forward to doing a little exploring in the wine country area. Assuming our plans stay in tact, I will plan to post some pictures when we return and also provide some feedback on the venue for a potential date in the spring. Mike.
-
Here you go. http://www.compperformancegroupstores.com/store/merchant.mvc?Screen=PROD&Store_Code=FS&Product_Code=170401&Category_Code=Gas Mike.
-
Zedyone, I just purchased a wideband from FAST in order to dial in a new set of Webers I am installing. I also purchased the probe adapter that can be used at the exhaust, so I do not have to have an adapter weleded into my header or exhaust. This also makes it portable to other cars. If you would like I would happy to bring this along to the Texas Z Car rally for you to try out if you haven't solved your problem by then. Just let me know. Mike.
-
ms260Z, I actually do not have any pictures of my car in the garage area so that's why you could not find them. You can find a couple of pictures in this thread below but admittedly they are not the greastest shots of the bumpers. http://www.classiczcars.com/forums/showthread.php?43224-Appliance-Wheel-Refinishing&highlight=appliance+wheels I'm traveling back home from Asia at the moment, but I will try and post some better ones for you when I return this weekend. Mike.
-
Logan1, Can you tell me the manufacturer of the aluminum radiator that you used? It looks really nice. Mike.
-
The bumpers you have are the later style that were also on the early 280. If they are the original ones then you likely have a late model 260 that was only produced for about 4-5 months before they finally introduced the 280. I have the same car and you can see them in my avatar. The rubber ends are missing and it also looks to me like the front bumper is on upside down. The attachment for the license plate is supposed to be on the other side. One of the challenges with this car if it is in fact a late model 260 will be in identifying the correct parts for it and some of them can be tricky. Some of the parts they used were carried over from the early 260 while some parts came from the early 280. For example, the radiator in the car is from the 280, not the 260. You can tell for sure by looking at the manufacture date which you will find on the information plate which is located on the jamb of the drivers side door. If it is after 9/74, then you have a late model version. Mike.
-
Marty, The inertia switch that I used was from BWD / Intermotor. I purchased it from Advanced Auto. You can find more information about it here: http://shop.advanceautoparts.com/webapp/wcs/stores/servlet/product_Fuel-Pump-Cutoff-Switch-BWD-Intermotor_18970192-P_1399_R%7CGRPSESWAMS_____ It was a little expensive, but this is for safety so it made sense to me to spend the $$. I also used a fuel pump relay from Painless Performance. I did not want to add additional circuits to my electric system so I wired the pump up on its own new circuit connected directly to the battery (through the relay). Painless makes really good products and I also used them for my electric fan relay when I changed over to an aluminum radiator setup and replaced the old mechanical fan with an electric one. You can find more info about this product here: http://www.painlesswiring.com/webcatalog/largeview.php?SearchField=50102 As far as wiring is concerned, it was pretty straight forward. The most complicated part was trying to identify the original power feed wire to the pump, which in a late 260Z was a little tricky given how it was wired from the beginning. If you have an older Z that did not originally come with the electric pump, I think this is a little easier. I mounted both the inertia switch as well as the pump relay inside my glove box on the right hand side. It was a convenient place to install them and in the event of a false trip on the inertia switch it would be very easy to reset from inside the car. It was also convenient from a wiring perspective as the original pump wires are very near the fuse box located on the passenger side of the car. Hope that helps. if you need some additional guidance on finding the correct wires for the original pump, just let me know. I believe that I did a write up on this and will find the link for you. Mike.
-
Marty, Yes I believe that a fuel cut off is what Blue is referring to. I just completed an install of something similar, but rather than using oil pressure as a trigger, I installed an inertia switch which will disengage the electric pump on an impact. I believe that other forum members have done this as well. If you need more details about the switch and wiring, just let me know. It was a pretty simple install and gives some peace of mind in the event of an accident. Mike.
-
Lee, You are correct and I do not believe that the machinist that made mine is the same that made the one for Kevin. In the end, they both work as you indicated, but I do like the finish look of yours a little better. Oh well, in 25 years when I do this again I will either borrow Kevin's or have another made. BTW, I see that you are in Austin. It would be cool to hook up one of these days. I would be very interested in observing your restoration project. Let me know. Perhaps we can grab a drink after work or something. Mike.
-
Steve, No Kevin did not do mine, although I do know him. I have had him do some work for me and he does great work, but unfortunately I did not know about Kevin and his shop when I was going through this. Through a long chain of events I got connected with a little shop in Austin called Scotty's Driveshaft and they made the tool for me. Not sure who made Kevin's for him. In any case I will send you a PM and give you my contact detials so I can get this to you. Mike.
-
Steve, I also had one of these made (in fact I think I had it done before Kevin). I have lent it out to one other member and am willing to do the same for you if it would help you out. All I request is that you take care of postage / mailing costs and return it back to me as soon as you are done so it is available for other members when they need it. Let me know. Mike.
-
I'm in for two shirts. Prefer polo but definitely OK with T shirts. Large for both. Just let me know how to get the $$$ to you. Mike.