Mike W
Community Member
-
Joined
-
Last visited
Everything posted by Mike W
-
Brad Penn. # 1 rated oil by Isky Cams. Mike.
-
So does yours!! Everythings going well. Kids coming in for the holidays. May be doing some Z work with Alex. Hope all is well with you. Mike.
-
Here's another alternative. Mike.

-
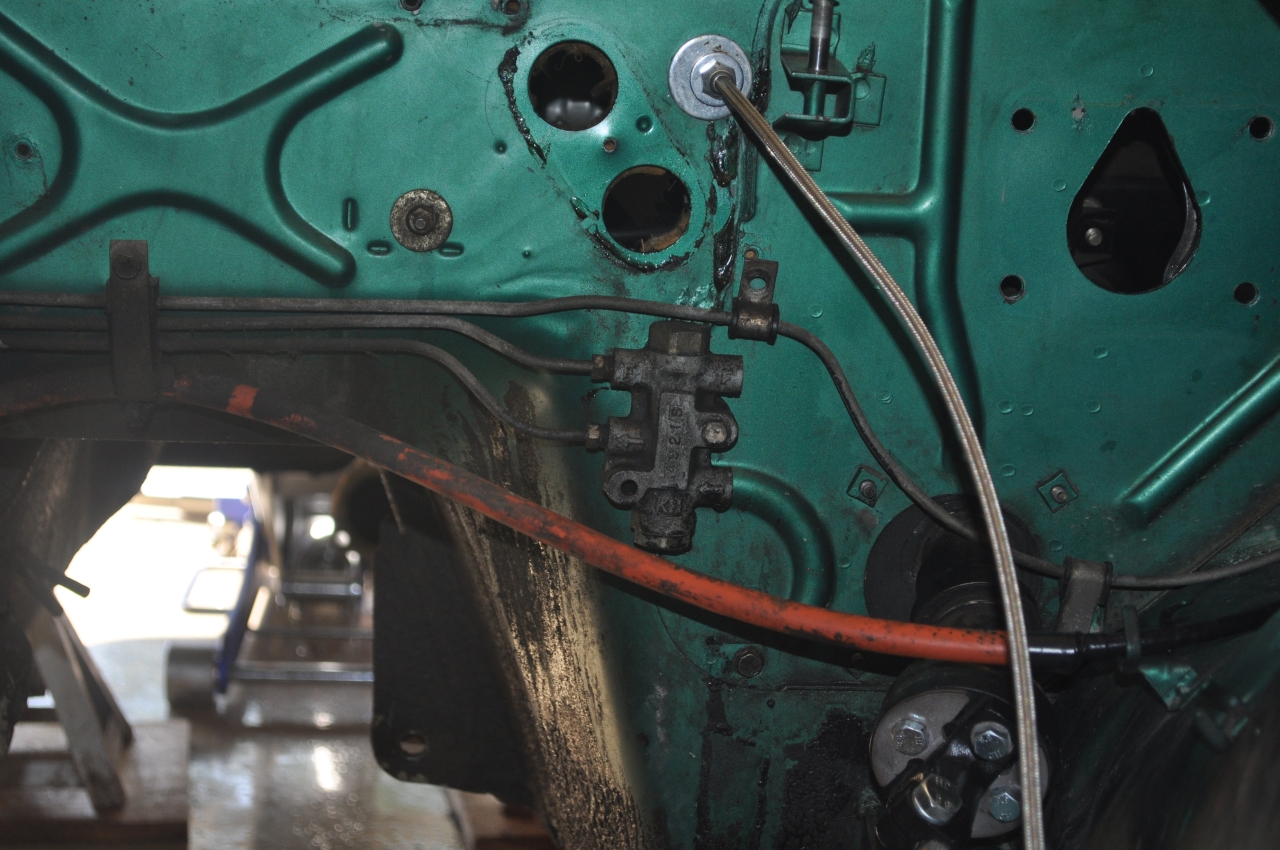
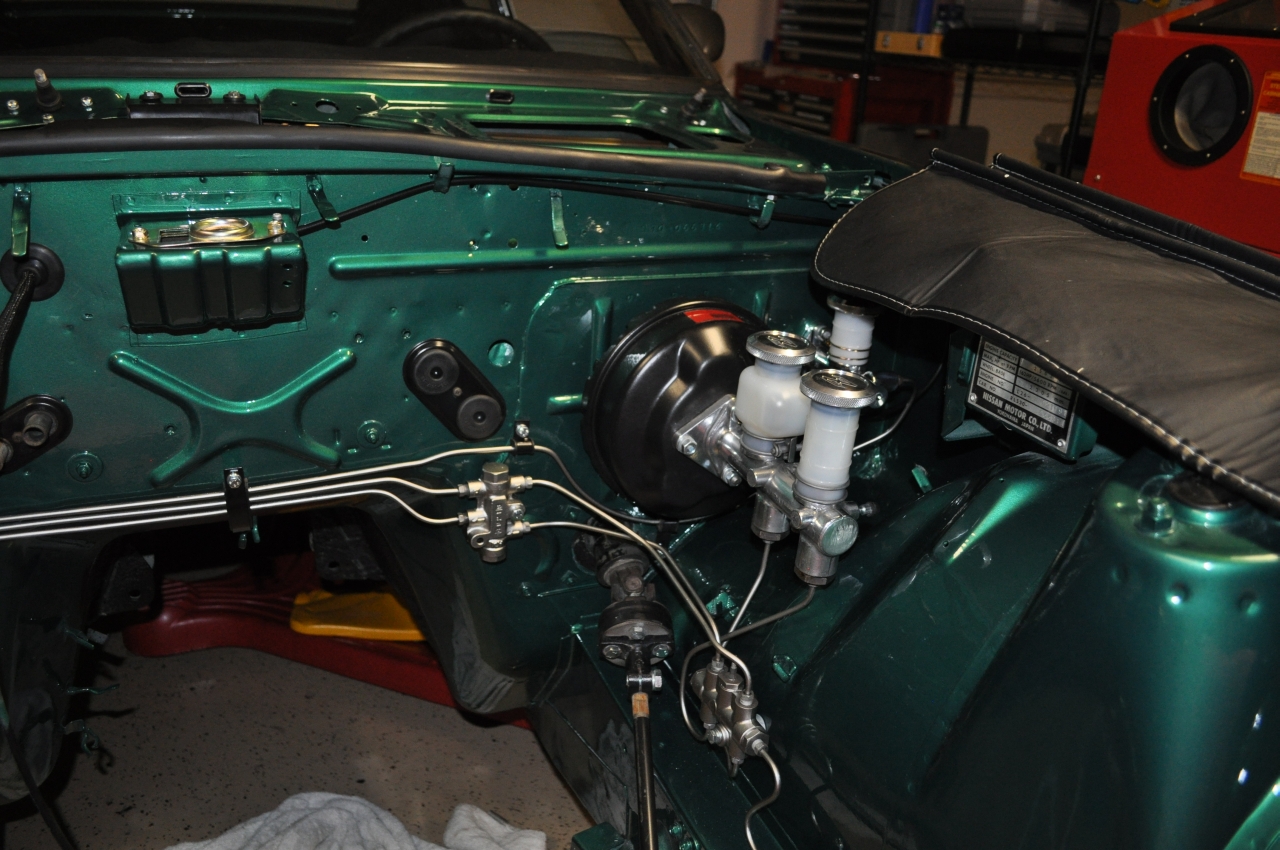
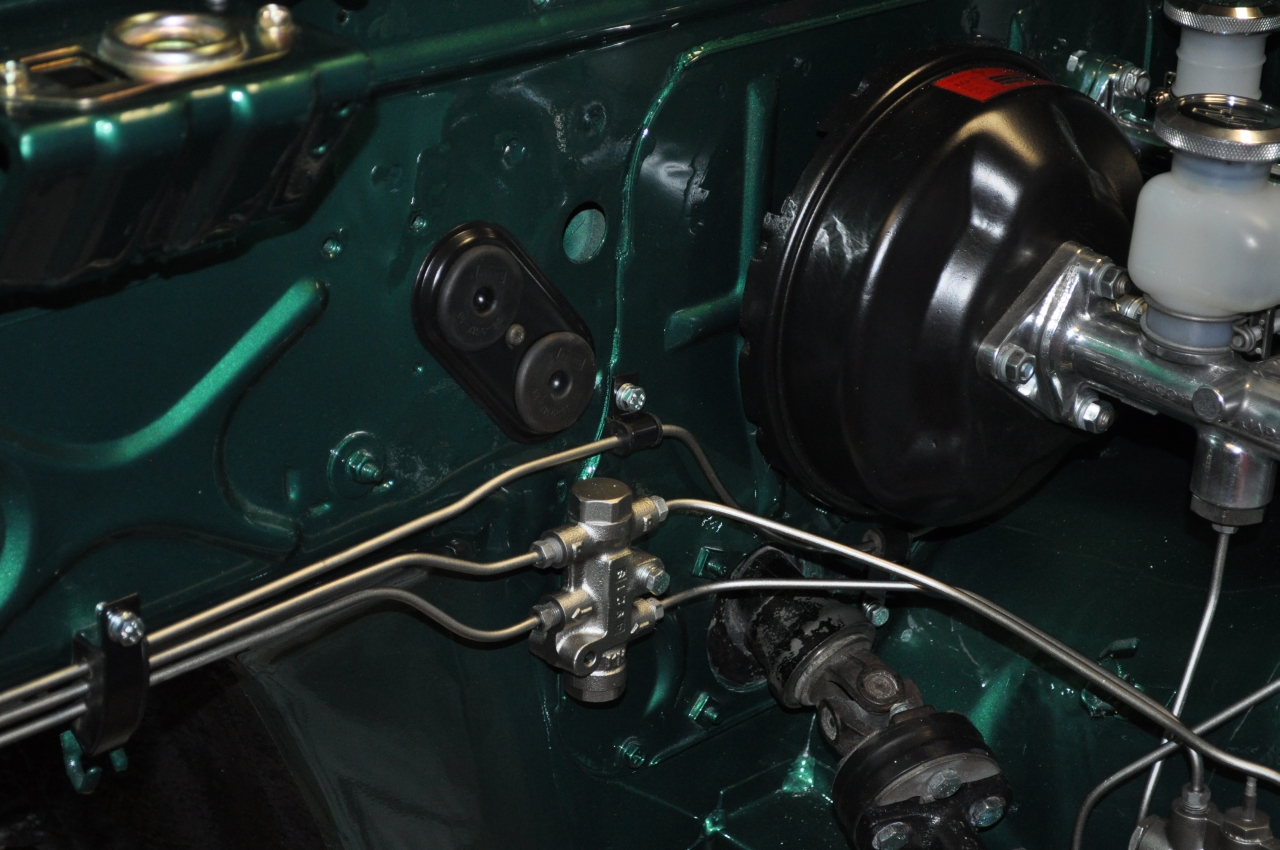
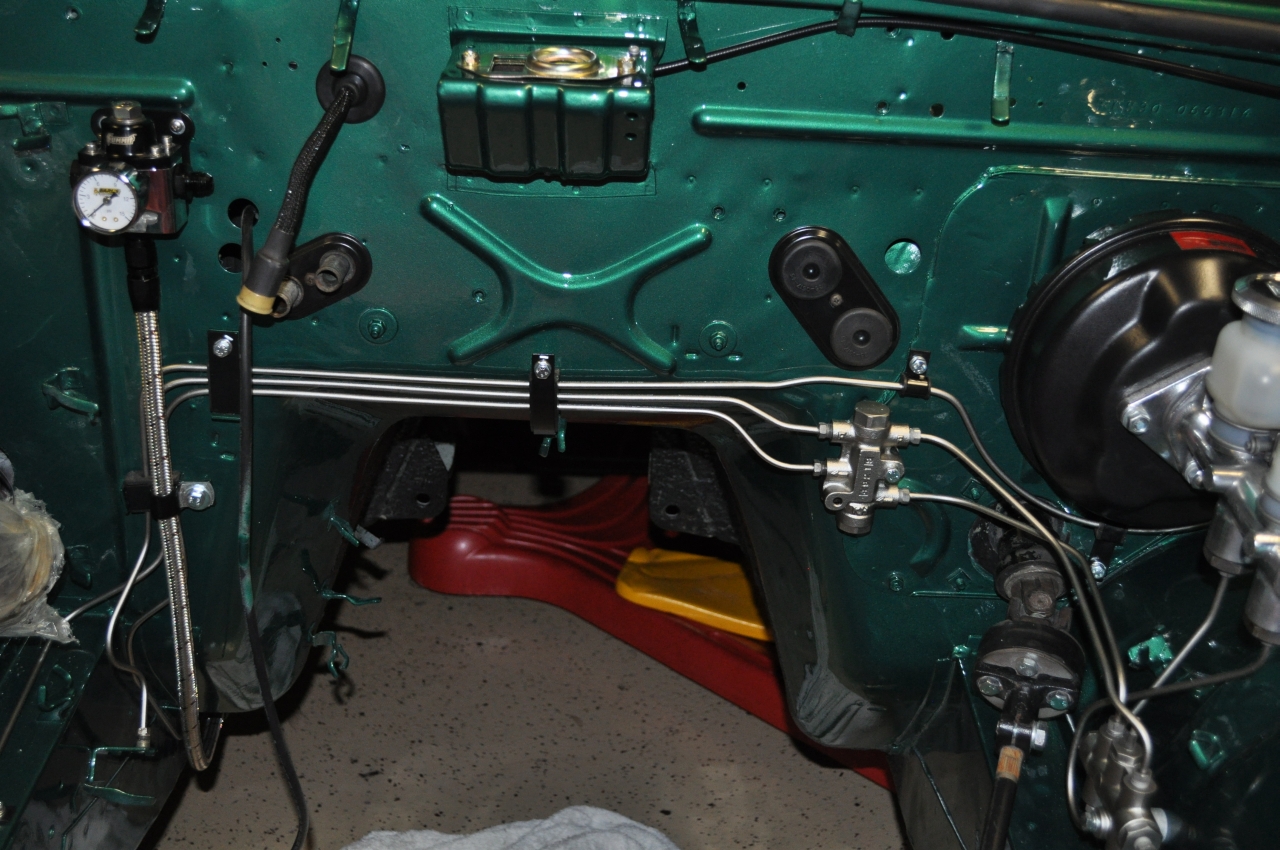
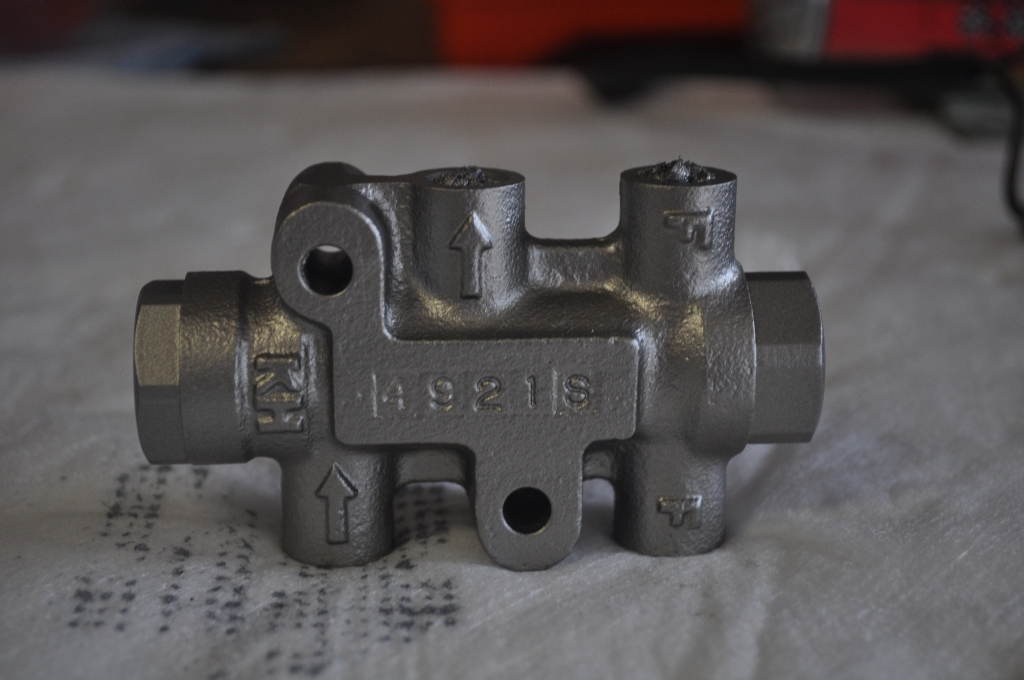
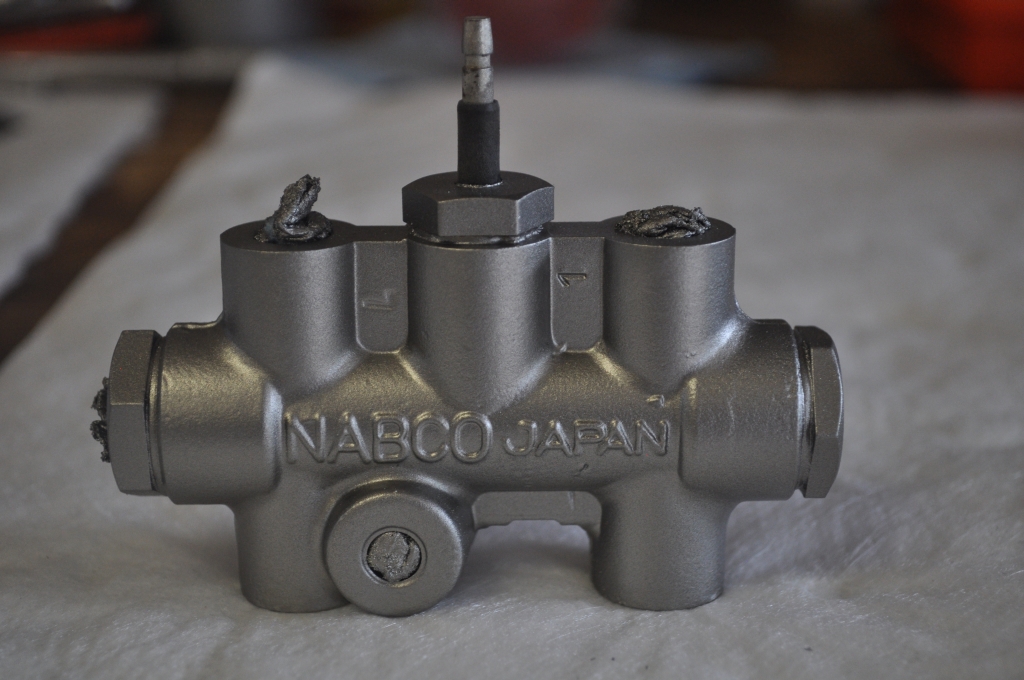
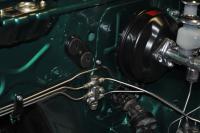
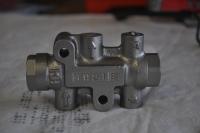
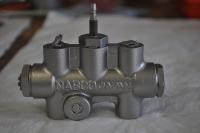
So I just went through this for my entire car. I strongly contemplated buying new lines and bending them myself, but decided to go the refresh route instead. I'm very happy with the results and would definitely go this way again, although some of the clean up process was tedious. I removed all lines and separated them from the junction blocks as well as from the proportional valve. If the pieces were small enough to fit into my media blaster, I plugged the ends and used the media blaster to clean off the lines as well as the fittings. Before painting, I completely flushed the lines to ensure there was no media left behind. Also blew them out with compressed air as a final insurance policy. Took the same approach with the junction blocks as well as the proportional valve. For the longer pieces that would not fit in the blaster I used a combination of scotch brite pads as well as 000 steel wool. This worked as well as the media blaster except was a little more tedious and it was more difficult to clean the fittings. After that, I primed each of the lines with Eastwood Rust Encapsulator. Applied 2 coats to each line and other pieces. After the undercoating was completely dry I used another product from Eastwood called Brake Gray (Brake Fluid Resistant Paint). As you will see from the before / after pictures below, I think that they came out very well. I will also say that as much as I like the look of the paint from Eastwood and it does provide some resistance to brake fluid, it is not completely immune to it. I had one very small leak when I reassembled my lines and I did lose a little of the paint where the fluid leaked, but after drying and cleaning up, I was able to touch up the area with some spare paint that I had leftover. Hope this helps. See pictures below. Mike.


-
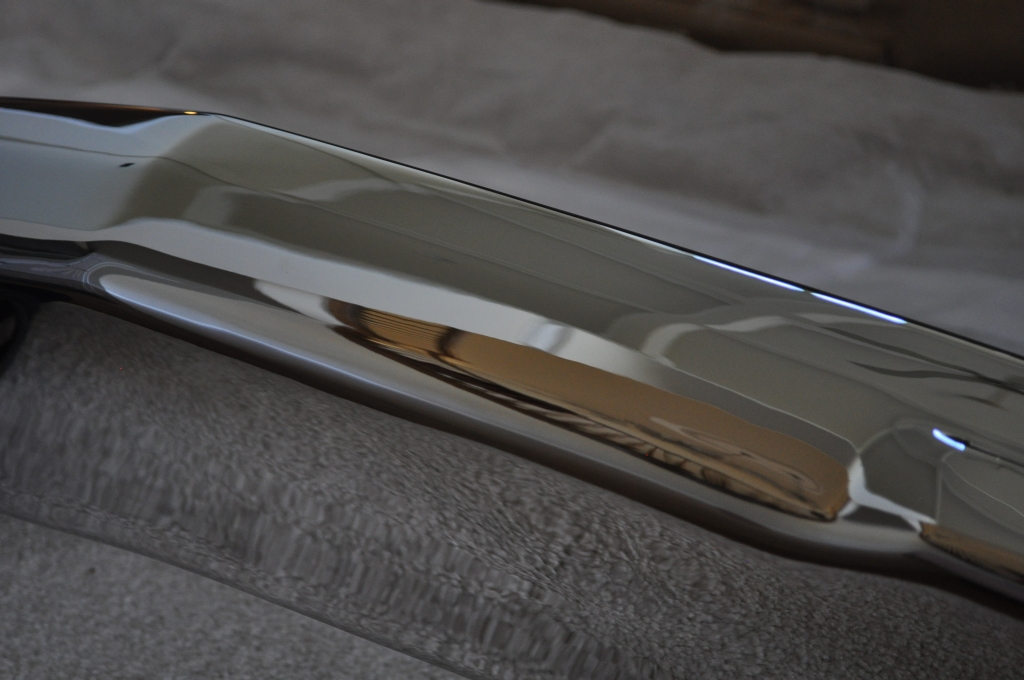
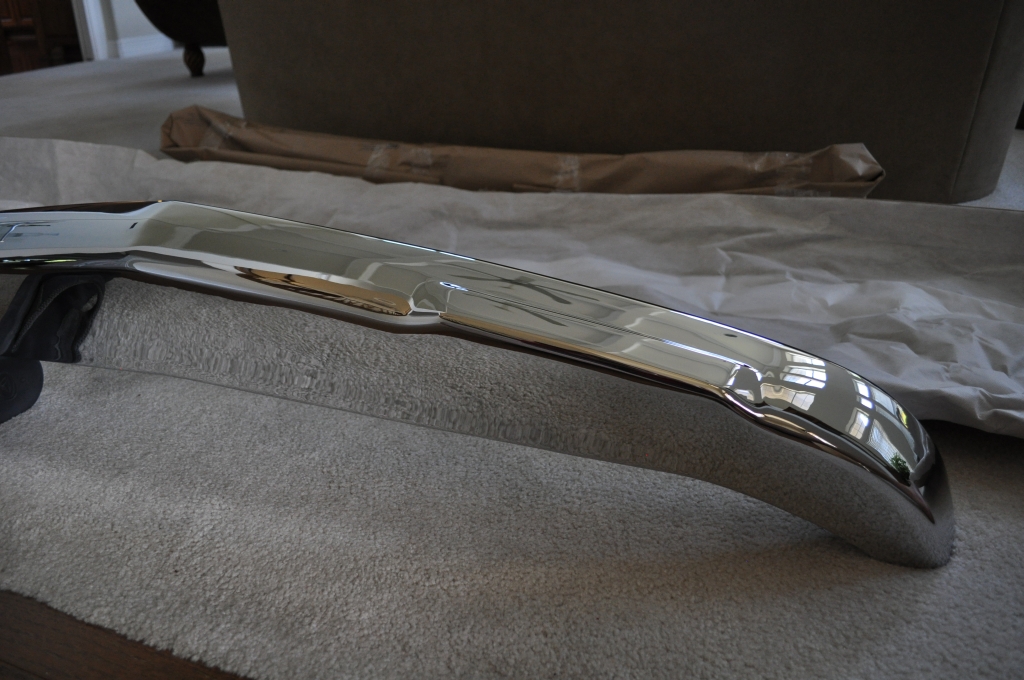
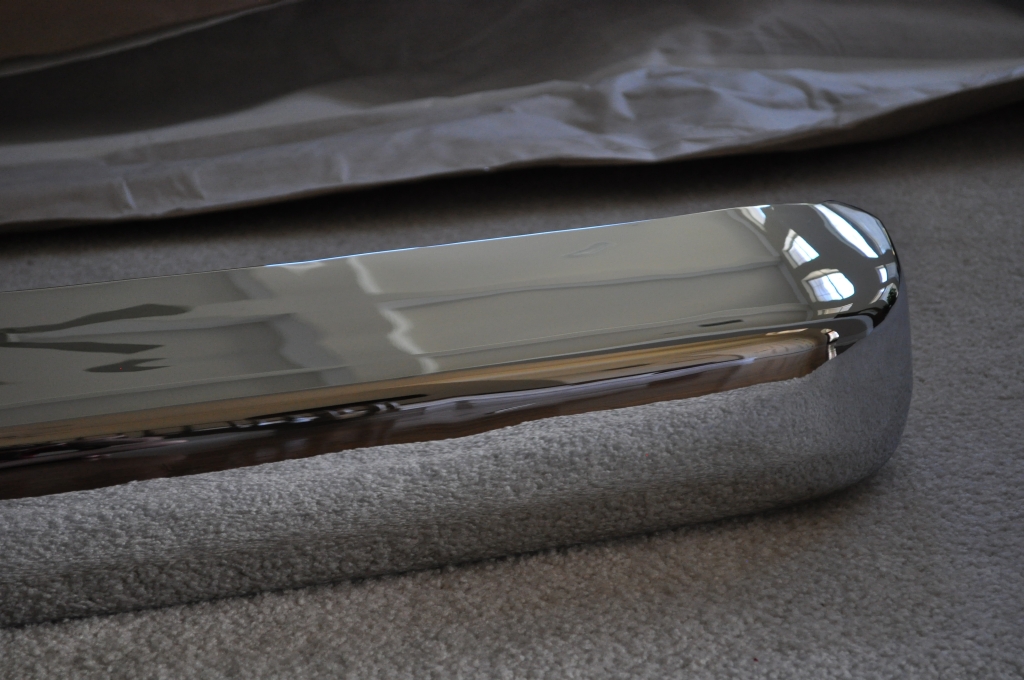
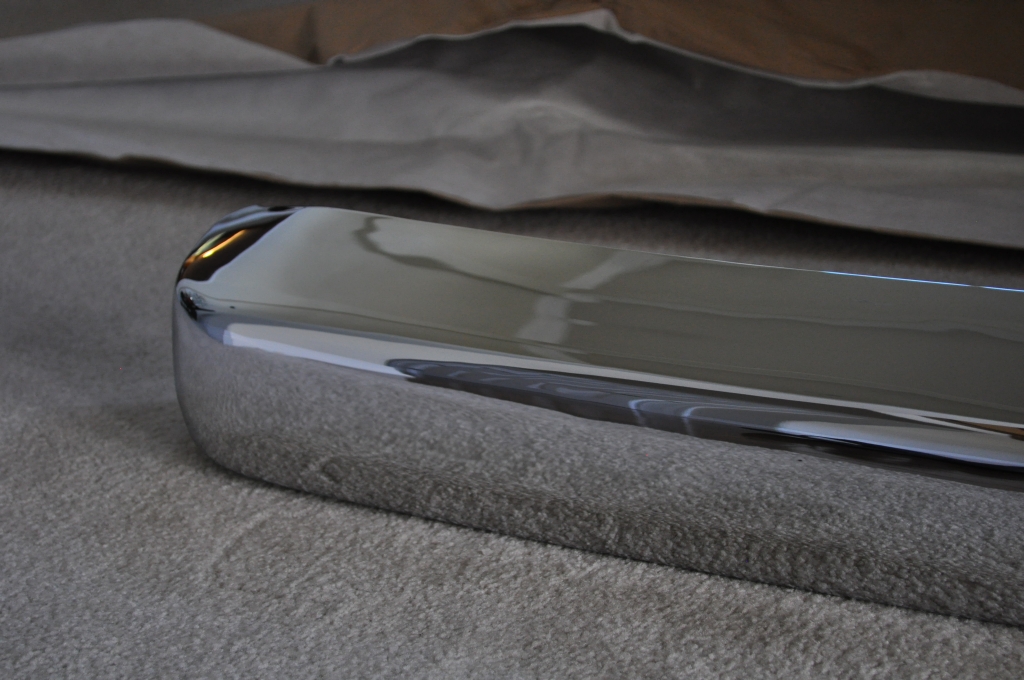
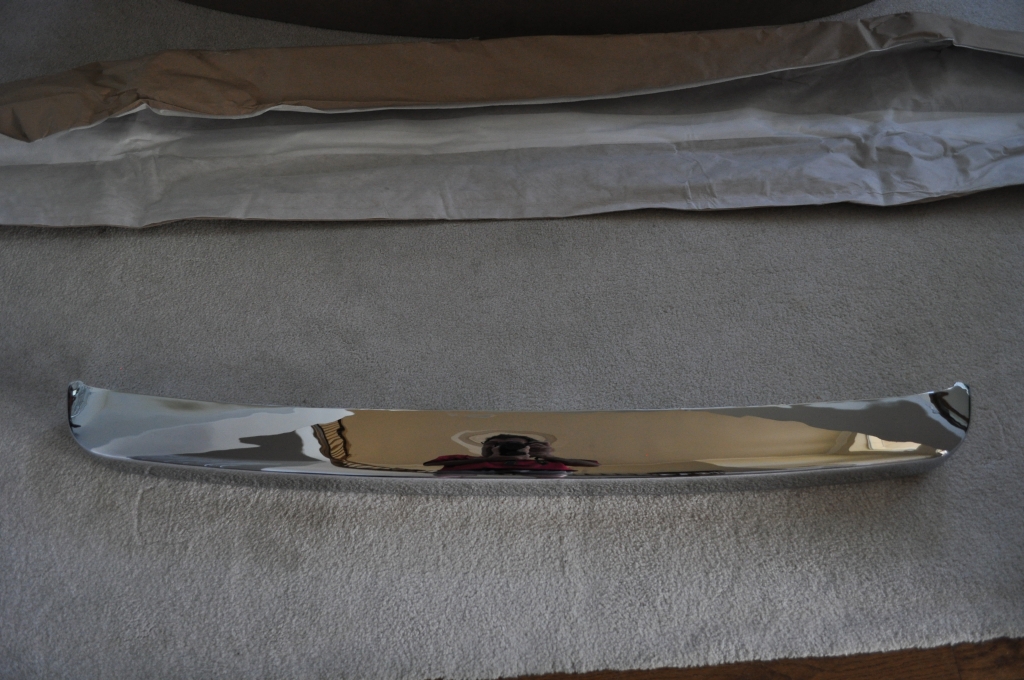
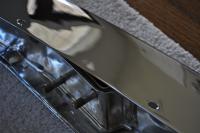
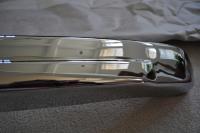
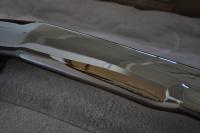
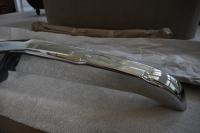
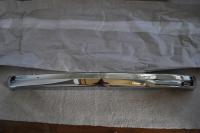
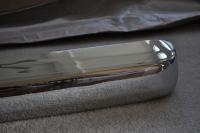
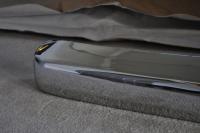
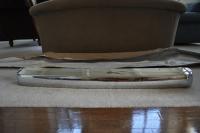
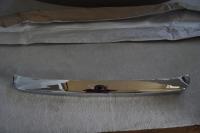
Hardway, I went through a similar exercise during the summer when I wanted to get the bumpers on my 74 1/2 260Z chromed and looked high and low in Austin to find a solid, reputable shop. The only one that I could locate was called Cen-Tex Plating and when I did a google on them, the reviews were mediocre at best. I was told their prices were reasonable but not to expect show quality chrome or longevity of the plating. Based on that I decided to look elsewhere and found a fabulous shop in Houston called Speed Sport Chrome (on Broadway in Houston if I remember correctly). They had a recommendation from Jay Leno on their site so I decided to give them a call and after talking to them directly, decided to also give them a try. I have the large early 280 bumpers on my model and went to heaven and back looking for the rubber bumper ends and center fillers and finally found NOS parts from a combination of Oliver at Z Specialities in Washington as well as Norm Murphy at Zeddsaver in Canada. They were on the pricey side but nothing close to the eBay seller from Houston who wants an arm and a leg for the ones that he carries. In any case after finding the new rubber pieces I definitely wanted a first class job on the rechrome and so that is wh atprompted me to look beyond the one shop that I had located here in Austin. Also, I was not able to source the rubber bumper pieces that bolted to each of the metal bumnpers themselves and so I decided to have the holes filled in and chromed over and the Houston shop had no issue with doing this for me. The job that Speed Sport Chrome did was nothing short of spectacular AND they guarantee them for life. If for any reason the chrome does not hold up I can bring them back to them at any time and they will re-chrome them for me for free. The person that I worked with there was named Kevin and he was great. Very helpful and straight forward. Apparently most of their business is done through the mail and he showed my numerous bumpers and other pieces that they had done and they all looked spectacular. I would highly recommend them if chroming your old bumpers is what you need to have done. They are also capable of taking out all of the dings and dents as well. I've attached a few pictures here so you can get an idea of the quality of their work, but frankly the pictures do not do the final job justice. I know that you are in Austin so I would welcome you to stop by to see my car first hand if you want to see the quality of their work. Hope this helps. Mike.

-
OK here's a couple of pictures that I just took. Hope these help to give you an idea of the job they did. Mike.

-
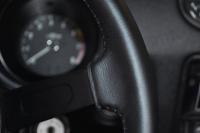
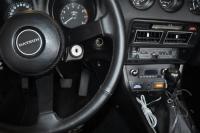
Not sure if this is what you are looking for, but I had my late 74 1/2 260 wheel recovered at a shop called Craft Customs. They are in Rockwall, Texas which is not too far from Dallas. I had the wheel recovered in black leather and they also refurbished the inner metal spokes as well as the center horn piece. They did a nice job but were also a little on the pricey side. I can post some pictures if you want to see some before and after. Mike.
-
Zedy, I have not had the same high voltage issue that you speak of however I have heard of the Unilite's sensitivity to higher voltages as well as voltage spikes. I have been running mine for over two years now with no issue. However, about six months after I installed it I also found an active power filter that Mallory also sells and it is made for the Unilites. I also installed this shortly thereafter. Not sure if this is the reason that I have not had issues, but I figured it couldn't hurt. I was also surprised that there was no mention of this in the user's manual especially given that they do provide a warning about ensuring a clean power supply. The only downside that I have observed is that it is a PITA to mount. The cables to the mating connectors to the Unilite are very short and so it really limits the places where it can be mounted or secured. I ended up making a longer harness from the Unilite and mounted the filter on the inside of the fender. In any case, here's a link to the filter. Not sure this is a solution for your high voltage problem but it might be something you want to consider in anyway. http://www.streetsideauto.com/p/mallory-active-power-filter-29351/?utm_source=googlepepla&utm_medium=adword&utm_content=pla&gclid=CKiE6Z6t67ICFWaoPAodlToAAQ Hope this helps. Mike.
-
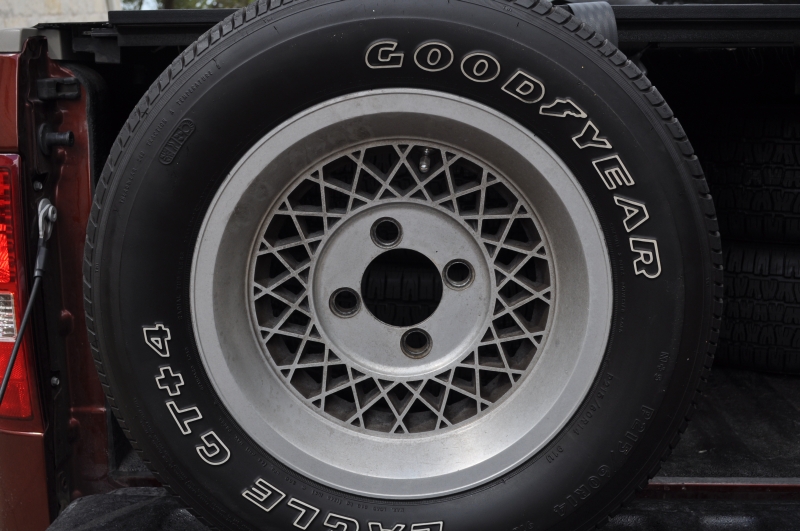
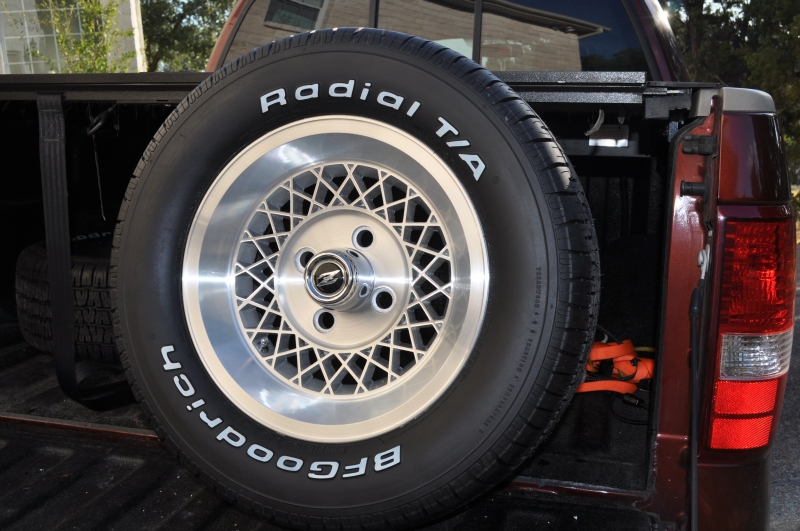
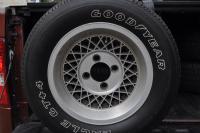
I believe those are actually Appliance wire mesh mags. I have the exact same ones on my car. I purchased them new shortly after I bought the car in 74. If you are really going to ditch them I'd be interested in taking them off your hands. Mike.
-
I had the same problem wrt tracing the wiring from the original fold out sheet from the FSM. So I took a good copy to FedEx / Kinkos, had them enlarge it to 3' x 4', and then had them laminate the whole thing. I now have a huge copy of the wiring diagram that I can use water based markers on to trace any of the circuits. Easy to roll up when I am done and store it away for the next time it's needed. Cost was about $45 for the enlargement and the lamination. Definitely better than trying to strain my eyes and ending up tracing the wrong wires. Mike.
-
Mike, I'm definitely interested in having a pair of taillight surrounds for a late 260 rechromed. Your price sounds reasonable as compared to others that have quoted this to me. I also have a spare set ready to go so I don't even have to remove the existing ones on the car. Let me know when you are ready as well as the process you are going to use to complete this. Thanks. Mike.
-
I believe that the installation of the chokes changed from the older -18's to the newer -151's. I have both and they are definitely different. On the -18's Dave is absolutely correct. You just remove the air horns and the aux venturis and the chokes slip right out. Very easy to do on the car. The 151's however are different as there are screws which hold these in place. The aux venturis use a screw in the bottom of the carb (with a lock nut attached) and this needs to be removed in order to remove the venturi. The chokes themselves are held in place with a screw (and lock nut) on top of the carb. The screw actually looks like a needle jet adjustment and I believe that this is new to the -151's. The weber docs I have read suggest that these are set at the factory and not made to be adjusted by the user but I have also read of people using these to get better idle balance between carbs as well. You will need to remove this before the choke can be removed. I just completed this on my -151's so I know it to be correct. I did this on the bench but believe it is possible to reach both of the screws while the carbs are on the car. Just not as easy as the -18's. Hope that helps. Mike.
-
If you are looking for the small (approx 4-5 inch) mudflap like part that goes inside the fender close to the proximitity of the door hinge, then Mike at Banzai Motorworks has them. Here's a link to find them on his site: http://www.zzxdatsun.com/catRubber.php My car is a late model 260Z (1974 1/2) and so is very similar in many respects to the early 1985 280Z. Not sure when they started to add these based on Escanlon's message above but they were certainly a part of my model year. I purchased a set of these from Mike about 2 months ago and they were a perfect replacement for what was originally on the car. Hope that helps. Mike.
-
I have purchased these just recently from another Texas eBay seller who goes by the-z-connexion. In fact I have purchased a number of items from him and every transaction has been flawless and his prices are a lot more reasonable than those of Reddat. I do not see that he has these listed right now but if you find him on eBay and send him a mail I'm sure that he will respond. Hope that helps. Mike.
-
I was successful in re-using the old C clips in one of the areas but had problems in the others. I ended up using 1/4" E clips. They were a tight fit but did the job nicely and were easier to use than the old C clips. Very easy to source as well. On the washers. I think they used felt mainly to provide a source of lubrication to the pivot arms over an extended time period as opposed to actually needing a washer in this configuration. If I were not going to try and replace with felt / grease, then I probably wouldn't use a washer at all. If I did, I'm sure that teflon would work well. Finally, if you do decide to go the felt washer route, the 1/8 " material I purchased worked OK on the drivers end where there was only one felt washer, but it was way too thick for the middle joint. I had to source a 1/16 inch felt to make this work. Mike.
-
I am right in the middle of doing this exact same thing and EScanlon is 100% correct on the ring clip that holds the assembly together. I found it to be a bit of a PITA in terms of initially getting a small screwdriver between the ring and the pivot body, but in the end it wasn't a problem. In addition to the "grease pocket" my assemblies also had felt washers on them which I believe had been impregnated with grease when initially manufactured. On mine, some of the washers were completely missing and others were so hard that they cracked when touched. I purchased some sheet felt from McMaster Carr and plan to fabricate some new washers and will impregnate them with grease before re-stalling so there should be an ample supply of lubricant to this mechanism for an extended period of time. I have pictures of the dis-assembly and some of the re-assembly if you need them. If you remove the arm that attaches to the motor, there is a specific order in which the parts need to go back together and having pictures of the unit before dis-assembly really helped. Hope that helps. Mike.
-
They are definitely Appliance wheels. They are called Wire Mags and were a pretty popular after market wheel for the Z back in the 70's. I have a set also and bought them new for my car a few years after I purchased the car new in 1974. About a year ago I needed new tires and so decided find a local company that could clean and polish my wheels. I posted a write up on the whole story which you can find here: http://www.classiczcars.com/forums/thread43224.html I am very happy with the result and that the wheels help to keep the car period correct. Here's a quick before and after picture so you can see the result of the process that I went through. Mike.

-
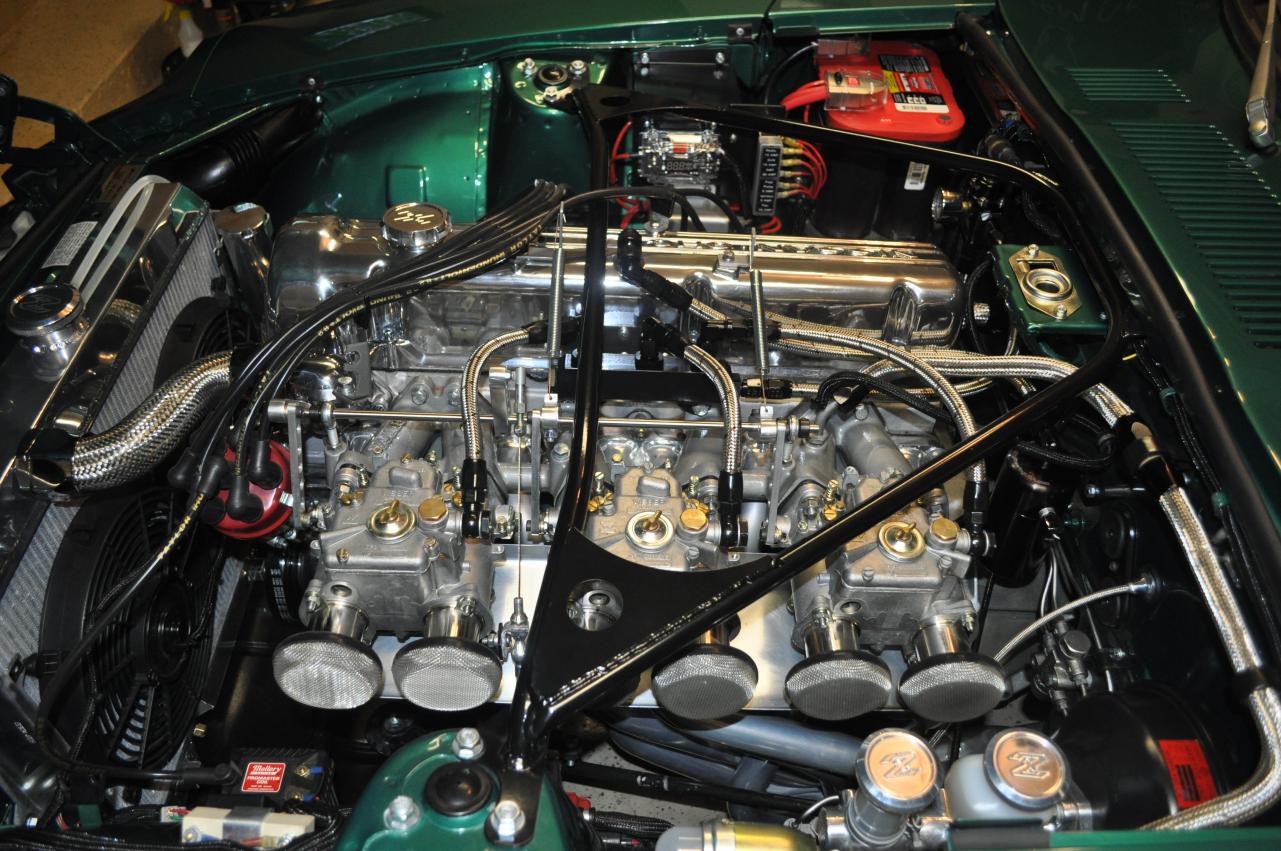
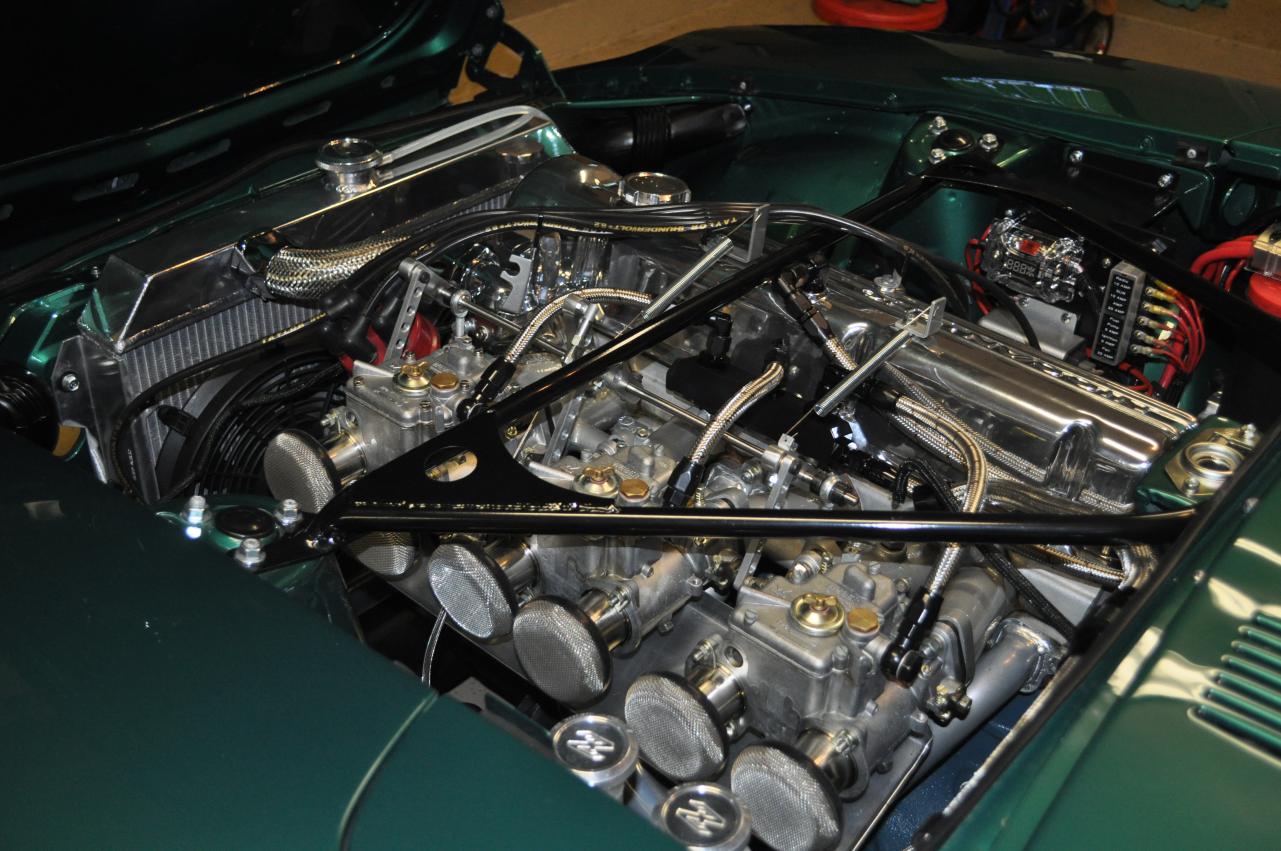
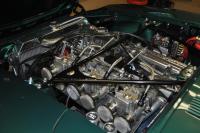
Stephen, I had the same problem with my Cannon manifold in terms of the rod end alignment. I totally agree with you that this contributed to the slow response time of the Weber throttle system especially when returning to idle. I solved the problem a different way than the way that zKars described above (which seems like a very elegant solution). I simply removed the middle rod end and replaced the throttle rod with a very hard stainless rod that I purchased from McMaster. This way I still had the desired stiffness of the rod (so there is no flexing when you exercise the throttles) but had perfect alignment as there are now only 2 attach points on the manifold. I have run my car this way for more than 6 months with no issues what so ever and the throttle response (especially return to idle) is better than it has ever been. This also has the benefit of freeing up some space in the middle of the intake which has made the installation of my throttle cable easier as there was much more room to deal with. Hope that helps. Mike.
-
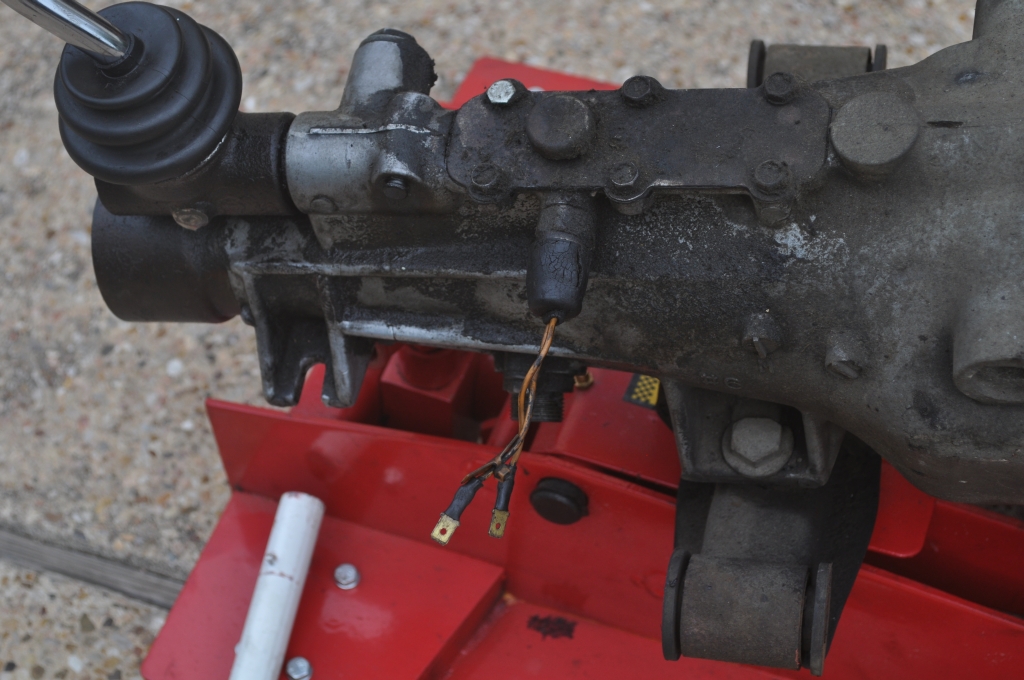
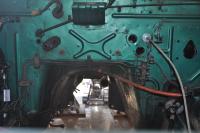
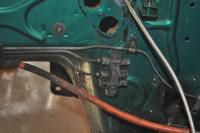
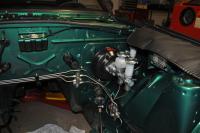
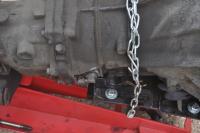
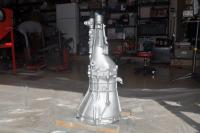
Steve, I am in the process of refreshing my transmission and have looked into the replacement switches needed for this as well as location. I have the FW471B transmission with I believe is the same as your B version. There are locations for 2 switches on this. One is very near the shift lever and is referred to as a "neutral switch". According to my local Z mechanic, this was used as a safety lockout for the emergency start circuit to ensure the car would not start if it was in gear. The neutral switch has spade style connectors and the most recent Nissan part number is 32006-K2004. I just purchased one from Courtesy so they are still available. The second switch is for the reverse light circuit and is located near the fill hole as was stated earlier. It has bullet style connectors rather than the spade style for the neutral switch. The Nissan part number for this one is 32005-K102A and it is also available from Courtesy. I have included a couple of pictures of these switches and locations for your reference. I also included one addtional picture which shows my transmission after the refresh process. I am very happy with how it came out and will certainly be a lot more pleasant to work on now that 40 years worth of grime and grease have been removed. Hope this helps. Mike.

-
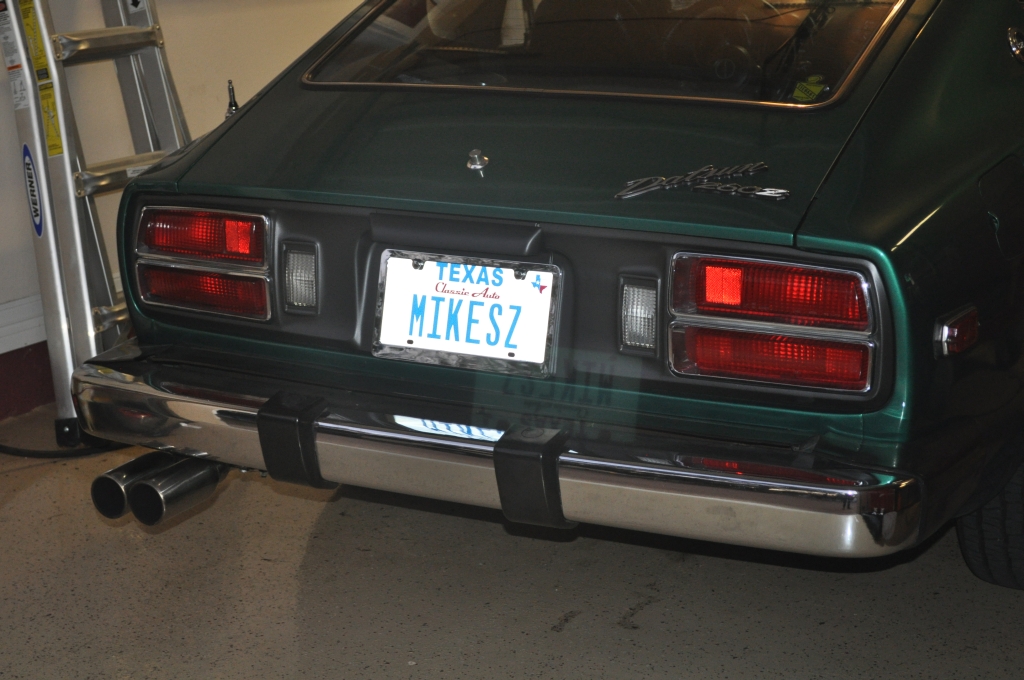
Blue, I used a dual tip from Magnaflow. It is part number 35167. Here's a picture of it: Here's the specs on it: Material: 100% Stainless Steel - Mirror Finish Diameter: 3in. I.D. Inlet: 2.25in. Length: 10in. Features and Benefits: Double Wall Tips (Weld-On) - Stainless Steel Tips Installed By Professionals. MagnaFlow's Polished Stainless Steel tips will last 5 times longer than chrome tips. These super tough tips will continue to shine for years to come with a Lifetime Warranty against defects. Double-Wall, Straight-Cut, Rolled-Edge. It was actually meant to be welded onto the muffler but I ended up using a band clamp as well as some aluminum tape to take up a little slack and it worked great. It protrudes a little further than I would like but I get no discoloring of my bumper and no exhaust fumes in the car at all. I actually purchased one almost exactly like the one pictured in your first post and it turned out to be pretty rough and cheesy. That Magnaflow is made really well and polished up nicely. Here's a picture of it installed on my car: Hope that helps. Mike.


-
Nate, I actually installed mine in stages starting with the Unilite, then adding the coil, and then finally the 6AL. I didn't want to do everything at once, so in the event of a problem, I could track down the issue with a lot more accuracy. It also made the install easier as you only have to focus on one thing. Hope that helps. Mike.
-
Nate, That is the right coil. I run the Unilite with this same coil as well as a Mallory Hyfire 6AL MSD type ignition. It has been flawless and I think that you will be very happy with this choice. The only downside that I have found is that you have to get Mallory distributor caps and rotors and these are not items that you typically find at your local Autozone. I would recommend that when you purchase the Unilite you also purchase a spare cap and rotor. That's what I have done and usually carry a spare set with me just in case. It's a pretty easy install but if you need some help just let me know. Mike.
-
Chuck, I have a brand new ball / socket setup for the TC rods that I am not going to use and would be willing to let it go. I opted for the TTT adjustable rods instead so this is no longer needed. Still in the bag. PM me if you are interested and I'm sure we can work something out. Mike.
-
I have a set of Appliance "mesh" mag wheels that I had remachined and needed new lug nuts to replace the old rusty ones that I had. Bought them on eBay, I believe from Massey's. The washer that they use is separate wheras on the originals they were integral to the lug nut itself, but the new ones worked great never the less. Good transaction without any issues. You can see his most recent auction for the same ones that I purchased here: http://www.ebay.com/itm/20-LUG-NUTS-FOR-APPLIANCE-WHEELS-NISSAN-DATSUN-12MM1-25-/350316425227?pt=Motors_Car_Truck_Parts_Accessories&hash=item51907c700b&vxp=mtr Mike.
-
This post helped me out a lot and has some very good rules of thumb to begin the tuning process. Hope this helps. http://www.classiczcars.com/forums/showthread.php?37897-tripple-weber-jet-sizes-and-adjustment&highlight=weber+tuning Mike.